MDB Steel Bumpers...
Moderator: bartonmd
Forum rules
All posts in this section pertain to our vendor:

Wait am i missing it somewhere? What are the prices now? Are they different for the BL and non-BL model?
Gettin' Dirrty in Jersey 
2003 GMC Sierra z71
7" FTS lift
35x12.5 Toyo MT on 18x9 MotoMetal 962
2003 GMC Sierra z71
7" FTS lift
35x12.5 Toyo MT on 18x9 MotoMetal 962
-

irishboy02 - Addict
- Posts: 840
- Joined: Thu Oct 15, 2009 9:28 pm
- Location: Jurzie boy
- Name: Brendan
- Vehicle Year: 2005
- Vehicle: Chevrolet TrailBlazer
- DriveTrain: 4WD
- Rank: Offroad Rated
irishboy02 wrote:Wait am i missing it somewhere? What are the prices now? Are they different for the BL and non-BL model?
Yeah, with there being 3" more material all the way across in the body lift version, will be $300, and the non-body-lift version will be $275...
ETA: These are GB prices... Both will be $40 more, after the GB...
Mike
- bartonmd
- Moderator
- Posts: 4469
- Joined: Wed Sep 09, 2009 9:35 am
- Location: IN, Indianapolis
- Name: Mike
- Vehicle Year: 2007
- Vehicle: Chevrolet TrailBlazer
- DriveTrain: 4WD w/ G80
- Rank: Offroad Rated
bartonmd wrote:irishboy02 wrote:Wait am i missing it somewhere? What are the prices now? Are they different for the BL and non-BL model?
Yeah, with there being 3" more material all the way across in the body lift version, will be $300, and the non-body-lift version will be $275...
ETA: These are GB prices... Both will be $40 more, after the GB...
Mike
You are a cheap slut...


they've always worked for me.
-

HARDTRAILZ - Moderator
- Posts: 6342
- Joined: Sat Sep 12, 2009 1:49 am
- Location: IN, Batesville
- Name: Kyle
- Vehicle Year: 2006
- Vehicle: Chevrolet TrailBlazer
- DriveTrain: 4WD w/ Aftermarket Locker
- Rank: Extreme Offroader
HARDTRAILZ wrote:bartonmd wrote:
Yeah, with there being 3" more material all the way across in the body lift version, will be $300, and the non-body-lift version will be $275...
ETA: These are GB prices... Both will be $40 more, after the GB...
Mike
You are a cheap slut...
LOL, I get that a lot!
Mike
- bartonmd
- Moderator
- Posts: 4469
- Joined: Wed Sep 09, 2009 9:35 am
- Location: IN, Indianapolis
- Name: Mike
- Vehicle Year: 2007
- Vehicle: Chevrolet TrailBlazer
- DriveTrain: 4WD w/ G80
- Rank: Offroad Rated
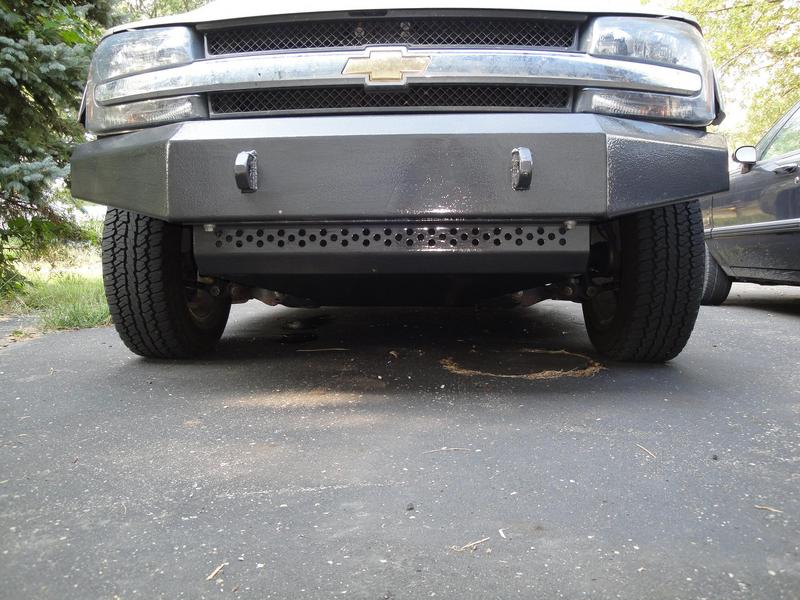
Got 'er painted up and mounted... Not 2 hours after I got it mounted, the wife and I were out for lunch with some friends, and some douche who was full of fail with respect to parallel parking backed into the bumper with the rear of his Civic, and put a nice dent/scratched area in his bumper... I laughed...
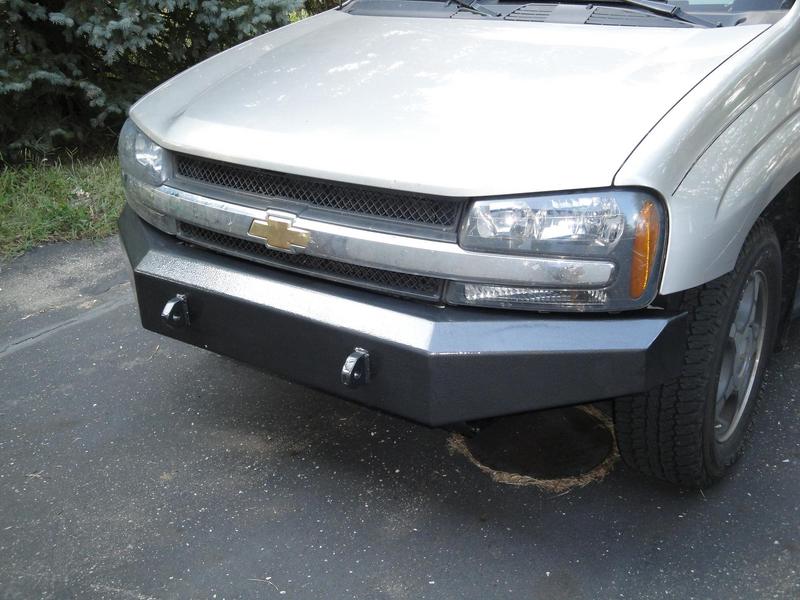

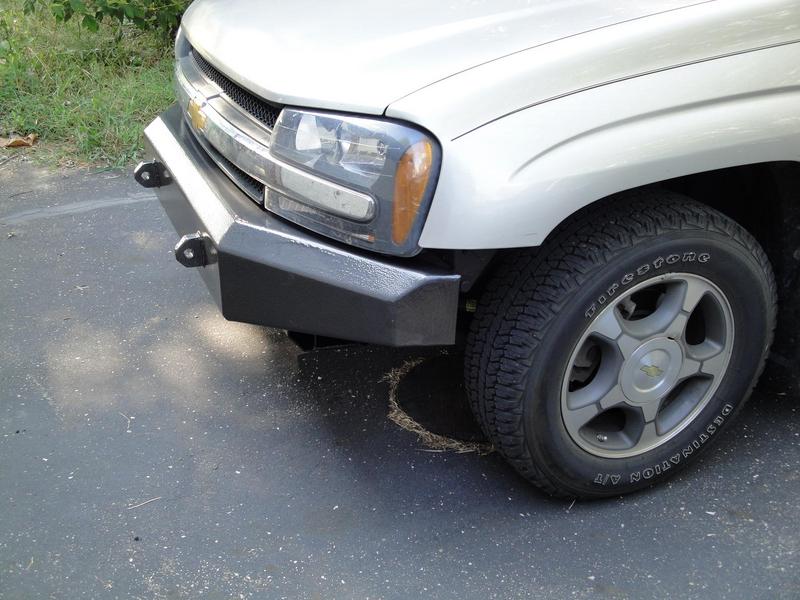
Here is a cardboard cutout of the blended end piece, though it'll have 1" horizontal front/top/rear pieces welded on... It'll be a $25 option, now that I see what it's going to take... It'll be 6 extra pieces to weld on, and 2 replacement ends of larger size...
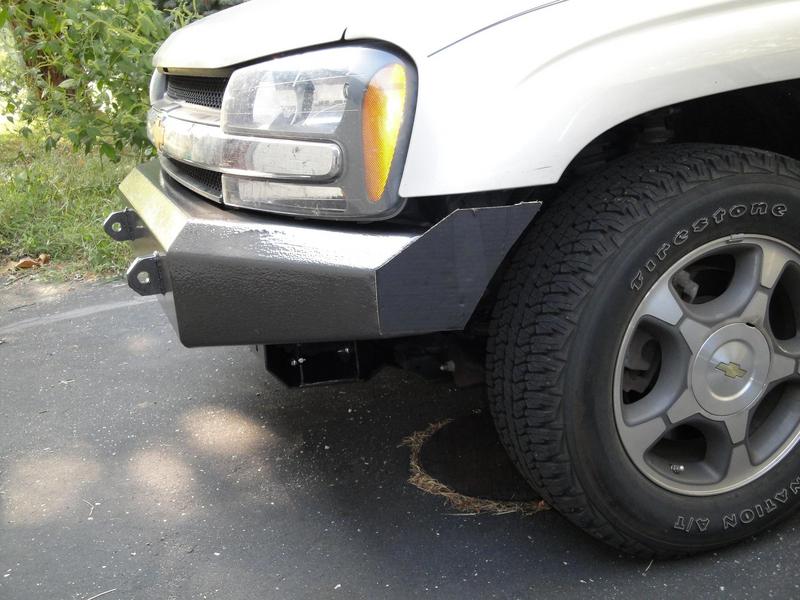
Here is a cardboard cutout of the blended end piece, though it'll have 1" horizontal front/top/rear pieces welded on... It'll be a $25 option, now that I see what it's going to take... It'll be 6 extra pieces to weld on, and 2 replacement ends of larger size...
- bartonmd
- Moderator
- Posts: 4469
- Joined: Wed Sep 09, 2009 9:35 am
- Location: IN, Indianapolis
- Name: Mike
- Vehicle Year: 2007
- Vehicle: Chevrolet TrailBlazer
- DriveTrain: 4WD w/ G80
- Rank: Offroad Rated
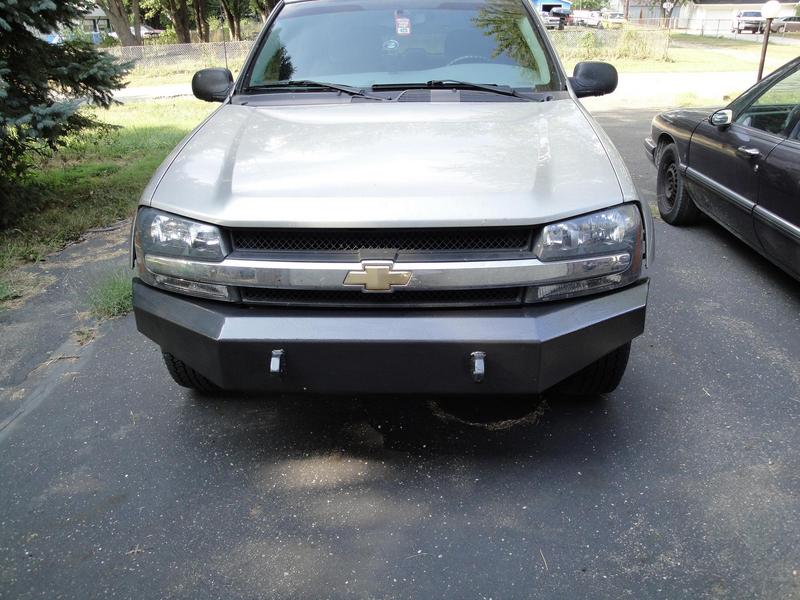
That is looking really sharp. I like the tight fit, the lines. Solid work.
-

MrSmithsTB - Veteran
- Posts: 1756
- Joined: Thu Sep 10, 2009 2:28 pm
- Location: EHT, NJ
- Name: Bob
- Vehicle Year: 2006
- Vehicle: Other GMT360/370
- DriveTrain: AWD w/ G80
- Rank: Offroad Rated
Thanks!
What do you guys think of the blending shape?
I think it's as good as I can do, while still keeping the 45 on the bumper, and keeping the thing close to the body... There's the empty place in front, but I think we're stuck with that...
Thanks,
Mike
What do you guys think of the blending shape?
I think it's as good as I can do, while still keeping the 45 on the bumper, and keeping the thing close to the body... There's the empty place in front, but I think we're stuck with that...
Thanks,
Mike
- bartonmd
- Moderator
- Posts: 4469
- Joined: Wed Sep 09, 2009 9:35 am
- Location: IN, Indianapolis
- Name: Mike
- Vehicle Year: 2007
- Vehicle: Chevrolet TrailBlazer
- DriveTrain: 4WD w/ G80
- Rank: Offroad Rated
Looking at it, I would bring it back a little farther at the bottom. Just enough to follow the curve of the fender, like the way the stock bumper is.
-
MrSmithsTB - Veteran
- Posts: 1756
- Joined: Thu Sep 10, 2009 2:28 pm
- Location: EHT, NJ
- Name: Bob
- Vehicle Year: 2006
- Vehicle: Other GMT360/370
- DriveTrain: AWD w/ G80
- Rank: Offroad Rated
MrSmithsTB wrote:Looking at it, I would bring it back a little farther at the bottom. Just enough to follow the curve of the fender, like the way the stock bumper is.
I want to keep the bottom as far forward as possible, because I know Kyle's tire gets close to the corner when turning and compressed, as it is... Hitting on a plastic bumper skin is one thing, but hitting on a metal bumper is a tad harder on tires...
Mike
- bartonmd
- Moderator
- Posts: 4469
- Joined: Wed Sep 09, 2009 9:35 am
- Location: IN, Indianapolis
- Name: Mike
- Vehicle Year: 2007
- Vehicle: Chevrolet TrailBlazer
- DriveTrain: 4WD w/ G80
- Rank: Offroad Rated
Gotcha. Like I said, I like it as is. Whatever you decide works for me.
-
MrSmithsTB - Veteran
- Posts: 1756
- Joined: Thu Sep 10, 2009 2:28 pm
- Location: EHT, NJ
- Name: Bob
- Vehicle Year: 2006
- Vehicle: Other GMT360/370
- DriveTrain: AWD w/ G80
- Rank: Offroad Rated
bartonmd wrote:What do you guys think of the blending shape?
I think it's as good as I can do, while still keeping the 45 on the bumper, and keeping the thing close to the body... There's the empty place in front, but I think we're stuck with that...
Well what is the worst case with that empty spot? Maybe a little more wind noise, I think we can cross that bridge if that is the case.
-

djthumper - Moderator
- Posts: 2702
- Joined: Wed Mar 24, 2010 6:04 pm
- Location: NV, Las Vegas
- Name: Larry
- Vehicle Year: 2006
- Vehicle: Chevrolet TrailBlazer
- DriveTrain: 4WD
- Rank: Offroad Rated
djthumper wrote:bartonmd wrote:What do you guys think of the blending shape?
I think it's as good as I can do, while still keeping the 45 on the bumper, and keeping the thing close to the body... There's the empty place in front, but I think we're stuck with that...
Well what is the worst case with that empty spot? Maybe a little more wind noise, I think we can cross that bridge if that is the case.
No, it's not really an empty slot... It's that the front of the fender is farther forward of where the bumper meets it... It's purely an aesthetic thing...
Mike
- bartonmd
- Moderator
- Posts: 4469
- Joined: Wed Sep 09, 2009 9:35 am
- Location: IN, Indianapolis
- Name: Mike
- Vehicle Year: 2007
- Vehicle: Chevrolet TrailBlazer
- DriveTrain: 4WD w/ G80
- Rank: Offroad Rated
Oooh, looks good Mike!! I say for me I'd like to do the blend, looks a lil better... Certainly a nice looking bumper! 
Build Thread
Back to stock, had fun while it lasted...
Back to stock, had fun while it lasted...
- janesy86
- Veteran
- Posts: 1291
- Joined: Thu Sep 10, 2009 2:29 pm
- Location: MA, Salem
- Name: Nick Janes
- Vehicle Year: 2007
- Vehicle: Chevrolet TrailBlazer
- DriveTrain: 4WD w/ G80
- Rank: Offroad Rated
bartonmd wrote:
What about rather than adding it to the side like your cardboard piece indicates, you start at the top between the bumper and fender and go back twords the tire, then down the back of the bumper for a fill similar to the cardboard piece?
Just another idea...
Also, what did you use to paint the bumper?
- Diacom
- Addict
- Posts: 881
- Joined: Fri Jul 23, 2010 9:08 pm
- Location: NV, Yerington
- Name: Noel
- Vehicle Year: 2003
- Vehicle: Chevrolet TrailBlazer
- DriveTrain: 4WD w/ Aftermarket Locker
Diacom wrote:
What about rather than adding it to the side like your cardboard piece indicates, you start at the top between the bumper and fender and go back twords the tire, then down the back of the bumper for a fill similar to the cardboard piece?
Just another idea...
Also, what did you use to paint the bumper?
The outside piece was just to show the shape. Like I say,there will be 1" wide pieces going inward around all sides of that end piece, so yes, the metal one will have an outside shape like that, and the 1" edges will start by extending that 45 degree angle at the front of the bumper.
It's the Rustoleum "Hammer Finish" brush-on paint...
Mike
- bartonmd
- Moderator
- Posts: 4469
- Joined: Wed Sep 09, 2009 9:35 am
- Location: IN, Indianapolis
- Name: Mike
- Vehicle Year: 2007
- Vehicle: Chevrolet TrailBlazer
- DriveTrain: 4WD w/ G80
- Rank: Offroad Rated
bartonmd wrote: No, it's not really an empty slot... It's that the front of the fender is farther forward of where the bumper meets it... It's purely an aesthetic thing...
Mike
Nothing to worry about then. I like the add-on piece, it looks like it will help by filling that gap.
-
djthumper - Moderator
- Posts: 2702
- Joined: Wed Mar 24, 2010 6:04 pm
- Location: NV, Las Vegas
- Name: Larry
- Vehicle Year: 2006
- Vehicle: Chevrolet TrailBlazer
- DriveTrain: 4WD
- Rank: Offroad Rated
Group Buy Thread:
viewtopic.php?f=35&t=1275
viewtopic.php?f=35&t=1275
- bartonmd
- Moderator
- Posts: 4469
- Joined: Wed Sep 09, 2009 9:35 am
- Location: IN, Indianapolis
- Name: Mike
- Vehicle Year: 2007
- Vehicle: Chevrolet TrailBlazer
- DriveTrain: 4WD w/ G80
- Rank: Offroad Rated
bartonmd wrote:It's the Rustoleum "Hammer Finish" brush-on paint...
Unless it's just the pic, that finish looks great for a brush on.
PM sent for my order.
Shame you can't laser cut MTA in the parts, I know I'd sure be proud to sport it for some advertisement for you.
- Diacom
- Addict
- Posts: 881
- Joined: Fri Jul 23, 2010 9:08 pm
- Location: NV, Yerington
- Name: Noel
- Vehicle Year: 2003
- Vehicle: Chevrolet TrailBlazer
- DriveTrain: 4WD w/ Aftermarket Locker
I did the Hammer finich on the last one in brush on and again in spray on...The brush on is a far better product and give a much nicer finish. I use it often to touch up the sliders.
they've always worked for me.
-
HARDTRAILZ - Moderator
- Posts: 6342
- Joined: Sat Sep 12, 2009 1:49 am
- Location: IN, Batesville
- Name: Kyle
- Vehicle Year: 2006
- Vehicle: Chevrolet TrailBlazer
- DriveTrain: 4WD w/ Aftermarket Locker
- Rank: Extreme Offroader
Exactly! 2 coats and it turns out great!
Mike
Mike
- bartonmd
- Moderator
- Posts: 4469
- Joined: Wed Sep 09, 2009 9:35 am
- Location: IN, Indianapolis
- Name: Mike
- Vehicle Year: 2007
- Vehicle: Chevrolet TrailBlazer
- DriveTrain: 4WD w/ G80
- Rank: Offroad Rated