Offroad Trailblazers and Envoys

MarkMC lift is on! I love it! diary of my install

BDS, ReadyLift, Smaxx... You name it, we know about it here.

by snowmirage » Tue Jul 12, 2011 6:45 pm

First off a picture of the old girl in stock form the day I picked her up

Image

2003 Chevy Trailblazer LTZ 4x4 I6
67,000 miles $9,999

MarkMC Liftmeister kit 2.5" lift on all 4 corners
Mark's Wheel Spacers (1.5" if I recall? not 100% on that)
Nitto Terra Grappler AT tires 265/70 on stock 17" wheels

I have to apologize for the lack of pictures during the install, my friend and I thought everything was going to be pretty straight forward but we hit a few snags.

First issue we had was removing the center nut on the first strut assembly. We started the project Saturday morning at about 10am and this first issue kept us tied up for a good six hours lol.

Everything we tried (impact wrench, vice grips on the very upper shock shaft, and a few other tricks) didnt make any difference the shaft just kept on spinning and we could not get that nut to come loose. I finally gave up on it went to a local auto parts store and bought a new set of front struts (think they were about $82 a piece) I figured with nearly 93,000+ miles on the truck I was probably due for a set sometime relatively soon anyway. Next stop was the hardware store, I picked up cheap dremel and cut the dam nut off! MUHAHAHA power tools shall prevail!

The next issue we had was getting the front lower control arm to drop low enough to slide the lower strut mount back on. After some advice from Mark over the phone and via email we finally found a spot we could get some leverage on to drop it just enough to slide on. I suspect something we did in reassembly made this part significantly harder than it should have been but we got it.

Thankfully the second front strut (passenger side) was MUCH easier! First strut took us about 7hrs to do between the 15 min trips to the stores. The second I think we had completely done and reassembled in about 2hrs. When we did the second strut we gripped the very top of the shaft with a pair of vice grips as before and gave that center nut a kick with his electric impact driver and it come right off. Just that saved me an hour of cutting away at the nut while waiting for the dremel to cool off im sure.

We kinda jinxed our selves on the rear saying how easy they would be. The issue we had was the top of the rear spacer (the raised section) was just a bit to large to fit up inside the spring by hand. so we had to get about 3" or so of clearance to be able to slide the spacers under the compressed springs. Problem was we couldnt compress the springs anymore beacuse the top of our spring compressors were extending up above the top of the spring and causing interference. We finally found a bottle jack and used it to jack the axel down farther (placed the bottle jack between the frame and the axel) and that gave us plenty of room to slip the spacers in.

All said and done including trips to the store for parts / tools. It took us about 12hrs not counting our very short breaks. If your going to take this project on, if you can I'd suggest replacing your front struts while your at it. Then you can just cut up your stockers if needed like I did (BE SURE TO STILL USE THE SPRING COMPRESSOR! ;o) !!!) you wont want to do it all again to replace them later on anyway.

Next step for me is finding a place for a full size spare and some new rear shocks I can definitely tell now that they are on their last leg they are more than a little "bouncy".

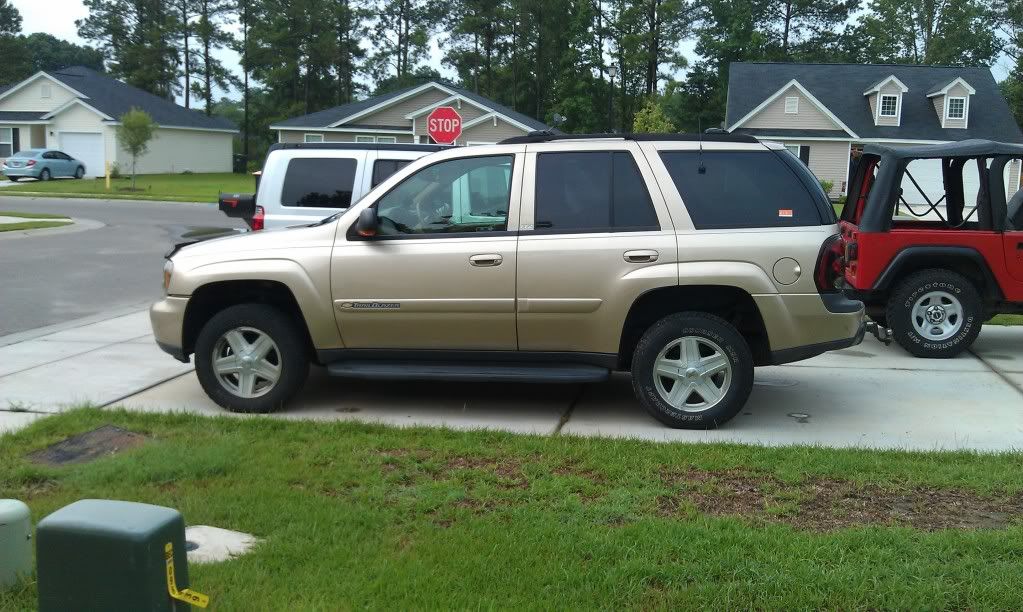
And now the results!
Below is with the lift on still on the stock size rubber
Image


And here is the end result (for now... :D )
Image


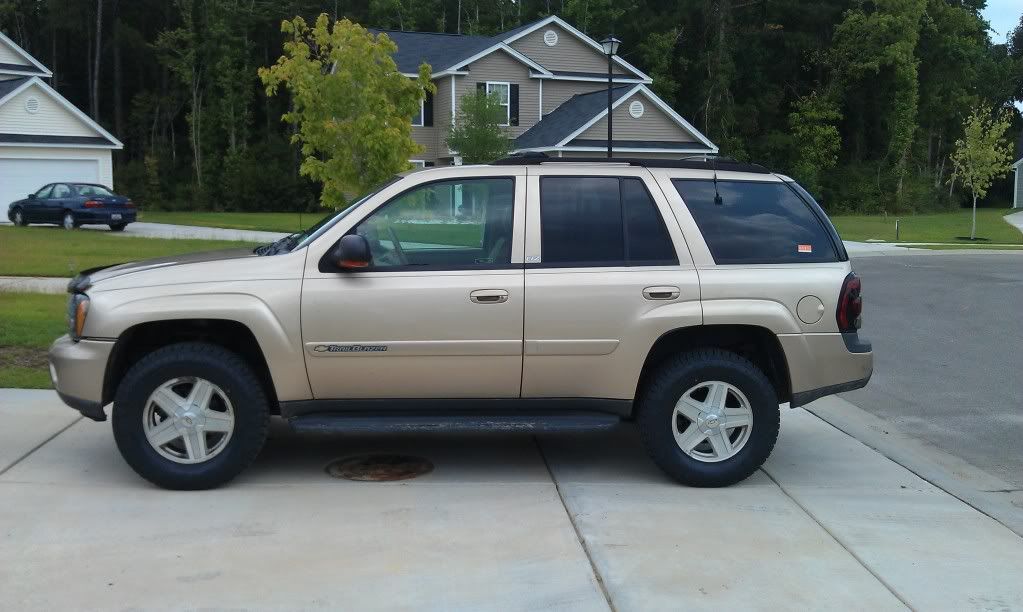
Just as Mark said when I asked him with the spacers the tires fit just fine with no cutting trimming or grinding. Could probably have gone a bit larger, but maybe not when I looked it was dark and 11pm :o)

I cant thank Mark enough for all his help, truely the best Customer Service ever answered all my questions 20x quicker than I would have ever expected. And was a great help on the phone and via email with pictures / suggestions when we ran into problems. I cant recommend his superior product enough.

Now I just cant wait to go play in the dirt... but now my issue is the closest friend that could come join me incase one of us gets stuck is 4hrs away... grrrrr o well maybe in a few more weeks I can make another trip down.
User avatar
snowmirage
Off-Roader
 
Posts: 232
Joined: Sun Jun 26, 2011 12:13 pm
Location: MD, Baltimore
Name: Brandon
Vehicle Year: 2003
Vehicle: Chevrolet TrailBlazer
DriveTrain: 4WD w/ G80

by MrSmithsTB » Wed Jul 13, 2011 9:28 am

Nice! Now, loose the running boards and you're set. :poke:
back in the saddle
TB BUILD
User avatar
MrSmithsTB
Veteran
 
Posts: 1756
Joined: Thu Sep 10, 2009 2:28 pm
Location: EHT, NJ
Name: Bob
Vehicle Year: 2006
Vehicle: Other GMT360/370
DriveTrain: AWD w/ G80
Rank: Offroad Rated

by navigator » Wed Jul 13, 2011 9:44 am

looks great, agree with Bob though, lose the boards.
"Please consider a search before posting. Folks on this site PIONEERED functional offroad use of these trucks."
The answer to many common lift questions can be found
here
My Build Thread
User avatar
navigator
Moderator
 
Posts: 4651
Joined: Wed Mar 09, 2011 10:16 am
Location: NC, Winnabow
Name: Chris
Vehicle Year: 2006
Vehicle: Chevrolet TrailBlazer
DriveTrain: 4WD
Rank: Trail Ready

by Trail X » Wed Jul 13, 2011 10:25 am

The first time always has a bit of a learning curve. Glad you got it all figured out. You'll be amazed how fast it will go next time because you'll know all the little tricks to make it go faster.
8-) Build Thread | ExPo Build | YouTube Videos
Not all who wander are lost. -Tolkien
User avatar
Trail X
Founder
 
Posts: 9925
Joined: Mon Sep 07, 2009 10:22 pm
Location: VA, Roanoke
Name: James Downing
Vehicle Year: 2005
Vehicle: Chevrolet TrailBlazer
DriveTrain: 4WD w/ Aftermarket Locker
Rank: Expedition Guide

by snowmirage » Wed Jul 13, 2011 11:10 am

Thanks

Ya I know the running boards need to go, but it was just to late to start working on that. Next time I dive into it they'll go.
User avatar
snowmirage
Off-Roader
 
Posts: 232
Joined: Sun Jun 26, 2011 12:13 pm
Location: MD, Baltimore
Name: Brandon
Vehicle Year: 2003
Vehicle: Chevrolet TrailBlazer
DriveTrain: 4WD w/ G80

by Diacom » Wed Jul 13, 2011 8:16 pm

Grats, now the expensive stuff starts...
Diacom
Addict
 
Posts: 881
Joined: Fri Jul 23, 2010 9:08 pm
Location: NV, Yerington
Name: Noel
Vehicle Year: 2003
Vehicle: Chevrolet TrailBlazer
DriveTrain: 4WD w/ Aftermarket Locker

by Mooseknuckle » Wed Jul 13, 2011 11:43 pm

Looks awesome. I agree running boards into the trash. What are you going to do next?
I don't dial 911
Mooseknuckle
Addict
 
Posts: 708
Joined: Sun Feb 21, 2010 9:31 am
Location: NJ,Brick
Name: Jeff
Vehicle Year: 2006
Vehicle: Chevrolet TrailBlazer
DriveTrain: 4WD
Rank: Offroad Rated

by snowmirage » Fri Jul 15, 2011 11:01 am

I think the most useful thing would be a 8.6" G80 axle from an EXT, if I can find one in good shape for the right price.

I also want to get a full size spare and a place to mount it. (I've been talking about both these projects in other threads I started)

I also need to replace the rear shocks, they are shot....

When I had the alignment done the shop (Firestone) told me the camber wasnt quite in line but it was better than it was. And told me I should try to find a camber kit then come have it re-done.

I think I read a few million posts on various lifts and stuff before I even made the purchase let alone did the install, and I dont think I remember hearing anyone mention needing a camber kit. Anyone else had to do it?
User avatar
snowmirage
Off-Roader
 
Posts: 232
Joined: Sun Jun 26, 2011 12:13 pm
Location: MD, Baltimore
Name: Brandon
Vehicle Year: 2003
Vehicle: Chevrolet TrailBlazer
DriveTrain: 4WD w/ G80

by Trail X » Fri Jul 15, 2011 11:14 am

Camber should be able to be adjusted if you flip the upper control arms.
8-) Build Thread | ExPo Build | YouTube Videos
Not all who wander are lost. -Tolkien
User avatar
Trail X
Founder
 
Posts: 9925
Joined: Mon Sep 07, 2009 10:22 pm
Location: VA, Roanoke
Name: James Downing
Vehicle Year: 2005
Vehicle: Chevrolet TrailBlazer
DriveTrain: 4WD w/ Aftermarket Locker
Rank: Expedition Guide

by KE7WOX » Fri Jul 15, 2011 11:21 am

Is it that bad with the 2.5" kit? After I installed the BDS 2" kit the camber was off but correctable with no UCA flipping or anything
This is an aggressive post. You probably won’t like it. It is quite doubtful that you have the taste or sophistication to be able to appreciate a post of this quality and depth.

Build Thread
User avatar
KE7WOX
Veteran
 
Posts: 1226
Joined: Tue Sep 29, 2009 2:10 pm
Location: OH, Dublin (Columbus)
Name: Felipe G
Vehicle Year: 2004
Vehicle: Chevrolet TrailBlazer
DriveTrain: 4WD

by snowmirage » Fri Jul 15, 2011 1:42 pm

I really dont even know how far its off, I didnt think to ask for specs before and / or after the alignment.

The manager basically told me "You wont eat your tires up on the way home (it was a 4hr drive back from my friends place) but try to find a camber kit and then come back we'll do it for free again"

I was just reading a bit about the upper control arm flip a few days ago. I might do some more research on that.

Maybe it'll get me straightened up without having to invest in a camber kit.
User avatar
snowmirage
Off-Roader
 
Posts: 232
Joined: Sun Jun 26, 2011 12:13 pm
Location: MD, Baltimore
Name: Brandon
Vehicle Year: 2003
Vehicle: Chevrolet TrailBlazer
DriveTrain: 4WD w/ G80

by MrSmithsTB » Fri Jul 15, 2011 1:51 pm

I don't know, man. I have Marks kit and all I had to do was give the LCA a few swift whacks with a sledge and it knocked them right into place. Alignment shop didn't even have to touch my camber.

My UCAs are not flipped either, and they won't be unless I add stiffer springs.
back in the saddle
TB BUILD
User avatar
MrSmithsTB
Veteran
 
Posts: 1756
Joined: Thu Sep 10, 2009 2:28 pm
Location: EHT, NJ
Name: Bob
Vehicle Year: 2006
Vehicle: Other GMT360/370
DriveTrain: AWD w/ G80
Rank: Offroad Rated

by snowmirage » Fri Jul 15, 2011 2:24 pm

I suppose it could be a case of its off, but by such a small amount most shops wouldnt have said anything but she was just doing a really good job for some reason? Ehh Who knows.

I'll bring it back and see how far off it is and see if its acceptable I guess sometime soon.
User avatar
snowmirage
Off-Roader
 
Posts: 232
Joined: Sun Jun 26, 2011 12:13 pm
Location: MD, Baltimore
Name: Brandon
Vehicle Year: 2003
Vehicle: Chevrolet TrailBlazer
DriveTrain: 4WD w/ G80

by Blackout » Fri Jul 15, 2011 4:17 pm

Probably depends on the truck. I have the BDS kit and mine was off a bit too when I got mine done. I'm not worrying about it until I get new tires and springs. I have the lifetime alignment anyway so I can go in whenever I want.
User avatar
Blackout
Trail-Blazer
 
Posts: 310
Joined: Fri Oct 08, 2010 6:12 pm
Location: OH, Columbus
Name: Brian
Vehicle Year: 2004
Vehicle: Chevrolet TrailBlazer
DriveTrain: 4WD


Return to Lifts / Suspension

cron