So the 4x4 disconnect is starting to give me troubles. I've been meaning to get the truck up on stands so that I can swap out the front suspension components. Looks like Sunday I'll be putting the truck in the garage and getting started!
On the list...
[x]Replace front springs with 88s
[x]Replace Driver Axle
[x]Replace Pass Axle
[x]Replace Driver Upper Ball Joint
[_]Replace Pass Upper Ball Joint
[x]Flip UCAs
[x]Inspect and Rebuild Disconnect
[x]Replace front differential fluid
[_]Replace transfer case fluid
[_]Replace rear differential fluid
I don't think I'll be finished in 1 day... but I'm hoping for the best...
Anyone wanna stop by, feel free...
Gordinho80's Front End Overhaul
37 posts
• Page 1 of 2 • 1, 2
-

Gordinho80 - Lifer
- Posts: 2787
- Joined: Tue Sep 08, 2009 9:27 am
- Location: NJ, Jackson
- Name: Mario Almeida
- Vehicle Year: Other
- Vehicle: Other Vehicle
- DriveTrain: 4WD
Finally got started on my suspension overhaul. Few weeks ago I did the front springs, they came out great!
Today, I decided I'd start the axles... figure I could probably do the driver side in a few hours if I'm lucky. Well, wasn't lucky...
After fighting the hub assembly with the slide hammer for a good hour, it finally came off the axle. Now, the problem is this. The axle had been clicking for a week now, I found out why when I started working. The shaft came apart. The boot that is inserted into the differential is stuck in place and the rest of the axle is out. I ran out of time and ideas so I put the wheel back together so that I could at least roll the thing. I've essentially got a 3 wheel drive truck right now.
Thoughts on how to get the rest of the axle out?


I also removed the driver side upper ball joint, figured why not...

Today, I decided I'd start the axles... figure I could probably do the driver side in a few hours if I'm lucky. Well, wasn't lucky...
After fighting the hub assembly with the slide hammer for a good hour, it finally came off the axle. Now, the problem is this. The axle had been clicking for a week now, I found out why when I started working. The shaft came apart. The boot that is inserted into the differential is stuck in place and the rest of the axle is out. I ran out of time and ideas so I put the wheel back together so that I could at least roll the thing. I've essentially got a 3 wheel drive truck right now.
Thoughts on how to get the rest of the axle out?
I also removed the driver side upper ball joint, figured why not...
Mario - Build Thread
-
Gordinho80 - Lifer
- Posts: 2787
- Joined: Tue Sep 08, 2009 9:27 am
- Location: NJ, Jackson
- Name: Mario Almeida
- Vehicle Year: Other
- Vehicle: Other Vehicle
- DriveTrain: 4WD
This same thing happened to me in oct. last year. I took every thing apart and the axle fell off but that part was stuck in real good, took about an hour to get out with 2-3 guys we use a prybar a hammer and 2 vise grips. pull on it with vise grips while someone uses the prybar, may have to tap on prybar with hammer. It sucked took about 3.5-4 hrs to do both sides.Good luck!
IF THE FISH STOP BITING... HUNT FOR SHELLS!!!
-

NC_IslandRunner - Moderator
- Posts: 3021
- Joined: Fri Dec 03, 2010 4:49 pm
- Location: NC, Sanford
- Name: Rory
- Vehicle Year: 2004
- Vehicle: Chevrolet TrailBlazer
- DriveTrain: 4WD w/ G80
- Rank: Offroad Rated
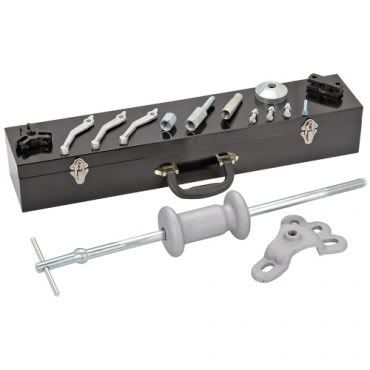
I've considered investing in one of these from autozone and a slide hammer to help with that pesky inner CV joint.
$20... not bad.

$20... not bad.
-

Trail X - Founder
- Posts: 9925
- Joined: Mon Sep 07, 2009 10:22 pm
- Location: VA, Roanoke
- Name: James Downing
- Vehicle Year: 2005
- Vehicle: Chevrolet TrailBlazer
- DriveTrain: 4WD w/ Aftermarket Locker
- Rank: Expedition Guide
Man, I must have gotten really lucky. Both of my axles took less than an hr. each. 6 lb hammer with a large pickle fork on the back side of the housing...about the 4th whack and they popped right out.
My passenger side came apart like yours, my drivers side came out all in one piece.
My passenger side came apart like yours, my drivers side came out all in one piece.
- bdp1978
- Trail-Blazer
- Posts: 253
- Joined: Fri Oct 22, 2010 12:32 pm
- Location: Rochester Hills, Mi
- Name: Brad
- Vehicle Year: 2004
- Vehicle: Chevrolet TrailBlazer
- DriveTrain: 4WD w/ G80
It just sucks that on the driver side, there is no easy way to get a fork or prybar under the truck and between the pumpkin and the shaft...
That puller looks like a good option, JD. I'll call AutoZone and see if they've got one.
That puller looks like a good option, JD. I'll call AutoZone and see if they've got one.
Mario - Build Thread
-
Gordinho80 - Lifer
- Posts: 2787
- Joined: Tue Sep 08, 2009 9:27 am
- Location: NJ, Jackson
- Name: Mario Almeida
- Vehicle Year: Other
- Vehicle: Other Vehicle
- DriveTrain: 4WD
They're isnt a lot of room, but there is enough to just grab the edge of the housing. All it takes is one good conection to get it to pop. I did bust a knuckle pretty good when it slipped off on one of my whacks.
- bdp1978
- Trail-Blazer
- Posts: 253
- Joined: Fri Oct 22, 2010 12:32 pm
- Location: Rochester Hills, Mi
- Name: Brad
- Vehicle Year: 2004
- Vehicle: Chevrolet TrailBlazer
- DriveTrain: 4WD w/ G80
I popped my drivers side with a foot long piece of half inch rebar. It slid in and caught enough of the lip to pop it.
they've always worked for me.
-

HARDTRAILZ - Moderator
- Posts: 6342
- Joined: Sat Sep 12, 2009 1:49 am
- Location: IN, Batesville
- Name: Kyle
- Vehicle Year: 2006
- Vehicle: Chevrolet TrailBlazer
- DriveTrain: 4WD w/ Aftermarket Locker
- Rank: Extreme Offroader
If you can't get a solid spot for the rebar, might I suggest wedging something flat and solid between the axle and diff? Try to use something long enough to extend past the frame rail. That should create a point of impact that will allow you to put some strength behind your hit without the worry of slippage.
-

MrSmithsTB - Veteran
- Posts: 1756
- Joined: Thu Sep 10, 2009 2:28 pm
- Location: EHT, NJ
- Name: Bob
- Vehicle Year: 2006
- Vehicle: Other GMT360/370
- DriveTrain: AWD w/ G80
- Rank: Offroad Rated
SUCCESS!!! I managed to get it off with the pickle fork, wedged in between cup and the diff from underneath. I hammered it into the cup to wedge it more and noticed it moved a hair... so I whacked at it a few more times and the fawker just slid right off! Now, time to clean the seal and see how it looks. Taking that out should be fun too if I decide to replace it.

Mario - Build Thread
-
Gordinho80 - Lifer
- Posts: 2787
- Joined: Tue Sep 08, 2009 9:27 am
- Location: NJ, Jackson
- Name: Mario Almeida
- Vehicle Year: Other
- Vehicle: Other Vehicle
- DriveTrain: 4WD
JamesDowning wrote:I've considered investing in one of these from autozone and a slide hammer to help with that pesky inner CV joint.
$20... not bad.
Its what I use! And it works great, it well worth the 20$!! What more of an excuse does a guy need to buy a new tool!!
-

OregTrailBlazin - Off-Road Vendor
- Posts: 610
- Joined: Wed Sep 09, 2009 2:34 pm
- Location: OR, Grants Pass
- Name: Johnathan Kurz
- Vehicle Year: 2004
- Vehicle: Chevrolet TrailBlazer
- DriveTrain: 4WD
OregTrailBlazin wrote:Its what I use! And it works great, it well worth the 20$!! What more of an excuse does a guy need to buy a new tool!!
Maybe you can be of help then... is the thread size a standard among slide hammers? I can't seem to nail that answer down via my googling.
-
Trail X - Founder
- Posts: 9925
- Joined: Mon Sep 07, 2009 10:22 pm
- Location: VA, Roanoke
- Name: James Downing
- Vehicle Year: 2005
- Vehicle: Chevrolet TrailBlazer
- DriveTrain: 4WD w/ Aftermarket Locker
- Rank: Expedition Guide
JamesDowning wrote:OregTrailBlazin wrote:Its what I use! And it works great, it well worth the 20$!! What more of an excuse does a guy need to buy a new tool!!
Maybe you can be of help then... is the thread size a standard among slide hammers? I can't seem to nail that answer down via my googling.
Most of the slide hammers I've been around have had a larger thread on the slide, then a little adapter that will work with this, and other like attachments.
Edit:.. Looks like McMaster shows the different ends, but I don't see the adapters.. The last time I was in Harbor Freight, they had a kit that had three different adapters and mulitiple attachments.
Edit2:--
 From HF
-
OregTrailBlazin - Off-Road Vendor
- Posts: 610
- Joined: Wed Sep 09, 2009 2:34 pm
- Location: OR, Grants Pass
- Name: Johnathan Kurz
- Vehicle Year: 2004
- Vehicle: Chevrolet TrailBlazer
- DriveTrain: 4WD
Old seal removed... wasn't as easy as I hoped, but I got it out...

New seal in... now to get the new axle shaft in and the rest put back together...

New seal in... now to get the new axle shaft in and the rest put back together...
Mario - Build Thread
-
Gordinho80 - Lifer
- Posts: 2787
- Joined: Tue Sep 08, 2009 9:27 am
- Location: NJ, Jackson
- Name: Mario Almeida
- Vehicle Year: Other
- Vehicle: Other Vehicle
- DriveTrain: 4WD
my seal went bad too. Pain in the ass
- Zero
- Veteran
- Posts: 1048
- Joined: Thu Sep 10, 2009 5:07 pm
- Location: Los Angeles, CA / Toronto, ON
- Name: Brendan
- Vehicle Year: 2005
- Vehicle: Chevrolet Trailblazer EXT
- DriveTrain: 4WD w/ G80
- Rank: Offroad Rated
And I thought I mangled my diff seal trying to get it out... lol
I had a lot of trouble too getting the diff side axle out, thats why I'm being lazy about the other side. Might have to invest in more tools
I had a lot of trouble too getting the diff side axle out, thats why I'm being lazy about the other side. Might have to invest in more tools
MarcMC - Bilstien - BDS - WheelAdapters - Treadwright - K&N - Gibson - Hayden - Zone
My Build Thread
My Build Thread
-

tbangert - Off-Roader
- Posts: 157
- Joined: Mon Jun 07, 2010 5:05 pm
- Location: ME, Berwick
- Name: Tyler
- Vehicle Year: 2005
- Vehicle: Chevrolet TrailBlazer
- DriveTrain: 4WD
tbangert wrote:And I thought I mangled my diff seal trying to get it out... lol
I had a lot of trouble too getting the diff side axle out, thats why I'm being lazy about the other side. Might have to invest in more tools
Pass side is easy. Unbolt the splined disconnect and pull it with the axle as a unit. Then you can separate them while off the truck.
I own too many vehicles now. Let's leave it at that.
The old Trailblazer - Build
The old Trailblazer - Build
-

fishsticks - Moderator
- Posts: 4358
- Joined: Thu Apr 01, 2010 11:30 pm
- Location: WA, Castle Rock
- Name: Donny
- Vehicle Year: Other
- Vehicle: Other Vehicle
- DriveTrain: 4WD w/ Aftermarket Locker
- Rank: Extreme Offroader
UPDATE:
Driver Side axle replaced! Upper Control Arms swapped! I had to call it a night before I could work on the pass side axle shaft.
Left on the list...
Replace Pass Side Axle Shaft
Replace Pass Side Upper Ball Joint
Open/Inspect/Clean/Re-Grease Disconnect... (order any parts that need to be replaced if worn)
Replace Front Differential Fluid
Replace TC Fluid
Replace Rear Differential Fluid
Mario - Build Thread
-
Gordinho80 - Lifer
- Posts: 2787
- Joined: Tue Sep 08, 2009 9:27 am
- Location: NJ, Jackson
- Name: Mario Almeida
- Vehicle Year: Other
- Vehicle: Other Vehicle
- DriveTrain: 4WD
JamesDowning wrote:I've considered investing in one of these from autozone and a slide hammer to help with that pesky inner CV joint.
$20... not bad.
These are life savers... I picked up one because i didn't feel like prying on the side of the transmission case on my cavalier. One slide on the hammer and they retainer clips just let go. I only paid $12 on my tho...
-

Opeth - Addict
- Posts: 846
- Joined: Tue Oct 05, 2010 4:46 pm
- Location: NY, Solvay
- Name: Cody
- Vehicle Year: 2006
- Vehicle: Chevrolet TrailBlazer
- DriveTrain: 4WD
- Rank: Trail Ready
Hey Mario if you want I'm available sat evening and sunday I can help with whatever you need not to mention I need to replace my fluids as well..
I don't dial 911
- Mooseknuckle
- Addict
- Posts: 708
- Joined: Sun Feb 21, 2010 9:31 am
- Location: NJ,Brick
- Name: Jeff
- Vehicle Year: 2006
- Vehicle: Chevrolet TrailBlazer
- DriveTrain: 4WD
- Rank: Offroad Rated
37 posts
• Page 1 of 2 • 1, 2