Offroad Trailblazers and Envoys

Google Sketch-up / CAD of Trailblazer frame

Trailblazer and Envoy related, but not off-road related...

by snowmirage » Wed May 09, 2012 9:45 pm

I was doing some mental fab work on my truck today (otherwise known as day dreaming :idea: ) and what I would do if I could.

(Started thinking about a radius arm for a solid axle in the front with coil overs if your wondering)

Hopefully in a few years I'll be able to buy my own place, with a size-able garage included (thinking about trying to buy a small plot someplace building a 3-4 car garage with a sizeable apartment on top, then building the actual house to go with it years later).

Until then I guess I have plenty of time to dream and plan.

I have dabbled with a few basic CAD / 3d design programs before, and done a little bit of stuff with Google Sketch-up.

That got me thinking about trying to build our frame (and other nessicary parts, wheel wells, fenders etc, steering) in something easily accessible like Google sketch-up.

The more I thought about it the more I realized how complicated just getting that base to design something off of would be.

Anyone else ever given something like this any thought?

(end day dream sequence :coffee: )
User avatar
snowmirage
Off-Roader
 
Posts: 232
Joined: Sun Jun 26, 2011 12:13 pm
Location: MD, Baltimore
Name: Brandon
Vehicle Year: 2003
Vehicle: Chevrolet TrailBlazer
DriveTrain: 4WD w/ G80

by The Roadie » Thu May 10, 2012 3:03 am

While you're dreaming, just ask for a Faro Arm. Will solve all data input problems. Then you can model the steering knuckle and get taller replacements designed. :excited:
User avatar
The Roadie
Founder
 
Posts: 5011
Joined: Mon Sep 07, 2009 11:29 pm
Location: OR, Portland area
Name: Bill Carton
Vehicle Year: 2004
Vehicle: GMC Envoy
DriveTrain: 4WD w/ G80
Rank: Expedition Guide

by chevycrew » Thu May 10, 2012 4:31 am

When you are mocking up, try a 3 link and panhard. A radius arm setup is good for the street as it has a natural bind that acts as a sway bar. But, if you are going for flex, try 2 lower links, 1 upper link, and the panhard. then add a sway bar with disconnects for street use.
User avatar
chevycrew
Veteran
 
Posts: 1088
Joined: Tue Mar 08, 2011 2:42 pm
Location: UT, Salt Lake City
Name: Steve
Vehicle Year: 2002
Vehicle: Chevrolet TrailBlazer
DriveTrain: 4WD
Rank: Trail Ready

by Trail X » Thu May 10, 2012 10:12 am

For my rear bumper, I think we only ever mocked up the two frame tubes sticking out the back in 3D. And they were done excessively simply.
8-) Build Thread | ExPo Build | YouTube Videos
Not all who wander are lost. -Tolkien
User avatar
Trail X
Founder
 
Posts: 9925
Joined: Mon Sep 07, 2009 10:22 pm
Location: VA, Roanoke
Name: James Downing
Vehicle Year: 2005
Vehicle: Chevrolet TrailBlazer
DriveTrain: 4WD w/ Aftermarket Locker
Rank: Expedition Guide

by Hatchet669 » Thu May 10, 2012 11:39 am

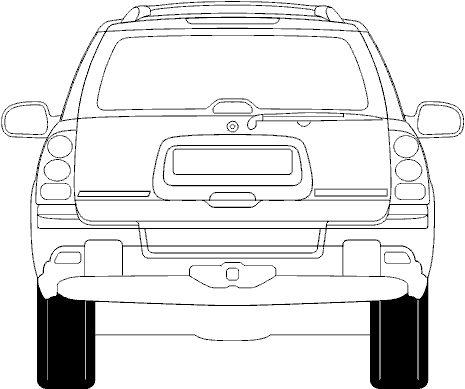
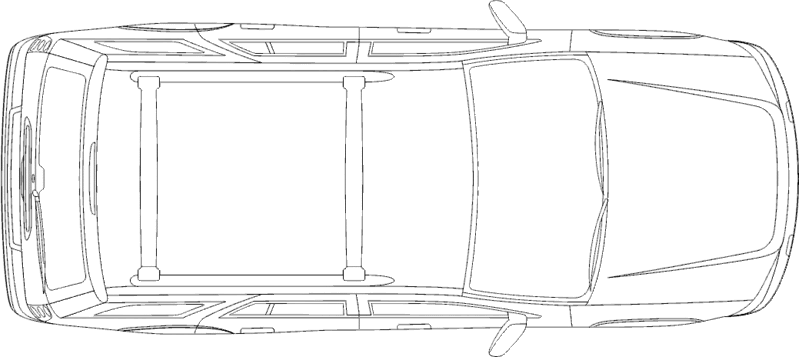
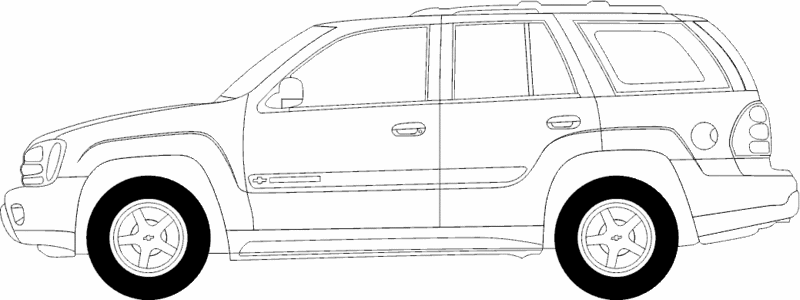
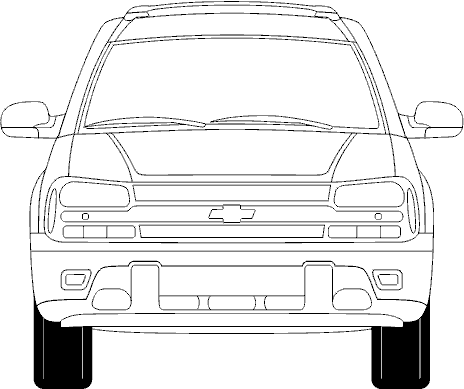
Here these mite help. We use these photos when we create a 3d model in 3DS Max.

Image
Image
Image
Image
Image
User avatar
Hatchet669
Trail-Blazer
 
Posts: 257
Joined: Wed Sep 30, 2009 8:23 pm
Location: IL, Worth
Name: Joe
Vehicle Year: 2003
Vehicle: Chevrolet TrailBlazer
DriveTrain: 4WD
Rank: Trail Ready

by Gordinho80 » Thu May 10, 2012 11:51 am

Those photos helped me create the ORTB logos!
Mario - Build Thread
User avatar
Gordinho80
Lifer
 
Posts: 2787
Joined: Tue Sep 08, 2009 9:27 am
Location: NJ, Jackson
Name: Mario Almeida
Vehicle Year: Other
Vehicle: Other Vehicle
DriveTrain: 4WD

by bartonmd » Thu May 10, 2012 3:56 pm

Fab work, 1-off stuff... It's MUCH quicker and simpler, and easier to REALLY look at and see if you like it, to just make it on the vehicle... I start with cardboard, a piece at a time, then slice until it's something I like. When I've got something I like in cardboard, I trace it on steel and cut it out with the plasma, then tack it on and start the next cardboard piece...

Matt's Envoy bumper, for instance, was like that, and it went from a little bit of an idea to this in like 7 hours:

Image

Then after around 6-7 hours of work by myself (welding, grinding, blending, sanding), it looked like this:

Image

Then after another day, it looked like this:

Image

The bottom line is, I'd have had more time in modeling it up (front of the vehicle and all) than it took me to make it from scratch. It also would have been more expensive, because I would have had the shop punch and bend the parts, where this started as a flat sheet of 7ga...

Mike
bartonmd
Moderator
 
Posts: 4469
Joined: Wed Sep 09, 2009 9:35 am
Location: IN, Indianapolis
Name: Mike
Vehicle Year: 2007
Vehicle: Chevrolet TrailBlazer
DriveTrain: 4WD w/ G80
Rank: Offroad Rated

by snowmirage » Fri May 18, 2012 11:00 pm

I totally agree Mike and that's what I'd normally do.

That's pretty much how I built my little tire carrier before I ordered the parts. Figured out the dimensions of the parts online then mocked it up in cardboard to make sure the tire would clear the way I wanted it to.

In this case though this project is in all honesty probably years away.

Step 1) New car, alternative daily driver to allow me to have down time on the truck, have to get to work some how
Step 2) Get out of the Apartment and buy a house, and by house I'm thinking build a VERY large garage (3+ cars) build a decent apartment in the loaf, years later build the house to go with the garage and rent out the apartment.
Step 3) Tools
Step 4) The fun begins

So if I could manage to get the frame of the truck or such in to Google sketch-up or something I could at least start to work out the design.

When the time comes I'm sure I'll do just as you mentioned. Use cardboard to make templates to build up the various brackets etc. Watching one of the shows on Spike on the weekends gave me the idea to mock up the link arms maybe even the front drive-shaft if needed with PVC pipe until I'm sure the links are all the right length etc.
User avatar
snowmirage
Off-Roader
 
Posts: 232
Joined: Sun Jun 26, 2011 12:13 pm
Location: MD, Baltimore
Name: Brandon
Vehicle Year: 2003
Vehicle: Chevrolet TrailBlazer
DriveTrain: 4WD w/ G80

by RimoniManu » Fri Jul 27, 2012 5:26 pm

Dont mean to hijack but hatchet do you have those drawings for the EXT? Also, Barton what did you use to bend your tubing?
RimoniManu
Off-Roader
 
Posts: 138
Joined: Sat Sep 18, 2010 3:56 pm
Location: WA, Kent
Name: Ray
Vehicle Year: 2002
Vehicle: Chevrolet Trailblazer EXT
DriveTrain: 4WD w/ Aftermarket Locker

by bartonmd » Fri Jul 27, 2012 7:56 pm

RimoniManu wrote:Dont mean to hijack but hatchet do you have those drawings for the EXT? Also, Barton what did you use to bend your tubing?


My Pro-Tools 105HD draw bender.

Mike
bartonmd
Moderator
 
Posts: 4469
Joined: Wed Sep 09, 2009 9:35 am
Location: IN, Indianapolis
Name: Mike
Vehicle Year: 2007
Vehicle: Chevrolet TrailBlazer
DriveTrain: 4WD w/ G80
Rank: Offroad Rated


Return to Truck Discussion