Offroad Trailblazers and Envoys

Fixing my steering today...

BDS, ReadyLift, Smaxx... You name it, we know about it here.

by v7guy » Mon Jan 16, 2012 5:33 pm

HARDTRAILZ wrote:
ruffryder59 wrote:Is this what I need? http://www.ebay.com/itm/130371626604?ss ... 822wt_1396 Just want to make sure before I pull the trigger. Seems like a good deal!


Any confirmation there will work? On sale for $35 so I can buy two sets and have spares.


That ad lists the manufacturer part number being the same as the MOOG part numbers I picked up. I would guess that they are the right parts, but that is REALLY REALLY cheap. I think I mentioned this earlier in the thread. I've been driving it around with no problems, it's been a drama free mod.

Off to pull the pass CV out to replace the boot for hopefully the last time this winter... :roll:
build thread

All things in moderation, including moderation.
Some people never go crazy... what truly horrible lives they must lead
User avatar
v7guy
Moderator
 
Posts: 3712
Joined: Wed Mar 09, 2011 10:17 pm
Location: NY, long island
Name: Jason
Vehicle Year: 2004
Vehicle: Chevrolet TrailBlazer
DriveTrain: 4WD
Rank: Offroad Rated

by v7guy » Tue Feb 14, 2012 8:05 pm

Looked under the truck today and noticed my inner tie rod ends are starting to bend in the threaded area after I took the truck out climbing some rocks at the beach.
Maybe I reamed too deep, maybe it's the extra angle from the 89 springs, maybe its from the extra flex from no front sway bar... or possibly all of the above.
It appears the body of the outer tie rod end may be hitting the knuckle when the suspension droops. Won't know for sure till I get it off tomorrow.

Anybody else have this happen?
build thread

All things in moderation, including moderation.
Some people never go crazy... what truly horrible lives they must lead
User avatar
v7guy
Moderator
 
Posts: 3712
Joined: Wed Mar 09, 2011 10:17 pm
Location: NY, long island
Name: Jason
Vehicle Year: 2004
Vehicle: Chevrolet TrailBlazer
DriveTrain: 4WD
Rank: Offroad Rated

by Trail X » Wed Feb 15, 2012 9:41 am

Did you mean your outer tie rods?
8-) Build Thread | ExPo Build | YouTube Videos
Not all who wander are lost. -Tolkien
User avatar
Trail X
Founder
 
Posts: 9935
Joined: Mon Sep 07, 2009 10:22 pm
Location: VA, Roanoke
Name: James Downing
Vehicle Year: 2005
Vehicle: Chevrolet TrailBlazer
DriveTrain: 4WD w/ Aftermarket Locker
Rank: Expedition Guide

by v7guy » Wed Feb 15, 2012 10:15 am

The threaded piece that the outer rod screws onto is what is bent, just behind the jam nut.
build thread

All things in moderation, including moderation.
Some people never go crazy... what truly horrible lives they must lead
User avatar
v7guy
Moderator
 
Posts: 3712
Joined: Wed Mar 09, 2011 10:17 pm
Location: NY, long island
Name: Jason
Vehicle Year: 2004
Vehicle: Chevrolet TrailBlazer
DriveTrain: 4WD
Rank: Offroad Rated

by Trail X » Wed Feb 15, 2012 10:19 am

AH! Sorry, I was still picturing our stock inners.

Is it bent up or down? Could it have gotten into a rock?
8-) Build Thread | ExPo Build | YouTube Videos
Not all who wander are lost. -Tolkien
User avatar
Trail X
Founder
 
Posts: 9935
Joined: Mon Sep 07, 2009 10:22 pm
Location: VA, Roanoke
Name: James Downing
Vehicle Year: 2005
Vehicle: Chevrolet TrailBlazer
DriveTrain: 4WD w/ Aftermarket Locker
Rank: Expedition Guide

by v7guy » Wed Feb 15, 2012 10:34 am

It's bent up in a V shape... Probably about 5 degrees. I don't think I smacked them on anything, they're both bent in almost an identical fashion.
A few companies make a sleeve that replaces the jam nut because the 2500 guys apparently bend them fairly often. It reinforces the rod. But my initial guess is there isn't enough articulation in the joint. The outer in hitting the knuckle and the threaded part bends to let the suspension droop. I'll try to get a picture.
build thread

All things in moderation, including moderation.
Some people never go crazy... what truly horrible lives they must lead
User avatar
v7guy
Moderator
 
Posts: 3712
Joined: Wed Mar 09, 2011 10:17 pm
Location: NY, long island
Name: Jason
Vehicle Year: 2004
Vehicle: Chevrolet TrailBlazer
DriveTrain: 4WD
Rank: Offroad Rated

by fishsticks » Wed Feb 15, 2012 11:11 am

Strange... mine are fine. :?:
11 Silverado LTZ - 6.2L/6l80, 2/3 drop, self tuned
85 Hilux - 3RZ, dual cases, caged, 40s, chromo everything
02 TrailBlazer LTZ - 35s, lockers, balls - Gone but not forgotten - Build
User avatar
fishsticks
Moderator
 
Posts: 4356
Joined: Thu Apr 01, 2010 11:30 pm
Location: WA, Vancouver
Name: Donny
Vehicle Year: Other
Vehicle: Other Vehicle
DriveTrain: 4WD w/ Aftermarket Locker
Rank: Extreme Offroader

by v7guy » Wed Feb 15, 2012 12:12 pm

I don't think I was doing anything crazy... just went put and snapped a pic
Image
build thread

All things in moderation, including moderation.
Some people never go crazy... what truly horrible lives they must lead
User avatar
v7guy
Moderator
 
Posts: 3712
Joined: Wed Mar 09, 2011 10:17 pm
Location: NY, long island
Name: Jason
Vehicle Year: 2004
Vehicle: Chevrolet TrailBlazer
DriveTrain: 4WD
Rank: Offroad Rated

by Trail X » Wed Feb 15, 2012 12:18 pm

Hm yeah, it looks like you might have reamed a bit too deep. That boot isn't supposed to be that smashed.
8-) Build Thread | ExPo Build | YouTube Videos
Not all who wander are lost. -Tolkien
User avatar
Trail X
Founder
 
Posts: 9935
Joined: Mon Sep 07, 2009 10:22 pm
Location: VA, Roanoke
Name: James Downing
Vehicle Year: 2005
Vehicle: Chevrolet TrailBlazer
DriveTrain: 4WD w/ Aftermarket Locker
Rank: Expedition Guide

by bartonmd » Wed Feb 15, 2012 1:02 pm

JamesDowning wrote:Hm yeah, it looks like you might have reamed a bit too deep. That boot isn't supposed to be that smashed.


I agree, and look how much farther down the castle nuts is, than the cotter pin. The cotter pin is supposed to sit down in the machined part of the castle nut, so your joint is a solid 1/4-3/8" too far in.

Mike
bartonmd
Moderator
 
Posts: 4469
Joined: Wed Sep 09, 2009 9:35 am
Location: IN, Indianapolis
Name: Mike
Vehicle Year: 2007
Vehicle: Chevrolet TrailBlazer
DriveTrain: 4WD w/ G80
Rank: Offroad Rated

by v7guy » Wed Feb 15, 2012 1:11 pm

I questioned it a bit when I put it together. But then again I only had the hole reamed for the new angle about half way. Guess next time I just get a 1/4" mounting surface for the rod end.

Anybody know if there are any options other than a new knuckle and "try again"?
Thought about wrapping the tapered part in some 1/8" steel to space it down some but it seems kinda shady
build thread

All things in moderation, including moderation.
Some people never go crazy... what truly horrible lives they must lead
User avatar
v7guy
Moderator
 
Posts: 3712
Joined: Wed Mar 09, 2011 10:17 pm
Location: NY, long island
Name: Jason
Vehicle Year: 2004
Vehicle: Chevrolet TrailBlazer
DriveTrain: 4WD
Rank: Offroad Rated

by navigator » Wed Feb 15, 2012 1:51 pm

wonder if one of the SAS guys still have a knuckle lying around?
"Please consider a search before posting. Folks on this site PIONEERED functional offroad use of these trucks."
The answer to many common lift questions can be found
here
My Build Thread
User avatar
navigator
Moderator
 
Posts: 4651
Joined: Wed Mar 09, 2011 10:16 am
Location: NC, Winnabow
Name: Chris
Vehicle Year: 2006
Vehicle: Chevrolet TrailBlazer
DriveTrain: 4WD
Rank: Trail Ready

by Trail X » Wed Feb 15, 2012 1:53 pm

Convert to heims...

Image

Your idea of wrapping the conical surface is good in theory, but I'd try to find a machine shop that would cut out very small cone instead of trying to create your own spacers. This cone might also need to be heat treated.
8-) Build Thread | ExPo Build | YouTube Videos
Not all who wander are lost. -Tolkien
User avatar
Trail X
Founder
 
Posts: 9935
Joined: Mon Sep 07, 2009 10:22 pm
Location: VA, Roanoke
Name: James Downing
Vehicle Year: 2005
Vehicle: Chevrolet TrailBlazer
DriveTrain: 4WD w/ Aftermarket Locker
Rank: Expedition Guide

by v7guy » Wed Feb 15, 2012 3:36 pm

I've been looking at that but doing it for a reasonable price seems tough.
trying to find those taper pins to piece something together is even tougher.
build thread

All things in moderation, including moderation.
Some people never go crazy... what truly horrible lives they must lead
User avatar
v7guy
Moderator
 
Posts: 3712
Joined: Wed Mar 09, 2011 10:17 pm
Location: NY, long island
Name: Jason
Vehicle Year: 2004
Vehicle: Chevrolet TrailBlazer
DriveTrain: 4WD
Rank: Offroad Rated

by Trail X » Wed Feb 15, 2012 5:33 pm

8-) Build Thread | ExPo Build | YouTube Videos
Not all who wander are lost. -Tolkien
User avatar
Trail X
Founder
 
Posts: 9935
Joined: Mon Sep 07, 2009 10:22 pm
Location: VA, Roanoke
Name: James Downing
Vehicle Year: 2005
Vehicle: Chevrolet TrailBlazer
DriveTrain: 4WD w/ Aftermarket Locker
Rank: Expedition Guide

by v7guy » Wed Feb 15, 2012 6:01 pm

My google fu is weak.
I have found over the last few hours that IH had the same 7deg taper and they offer a tapered stud for the conversion. That speedway link is a good bit cheaper.
Thanks for the link!
build thread

All things in moderation, including moderation.
Some people never go crazy... what truly horrible lives they must lead
User avatar
v7guy
Moderator
 
Posts: 3712
Joined: Wed Mar 09, 2011 10:17 pm
Location: NY, long island
Name: Jason
Vehicle Year: 2004
Vehicle: Chevrolet TrailBlazer
DriveTrain: 4WD
Rank: Offroad Rated

by Trail X » Thu Feb 16, 2012 9:53 am

At that price, you can at least see if it works. I worry a bit that it doesn't appear to be grade 8 though.
8-) Build Thread | ExPo Build | YouTube Videos
Not all who wander are lost. -Tolkien
User avatar
Trail X
Founder
 
Posts: 9935
Joined: Mon Sep 07, 2009 10:22 pm
Location: VA, Roanoke
Name: James Downing
Vehicle Year: 2005
Vehicle: Chevrolet TrailBlazer
DriveTrain: 4WD w/ Aftermarket Locker
Rank: Expedition Guide

by dirty anton » Thu Feb 16, 2012 10:38 am

User avatar
dirty anton
Trail-Blazer
 
Posts: 426
Joined: Thu Aug 19, 2010 12:21 am
Location: upper marlboro md
Name: mike
Vehicle Year: 2002
Vehicle: Chevrolet TrailBlazer
DriveTrain: 4WD w/ Aftermarket Locker
Rank: Extreme Offroader

by v7guy » Thu Feb 16, 2012 10:43 am

Does the TJ have the 7 deg taper?


I've been looking at a permanent solution for the last 3 hours trying to find a good selection of parts. There's simply no cheap fix. Even if I drill it out for a grade 8 bolt it's well over $100 and I'm not for sure any of it will work with the space available.
this is the piece I had found that I referenced earlier, they also have a short version.

I should have measured the 2500 tie rod end at the height the cotter pin would have went through the castle nut and then measured the hole in the spindle to see how much I could open it up instead of putting the taper half way up the tie rod hole.

For now I'm going to make a steel sleeve to go over the tie rod end and pick up some new inners. It should be fine for awhile and give me time to decide what to do. I can't really drive around with this rod bent.
build thread

All things in moderation, including moderation.
Some people never go crazy... what truly horrible lives they must lead
User avatar
v7guy
Moderator
 
Posts: 3712
Joined: Wed Mar 09, 2011 10:17 pm
Location: NY, long island
Name: Jason
Vehicle Year: 2004
Vehicle: Chevrolet TrailBlazer
DriveTrain: 4WD
Rank: Offroad Rated

by v7guy » Fri Feb 17, 2012 11:05 pm

well I went to work on this today. my first piece was some 1/8" I had laying around. I cut out a paper template and then copied it to steel and cut it out. I deburred the edges and bent and shrunk it at the small end. The 1/8" was really too thick. It did work, but it didn't sink down in the hole well. I was just able to get the castle nut on the stud and then I wrenched it down.

The drivers side I ended up using some sheet metal, I think it was 16 ga or so. Did the same thing as the 1/8" and pushed it into the knuckle and then tightened down the tie rod end. This side worked much better. It was fully inside the hole, unlike the 1/8" and it allowed the tie rod end to come up just far enough at about 40 ft lbs to put in a cotter pin.

I'm going to remake the pass side with the same sheet metal to make it fit properly.

I left the end open on the spacer instead of welding it and grinding it smooth to let it stretch to the gap between the knuckle and the tie rod end when I tightened it down. It seems to work pretty alright. I put about 100 miles on it today with no issues.

The tie rod ends do have some light contact marks on the body. The rods were bent not only upwards but also towards the back of the vehicle. I assume due to the suspension cycling.

Everything is buttoned up and I'm going to be keeping a close eye on it over the next few days. I drove up some curbs and dropped the suspension reasonably hard a few times to further check it's integrity. My only real worry is that that shims/spacers could move around and eat at the knuckle. I think I'm going to pick up those international adapters and move to a heim joint. When I was looking at the knuckle I only reamed the hole about half way. So for the guys doing this... realize you need to take out a very very small amount of material.

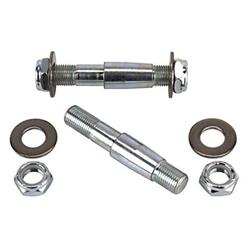
Here's a couple picks of what you have to make when your a dipshit and //// it all up...

Image

Image
build thread

All things in moderation, including moderation.
Some people never go crazy... what truly horrible lives they must lead
User avatar
v7guy
Moderator
 
Posts: 3712
Joined: Wed Mar 09, 2011 10:17 pm
Location: NY, long island
Name: Jason
Vehicle Year: 2004
Vehicle: Chevrolet TrailBlazer
DriveTrain: 4WD
Rank: Offroad Rated

PreviousNext

Return to Lifts / Suspension

cron