After being asked by a couple people, it's something I'm kicking around. Time is my main problem, not supply. It costs me basically zero bumper-fab time to buy the punched/bent pieces from my real job and sell/ship them separately, and my bumper-fab time is what my backlog is based around.
Basically, with a bumper or skidplate parts kit, if somebody has a welder and a grinder (with a cutoff wheel or 2, as well), they can make a bumper from parts kits, on their vehicle, how they want it. There would be some fabrication, like the 1" trim around the wings would come as 1" strips that would need to be cut to length and welded on, but it would be basically a "here's all the metal you need" kind of thing. I could do standard bumpers for NBL and 3" body lift like that, as well as radiator and oil pan skids. I could actually even do bent tubes, cut long, for a full tube brush guard, that the person would just have to cut to length, notch, and weld on how they like it. I can't do winch bumpers, Envoy bumpers, or rear bumpers like this, though, because those are made piece-by-piece. I could do this for already-in-house deposited orders, as well.
Pricing could/would be like:
Standard bumper kit - $275
3" body lift bumper kit - $300
Tube brush guard kit - $125
Radiator skid kit - $200
Oil pan skid kit - $100
These aren't horribly far off of listed bumper prices ($100), but real business insurance is raising my operating cost by $2k/year, so regular bumper prices are going up some when I start taking orders again, anyway.
Thoughts?
I'll post some pictures this weekend of what the kits could look like.
Mike
MDB Standard Bumper/Skid Parts Kits
Moderator: bartonmd
Forum rules
All posts in this section pertain to our vendor:

71 posts
• Page 1 of 4 • 1, 2, 3, 4
- bartonmd
- Moderator
- Posts: 4469
- Joined: Wed Sep 09, 2009 9:35 am
- Location: IN, Indianapolis
- Name: Mike
- Vehicle Year: 2007
- Vehicle: Chevrolet TrailBlazer
- DriveTrain: 4WD w/ G80
- Rank: Offroad Rated
Good deal for someone with some gumption and tools. Even those without a good welder could tack it together then have someone burn it in good.
they've always worked for me.
-

HARDTRAILZ - Moderator
- Posts: 6342
- Joined: Sat Sep 12, 2009 1:49 am
- Location: IN, Batesville
- Name: Kyle
- Vehicle Year: 2006
- Vehicle: Chevrolet TrailBlazer
- DriveTrain: 4WD w/ Aftermarket Locker
- Rank: Extreme Offroader
If you leave a small gap between parts, or grind a small bevel on the edges, even a $100 HF MIG welder could do everything but the shackle mounts. For those, yes, tack them in where you want them, and take it to your local welding shop, and pay them the $20 minimum charge to burn them in.
Mike
Mike
- bartonmd
- Moderator
- Posts: 4469
- Joined: Wed Sep 09, 2009 9:35 am
- Location: IN, Indianapolis
- Name: Mike
- Vehicle Year: 2007
- Vehicle: Chevrolet TrailBlazer
- DriveTrain: 4WD w/ G80
- Rank: Offroad Rated
I'd be totally interested. It makes the front bumper much more affordable Imo. I'll have to have someone help me with the welding and such but I could see my self ordering a bumper when the cash is around(next year....). Do you have shipping costs? What about sliders? That would be another thing I'd be interested in.
The FIRST Solid Axle Swapped Trailblazer in Presque Isle County MI
My Build
My Build
The Roadie wrote:Research, plan your mods, fund the plan, then GO DO THEM. THEN WHEEL IT.
-

Cable810 - Veteran
- Posts: 1989
- Joined: Thu Feb 09, 2012 6:43 pm
- Location: MI, Rogers City
- Name: Caleb
- Vehicle Year: 2002
- Vehicle: Chevrolet TrailBlazer
- DriveTrain: 4WD w/ Aftermarket Locker
- Rank: Offroad Rated
Shipping would be about like regular bumper shipping. $120-$140 for bumper/skids east of the MS, ~$150 between the MS and the Rockies, $160-$200 out to the left coast, depending on how remote a person lives.
Sliders are a different story, really. If you just want lengths of tube, with the outer tube bent, and you cut and notch all of the smaller tubes and weld them in, sure. If you want everything cut/notched, that's 90% of the work in a set of sliders, and that takes quite a bit of time, so no. The reality is that the TG sliders are cheap and easy to get, so unless you want something special, or are local to me, they're probably the way to go. For you, in MI, you'd come down here and pick up the bumper/skids anyway, so slider tube with just the outers bent, and nothing else done may be fine for you.
Mike
- bartonmd
- Moderator
- Posts: 4469
- Joined: Wed Sep 09, 2009 9:35 am
- Location: IN, Indianapolis
- Name: Mike
- Vehicle Year: 2007
- Vehicle: Chevrolet TrailBlazer
- DriveTrain: 4WD w/ G80
- Rank: Offroad Rated
The Trailgear sliders are definitely the way to go. I work for a company that specializes in industrial plumbing, piping, and valve automation. Even at cost, the tubing and then all the work, is nowhere near the price point of the TG's.Tubing alone was going to run around 135-140$ for two sticks of 20'
I DON'T care what my GMT360 was designed to do, I care about what it can do!
-

Conner299 - Addict
- Posts: 706
- Joined: Mon Oct 29, 2012 8:47 am
- Location: KY, Louisville
- Name: Ed
- Vehicle Year: 2005
- Vehicle: Chevrolet TrailBlazer
- DriveTrain: 4WD
- Rank: Trail Ready
Conner299 wrote:The Trailgear sliders are definitely the way to go. I work for a company that specializes in industrial plumbing, piping, and valve automation. Even at cost, the tubing and then all the work, is nowhere near the price point of the TG's.Tubing alone was going to run around 135-140$ for two sticks of 20'
Yeah... Hard to beat China-made steel, machine-welded together in China... Having said that, a competing company did some testing, and it would seem that US-made HREW is stronger than China-made HREW-DOM tube. I normally use US-made HREW for sliders and brush guards, and it runs me about $50/stick after tax, through work.
Mike
- bartonmd
- Moderator
- Posts: 4469
- Joined: Wed Sep 09, 2009 9:35 am
- Location: IN, Indianapolis
- Name: Mike
- Vehicle Year: 2007
- Vehicle: Chevrolet TrailBlazer
- DriveTrain: 4WD w/ G80
- Rank: Offroad Rated
Wow this is pretty good if I decide that I want to just get your standard bumper.
-

djthumper - Moderator
- Posts: 2702
- Joined: Wed Mar 24, 2010 6:04 pm
- Location: NV, Las Vegas
- Name: Larry
- Vehicle Year: 2006
- Vehicle: Chevrolet TrailBlazer
- DriveTrain: 4WD
- Rank: Offroad Rated
I agree with mike on the china made TG slider DOM steel. Mine are soft!
-

chevycrew - Veteran
- Posts: 1088
- Joined: Tue Mar 08, 2011 2:42 pm
- Location: UT, Salt Lake City
- Name: Steve
- Vehicle Year: 2002
- Vehicle: Chevrolet TrailBlazer
- DriveTrain: 4WD
- Rank: Trail Ready
chevycrew wrote:I agree with mike on the china made TG slider DOM steel. Mine are soft!
Same. I dented one of the legs on mine.
11 Silverado LTZ - 6.2L/6l80, 2/3 drop, self tuned
85 Hilux - 3RZ, dual cases, caged, 40s, chromo everything
02 TrailBlazer LTZ - 35s, lockers, balls - Gone but not forgotten - Build
85 Hilux - 3RZ, dual cases, caged, 40s, chromo everything
02 TrailBlazer LTZ - 35s, lockers, balls - Gone but not forgotten - Build
-

fishsticks - Moderator
- Posts: 4356
- Joined: Thu Apr 01, 2010 11:30 pm
- Location: WA, Vancouver
- Name: Donny
- Vehicle Year: Other
- Vehicle: Other Vehicle
- DriveTrain: 4WD w/ Aftermarket Locker
- Rank: Extreme Offroader
I agree with Mike, as well. The American tubing can't be beat for quality. But, you will pay for it. One way, or another.
I DON'T care what my GMT360 was designed to do, I care about what it can do!
-
Conner299 - Addict
- Posts: 706
- Joined: Mon Oct 29, 2012 8:47 am
- Location: KY, Louisville
- Name: Ed
- Vehicle Year: 2005
- Vehicle: Chevrolet TrailBlazer
- DriveTrain: 4WD
- Rank: Trail Ready
I'll be interested, would all the bumper parts be cut to length and size so it's just a tack n weld ( besides corner wings) or would we still need a cutter to make trimmings?
Would the fog light option you offer for the bumpers still be an option in these kits?
I'm having a tire carrier custom built right now so I couldn't order right away, but definitely interested and seeing some kit pics.
Would the fog light option you offer for the bumpers still be an option in these kits?
I'm having a tire carrier custom built right now so I couldn't order right away, but definitely interested and seeing some kit pics.
-

Opeth - Addict
- Posts: 846
- Joined: Tue Oct 05, 2010 4:46 pm
- Location: NY, Solvay
- Name: Cody
- Vehicle Year: 2006
- Vehicle: Chevrolet TrailBlazer
- DriveTrain: 4WD
- Rank: Trail Ready
Opeth wrote:I'll be interested, would all the bumper parts be cut to length and size so it's just a tack n weld ( besides corner wings) or would we still need a cutter to make trimmings?
Would the fog light option you offer for the bumpers still be an option in these kits?
I'm having a tire carrier custom built right now so I couldn't order right away, but definitely interested and seeing some kit pics.
The main pieces would be already cut/bent with the holes in them, like the center piece, the top frame mount, the shackle mounts, the under-headlight pieces, the main 'wing' pieces. However, the 1" trim strips around the wings would be long 1" wide strips that you'd cut to length. It's something that can easily be done with a cutoff wheel or maybe 2, on the grinder that you have, anyway.
Mike
- bartonmd
- Moderator
- Posts: 4469
- Joined: Wed Sep 09, 2009 9:35 am
- Location: IN, Indianapolis
- Name: Mike
- Vehicle Year: 2007
- Vehicle: Chevrolet TrailBlazer
- DriveTrain: 4WD w/ G80
- Rank: Offroad Rated
Mike, I think this is going to turn into one of your hotter deals really. Sometimes all that is holding a guy back from making his own is exactly what your going to be providing in this format.
With the option of a little customization done at time of the build, as well as quality being shipped to the assembler, most will be hard pressed to not look at this option if they know of someone who is willing to do the welding for them.
Kudos for finding a way to relieve some of your workload and still fill order quantity.
- Diacom
- Addict
- Posts: 882
- Joined: Fri Jul 23, 2010 9:08 pm
- Location: NV, Yerington
- Name: Noel
- Vehicle Year: 2003
- Vehicle: Chevrolet TrailBlazer
- DriveTrain: 4WD w/ Aftermarket Locker
Thanks! I really do think that it should be a hit. Seems that lots of people have or have access to a welder, and like doing that kind of stuff, but don't know where to start to make a bumper.
Mike
Mike
- bartonmd
- Moderator
- Posts: 4469
- Joined: Wed Sep 09, 2009 9:35 am
- Location: IN, Indianapolis
- Name: Mike
- Vehicle Year: 2007
- Vehicle: Chevrolet TrailBlazer
- DriveTrain: 4WD w/ G80
- Rank: Offroad Rated
Kit picture:
- Center section
- (2) under-headlight pieces
- (2) wings
- Top frame mount
- (2) shackle mounts
- More than enough 1" strip for the wing trim
- More than enough 1.38" strip for the blended front of the wings
- Extra material (for whatever it may be needed to replace. We won't call it "for mistakes")
- bartonmd
- Moderator
- Posts: 4469
- Joined: Wed Sep 09, 2009 9:35 am
- Location: IN, Indianapolis
- Name: Mike
- Vehicle Year: 2007
- Vehicle: Chevrolet TrailBlazer
- DriveTrain: 4WD w/ G80
- Rank: Offroad Rated
This is all there is to putting one of these together:
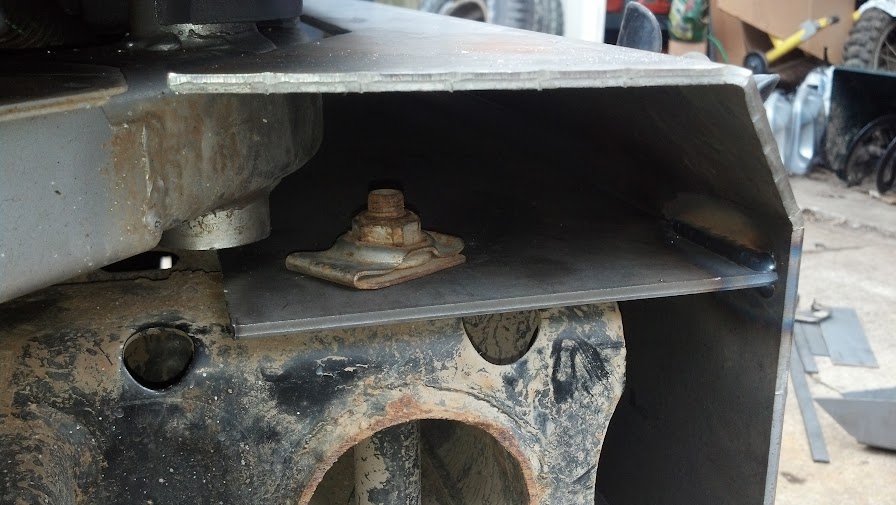
Grind the top of the frame flat
It'll go on easier after it's all welded up if you use a 1/16" shim (which I guess I can include)
Put the upper mount on top of the shims and line up the holes
Put on the center section
Pull everything as far forward as it'll go
tighten the bolts
Put a ~2" weld on top and bottom of the upper mount, at the main center section
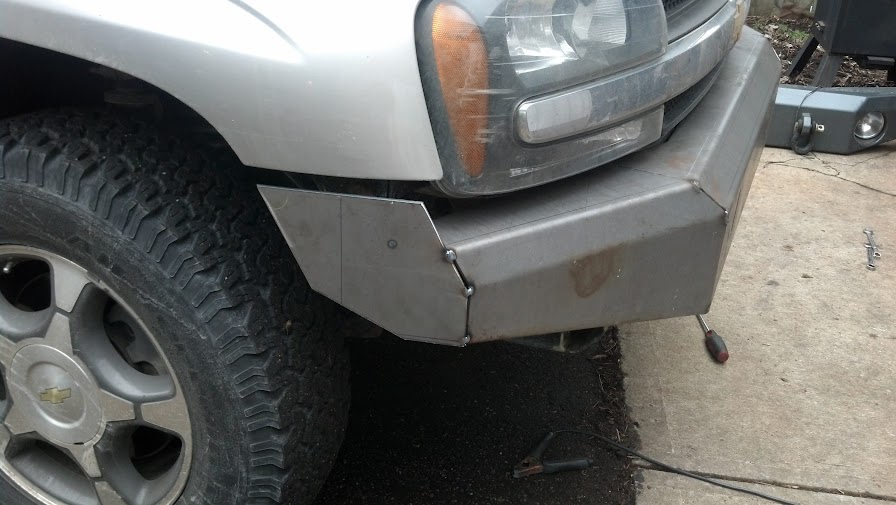
Put on the under-headlight pieces. Line up the front corner of the top and the front, and put a tack at top and bottom of the front (vertical) part. (unlike the photo, don't tack the top corner)
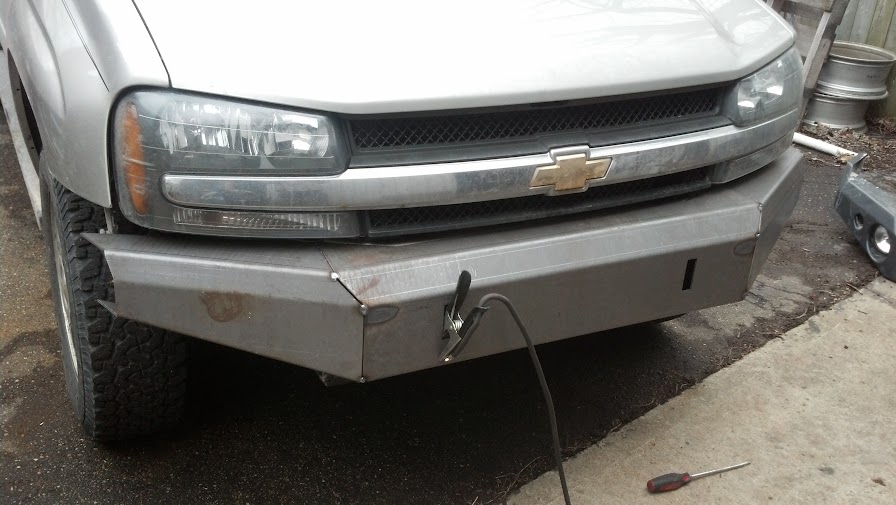
2 tacks on the vertical forward portion of the wing, then fine-tune your angles to your liking, and tack the upper corners as shown. There needs to be 3/4" or more of space between the wing and fender, for body-to-frame movement, or it'll rub the paint off or possibly bend your fenders. Even at 3/4", the wing will still touch the fender when you flex out the wheel travel.
(If the fit-up puts the wing back into the wheel well, mark where you want to cut it off while on the vehicle, then cut it off when on the bench)
Take off the bumper and put it on the bench.
Since the angles aren't always perfectly bent to match, sometimes you'll have to use a C-clamp on the top, to get the edges lined up before you tack the back edge. DO NOT DO THIS ON THE BOTTOM, because the bottom is also the mount, and it'll screw up how the mounts fit. Nobody will see the bottom, anyway.
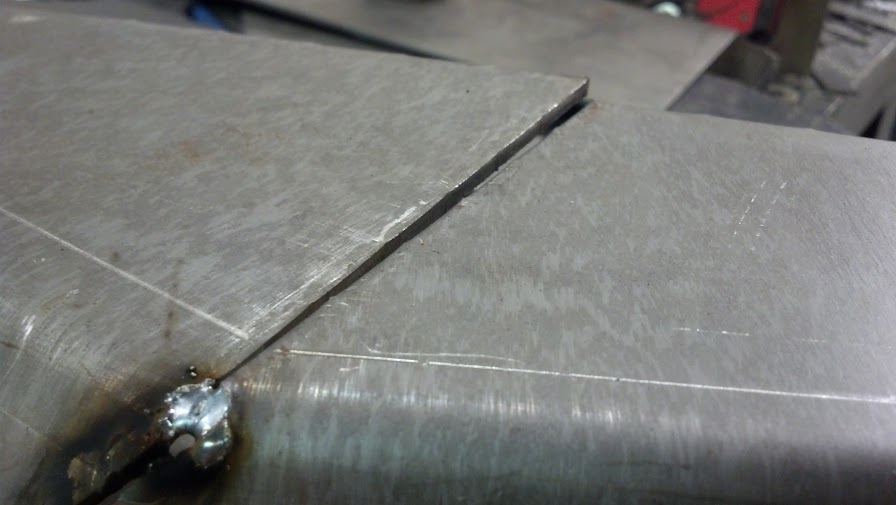
Weld up everything but the top corner of the under-headlight piece, at the wing. This is where the blended piece goes.
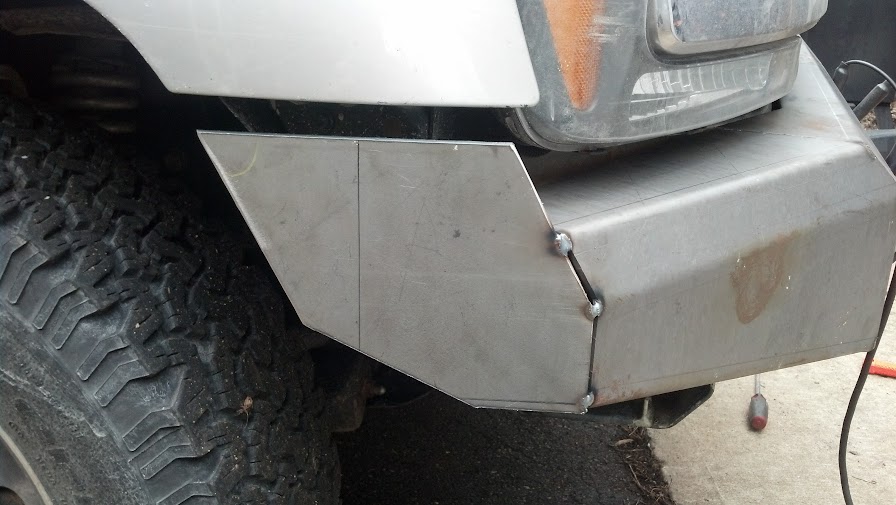
Use the 1.38" strip for the front blended pieces, and the 1" strips for the tops/backs/bottoms of the wings, as shown.
Weld inside and out of all the wing pieces. Since there's a bend, I find that I need to put 2 beads next to one another where the 1.38" piece meets the under-headlight bent portion of the bumper, so that it grinds smooth.
Grind it all smooth on the outside.
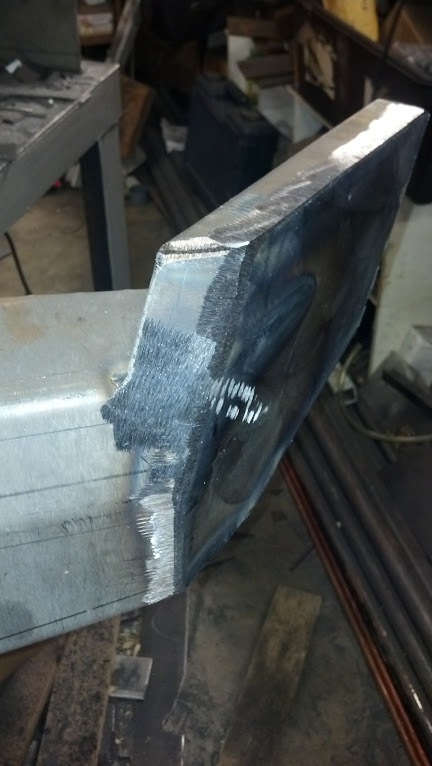
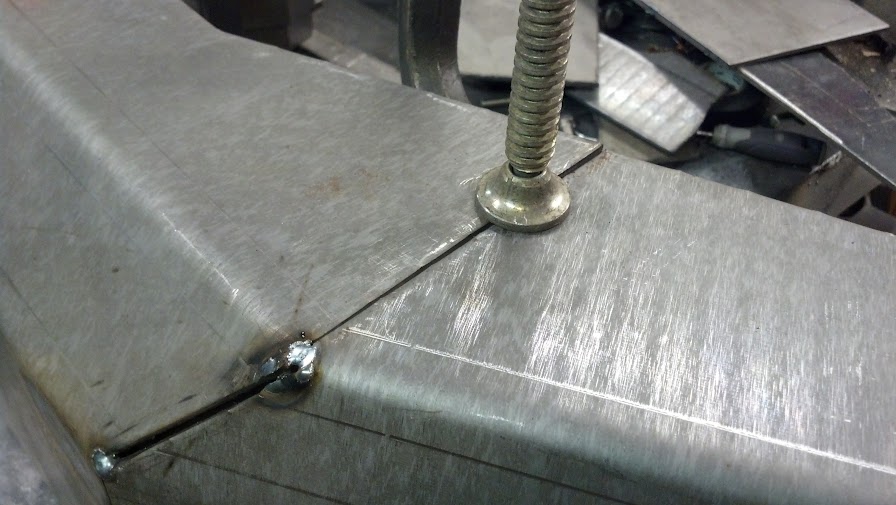
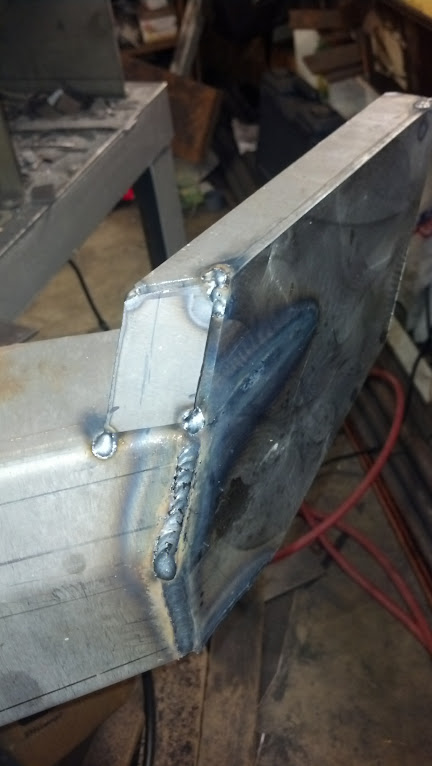
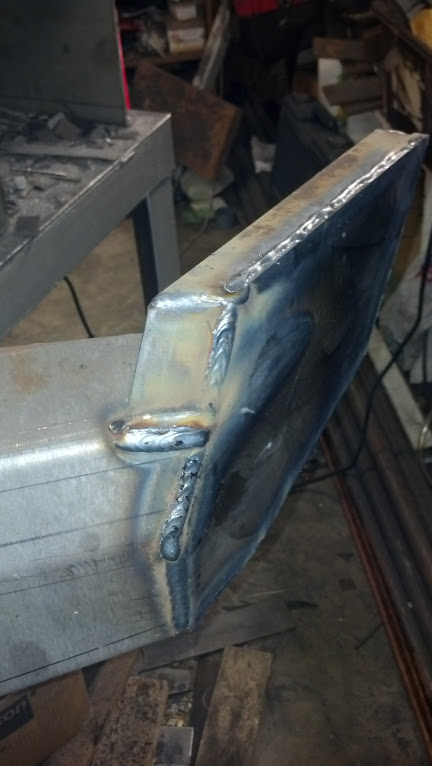
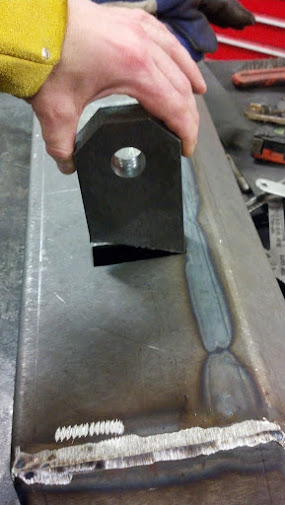
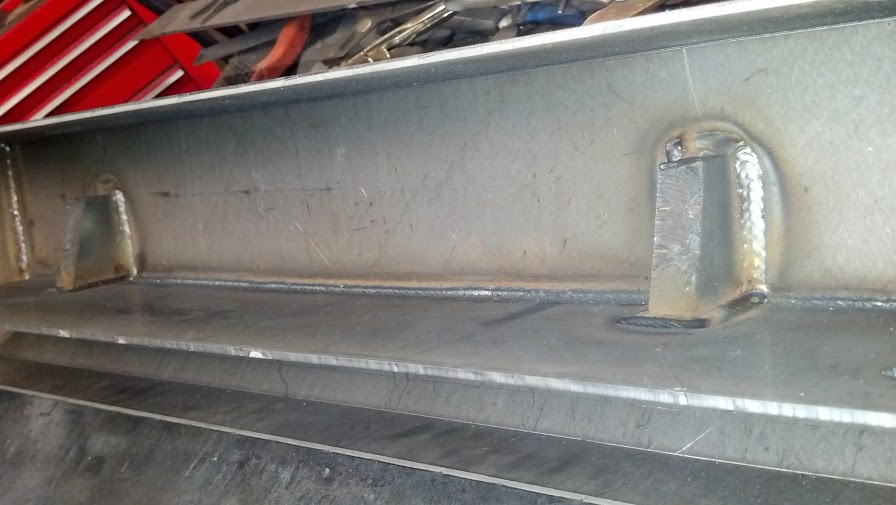
Shackle mounts, They should be inserted with the long side "up" against the top mount. They stick out 2.5" from the face of the bumper. I tack one corner at the right height, then make sure they're square with the surface, then tack all 4 corners, then seam weld the outside.
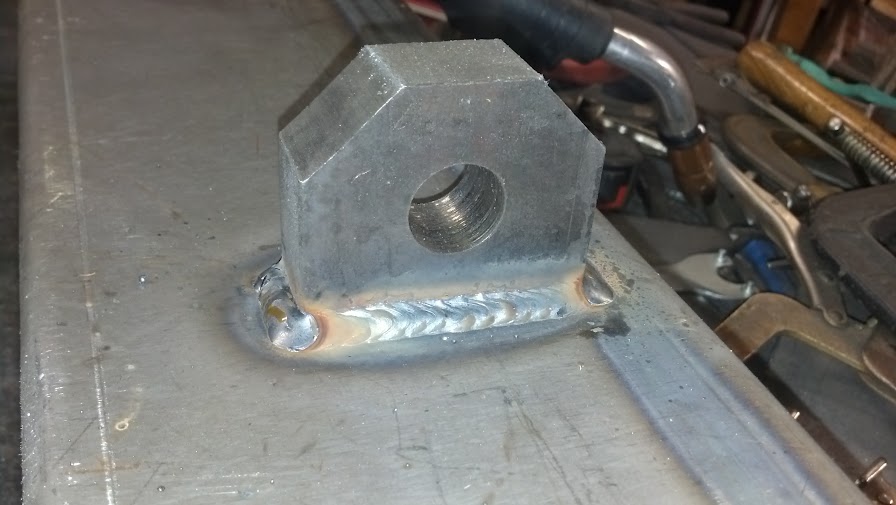
On the back side, I weld everything once at the settings that I weld the rest of the bumper at.
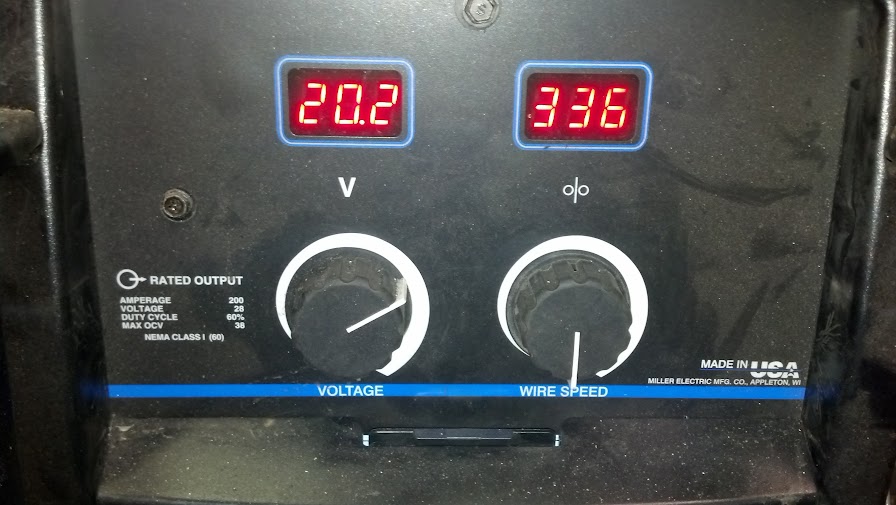
Then I weld the second bead around everything, toward the flat material, on the same settings as above.
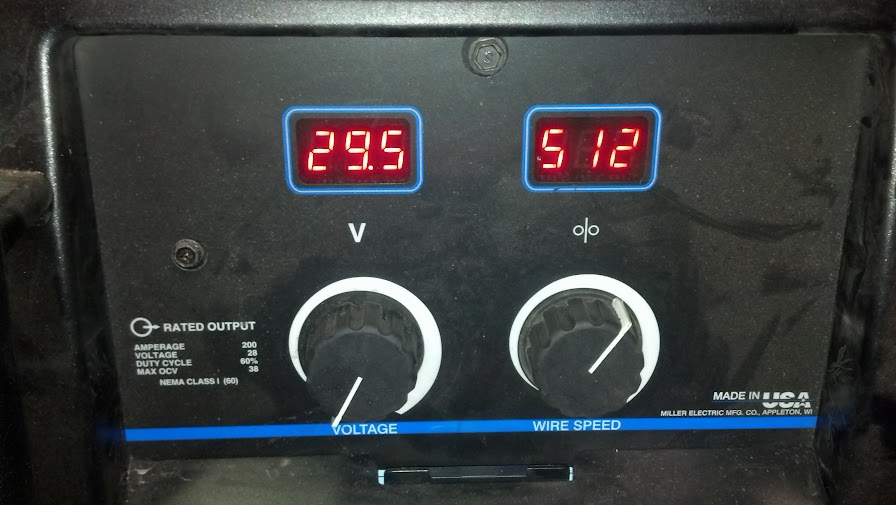
I then crank it the fack up and burn the third pass in. However, if you do the last one at whatever your welder can do, and do it close enough to the same time as the others, it'll act as pre-heat for the shackle mount, and will penetrate fine.
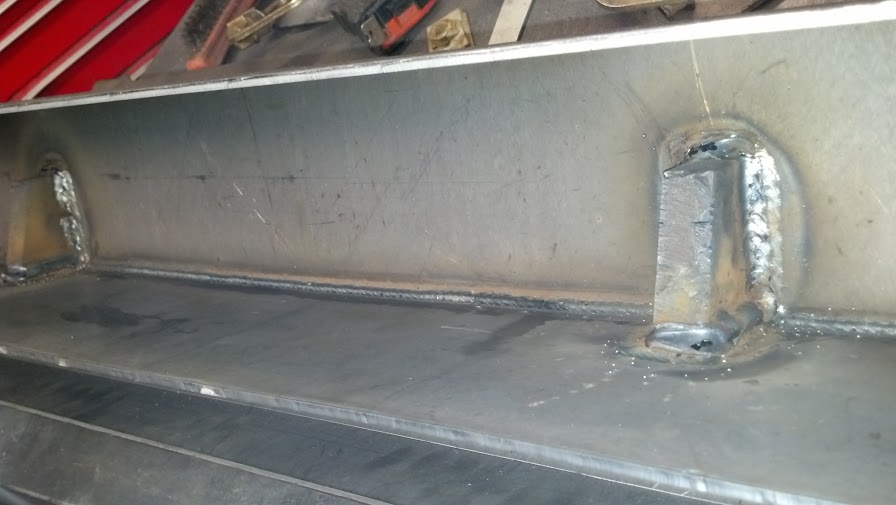
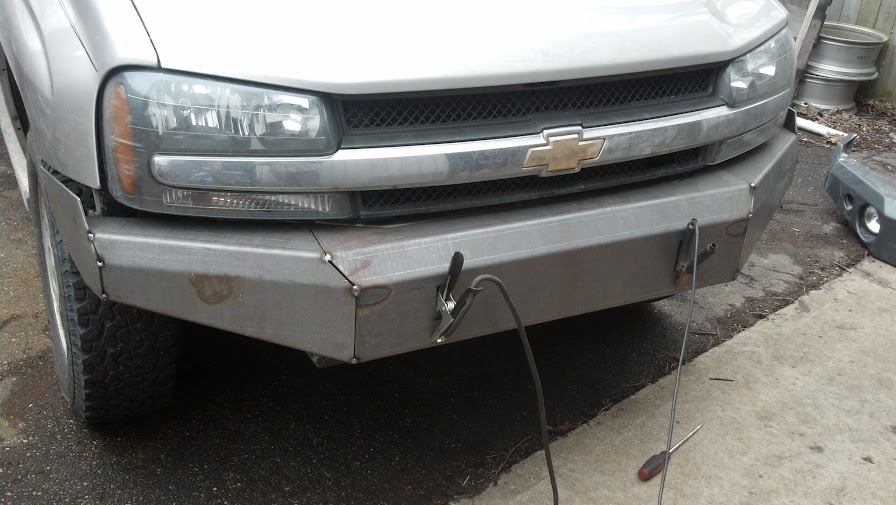
All that's left after that is running over the whole thing with a flap disk to smooth it out.
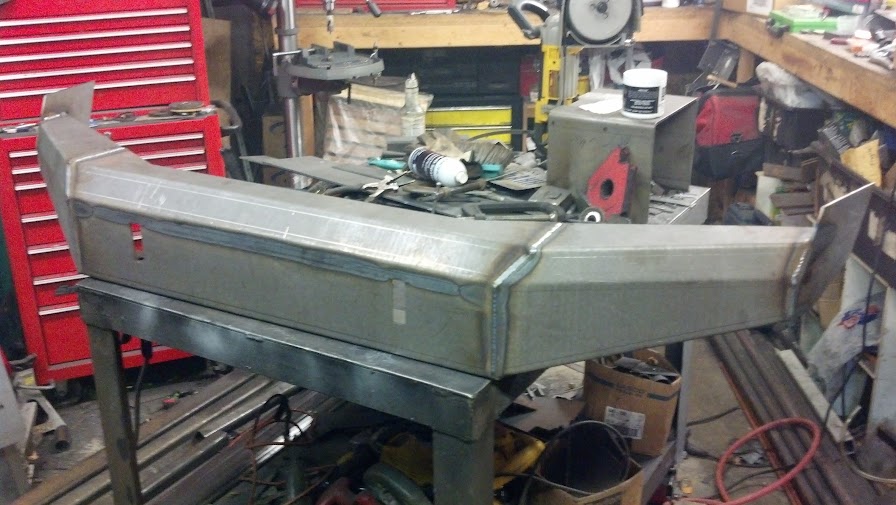
From the "kit" form to right there, I have about 4-5 hours in this right now.
Mike
Grind the top of the frame flat
It'll go on easier after it's all welded up if you use a 1/16" shim (which I guess I can include)
Put the upper mount on top of the shims and line up the holes
Put on the center section
Pull everything as far forward as it'll go
tighten the bolts
Put a ~2" weld on top and bottom of the upper mount, at the main center section
Put on the under-headlight pieces. Line up the front corner of the top and the front, and put a tack at top and bottom of the front (vertical) part. (unlike the photo, don't tack the top corner)
2 tacks on the vertical forward portion of the wing, then fine-tune your angles to your liking, and tack the upper corners as shown. There needs to be 3/4" or more of space between the wing and fender, for body-to-frame movement, or it'll rub the paint off or possibly bend your fenders. Even at 3/4", the wing will still touch the fender when you flex out the wheel travel.
(If the fit-up puts the wing back into the wheel well, mark where you want to cut it off while on the vehicle, then cut it off when on the bench)
Take off the bumper and put it on the bench.
Since the angles aren't always perfectly bent to match, sometimes you'll have to use a C-clamp on the top, to get the edges lined up before you tack the back edge. DO NOT DO THIS ON THE BOTTOM, because the bottom is also the mount, and it'll screw up how the mounts fit. Nobody will see the bottom, anyway.
Weld up everything but the top corner of the under-headlight piece, at the wing. This is where the blended piece goes.
Use the 1.38" strip for the front blended pieces, and the 1" strips for the tops/backs/bottoms of the wings, as shown.
Weld inside and out of all the wing pieces. Since there's a bend, I find that I need to put 2 beads next to one another where the 1.38" piece meets the under-headlight bent portion of the bumper, so that it grinds smooth.
Grind it all smooth on the outside.
Shackle mounts, They should be inserted with the long side "up" against the top mount. They stick out 2.5" from the face of the bumper. I tack one corner at the right height, then make sure they're square with the surface, then tack all 4 corners, then seam weld the outside.
On the back side, I weld everything once at the settings that I weld the rest of the bumper at.
Then I weld the second bead around everything, toward the flat material, on the same settings as above.
I then crank it the fack up and burn the third pass in. However, if you do the last one at whatever your welder can do, and do it close enough to the same time as the others, it'll act as pre-heat for the shackle mount, and will penetrate fine.
All that's left after that is running over the whole thing with a flap disk to smooth it out.
From the "kit" form to right there, I have about 4-5 hours in this right now.
Mike
- bartonmd
- Moderator
- Posts: 4469
- Joined: Wed Sep 09, 2009 9:35 am
- Location: IN, Indianapolis
- Name: Mike
- Vehicle Year: 2007
- Vehicle: Chevrolet TrailBlazer
- DriveTrain: 4WD w/ G80
- Rank: Offroad Rated
All looks good, now... how about the brush guard and the skids..
2003 LTZ-3" suspension-3"body-Massive rear upper/lower-pan hard bar-Bilstien HD struts-Skyjacker 7000 shocks-Micky Thompson 15"W/-35-12.5-15 STT-Barton front bumper, oil and radiator skids-turbo mufler-And then theres the audio
-

jhmeg2 - Member
- Posts: 68
- Joined: Thu Aug 16, 2012 12:55 pm
- Location: Wi. Hancock
- Name: Patrick
- Vehicle Year: 2003
- Vehicle: Chevrolet TrailBlazer
- DriveTrain: 4WD w/ G80
The skids are extremely self-explanatory, and you can tell what to do with the tube by looking at a finished brush guard. Cut, notch, weld.
Mike
Mike
- bartonmd
- Moderator
- Posts: 4469
- Joined: Wed Sep 09, 2009 9:35 am
- Location: IN, Indianapolis
- Name: Mike
- Vehicle Year: 2007
- Vehicle: Chevrolet TrailBlazer
- DriveTrain: 4WD w/ G80
- Rank: Offroad Rated
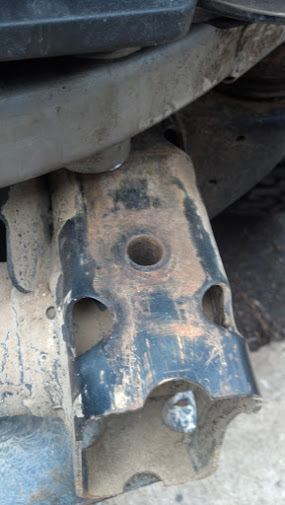
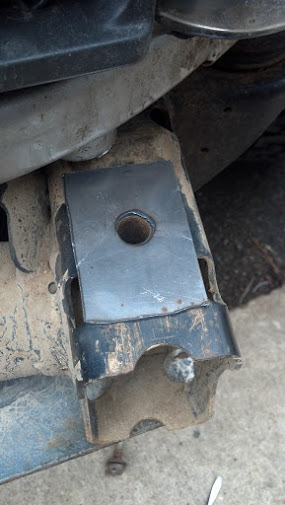
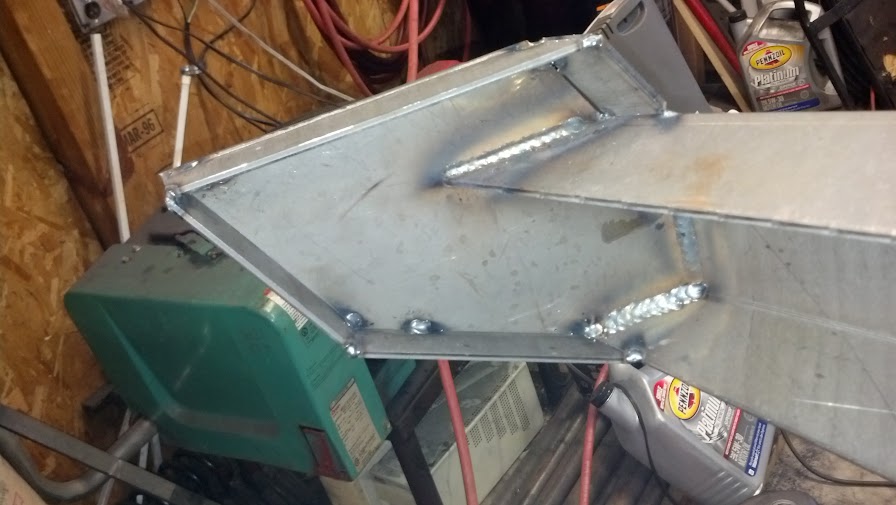
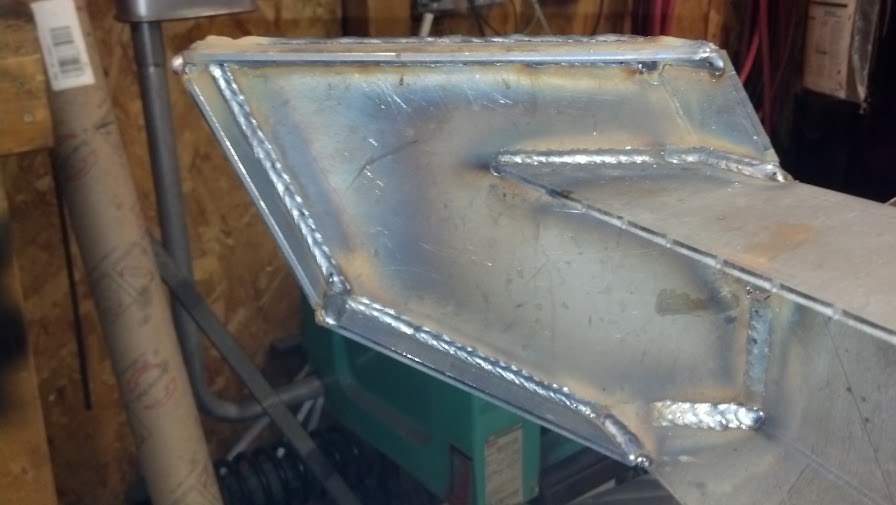
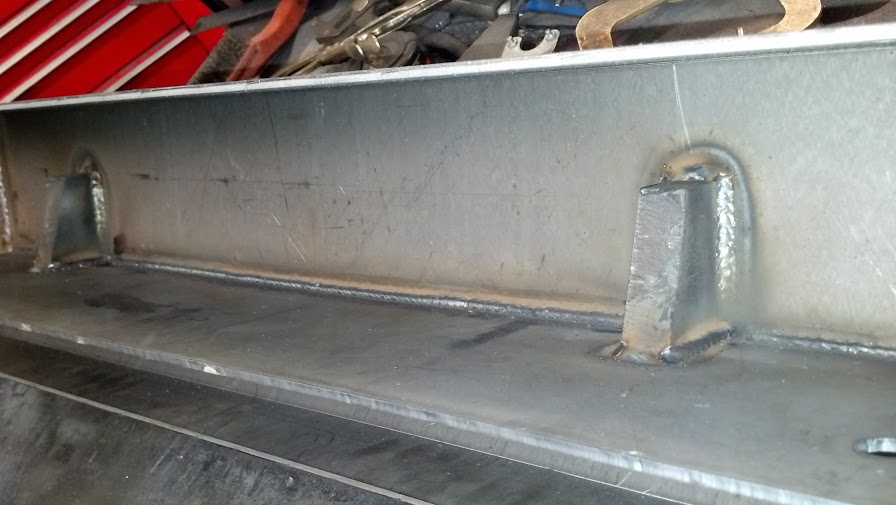
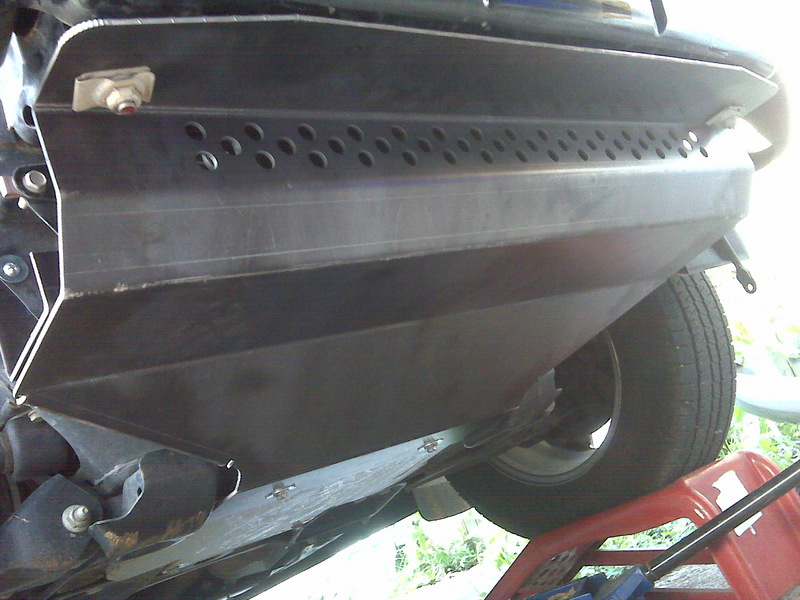
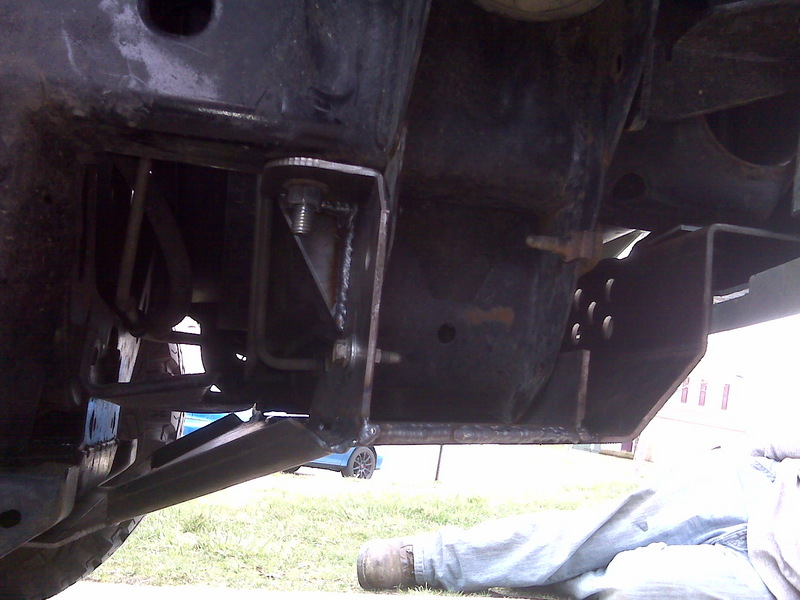
These two pictures will tell you what to do with the radiator skid:
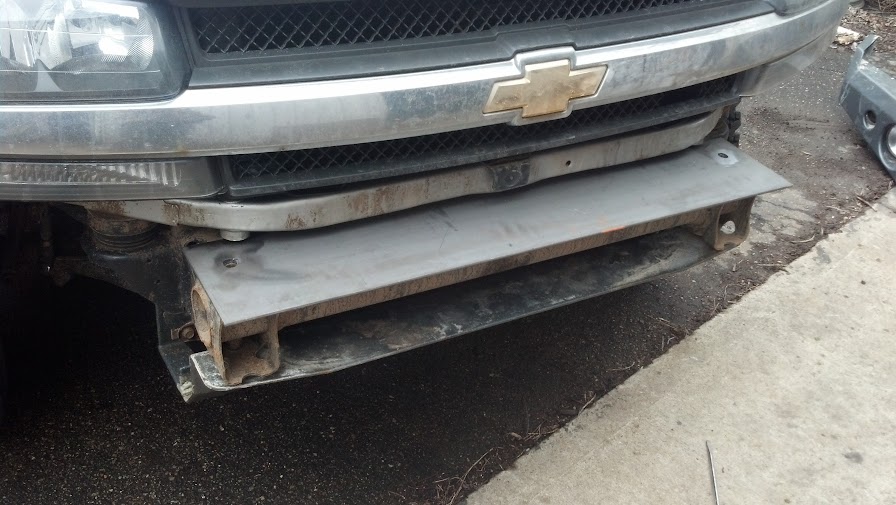
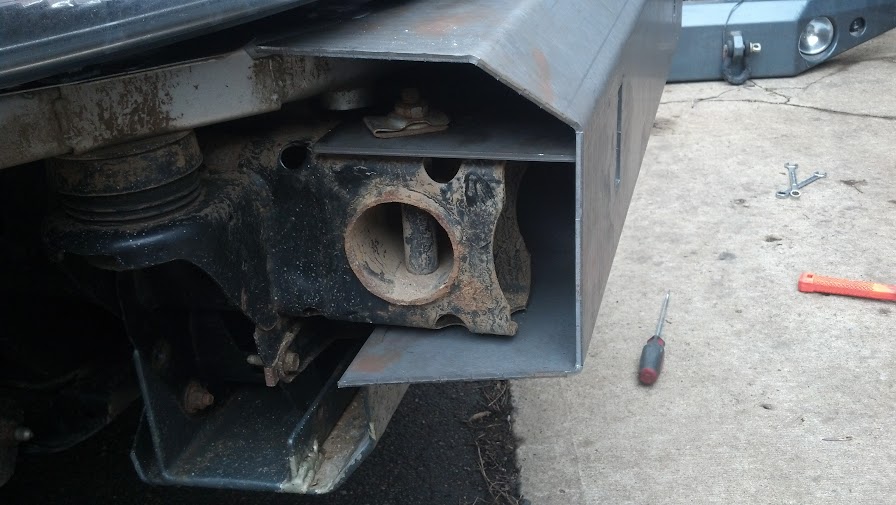
This one will tell you what to do with the brush guard:

Mike
This one will tell you what to do with the brush guard:
Mike
- bartonmd
- Moderator
- Posts: 4469
- Joined: Wed Sep 09, 2009 9:35 am
- Location: IN, Indianapolis
- Name: Mike
- Vehicle Year: 2007
- Vehicle: Chevrolet TrailBlazer
- DriveTrain: 4WD w/ G80
- Rank: Offroad Rated
71 posts
• Page 1 of 4 • 1, 2, 3, 4