Offroad Trailblazers and Envoys

JD's Front Bumper

Any special projects involving a decent amount of fab work (bumpers, sliders, roof racks, etc)

by Trail X » Mon Sep 07, 2009 11:28 pm

"why did you customize the KMA bumper?"

A few reasons:

  • They don't offer powdercoating
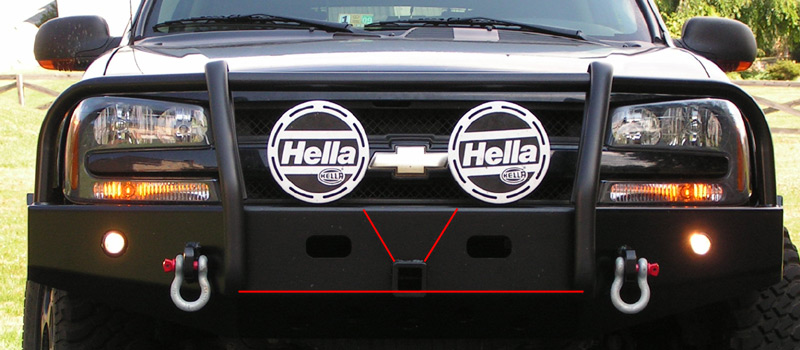
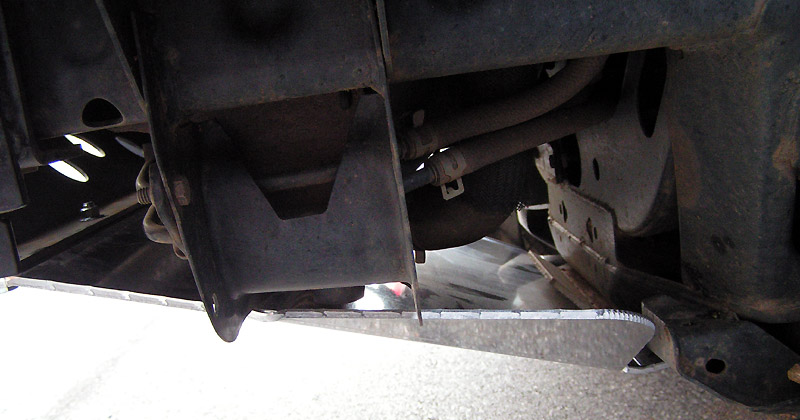
  • Have you seen pictures of their normal stock bumpers after being installed? They stick off the side of the vehicle by at least 3" on each side, and they stick into the wheel well another 1.5" (see below picture).
  • Have you seen the brush guards they make? I don't want to make fun of anyone's vehicles, but their designs do not match the vehicle at all. (sure, functionality comes first, but aesthetics play a role when you're shelling out bags of money)
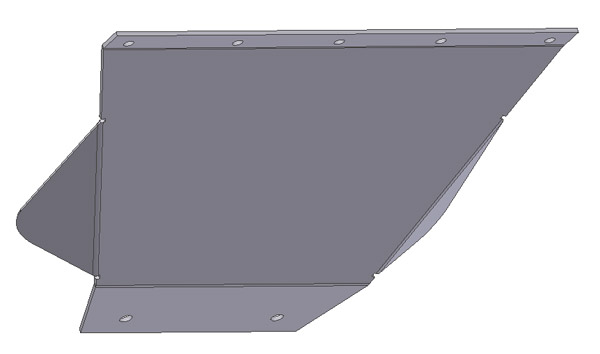
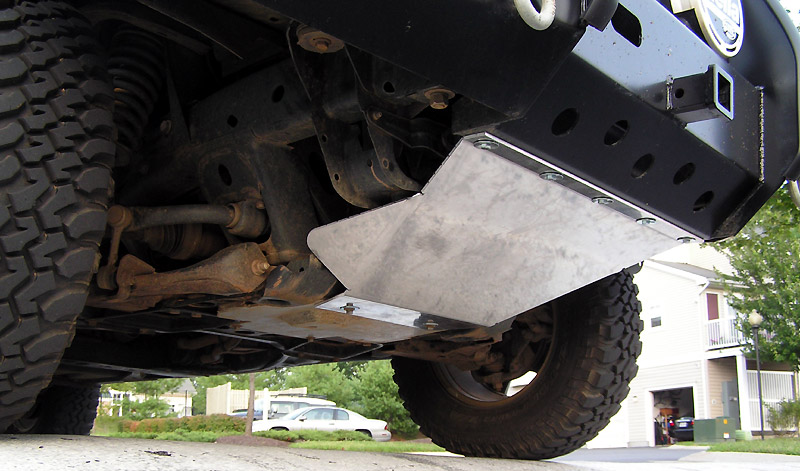
  • KMA doesn't offer a skidplate to work with their bumper.
  • Since a fabricator had to weld the bumper mounting brackets on anyways, it naturally made sense to have him to a little more work to "finish" the bumper.
As I said before, KMA produced a great starting point. I just felt like it needed a little more refinement to make it perfect.

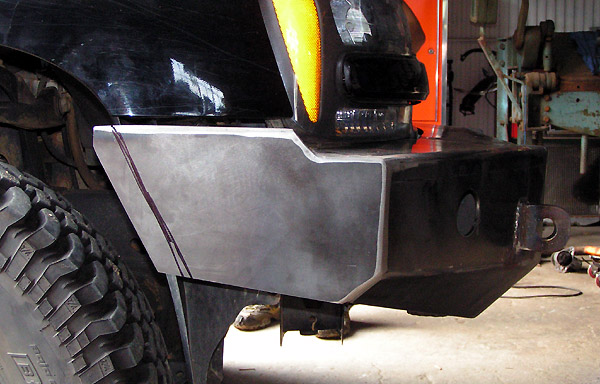
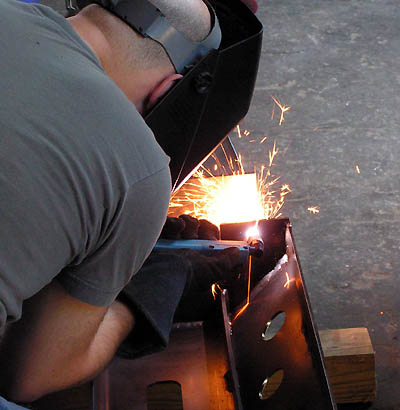
An example of one of the many tweaks we did:
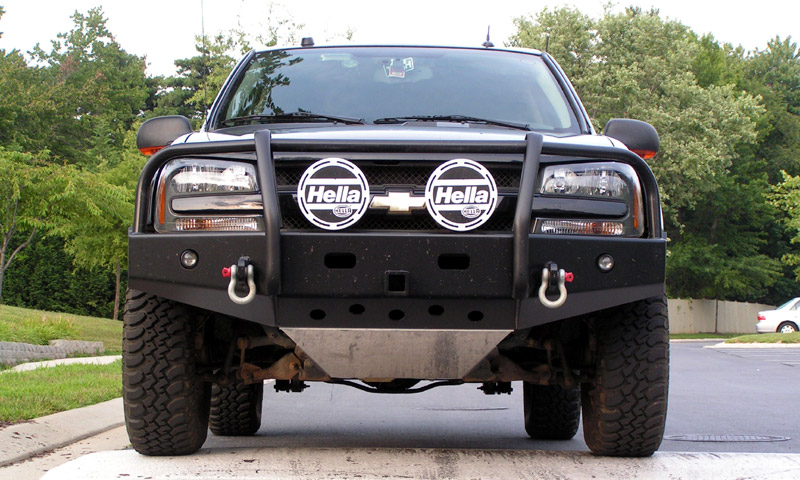
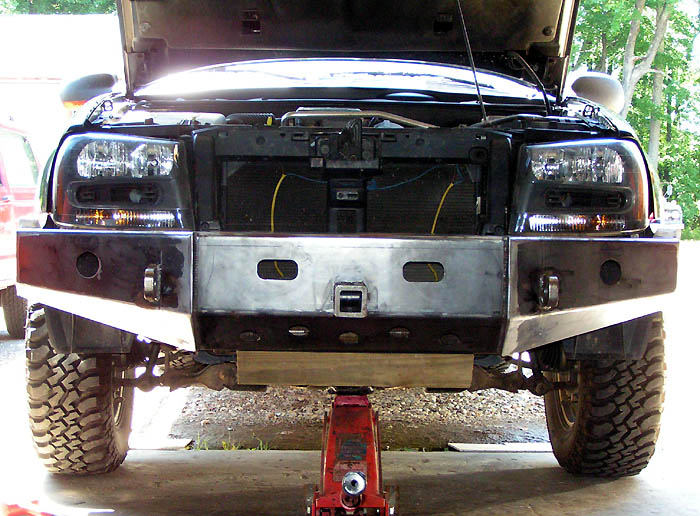
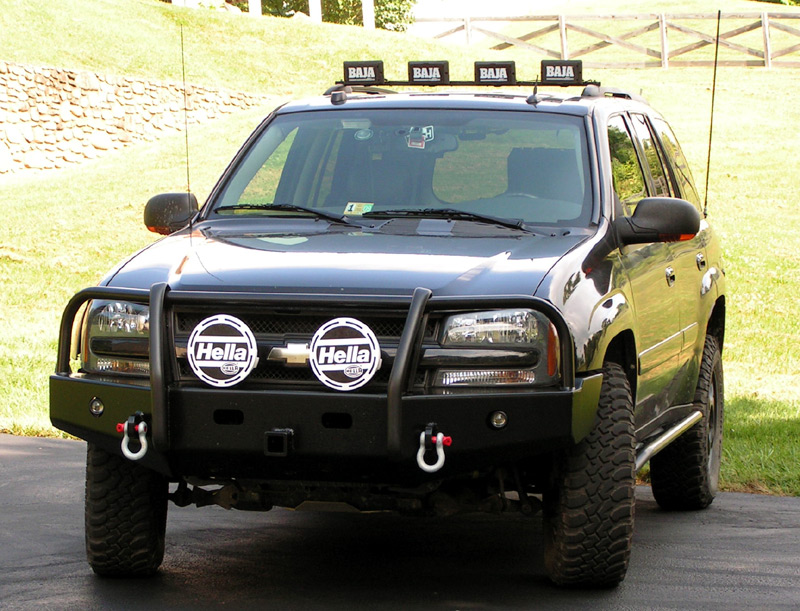
Image

Final product:

Image

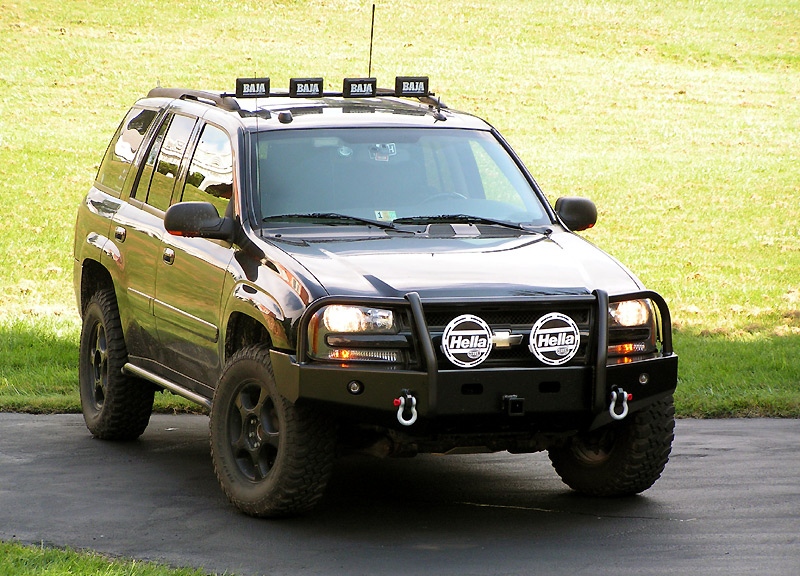
The bumper project that I started back in late March was finally installed!

Image

The bumper started as a Kennesaw Mtn bumper... but with some tweaks, and a lot of custom work. Anyone recognize the resemblance to my old WAAG?

Image

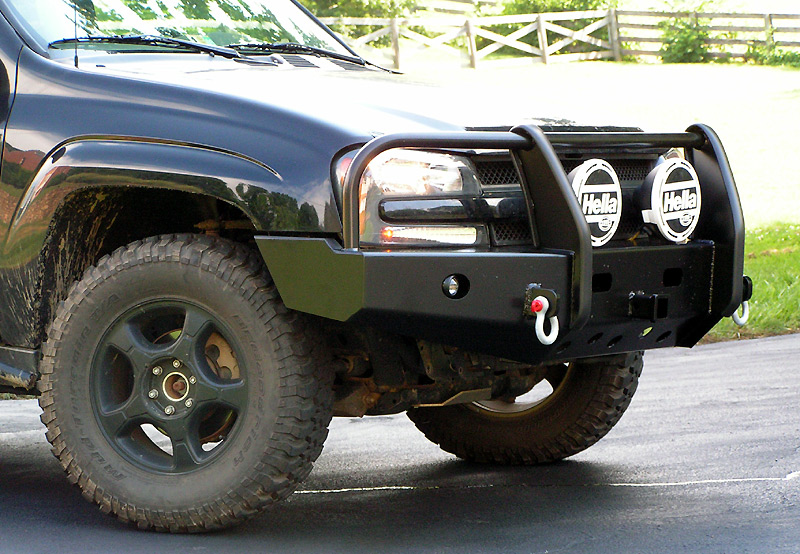
The push bars were pushed only 2" out from the normal mounting location, and worked into the bumper design.

Image

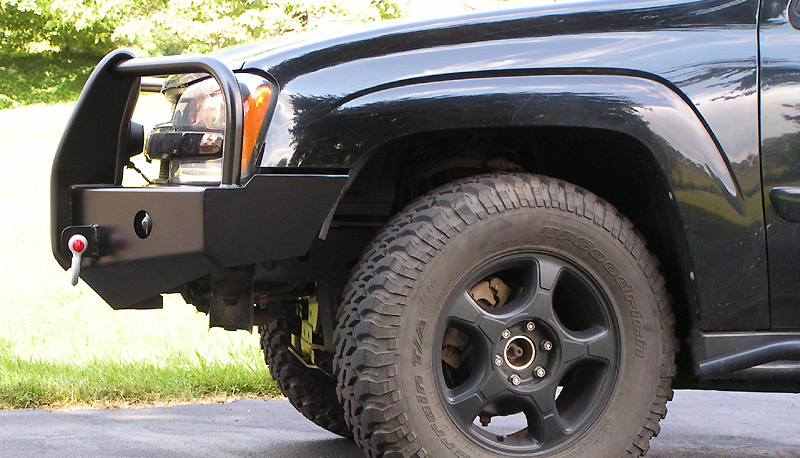
Notice... no fender overhang, as is prevalent in every other Kennesaw bumper I've seen.

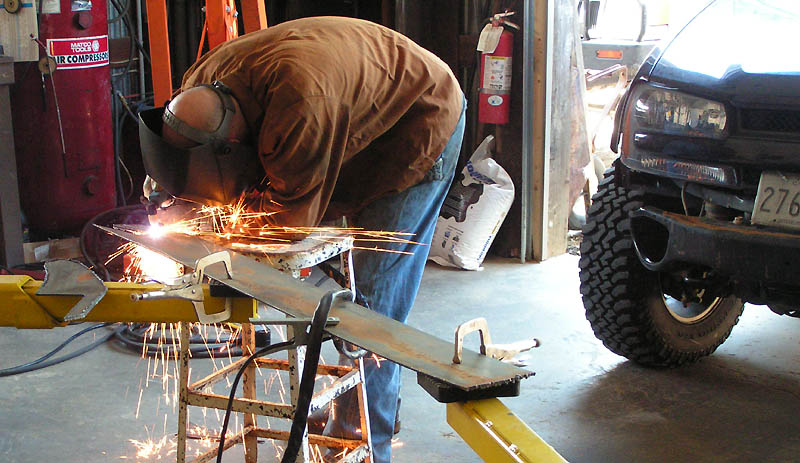
All of the custom work was completed by my fabricator, Eric. He's the same guy that made my rock sliders viewtopic.php?f=9&t=15.

Image

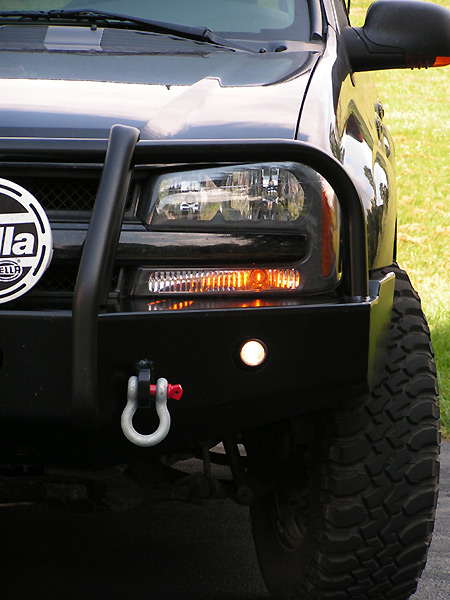
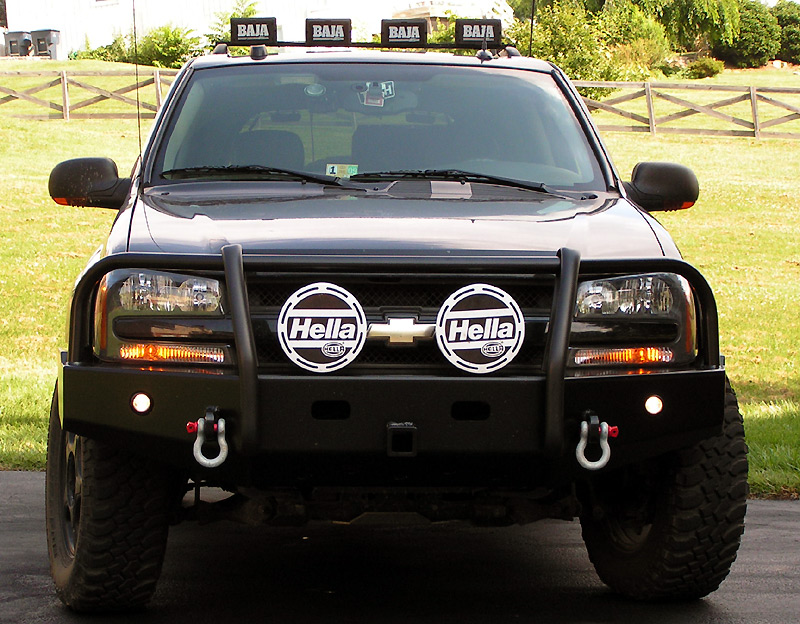
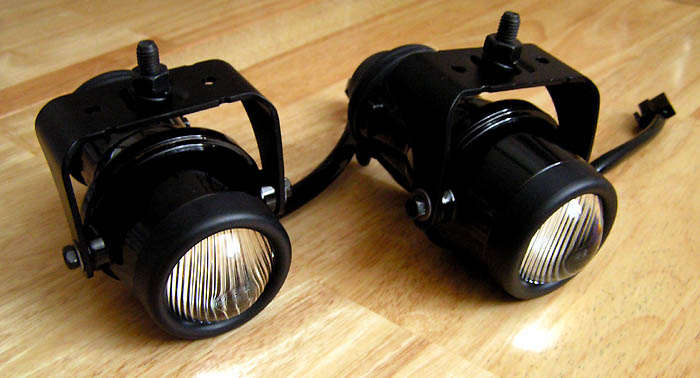
After much review and debate, I decided to mount up new fog lights. Part of me liked the stock fogs, but their performance was just awful. So I found the perfect lights, with the perfect beam. Not surprisingly they were another set of Hellas.

Hella Micro DEs:

Image

Figured I'd give you some background of the build over the past couple months:

Image

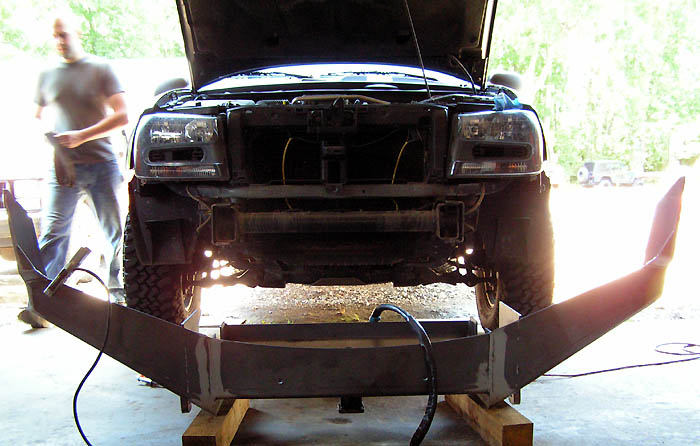
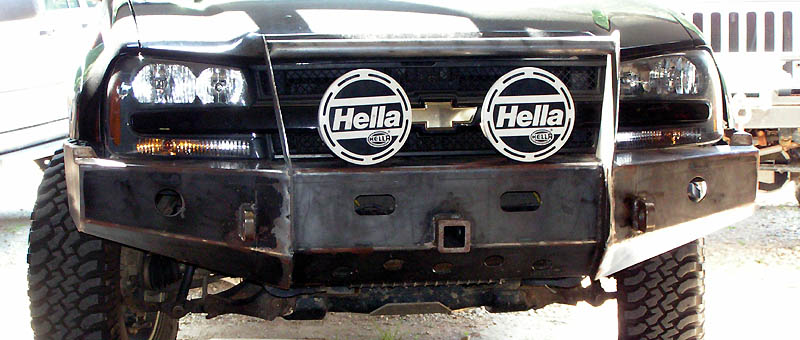
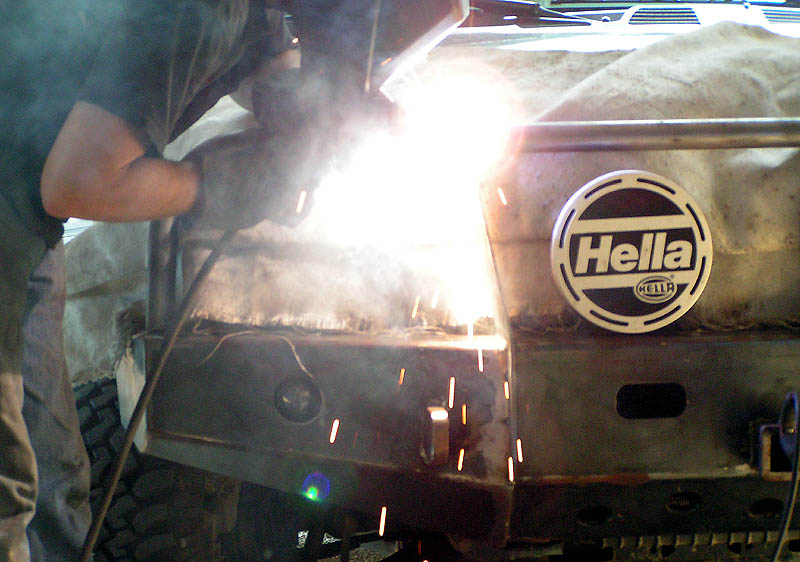
The bumper came with some deficiencies... which were addressed by Eric and his masterful welding, grinding, and plasma cutter skills:

Image

Test fitment with some of the adjustments:

Image

Working on the grille guard (fabbed from scratch):

Image

Center section tacked in for measurement and debate:

Image

Welding in the headlight hoops. They were welded while on the vehicle in order to get them perfectly (in my eyes) matched and aligned:

Image

Here's the final test fitment of everything before sending it off to the powdercoaters (even if I had wanted a powdercoat from Kennesaw, they don't offer it):

Image

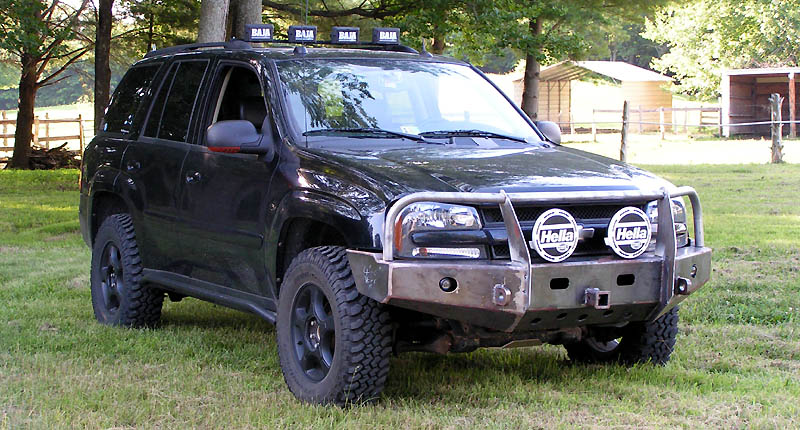
Fully powdercoated and finished... EXACTLY as I had envisioned it:

Image

I have to compliment Kennesaw though. They produced a decent bumper (a nice, strong base) for me to begin with. Kyle (with KMA) was very helpful, and worked with me through my many, many questions and inquiries. I bugged the crap out of him. They were a two weeks behind on delivery (which is pretty good for a bumper company), but it saved Eric and I the hassle of making time to start from scratch. With work these days, there's no chance it would be done by now.

Eric, at Freaky Tree Offroad, did a great job dealing with my deadlines, constant nagging, and perfectionist yammering. I'd fully recommend him (again).

As always, the project is never finished... my next step is to find the right winch to mount in the receiver.

I hope you guys enjoy it as much as I do.
Image
8-) Build Thread | ExPo Build | YouTube Videos
Not all who wander are lost. -Tolkien
User avatar
Trail X
Founder
 
Posts: 9935
Joined: Mon Sep 07, 2009 10:22 pm
Location: VA, Roanoke
Name: James Downing
Vehicle Year: 2005
Vehicle: Chevrolet TrailBlazer
DriveTrain: 4WD w/ Aftermarket Locker
Rank: Expedition Guide

by Trail X » Mon Sep 07, 2009 11:31 pm

The receiver goes through the front plate and is welded on both sides. The bottom rib shown in the photo below was done by Kennesaw. Eric and I agreed that we wanted a little more support, so we added in the upper ribs. The upper ribs are welded to the receiver, the front plate, and the top plate.

In addition to that, he reinforced the left and right corners. If something did hit the light hoops, we didn't want it to bend the bumper and allow the light hoop to hit the hood or headlight.

Next time I take it off, I'll be sure to take some pictures.

Image

-------------------------------------------------------

Update:
With the original design, the radiator stuck down below the bumper by a few inches. I've been very cautious lately with rocks because of this. The lower endcap of the radiator is extremely susceptible to road and trail damage when it's hanging out like that. So it was time for some protection.

First, the foam-board prototype:

Image

The 3D model designed around the foam prototype:
Image

Finally, the finished product, thanks to BartonMD! Thanks Mike!

Image

I went with an aluminum design. I had done FEA analysis, and found that for most hits, I didn't need steel (for this design). Granted, if i were to drive it straight into a large rock, it will bend... but that's why I have a spare... :laugh: (you heard right, Mike made me two!)

The bolts used are Mike's bolts from the oil pan skidplate, and five grade 5 bolts attach at the bumper. Should be plenty to keep the skidplate in place.

Image

This photo gives you a view of the inside of the plate. It mounts to the bottom of the bumper so the bolts won't be stressed in tension if the plate takes a hit. On the engine side it is further reinforced by the oilpan skidplate, as it shares the same bend point.

There's about a 1/4" of clearance to the radiator brackets... just enough to provide protection in case I bend the plate.

Image
8-) Build Thread | ExPo Build | YouTube Videos
Not all who wander are lost. -Tolkien
User avatar
Trail X
Founder
 
Posts: 9935
Joined: Mon Sep 07, 2009 10:22 pm
Location: VA, Roanoke
Name: James Downing
Vehicle Year: 2005
Vehicle: Chevrolet TrailBlazer
DriveTrain: 4WD w/ Aftermarket Locker
Rank: Expedition Guide

by cbbryan » Mon Nov 02, 2009 12:28 pm

What was your total cost bumper + fab and install?
I would like to get one made out of diamond plate like some of the ones made for full size chevy trucks.

I really like this design; I looked into their products and tried to look elsewhere too. I didn't find much else for our vehicles so I emailed a few custom and heavy duty bumper companies. I inquired about front and rear. I recieved emails back all saying the same thing "we sorry, we currently don't make a product for your vehcile". I was hoping to spark their interest so we can have some competion between companies which may lower the price. Maybe if more of us do some contacting on a variety of products these companies will see that there is money to be made off of our platform. I think next time I will have a design with dimensions so they can see how serious I am and it'll make it easier on them so that maybe they can fab it up.
User avatar
cbbryan
Trail-Blazer
 
Posts: 270
Joined: Tue Sep 22, 2009 2:26 pm
Location: MS, Amory
Name: Chris
Vehicle Year: 2005
Vehicle: Chevrolet TrailBlazer
DriveTrain: 4WD

by janesy86 » Mon Nov 02, 2009 12:44 pm

That won't do much b/c there are so few of us with serious offroad TB's.. so therefore no market for them and they wouldn't make anything off of them with the needed R&D..

Best bet would to pick one of these up and mod it to make it how you want or find a shop that will custom make you a bumper..it certainly will cost a lot.

I thought I also remember Neil was saying he could make some bumpers if requested and serious about it..from the work that he has done on The Roadies' Voy and Teebes' TB he is highly experienced..
Build Thread
Back to stock, had fun while it lasted...
janesy86
Veteran
 
Posts: 1291
Joined: Thu Sep 10, 2009 2:29 pm
Location: MA, Salem
Name: Nick Janes
Vehicle Year: 2007
Vehicle: Chevrolet TrailBlazer
DriveTrain: 4WD w/ G80
Rank: Offroad Rated

by Trail X » Mon Nov 02, 2009 2:15 pm

Oy... total cost?

(This is from recollection) Just the KMA bumper was ~$550. Shipping was ~$200. Customization was ~$350. Powdercoat was ~$200. Lights (fogs and big hellas) were ~$350. So including the lights, ~$1650.

It'd also be hard to beat the KMA cost, honestly. If I had done a full-custom bumper, I was quoted at $2k. That is why I chose to modify the KMA. Similar bumpers from more well-known companies are of comparable cost, especially when factoring in shipping costs.

The KMA is a decent bumper, but in my opinion, it needs a little work to make it acceptable.

Edit... and the skids were another $200 I beleive :shock: ... (right Mike?)
8-) Build Thread | ExPo Build | YouTube Videos
Not all who wander are lost. -Tolkien
User avatar
Trail X
Founder
 
Posts: 9935
Joined: Mon Sep 07, 2009 10:22 pm
Location: VA, Roanoke
Name: James Downing
Vehicle Year: 2005
Vehicle: Chevrolet TrailBlazer
DriveTrain: 4WD w/ Aftermarket Locker
Rank: Expedition Guide

by cbbryan » Mon Nov 02, 2009 3:48 pm

Acording to their site which shows your vehicle James they do offer them in black now as well as other colors with a bedliner coat, but they do not offer diamond plate. I guess I'll just have to settle for flat steel. Do you think we could talk them into doing a rear bumber as well?
User avatar
cbbryan
Trail-Blazer
 
Posts: 270
Joined: Tue Sep 22, 2009 2:26 pm
Location: MS, Amory
Name: Chris
Vehicle Year: 2005
Vehicle: Chevrolet TrailBlazer
DriveTrain: 4WD

by bartonmd » Mon Nov 02, 2009 4:01 pm

Yes, James... They were under $200 for both of them, together...

Mike
bartonmd
Moderator
 
Posts: 4469
Joined: Wed Sep 09, 2009 9:35 am
Location: IN, Indianapolis
Name: Mike
Vehicle Year: 2007
Vehicle: Chevrolet TrailBlazer
DriveTrain: 4WD w/ G80
Rank: Offroad Rated

by Trail X » Mon Nov 02, 2009 4:02 pm

Interesting that KMA is using my photos now. Took them a while to get them up I guess. I wonder what they would do if someone asked for an exact replica. I'm not sure if they could produce. :?

They have offered black forever, but if you search around a little, you'll find that most people that get their normal coating end up complaining of rust and chipping paint after a few months. I'd still recommend finding a way to PC it.

Also... why in god's name would you want diamond plate :puker: ? Are you making a fire engine?

As for a rear bumper... that goal is still a ways off for me. I'm still happy the way I have it set up. Plus, I've vowed never to contact a company about a product that I don't intend to purchase immediately. It tends to send the wrong impression.
8-) Build Thread | ExPo Build | YouTube Videos
Not all who wander are lost. -Tolkien
User avatar
Trail X
Founder
 
Posts: 9935
Joined: Mon Sep 07, 2009 10:22 pm
Location: VA, Roanoke
Name: James Downing
Vehicle Year: 2005
Vehicle: Chevrolet TrailBlazer
DriveTrain: 4WD w/ Aftermarket Locker
Rank: Expedition Guide

by cbbryan » Mon Nov 02, 2009 4:14 pm

I wasn't planning on contacting until I was getting one. I was also going to take some measurements and submit a design so they would know what I'm wanting. I'll probably wait till I get to Ft. Benning that way I can go down there on their monkey day weekends and collectively design and build it(both front and rear) it may end up cheaper that way.
User avatar
cbbryan
Trail-Blazer
 
Posts: 270
Joined: Tue Sep 22, 2009 2:26 pm
Location: MS, Amory
Name: Chris
Vehicle Year: 2005
Vehicle: Chevrolet TrailBlazer
DriveTrain: 4WD

by EwingJK » Wed Nov 04, 2009 1:26 pm

James,
You have some great ideas there. My bumper is strikingly similar to yours in shape. It was custom built by a 4X4 shop in Dubai. The shop specializes in Jeeps, but they will work on just about anything. They based the bumper on a design they have for Silverados. It's already prepped for a Superwinch EPi9.0. I'm also concerned about the radiator protection. I've had issues with overheating due to the PS cooler, condenser & radiator being smacked together and blocking air flow. There's a thread on the OS about the issues.    TrailVoy Thread  

Have you had any airflow issues with the lower guard? I see that you have holes in the lower part of the bumper. Are those working for you? The temperatures here typically get in the 130º F in the Summer and the TB is my daily driver for a 60 mile one-way commute. If you won't be too offended, I'm going to take a couple of shots of your bumper and guard to the shop that fabricated my bumper and see if he will do the same for me. I might even have them do the push bar.
User avatar
EwingJK
Cruiser
 
Posts: 43
Joined: Sun Sep 13, 2009 1:23 am
Location: Brentwood, CA (SF Bay Area)
Name: John Ewing
Vehicle Year: 2005
Vehicle: Chevrolet TrailBlazer
DriveTrain: 4WD w/ G80

by Trail X » Wed Nov 04, 2009 2:03 pm

I have not had any airflow issues, but it certainly doesn't get up to 130*F around here. My water temp stays right at 200 F (scangauge value). If your instrument cluster indicator is at 210*F, the actual coolant temp could be anywhere between 170 and 220 (or maybe higher). The code in the cluster dummyizes the data stream to prevent people from bringing their vehicles in for service if the needle is ever-so-slightly off.

The thing to note about the stock setup is that any air flowing into the radiator 'air plenum' essentially must go through a radiator. It's fairly sealed. By removing the stock bumper, we provide large places for the pressure to easily escape without flowing through the radiator. That was one of my many reasons for making a skidplate, and designing it to fit close to the radiator... trying to minimize air escaping around the radiators.

Please do show your fab guys. It may not help, but more airflow certainly cannot hurt things. I'd also try to work towards sealing in the area between your bumper and the radiator endcap, as that will help decrease your temps when at speed.

Good luck!
8-) Build Thread | ExPo Build | YouTube Videos
Not all who wander are lost. -Tolkien
User avatar
Trail X
Founder
 
Posts: 9935
Joined: Mon Sep 07, 2009 10:22 pm
Location: VA, Roanoke
Name: James Downing
Vehicle Year: 2005
Vehicle: Chevrolet TrailBlazer
DriveTrain: 4WD w/ Aftermarket Locker
Rank: Expedition Guide

by cowboy63645 » Fri Nov 06, 2009 7:01 pm

Have you had any problems with the bumper coming into contact with the body as of yet?
cowboy63645
Member
 
Posts: 66
Joined: Mon Oct 26, 2009 11:46 am
Location: Southeast, MO
Vehicle Year: 2002
Vehicle: Chevrolet Trailblazer EXT
DriveTrain: 4WD

by Trail X » Sat Nov 07, 2009 3:31 pm

I guess the only area it would contact the body would be at the front quarter panel. In my experience, I haven't seen it touch at all no matter the flex. The bumper does move some though, and that's why there's some clearance.
8-) Build Thread | ExPo Build | YouTube Videos
Not all who wander are lost. -Tolkien
User avatar
Trail X
Founder
 
Posts: 9935
Joined: Mon Sep 07, 2009 10:22 pm
Location: VA, Roanoke
Name: James Downing
Vehicle Year: 2005
Vehicle: Chevrolet TrailBlazer
DriveTrain: 4WD w/ Aftermarket Locker
Rank: Expedition Guide

by EwingJK » Mon Nov 09, 2009 10:48 am

JamesDowning wrote:The thing to note about the stock setup is that any air flowing into the radiator 'air plenum' essentially must go through a radiator. It's fairly sealed. By removing the stock bumper, we provide large places for the pressure to easily escape without flowing through the radiator. That was one of my many reasons for making a skidplate, and designing it to fit close to the radiator... trying to minimize air escaping around the radiators.


That makes sense, and probably explains my recent experiences with the P0128 code now that we are in cooler weather. The code is thrown at about 174ºF to 179ºF. The engine eventually gets up to temperature (usually 2 or 3 minutes after the code is thrown). I sent some pics of your guard to a couple of fabricators to see if they're interested. One already replied that they could do it, so I'm taking the TB to them for a quote this weekend.
User avatar
EwingJK
Cruiser
 
Posts: 43
Joined: Sun Sep 13, 2009 1:23 am
Location: Brentwood, CA (SF Bay Area)
Name: John Ewing
Vehicle Year: 2005
Vehicle: Chevrolet TrailBlazer
DriveTrain: 4WD w/ G80

by Trail X » Mon Nov 09, 2009 10:53 am

P0128... I know it well. Failed thermostat... and it's an absolute pain to get out. No way your bumper could have caused that.
8-) Build Thread | ExPo Build | YouTube Videos
Not all who wander are lost. -Tolkien
User avatar
Trail X
Founder
 
Posts: 9935
Joined: Mon Sep 07, 2009 10:22 pm
Location: VA, Roanoke
Name: James Downing
Vehicle Year: 2005
Vehicle: Chevrolet TrailBlazer
DriveTrain: 4WD w/ Aftermarket Locker
Rank: Expedition Guide

by EwingJK » Mon Nov 09, 2009 11:05 am

JamesDowning wrote:P0128... I know it well. Failed thermostat... and it's an absolute pain to get out. No way your bumper could have caused that.


My thermostat is brand new. I just had it replace by the Chevy dealer about a month ago. Still, it could be defective. Also, it's very intermittent. It might not happen for a week or more, then it will happen one or two days, then nothing for another week or more. It only happens when I leave from work in the afternoon. Anyway, this thread isn't about heating issues. Thanks for the info.

By the way, I sent you a PM at the OS.
User avatar
EwingJK
Cruiser
 
Posts: 43
Joined: Sun Sep 13, 2009 1:23 am
Location: Brentwood, CA (SF Bay Area)
Name: John Ewing
Vehicle Year: 2005
Vehicle: Chevrolet TrailBlazer
DriveTrain: 4WD w/ G80

by aaronrules » Fri May 21, 2010 4:41 am

Looking at their website, I don't see any mention of Trailblazers...or a pic of your rig JD....hmmmm
Lift, shocks, wheels and tires installed...need some armor now.
aaronrules
Off-Roader
 
Posts: 155
Joined: Thu Apr 01, 2010 2:21 am
Name: Aaron
Vehicle Year: 2004
Vehicle: Chevrolet TrailBlazer
DriveTrain: 4WD

by rgraboske » Fri May 21, 2010 7:28 am

aaronrules wrote:Looking at their website, I don't see any mention of Trailblazers...or a pic of your rig JD....hmmmm


You need to look under Custom Vehicles and Projects :work:

http://www.kenmtnac.com/TrailBlzr.html
rgraboske
Trail-Blazer
 
Posts: 338
Joined: Wed Feb 24, 2010 2:17 pm
Location: MI, Royal Oak
Name: Rob Graboske
Vehicle Year: 2002
Vehicle: Chevrolet TrailBlazer
DriveTrain: 4WD w/ G80
Rank: Trail Ready

by aaronrules » Fri May 21, 2010 10:17 am

Am I remembering correctly? Did someone say that they are now making these the same way that you have it all modified now?
Lift, shocks, wheels and tires installed...need some armor now.
aaronrules
Off-Roader
 
Posts: 155
Joined: Thu Apr 01, 2010 2:21 am
Name: Aaron
Vehicle Year: 2004
Vehicle: Chevrolet TrailBlazer
DriveTrain: 4WD

by Trail X » Fri May 21, 2010 12:39 pm

You'll have to contact them if you're interested. They've told another member that they can produce it the same as my bumper... just minus the headlight hoops or something... talk to Kyle there... he's good at the CAD stuff and can probably whip up a design for you.
8-) Build Thread | ExPo Build | YouTube Videos
Not all who wander are lost. -Tolkien
User avatar
Trail X
Founder
 
Posts: 9935
Joined: Mon Sep 07, 2009 10:22 pm
Location: VA, Roanoke
Name: James Downing
Vehicle Year: 2005
Vehicle: Chevrolet TrailBlazer
DriveTrain: 4WD w/ Aftermarket Locker
Rank: Expedition Guide

Next

Return to Fab Work

cron