Offroad Trailblazers and Envoys

Homemade Roof Top Tent

Any special projects involving a decent amount of fab work (bumpers, sliders, roof racks, etc)

by Trail X » Sun Apr 24, 2011 6:05 pm

I normally only post finished projects, but I thought this one would be fun to share during it's progress. I thought about just buying one, but I thought it would be fun to create my own. So here I am... I have a few napkin sketches that I've worked on since last October, it was really a matter of finishing up some other projects and finally starting this one.

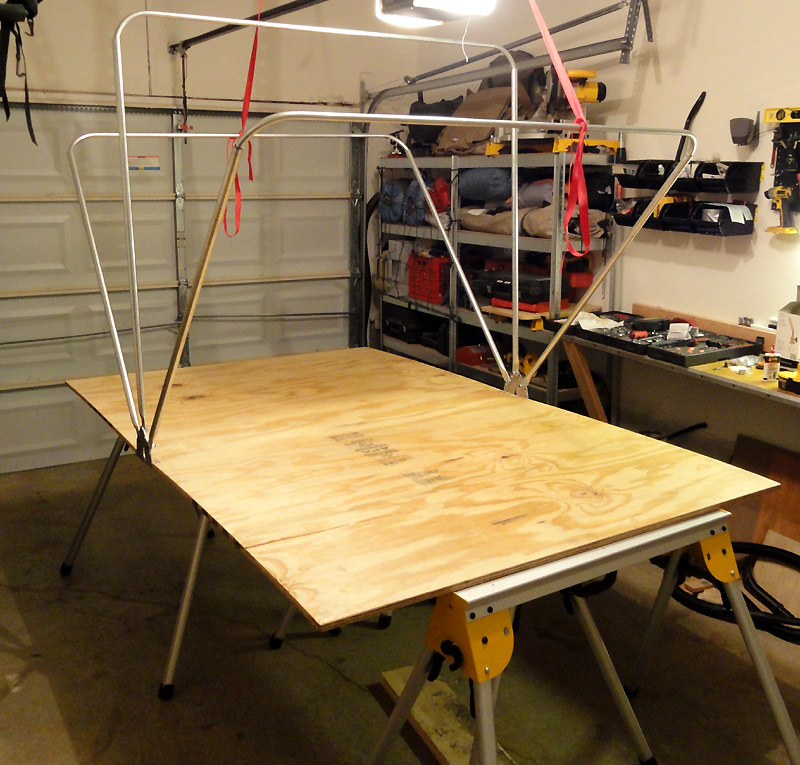
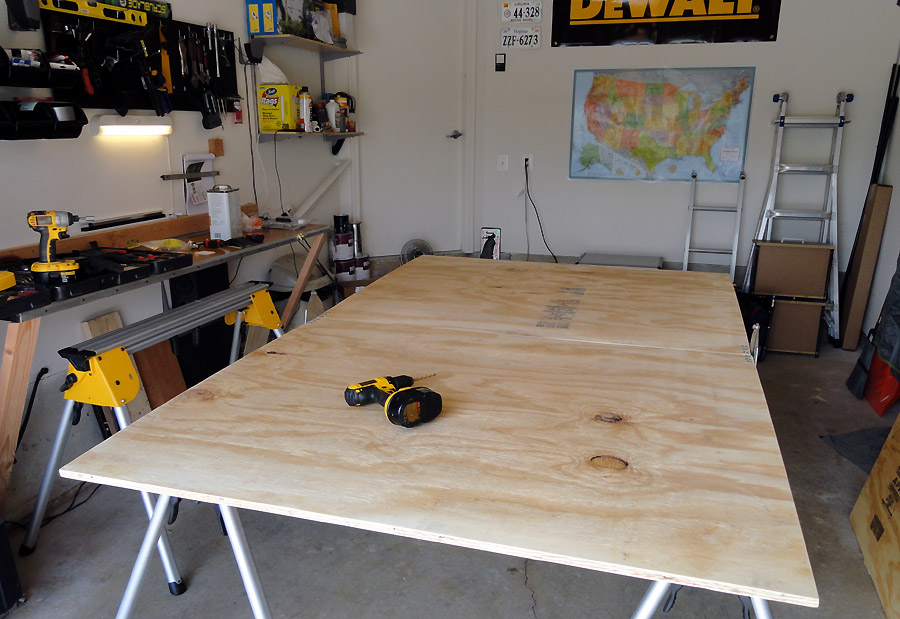
Here's the initial layout and test of the wood and hinges. I used 21/32 sheathing because I refuse to pay $50 for the nicer plywood. It's actually much stronger than I had originally planned, so I think I will be able to leave out some of the structure that I was going to add (which should be a nice weight savings).

I took some time to sand it down a bit to get rid of the majority of splinters.

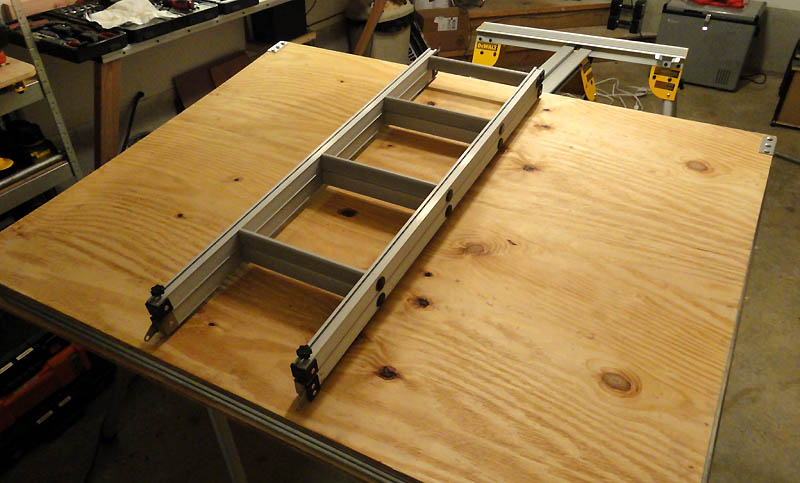
Here is is laid out on the stands:
Image

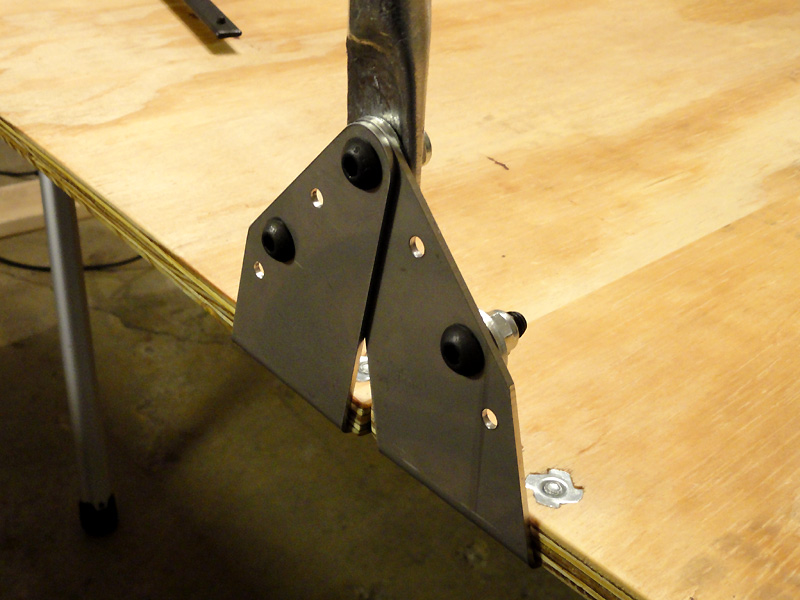
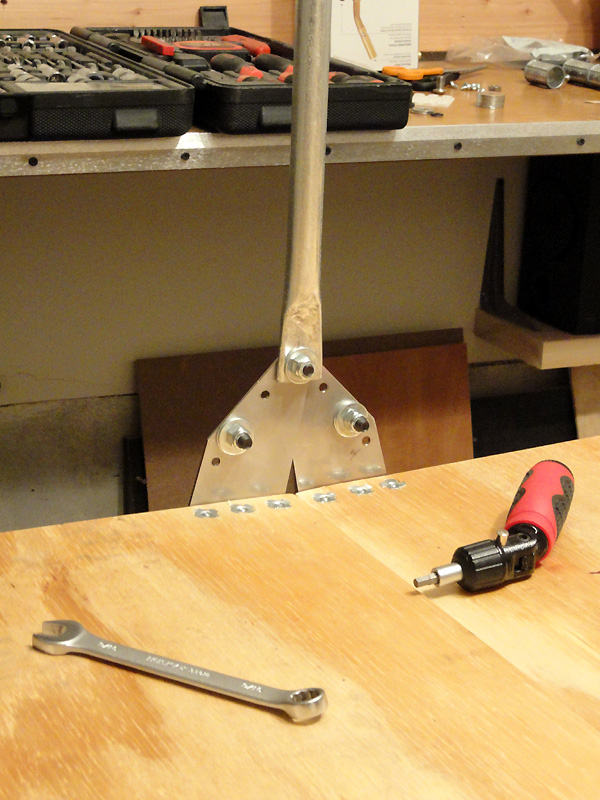
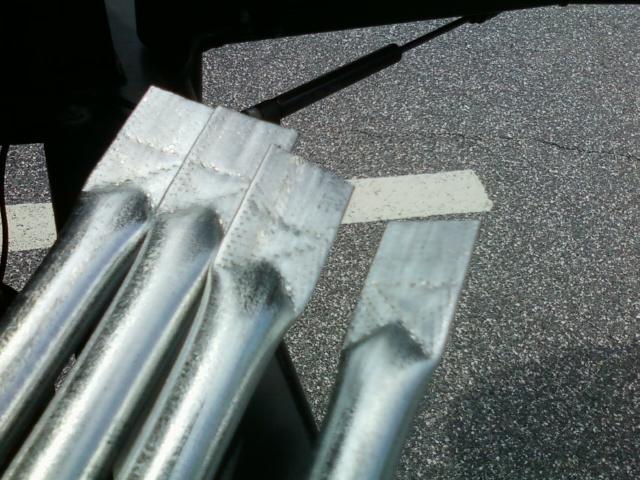
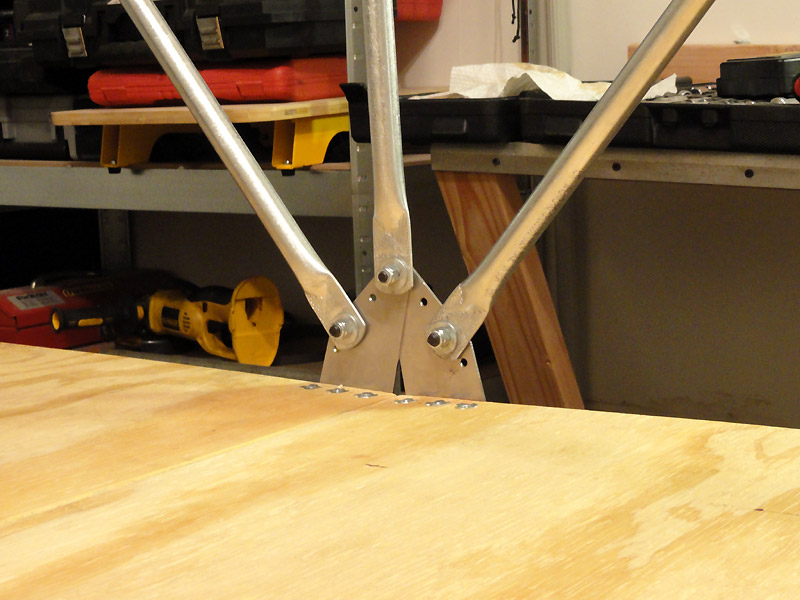
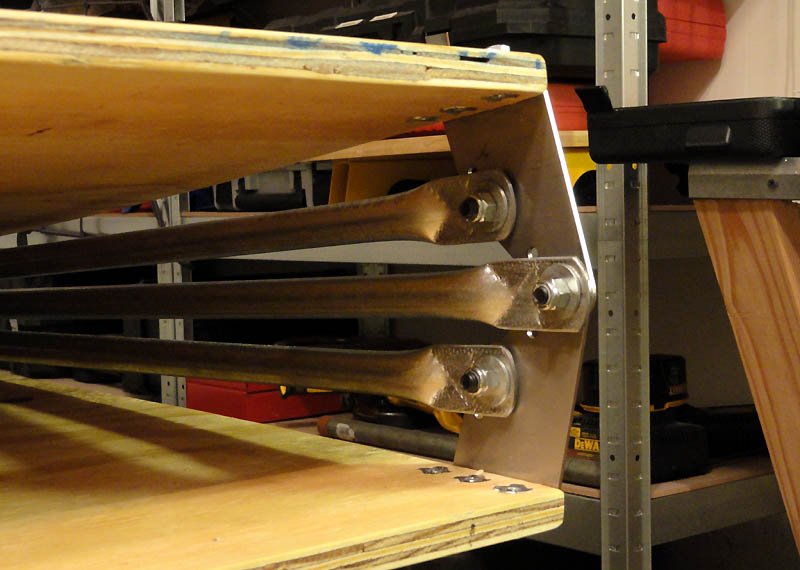
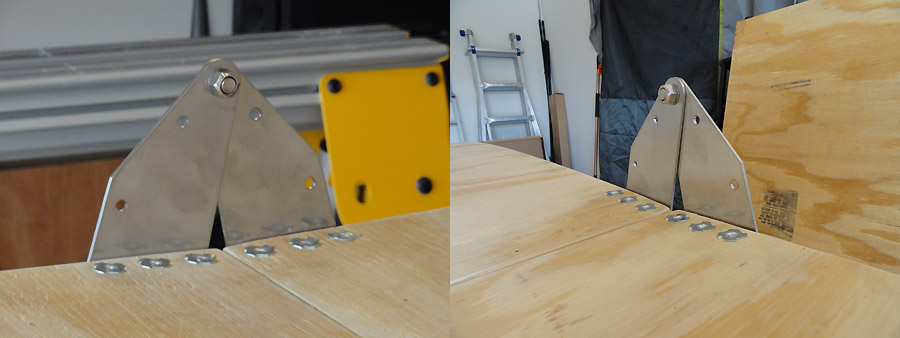
Here is a detail of the stainless steel hinges. They mount with 1/4"-20 bolts to press-in nuts. I still need to re-drill them with different holes. I got these from a different roof top tent from compactcampingconcepts.com. It was the one part that I was originally unsure of how to make, but luckily found these.
Image

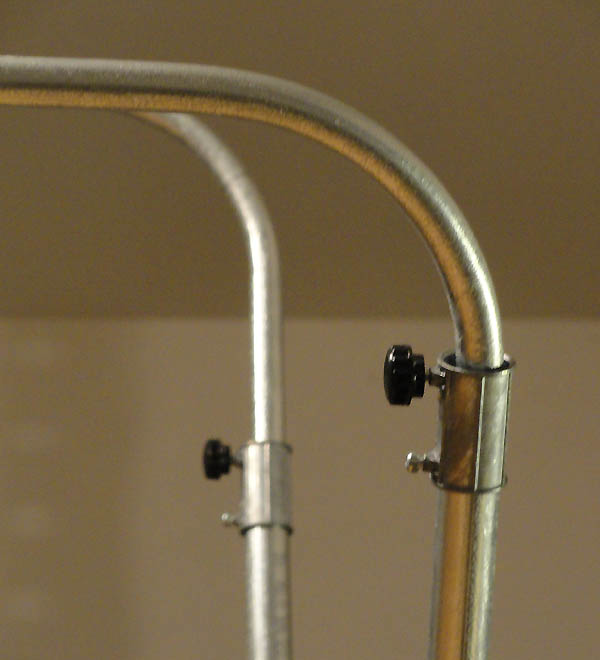
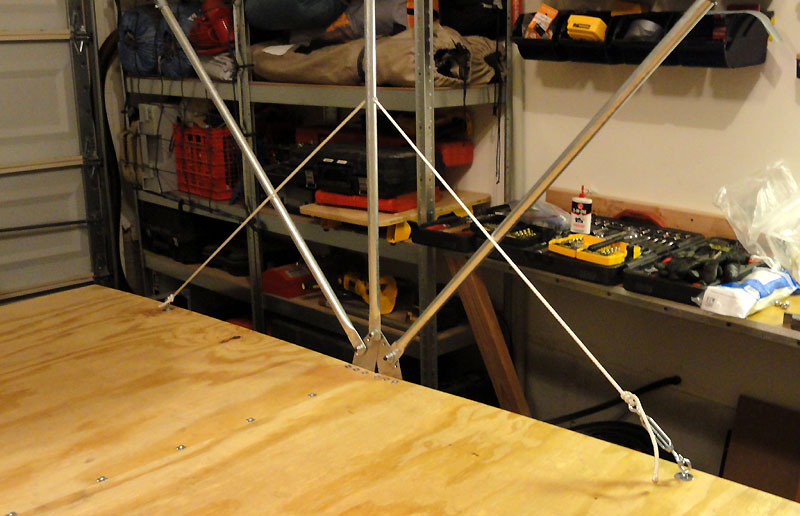
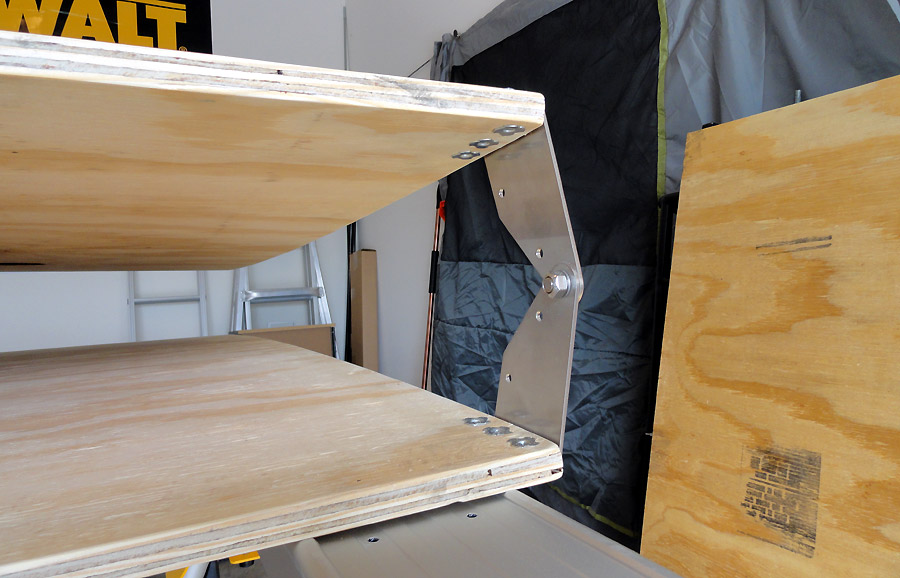
Folded, it will probably stand 9" above the roof rack, not including the ladder:
Image

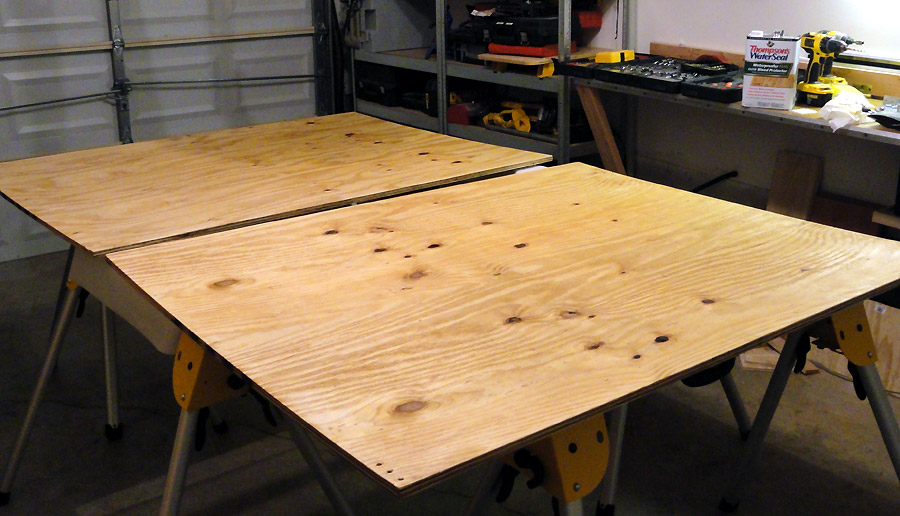
Treating it with some water sealant. It's currently drying:
Image

I can't promise that progress will be fast, but I hope to realistically have this done in a few months, I've got a few other projects that I also need to work on. Never enough time!
8-) Build Thread | ExPo Build | YouTube Videos
Not all who wander are lost. -Tolkien
User avatar
Trail X
Founder
 
Posts: 9935
Joined: Mon Sep 07, 2009 10:22 pm
Location: VA, Roanoke
Name: James Downing
Vehicle Year: 2005
Vehicle: Chevrolet TrailBlazer
DriveTrain: 4WD w/ Aftermarket Locker
Rank: Expedition Guide

by djthumper » Sun Apr 24, 2011 6:21 pm

Can't wait to see the progress. I know how it is having multiple projects going on and having to change the priorities constantly.
User avatar
djthumper
Moderator
 
Posts: 2702
Joined: Wed Mar 24, 2010 6:04 pm
Location: NV, Las Vegas
Name: Larry
Vehicle Year: 2006
Vehicle: Chevrolet TrailBlazer
DriveTrain: 4WD
Rank: Offroad Rated

by HARDTRAILZ » Sun Apr 24, 2011 6:33 pm

I am sure you will take your time and come up with something quite nice. Not something I see in my future but really cool to see someone try a build from scratch.
I hate to advocate weird chemicals, alcohol, violence or insanity to anyone...but
they've always worked for me.
User avatar
HARDTRAILZ
Moderator
 
Posts: 6342
Joined: Sat Sep 12, 2009 1:49 am
Location: IN, Batesville
Name: Kyle
Vehicle Year: 2006
Vehicle: Chevrolet TrailBlazer
DriveTrain: 4WD w/ Aftermarket Locker
Rank: Extreme Offroader

by fishsticks » Sun Apr 24, 2011 8:51 pm

Watching. Love home built projects!
11 Silverado LTZ - 6.2L/6l80, 2/3 drop, self tuned
85 Hilux - 3RZ, dual cases, caged, 40s, chromo everything
02 TrailBlazer LTZ - 35s, lockers, balls - Gone but not forgotten - Build
User avatar
fishsticks
Moderator
 
Posts: 4356
Joined: Thu Apr 01, 2010 11:30 pm
Location: WA, Vancouver
Name: Donny
Vehicle Year: Other
Vehicle: Other Vehicle
DriveTrain: 4WD w/ Aftermarket Locker
Rank: Extreme Offroader

by Blackout » Sun Apr 24, 2011 8:54 pm

Should be a good show
User avatar
Blackout
Trail-Blazer
 
Posts: 310
Joined: Fri Oct 08, 2010 6:12 pm
Location: OH, Columbus
Name: Brian
Vehicle Year: 2004
Vehicle: Chevrolet TrailBlazer
DriveTrain: 4WD

by janesy86 » Sun Apr 24, 2011 9:17 pm

Awesome James! I'm with Kyle, nothing I see in my future, or needing, but I love that your making this yourself and will watch your progress for sure! Very cool!
Build Thread
Back to stock, had fun while it lasted...
janesy86
Veteran
 
Posts: 1291
Joined: Thu Sep 10, 2009 2:29 pm
Location: MA, Salem
Name: Nick Janes
Vehicle Year: 2007
Vehicle: Chevrolet TrailBlazer
DriveTrain: 4WD w/ G80
Rank: Offroad Rated

by Trail X » Thu May 05, 2011 8:43 am

Small updates, figuring out some of the details:

Support adjustments:
Image

Testing the adjustment system, it appears to hold quite well:
Image

Drilled extra holes in the stainless bracket, obtained proper hardware (button heads on the outside so it won't snag the fabric), testing the support attachment:
Image

Same thing, interior side (flattening the tube has turned out to be a bigger challenge than I expected, I think next time I will try a torch in conjunction with the hammer):
Image

It's coming along slowly.
8-) Build Thread | ExPo Build | YouTube Videos
Not all who wander are lost. -Tolkien
User avatar
Trail X
Founder
 
Posts: 9935
Joined: Mon Sep 07, 2009 10:22 pm
Location: VA, Roanoke
Name: James Downing
Vehicle Year: 2005
Vehicle: Chevrolet TrailBlazer
DriveTrain: 4WD w/ Aftermarket Locker
Rank: Expedition Guide

by janesy86 » Thu May 05, 2011 9:25 am

JamesDowning wrote:It's coming along slowly.


But in the end, you'll know you made it yourself, and that will definitely be gratifying!
Build Thread
Back to stock, had fun while it lasted...
janesy86
Veteran
 
Posts: 1291
Joined: Thu Sep 10, 2009 2:29 pm
Location: MA, Salem
Name: Nick Janes
Vehicle Year: 2007
Vehicle: Chevrolet TrailBlazer
DriveTrain: 4WD w/ G80
Rank: Offroad Rated

by bartonmd » Thu May 05, 2011 9:29 am

So are you adapting another tent, or is the RTT going to be the tent, itself, as well?? What material will you be using?

Mike
bartonmd
Moderator
 
Posts: 4469
Joined: Wed Sep 09, 2009 9:35 am
Location: IN, Indianapolis
Name: Mike
Vehicle Year: 2007
Vehicle: Chevrolet TrailBlazer
DriveTrain: 4WD w/ G80
Rank: Offroad Rated

by Trail X » Thu May 05, 2011 9:49 am

bartonmd wrote:So are you adapting another tent, or is the RTT going to be the tent, itself, as well?? What material will you be using?

Mike


Kinda half and half. I'm not a pro at sewing, so I'll be cannibalizing another tent for all the pieces.

I believe the walls are Polyester Taffeta 75D or 68D (hard to tell which surfaces are what). The rain fly/roof will be Polyethylene 1000D. (You can actually see some of it in the background of the pictures in the first post.)
8-) Build Thread | ExPo Build | YouTube Videos
Not all who wander are lost. -Tolkien
User avatar
Trail X
Founder
 
Posts: 9935
Joined: Mon Sep 07, 2009 10:22 pm
Location: VA, Roanoke
Name: James Downing
Vehicle Year: 2005
Vehicle: Chevrolet TrailBlazer
DriveTrain: 4WD w/ Aftermarket Locker
Rank: Expedition Guide

by The Roadie » Thu May 05, 2011 10:36 am

One thing I hadn't known enough about ahead of time is the amount of condensation you can get UNDER the mattress from human humidity. Even in low humidity desert, there was enough moisture under the mattress to need it removed and dried in the sun before packing up. I'd hate to think how much would be there under humid conditions, but I'm such a wuss I hardly ever camp in the rain anymore.

Just make sure your wood treatment is totally waterproof and thick, and consider a layer of the moisture-matting under the mattress you will find when you Google.
User avatar
The Roadie
Founder
 
Posts: 5011
Joined: Mon Sep 07, 2009 11:29 pm
Location: CA, Vista, San Diego County
Name: Bill Carton
Vehicle Year: 2004
Vehicle: GMC Envoy
DriveTrain: 4WD w/ G80
Rank: Expedition Guide

by Trail X » Thu May 05, 2011 10:54 am

I'm confused at how that condensation forms. Is it from sweat essentially leaking through the mattress? What is causing it to condense?
8-) Build Thread | ExPo Build | YouTube Videos
Not all who wander are lost. -Tolkien
User avatar
Trail X
Founder
 
Posts: 9935
Joined: Mon Sep 07, 2009 10:22 pm
Location: VA, Roanoke
Name: James Downing
Vehicle Year: 2005
Vehicle: Chevrolet TrailBlazer
DriveTrain: 4WD w/ Aftermarket Locker
Rank: Expedition Guide

by navigator » Thu May 05, 2011 11:26 am

Isn't it mostly a combination of temperature change and humidity?
On our beach trip the condensation was so bad that sometimes it would drip on you in the tent, kind of a pain :-)
"Please consider a search before posting. Folks on this site PIONEERED functional offroad use of these trucks."
The answer to many common lift questions can be found
here
My Build Thread
User avatar
navigator
Moderator
 
Posts: 4651
Joined: Wed Mar 09, 2011 10:16 am
Location: NC, Winnabow
Name: Chris
Vehicle Year: 2006
Vehicle: Chevrolet TrailBlazer
DriveTrain: 4WD
Rank: Trail Ready

by The Roadie » Thu May 05, 2011 11:36 am

I think it was from our bodies, not respiration, since it was very dry and the window flaps were all open. A waterproof mattress cover might have stopped the migration downwards also, but it's a unique size mattress that not even a tall king size would be long enough for (I think). And my tent has a foam-core insulated base with aluminum skins, not wood. It might be just conduction on the aluminum skins. Not sure.
User avatar
The Roadie
Founder
 
Posts: 5011
Joined: Mon Sep 07, 2009 11:29 pm
Location: CA, Vista, San Diego County
Name: Bill Carton
Vehicle Year: 2004
Vehicle: GMC Envoy
DriveTrain: 4WD w/ G80
Rank: Expedition Guide

by bgwolfpack » Thu May 05, 2011 11:41 am

All condensation is formed when one object is substantially colder then another that is warm and wet. The moisture is drawn to the colder surface and is visible because this surface cannot hold the same moisture content as the warmer one. As how the cold Beer gets moisture on it when the air is hot and humid or how the window pane collects moisture in the bedroom where we sleep, above the kitchen sink when washing dishes or the bathroom window after a shower or bath. Also why the truck windows 'steam-up' when I was a teenager. :safe:

I would suggest making sure you have a good amount of blankets (cotton or wool not synthetic) down under your sleeping bag. This is more important then what covers you to keep you warm and dry.

Condensation is a tricky thing. Just remember you want to insulate your body from everything a different temperature than you. :cheers:
bgwolfpack
Veteran
 
Posts: 1794
Joined: Fri Sep 18, 2009 7:19 pm
Name: Randy
Vehicle Year: Other
Vehicle: Other Vehicle
DriveTrain: 4WD

by Trail X » Thu May 05, 2011 11:47 am

The Roadie wrote:I think it was from our bodies, not respiration, since it was very dry and the window flaps were all open. A waterproof mattress cover might have stopped the migration downwards also, but it's a unique size mattress that not even a tall king size would be long enough for (I think). And my tent has a foam-core insulated base with aluminum skins, not wood. It might be just conduction on the aluminum skins. Not sure.


Hm, I'll have to evaluate once my mattress comes in. I think it has a waterproof cover already, but the manufacturer didn't provide much detail.

My mattress won't be full size of the internal compartment, its skinnier than a full, but longer.

bgwolfpack wrote:I would suggest making sure you have a good amount of blankets (cotton or wool not synthetic) down under your sleeping bag. This is more important then what covers you to keep you warm and dry.


I'm hoping the mattress will be able to properly insulate us. It's 3" foam, but I don't know how it will handle moisture exactly.
8-) Build Thread | ExPo Build | YouTube Videos
Not all who wander are lost. -Tolkien
User avatar
Trail X
Founder
 
Posts: 9935
Joined: Mon Sep 07, 2009 10:22 pm
Location: VA, Roanoke
Name: James Downing
Vehicle Year: 2005
Vehicle: Chevrolet TrailBlazer
DriveTrain: 4WD w/ Aftermarket Locker
Rank: Expedition Guide

by dirty anton » Thu May 05, 2011 10:35 pm

cool idea with the emt connectors,like how its coming along
User avatar
dirty anton
Trail-Blazer
 
Posts: 426
Joined: Thu Aug 19, 2010 12:21 am
Location: upper marlboro md
Name: mike
Vehicle Year: 2002
Vehicle: Chevrolet TrailBlazer
DriveTrain: 4WD w/ Aftermarket Locker
Rank: Extreme Offroader

by Trail X » Fri May 06, 2011 12:42 pm

No more bacon-looking attachment ends to the support tubes. I just smashed them with our big vice here at work (why didn't I think of that before).

Much better:

Image
8-) Build Thread | ExPo Build | YouTube Videos
Not all who wander are lost. -Tolkien
User avatar
Trail X
Founder
 
Posts: 9935
Joined: Mon Sep 07, 2009 10:22 pm
Location: VA, Roanoke
Name: James Downing
Vehicle Year: 2005
Vehicle: Chevrolet TrailBlazer
DriveTrain: 4WD w/ Aftermarket Locker
Rank: Expedition Guide

by Trail X » Fri May 06, 2011 10:29 pm

Support hinges are done:

Image


Rough layout of the hoops. The thicker supports need to be cut down some and the adjustment knobs need to be popped on and tweaked. Slowly taking shape.

Image
8-) Build Thread | ExPo Build | YouTube Videos
Not all who wander are lost. -Tolkien
User avatar
Trail X
Founder
 
Posts: 9935
Joined: Mon Sep 07, 2009 10:22 pm
Location: VA, Roanoke
Name: James Downing
Vehicle Year: 2005
Vehicle: Chevrolet TrailBlazer
DriveTrain: 4WD w/ Aftermarket Locker
Rank: Expedition Guide

by Trail X » Mon May 09, 2011 9:03 am

On to some updates from the weekend. A lot of work, but it doesn't LOOK like a whole lot. A lot of seat-of-the-pants engineering work going on.

Support hoops trimmed to the proper lengths, adjustment knobs added.
Image

Hinge and support hoops when the tent is folded up. Looks nice and neat.
Image

Quickly laying out the ladder to see where the brackets will need to sit. (I still need to make the ladder brackets, not enough time in a weekend to do everything.)
Image

Through my testing so far, I noticed the cantilevered base section bowed under my weight much more than the base that is anchored to the roof. With my full weight, I could stick my fingers through the opening that was created between the bases. So it was not only a pinch point, but a weak point in the design too. So I added an aluminum support lip so the anchored base so it shares the load with the cantilevered base. So far it's working great, especially since it's essentially a bandaid that I didn't originally expect to need.
Image

Since I'm using a lighter polyester, and not a heavy canvas for my cover (and since it will not be fully stretched upon unfolding), I saw the possibility of hyper-extending the main joint. That could cause reliability issues, so I created a suspension support to help hold the weight of the cantilevered section. This will prevent pulling a seam or breaking the hinge. The main support will actually come from the ladder, but these should be a good aid, especially when setting the tent up.
Image

Detail of the nylon abrasion insert in the support tube.
Image

I also got a good start on the tent mounting points, but it needs more work. I'm hoping to have the whole structure mounted and tested on the truck later this week. It's slowly getting there. The real challenge will be the tent material itself.
8-) Build Thread | ExPo Build | YouTube Videos
Not all who wander are lost. -Tolkien
User avatar
Trail X
Founder
 
Posts: 9935
Joined: Mon Sep 07, 2009 10:22 pm
Location: VA, Roanoke
Name: James Downing
Vehicle Year: 2005
Vehicle: Chevrolet TrailBlazer
DriveTrain: 4WD w/ Aftermarket Locker
Rank: Expedition Guide

Next

Return to Fab Work