Offroad Trailblazers and Envoys

Maxing front suspension lift (split from UCA discussion)

BDS, ReadyLift, Smaxx... You name it, we know about it here.

by fishsticks » Tue Aug 03, 2010 12:22 pm

JamesDowning wrote:Fishsticks - you have the 2" ready lift + the 0.5" top spacer - right? So that means about 2.75" total lift right now.

If you have room for about another inch of top spacer - that means you could get essentially 4" of total front-end lift without stressing the UBJ too much. Wow.

Thanks DZP for bringing all of this to light! :party:

Now the only last question seems to be - can it be aligned?

Now that I begin to think it all through... I think the best possible suspension combination would be an 89 spring + readylift ... or some sorta combo like that. Hmm... :druken:


For clarity, I have the Rough Country lift. I don't own the Readylift kit.


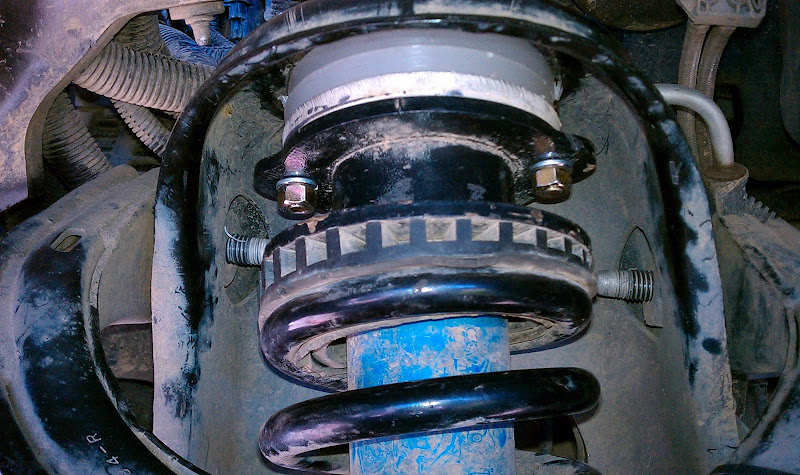
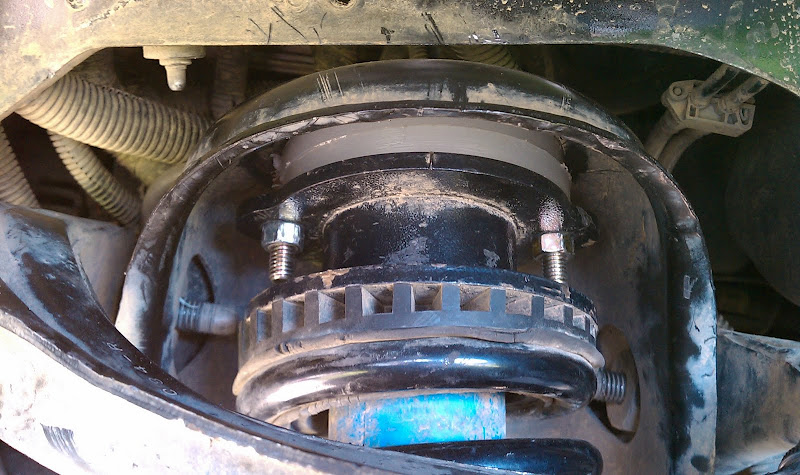
I just so happen to have some UHMW available to me in 3/4" thickness. I'm going to cut myself some new spacers today. I have 3/8x2" Grade 8 bolts and nuts to replace my existing top bolts.

It sounds like Kyle has about 1/8-1/4" of clearance with his UCAs in the stock position. I have 7/8"+ so it seems adding 3/4" to the mix would be a safe bet to add. Then I'll see how alingment goes.


With the weight I carry in the rear... I'm probably going to have negative rake... :wallbash:
11 Silverado LTZ - 6.2L/6l80, 2/3 drop, self tuned
85 Hilux - 3RZ, dual cases, caged, 40s, chromo everything
02 TrailBlazer LTZ - 35s, lockers, balls - Gone but not forgotten - Build
User avatar
fishsticks
Moderator
 
Posts: 4356
Joined: Thu Apr 01, 2010 11:30 pm
Location: WA, Vancouver
Name: Donny
Vehicle Year: Other
Vehicle: Other Vehicle
DriveTrain: 4WD w/ Aftermarket Locker
Rank: Extreme Offroader

by Trail X » Tue Aug 03, 2010 12:52 pm

My bad. Was going off my memory... which tends to lead me astray sometimes.

fishsticks wrote:With the weight I carry in the rear... I'm probably going to have negative rake... :wallbash:


Time to get new rear control arms from our new vendor and pump up the rear with some skyjacker springs!
8-) Build Thread | ExPo Build | YouTube Videos
Not all who wander are lost. -Tolkien
User avatar
Trail X
Founder
 
Posts: 9935
Joined: Mon Sep 07, 2009 10:22 pm
Location: VA, Roanoke
Name: James Downing
Vehicle Year: 2005
Vehicle: Chevrolet TrailBlazer
DriveTrain: 4WD w/ Aftermarket Locker
Rank: Expedition Guide

by Philberto » Tue Aug 03, 2010 5:17 pm

Pardon me if this is a non-issue, but what about CV joint angles at 4" of lift? Has anybody checked this? I know some of us have problems with boots leaking with just 2.5" of lift, so I can only imagine.
My Build Thread | 2006 Trailblazer LS Desert Camping Edition **SOLD**
2013 Nissan Xterra S "ReXterra"
User avatar
Philberto
Lifer
 
Posts: 2046
Joined: Fri Sep 11, 2009 5:30 pm
Location: CA, Oxnard
Name: Philip Cruz
Vehicle Year: Other
Vehicle: Other Vehicle
DriveTrain: 4WD
Rank: Offroad Rated

by Rob93 » Tue Aug 03, 2010 5:23 pm

I dont understand why there would be a problem with fitting the readylift spacer even without flipping the UCAs... Isn't a strut without the weight of the truck on it is the same length regardless if they have a spacer in the strut or not? I know of members on the OS who have had the Readylift installed without any inside the strut spacer, but there should be no reason it wouldnt work if you have marks lift or bds ect
Rob93
Trail-Blazer
 
Posts: 276
Joined: Tue Jul 27, 2010 5:52 pm
Location: FL, Ft. Lauderdale
Name: Rob
Vehicle Year: 2006
Vehicle: Chevrolet TrailBlazer
DriveTrain: 2WD

by Rob93 » Tue Aug 03, 2010 5:25 pm

Philberto wrote:Pardon me if this is a non-issue, but what about CV joint angles at 4" of lift? Has anybody checked this? I know some of us have problems with boots leaking with just 2.5" of lift, so I can only imagine.


I thought about this too... if it became a problem there is always the option of the stronger, aftermarket CV joints... (does Cardone sound right?)
Rob93
Trail-Blazer
 
Posts: 276
Joined: Tue Jul 27, 2010 5:52 pm
Location: FL, Ft. Lauderdale
Name: Rob
Vehicle Year: 2006
Vehicle: Chevrolet TrailBlazer
DriveTrain: 2WD

by Philberto » Tue Aug 03, 2010 5:30 pm

Well, we know cardone boots are more flexible, but we're talking a significant angle increase. I'm anxious to see someone guinea pig this, because 4" is the sweet spot for me as far as lift goes.
My Build Thread | 2006 Trailblazer LS Desert Camping Edition **SOLD**
2013 Nissan Xterra S "ReXterra"
User avatar
Philberto
Lifer
 
Posts: 2046
Joined: Fri Sep 11, 2009 5:30 pm
Location: CA, Oxnard
Name: Philip Cruz
Vehicle Year: Other
Vehicle: Other Vehicle
DriveTrain: 4WD
Rank: Offroad Rated

by Rob93 » Tue Aug 03, 2010 5:38 pm

Philberto wrote:Well, we know cardone boots are more flexible, but we're talking a significant angle increase. I'm anxious to see someone guinea pig this, because 4" is the sweet spot for me as far as lift goes.


teamred250 already has 4" of suspension lift... you could request some pics of his angle.... But if not I'll be doing this soon
Rob93
Trail-Blazer
 
Posts: 276
Joined: Tue Jul 27, 2010 5:52 pm
Location: FL, Ft. Lauderdale
Name: Rob
Vehicle Year: 2006
Vehicle: Chevrolet TrailBlazer
DriveTrain: 2WD

by MrSmithsTB » Tue Aug 03, 2010 5:54 pm

If I remember correctly from previous discussion, our CVs can handle up to 4.5" of lift. So I wouldn't imagine them posing too much of a problem. Still, nobody has run that much suspension lift long term. JamesDub had 3" IIRC, but nobody has done 4". I would love this to be a good thing, as it would have the same effect as suspension and body lifts, but with more ground clearance. One benefit that I can see is that it is not going to increase articulation, so a larger tire is not going to bang up the fenders. However, I do have my concerns about using the stock A arms. If anything, this confirms that the lowering arms will work when flipped. Being 1" longer than stock, they should suck the tires right back in up top with some extra height. Put 4" of rear lift in with the longer control arms and we're set.
back in the saddle
TB BUILD
User avatar
MrSmithsTB
Veteran
 
Posts: 1756
Joined: Thu Sep 10, 2009 2:28 pm
Location: EHT, NJ
Name: Bob
Vehicle Year: 2006
Vehicle: Other GMT360/370
DriveTrain: AWD w/ G80
Rank: Offroad Rated

by johnburgelin » Tue Aug 03, 2010 6:23 pm

Rob93 wrote:I dont understand why there would be a problem with fitting the readylift spacer even without flipping the UCAs... Isn't a strut without the weight of the truck on it is the same length regardless if they have a spacer in the strut or not? I know of members on the OS who have had the Readylift installed without any inside the strut spacer, but there should be no reason it wouldnt work if you have marks lift or bds ect


I think the problem is that the Readylift spacer which is an outside of the strut spacer (just bolts onto the top), is bigger than the system can handle in addition to the inside the strut spacer. I don't know but that's what I would assume. I figure the strut must be slightly longer with an inside the strut spacer installed. I'm just trying to get some extra markmc 1/2" spacers and if not I'm going to go the UHMW route that fishsticks is going. I'm thinking of getting a shop to make me a set of spacers similar to the readylift spacers only minus the high price tag if they would in fact work in conjunction with markmc's lift.
User avatar
johnburgelin
Off-Roader
 
Posts: 171
Joined: Sun May 23, 2010 9:29 am
Name: John
Vehicle Year: 2003
Vehicle: Chevrolet TrailBlazer
DriveTrain: 4WD

by Rob93 » Tue Aug 03, 2010 6:32 pm

johnburgelin wrote:
Rob93 wrote:I dont understand why there would be a problem with fitting the readylift spacer even without flipping the UCAs... Isn't a strut without the weight of the truck on it is the same length regardless if they have a spacer in the strut or not? I know of members on the OS who have had the Readylift installed without any inside the strut spacer, but there should be no reason it wouldnt work if you have marks lift or bds ect


I think the problem is that the Readylift spacer which is an outside of the strut spacer (just bolts onto the top), is bigger than the system can handle in addition to the inside the strut spacer. I don't know but that's what I would assume. I figure the strut must be slightly longer with an inside the strut spacer installed. I'm just trying to get some extra markmc 1/2" spacers and if not I'm going to go the UHMW route that fishsticks is going. I'm thinking of getting a shop to make me a set of spacers similar to the readylift spacers only minus the high price tag if they would in fact work in conjunction with markmc's lift.


It just doesn't make any sense why it would be able to fit... If you can fit it with a stock strut, you should be able to fit it with a lifted strut, being that it is the same length...
Rob93
Trail-Blazer
 
Posts: 276
Joined: Tue Jul 27, 2010 5:52 pm
Location: FL, Ft. Lauderdale
Name: Rob
Vehicle Year: 2006
Vehicle: Chevrolet TrailBlazer
DriveTrain: 2WD

by fishsticks » Tue Aug 03, 2010 7:02 pm

So front end surgery part 2 (3?) happened this afternoon.

A couple interesting things: First off, the Suspensionmaxx "1/2 inch" shims are actually only 3/8" thick. :hissyfit: Secondly, my UHMW, which I thought was only 3/8" thick, is actually 7/16" thick. Stacking it nets 7/8 instead of the original 3/4 I thought I'd get.


To make my shims I used a 4-1/2" hole saw to cut a disc, a 2-1/2" hole saw to cut the center out, then used a 7/16" bit to cut the bolt holes. A drill press made my life much much easier.

I used 3/8" x 2" Grade 8 bolts and nuts for replacements. The Rough Country front spacers don't weld the bolts in so I was able to knock them out easily and replace them. I don't know if this is unique to the RC lift.


Round 1: 1-1/4" shimming (2x UHMW + Smaxx shim)

Result: FAILURE.

1-1/4" is the maximum amount the UBJ can take with my flipped UCAs. With the UBJ at max angle, the unbolted shims were snug against the perch, but I could move them around by tugging a little bit. Bolting the top mount in drew everything up about 1/8-3/16" and gave just a little angle back to the UBJ.

Fender height was 39" or so (32" tires) and hub-fender was near 25".

The driver's CV joint was useless at full extension. Bound solid and tried to move the motor when I turned the wheel by hand. No go.

Round 2: 7/8" shimming (2x UHMW only, removed Smaxx shim)

Result: SUCCESS. *

7/8" shimming gives the UBJ a lot more breathing room. At full extension, the CV joints bind very slightly. I will continue to run this way as anytime I'm moving at full extension, I'm going pretty slow. But high angle CV joints are in my near future.

Fender height sits just above 38". Hub fender is 23-1/2". This is after driving around the block to settle the suspension.


Given my rear spring sandwich coupled with the the weight I normally carry, I can now go and hold my head high on the OS... for now I am perfectly LEVEL. :finger:
11 Silverado LTZ - 6.2L/6l80, 2/3 drop, self tuned
85 Hilux - 3RZ, dual cases, caged, 40s, chromo everything
02 TrailBlazer LTZ - 35s, lockers, balls - Gone but not forgotten - Build
User avatar
fishsticks
Moderator
 
Posts: 4356
Joined: Thu Apr 01, 2010 11:30 pm
Location: WA, Vancouver
Name: Donny
Vehicle Year: Other
Vehicle: Other Vehicle
DriveTrain: 4WD w/ Aftermarket Locker
Rank: Extreme Offroader

by johnburgelin » Tue Aug 03, 2010 7:14 pm

Rob93 wrote:It just doesn't make any sense why it would be able to fit... If you can fit it with a stock strut, you should be able to fit it with a lifted strut, being that it is the same length...


Well it looks like it doesn't fit because it puts the CV at too extreme of an angle. So.........I'm gonna need to find me some UHMW tomorrow :D
User avatar
johnburgelin
Off-Roader
 
Posts: 171
Joined: Sun May 23, 2010 9:29 am
Name: John
Vehicle Year: 2003
Vehicle: Chevrolet TrailBlazer
DriveTrain: 4WD

by Rob93 » Tue Aug 03, 2010 7:42 pm

johnburgelin wrote:
Rob93 wrote:It just doesn't make any sense why it would be able to fit... If you can fit it with a stock strut, you should be able to fit it with a lifted strut, being that it is the same length...


Well it looks like it doesn't fit because it puts the CV at too extreme of an angle. So.........I'm gonna need to find me some UHMW tomorrow :D


Lol guess ya proved me wrong :slap:

And sorry but what is UHMV?
Rob93
Trail-Blazer
 
Posts: 276
Joined: Tue Jul 27, 2010 5:52 pm
Location: FL, Ft. Lauderdale
Name: Rob
Vehicle Year: 2006
Vehicle: Chevrolet TrailBlazer
DriveTrain: 2WD

by fishsticks » Tue Aug 03, 2010 7:50 pm

Rob93 wrote:And sorry but what is UHMW?


A very high density plastic compound. Similar to (and sometimes used for) cutting boards.

People have been making skid plates out of it for awhile apparently. While I haven't see it used for suspension components, it seems to have similar impact/crush strength to Delrin...which I have seen used for spring spacers. I figured I'd give it a whirl. It's easier to work with than aluminum for the home garage/shop types... and I had some floating around.
11 Silverado LTZ - 6.2L/6l80, 2/3 drop, self tuned
85 Hilux - 3RZ, dual cases, caged, 40s, chromo everything
02 TrailBlazer LTZ - 35s, lockers, balls - Gone but not forgotten - Build
User avatar
fishsticks
Moderator
 
Posts: 4356
Joined: Thu Apr 01, 2010 11:30 pm
Location: WA, Vancouver
Name: Donny
Vehicle Year: Other
Vehicle: Other Vehicle
DriveTrain: 4WD w/ Aftermarket Locker
Rank: Extreme Offroader

by SteveTB03 » Tue Aug 03, 2010 7:56 pm

I was wondering what a UHMV was also :?:
Go Big & Go Broke
User avatar
SteveTB03
Addict
 
Posts: 600
Joined: Fri Sep 11, 2009 6:11 pm
Location: Las Vegas, NV
Name: Steve Darras
Vehicle Year: Other
Vehicle: Other Vehicle
DriveTrain: 4WD
Rank: Trail Ready

by Rob93 » Tue Aug 03, 2010 7:56 pm

fishsticks wrote:
Rob93 wrote:And sorry but what is UHMW?


A very high density plastic compound. Similar to (and sometimes used for) cutting boards.

People have been making skid plates out of it for awhile apparently. While I haven't see it used for suspension components, it seems to have similar impact/crush strength to Delrin...which I have seen used for spring spacers. I figured I'd give it a whirl. It's easier to work with than aluminum for the home garage/shop types... and I had some floating around.


Really wish I had the tools to cut this.. I need to see what i can sneak out of the companys shop for a weekend :raspberry: If not if anyone would be willing to make one for a fair price I could be interested... I'd just like to see how this shim works out for you first
Rob93
Trail-Blazer
 
Posts: 276
Joined: Tue Jul 27, 2010 5:52 pm
Location: FL, Ft. Lauderdale
Name: Rob
Vehicle Year: 2006
Vehicle: Chevrolet TrailBlazer
DriveTrain: 2WD

by fishsticks » Tue Aug 03, 2010 8:00 pm

Rob93 wrote:Really wish I had the tools to cut this.. I need to see what i can sneak out of the companys shop for a weekend :raspberry: If not if anyone would be willing to make one for a fair price I could be interested... I'd just like to see how this shim works out for you first


fishsticks wrote:To make my shims I used a 4-1/2" hole saw to cut a disc, a 2-1/2" hole saw to cut the center out, then used a 7/16" bit to cut the bolt holes. A drill press made my life much much easier.


:)

The 4-1/2" hole saw was the only thing I didn't have on hand. It cost me 35 dollars but in my line of work there will come a time when I can use it again.

I bought a Lenox.... you could probably find something way cheaper from Harbor Fright.
11 Silverado LTZ - 6.2L/6l80, 2/3 drop, self tuned
85 Hilux - 3RZ, dual cases, caged, 40s, chromo everything
02 TrailBlazer LTZ - 35s, lockers, balls - Gone but not forgotten - Build
User avatar
fishsticks
Moderator
 
Posts: 4356
Joined: Thu Apr 01, 2010 11:30 pm
Location: WA, Vancouver
Name: Donny
Vehicle Year: Other
Vehicle: Other Vehicle
DriveTrain: 4WD w/ Aftermarket Locker
Rank: Extreme Offroader

by Zero » Tue Aug 03, 2010 8:39 pm

i wish there was some pics of those 2 rounds of front end surgery.
Zero
Veteran
 
Posts: 1048
Joined: Thu Sep 10, 2009 5:07 pm
Location: Los Angeles, CA / Toronto, ON
Name: Brendan
Vehicle Year: 2005
Vehicle: Chevrolet Trailblazer EXT
DriveTrain: 4WD w/ G80
Rank: Offroad Rated

by fishsticks » Tue Aug 03, 2010 8:49 pm

Ask and you shall receive.

Here's the failed attempt.

Image


...and here's why it failed.

Image


Here's the successful attempt.

Image

... and the CV axle angle at rest (sorry didn't get one at full extension).

Image


I can take additional pics if you want... I think I may just organize and write this whole process up into an article. I dunno if JD wants to publish it yet though, seeing how it's still semi-experimental.

I plan to DD it.... *shrug*.
11 Silverado LTZ - 6.2L/6l80, 2/3 drop, self tuned
85 Hilux - 3RZ, dual cases, caged, 40s, chromo everything
02 TrailBlazer LTZ - 35s, lockers, balls - Gone but not forgotten - Build
User avatar
fishsticks
Moderator
 
Posts: 4356
Joined: Thu Apr 01, 2010 11:30 pm
Location: WA, Vancouver
Name: Donny
Vehicle Year: Other
Vehicle: Other Vehicle
DriveTrain: 4WD w/ Aftermarket Locker
Rank: Extreme Offroader

by MrSmithsTB » Tue Aug 03, 2010 9:17 pm

Not bad. While you were having your fun up front, I made my McDouble in the rear. Stacked 2 - 2" spacers with stock springs. It's dark now, so I won't get any pics until tomorrow. I'll say that the rear sits tall, measured 39" ground to fender. The change from level to rake put additional load up front though, making it now 36" ground to fender. :cry: I suppose shinning the front as you did might help that some, but it looks like I am going to save my sweat for a body lift and custom arms to simply fix the BJ angle.
back in the saddle
TB BUILD
User avatar
MrSmithsTB
Veteran
 
Posts: 1756
Joined: Thu Sep 10, 2009 2:28 pm
Location: EHT, NJ
Name: Bob
Vehicle Year: 2006
Vehicle: Other GMT360/370
DriveTrain: AWD w/ G80
Rank: Offroad Rated

PreviousNext

Return to Lifts / Suspension