Offroad Trailblazers and Envoys

Trailblazer Rear Bumper Design/Build

Any special projects involving a decent amount of fab work (bumpers, sliders, roof racks, etc)

by Trail X » Mon Jul 26, 2010 9:03 am

I've been working on a little secret project for a while now. It's still in somewhat of a planning phase, but it's also in the beginning build phase. I was originally going to keep this a secret, but then I thought... what's the fun in that?!

This was the original concept for a rear bumper that I made for Teebes about two years ago.

Image

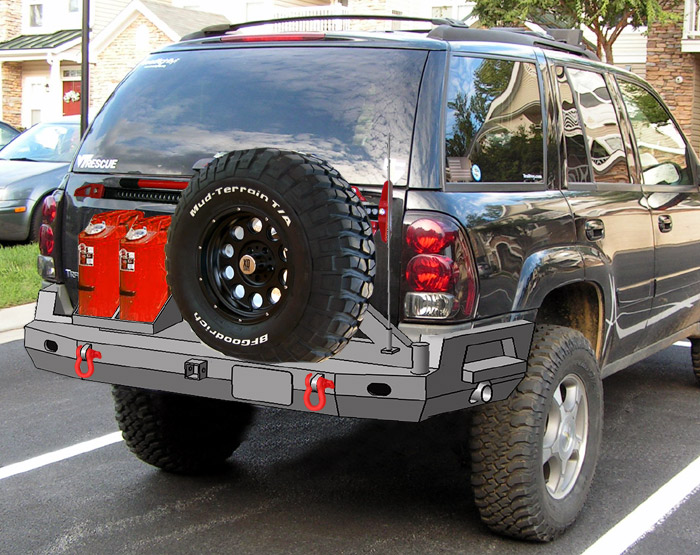
After much deliberation and sketching, I decided to make an 8"x4" tube the main structure component instead of building it out of sheet steel. One of my goals was to make the bumper a simple but extremely strong and robust bumper.

The upper 'wings' will fill in the section below the tail lights. The pic below doesn't have them trimmed to the proper length.

Image

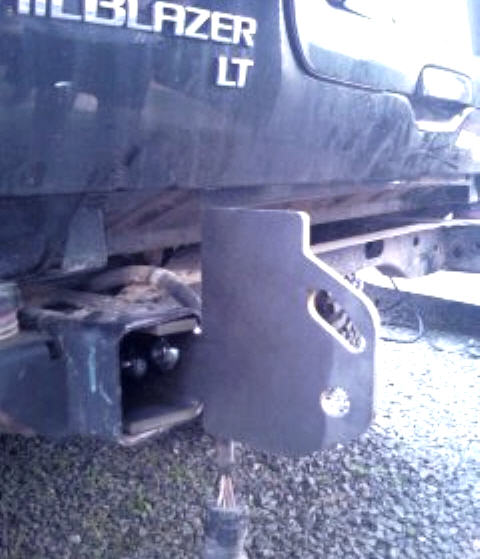
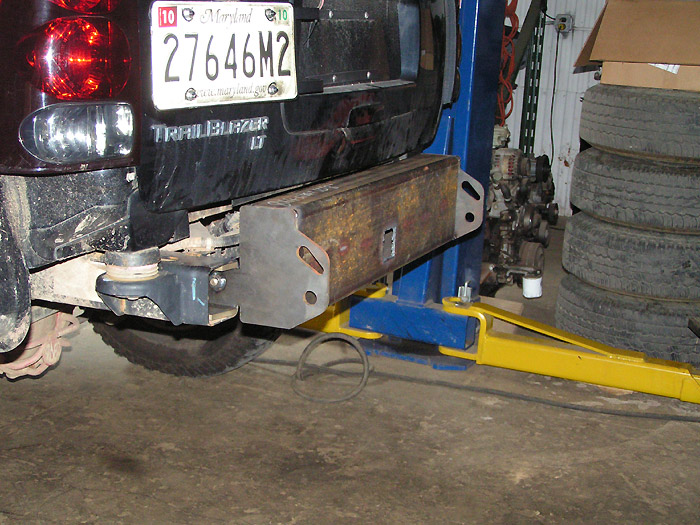
Here's a cell phone pic when I got the first bumper bracket on. 3/8" It's not going anywhere.

Image

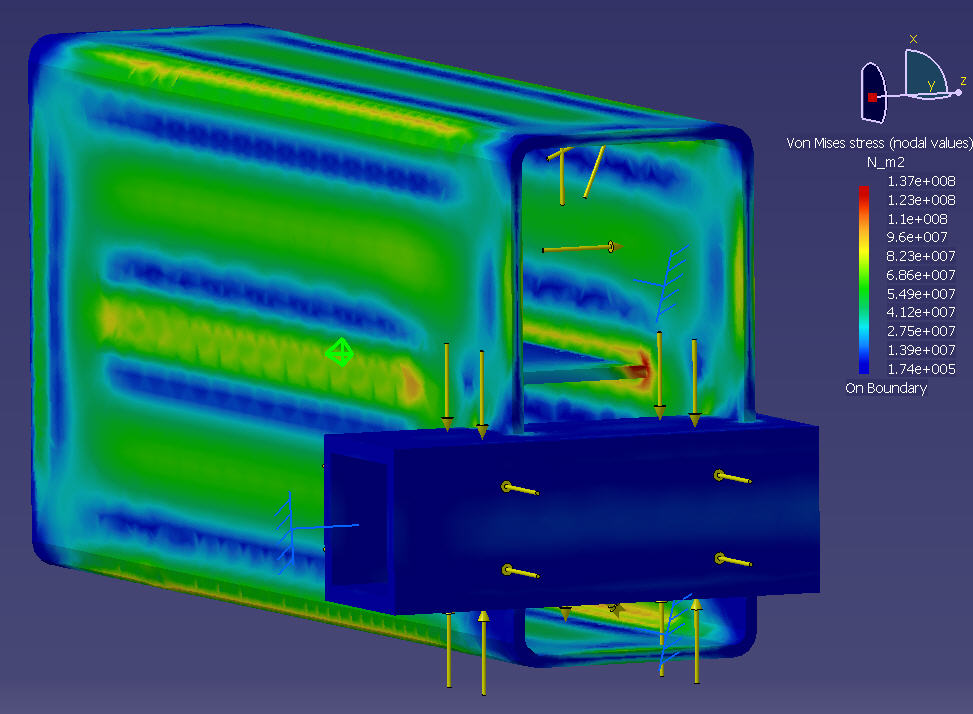
I worked on some FEA stress analysis since I knew that putting an air tank in the rear bumper could be potentially dangerous. Originally I didn't have internal ribbing, but it was added after the first round of FEA to keep the tube from expanding at the center.

Image

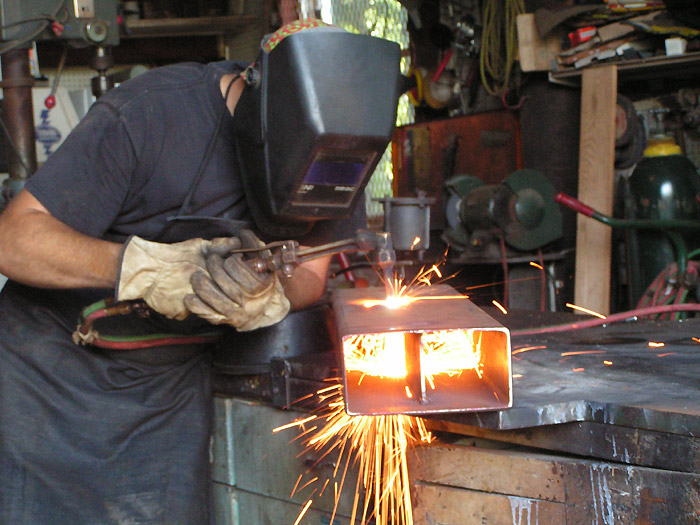
Here we are working on the center tube... Eric, my fabricator and friend, is cutting the hole for the 2" hitch.

Image

Aligning the center section.

Image

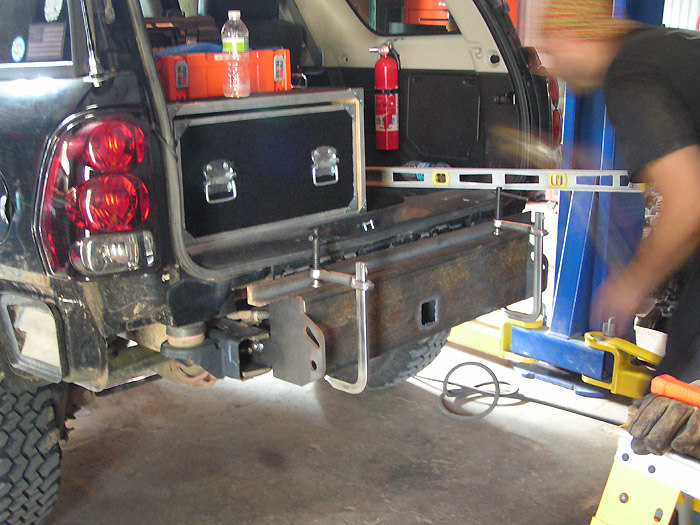
Center section tacked in place.

Image

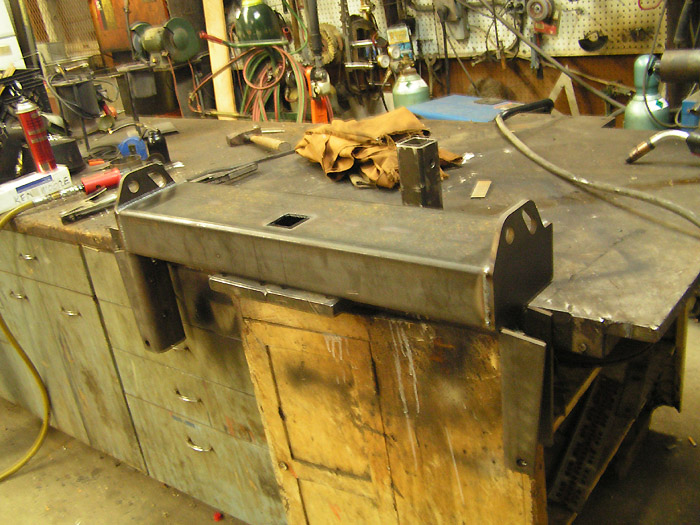
The end caps are very important here, as they will each be holding back thousands of pounds of pressure of compressed air, plus they will be supporting any trailer and winching loads.

Eric did a great job of getting 100% penetration welds all around the end caps. They will easily withstand the stresses being applied.

Below, hitch is sitting beside the bumper, ready to be welded in place.

After we weld in the air tank bungs, we'll do a pressure test to 150 psi. The tank should be good to about 200 psi before yeild, but my operating pressure will only be 100 psi.

Image

For the swing-out, I have a sketch of what will be done. I also already purchased a heavy duty hinge from EMS off road:

Image

That's it for now, it will be a few weeks until we can do a test fitment with the bumper wings. Then a few more weeks after that until we can complete the swing-out. I'll keep this updated as I make my slow progress.
8-) Build Thread | ExPo Build | YouTube Videos
Not all who wander are lost. -Tolkien
User avatar
Trail X
Founder
 
Posts: 9935
Joined: Mon Sep 07, 2009 10:22 pm
Location: VA, Roanoke
Name: James Downing
Vehicle Year: 2005
Vehicle: Chevrolet TrailBlazer
DriveTrain: 4WD w/ Aftermarket Locker
Rank: Expedition Guide

by HARDTRAILZ » Mon Jul 26, 2010 9:11 am

Nice addition for you.
I hate to advocate weird chemicals, alcohol, violence or insanity to anyone...but
they've always worked for me.
User avatar
HARDTRAILZ
Moderator
 
Posts: 6342
Joined: Sat Sep 12, 2009 1:49 am
Location: IN, Batesville
Name: Kyle
Vehicle Year: 2006
Vehicle: Chevrolet TrailBlazer
DriveTrain: 4WD w/ Aftermarket Locker
Rank: Extreme Offroader

by bartonmd » Mon Jul 26, 2010 9:12 am

Lookin good!

If there's room, you guys may want to fillet weld the bend reliefs on the frame brackets. Perfect place for a tear to start, as you know.

Mike
bartonmd
Moderator
 
Posts: 4469
Joined: Wed Sep 09, 2009 9:35 am
Location: IN, Indianapolis
Name: Mike
Vehicle Year: 2007
Vehicle: Chevrolet TrailBlazer
DriveTrain: 4WD w/ G80
Rank: Offroad Rated

by Trail X » Mon Jul 26, 2010 9:16 am

bartonmd wrote:Lookin good!

If there's room, you guys may want to fillet weld the bend reliefs on the frame brackets. Perfect place for a tear to start, as you know.

Mike


Once we weld the wing tubes on, the reliefs will get welded closed. Good eyes.
8-) Build Thread | ExPo Build | YouTube Videos
Not all who wander are lost. -Tolkien
User avatar
Trail X
Founder
 
Posts: 9935
Joined: Mon Sep 07, 2009 10:22 pm
Location: VA, Roanoke
Name: James Downing
Vehicle Year: 2005
Vehicle: Chevrolet TrailBlazer
DriveTrain: 4WD w/ Aftermarket Locker
Rank: Expedition Guide

by bartonmd » Mon Jul 26, 2010 9:26 am

JamesDowning wrote:
bartonmd wrote:Lookin good!

If there's room, you guys may want to fillet weld the bend reliefs on the frame brackets. Perfect place for a tear to start, as you know.

Mike


Once we weld the wing tubes on, the reliefs will get welded closed. Good eyes.


It's cool... I figured you would, but didn't want it to get forgotten, then me say "yeah, I saw that in the first part of the built, but didn't say anything"

Mike
bartonmd
Moderator
 
Posts: 4469
Joined: Wed Sep 09, 2009 9:35 am
Location: IN, Indianapolis
Name: Mike
Vehicle Year: 2007
Vehicle: Chevrolet TrailBlazer
DriveTrain: 4WD w/ G80
Rank: Offroad Rated

by Zero » Mon Jul 26, 2010 9:33 am

Damn Barton, your on top of this stuff like a fat kid on a cupcake!!!

And James, great looking bumper! That has to be the first one Ive seen that will also hold air. Good space saving idea.
Zero
Veteran
 
Posts: 1048
Joined: Thu Sep 10, 2009 5:07 pm
Location: Los Angeles, CA / Toronto, ON
Name: Brendan
Vehicle Year: 2005
Vehicle: Chevrolet Trailblazer EXT
DriveTrain: 4WD w/ G80
Rank: Offroad Rated

by janesy86 » Mon Jul 26, 2010 10:56 am

JD, thats pretty sweet! Can't wait to see some more updates!
Build Thread
Back to stock, had fun while it lasted...
janesy86
Veteran
 
Posts: 1291
Joined: Thu Sep 10, 2009 2:29 pm
Location: MA, Salem
Name: Nick Janes
Vehicle Year: 2007
Vehicle: Chevrolet TrailBlazer
DriveTrain: 4WD w/ G80
Rank: Offroad Rated

by djthumper » Mon Jul 26, 2010 2:01 pm

That looks pretty sweet. I can't wait to see more as it is completed.
User avatar
djthumper
Moderator
 
Posts: 2702
Joined: Wed Mar 24, 2010 6:04 pm
Location: NV, Las Vegas
Name: Larry
Vehicle Year: 2006
Vehicle: Chevrolet TrailBlazer
DriveTrain: 4WD
Rank: Offroad Rated

by Zero » Mon Jul 26, 2010 4:19 pm

A few things I hope make it onto your bumper from the first drawing are...

Side steps
Hole for exhaust
2x Jerry can holder
Zero
Veteran
 
Posts: 1048
Joined: Thu Sep 10, 2009 5:07 pm
Location: Los Angeles, CA / Toronto, ON
Name: Brendan
Vehicle Year: 2005
Vehicle: Chevrolet Trailblazer EXT
DriveTrain: 4WD w/ G80
Rank: Offroad Rated

by Trail X » Mon Jul 26, 2010 4:28 pm

Haha, I don't think any of those things are going to make it.

Steps are pretty useless there due to the slope of the roof. Provide no benefit over using the tire.

I may put a hole for the exhaust, but the bumper will be mounted so high, I'd have to cut the body to run the exhaust that high.

2 Jerry cans will be too much weight on the far side of the arm. Going with a single instead. My thought behind that is that a single is all that's needed 90% of the time. 5 gallons of gasoline gives you +90 miles on road, or +40 miles off road... plenty for most circumstances. I'll still have the option of mounting some on the roof as needed.

Sorry to disappoint. :raspberry:
8-) Build Thread | ExPo Build | YouTube Videos
Not all who wander are lost. -Tolkien
User avatar
Trail X
Founder
 
Posts: 9935
Joined: Mon Sep 07, 2009 10:22 pm
Location: VA, Roanoke
Name: James Downing
Vehicle Year: 2005
Vehicle: Chevrolet TrailBlazer
DriveTrain: 4WD w/ Aftermarket Locker
Rank: Expedition Guide

by Philberto » Mon Jul 26, 2010 5:00 pm

Solution for weight issue of 2 cans: dual swingouts. That's my plan anyways.
My Build Thread | 2006 Trailblazer LS Desert Camping Edition **SOLD**
2013 Nissan Xterra S "ReXterra"
User avatar
Philberto
Lifer
 
Posts: 2046
Joined: Fri Sep 11, 2009 5:30 pm
Location: CA, Oxnard
Name: Philip Cruz
Vehicle Year: Other
Vehicle: Other Vehicle
DriveTrain: 4WD
Rank: Offroad Rated

by KE7WOX » Mon Jul 26, 2010 5:05 pm

It seems that the pictures have vanished.
This is an aggressive post. You probably won’t like it. It is quite doubtful that you have the taste or sophistication to be able to appreciate a post of this quality and depth.

Build Thread
User avatar
KE7WOX
Veteran
 
Posts: 1226
Joined: Tue Sep 29, 2009 2:10 pm
Location: OH, Dublin (Columbus)
Name: Felipe G
Vehicle Year: 2004
Vehicle: Chevrolet TrailBlazer
DriveTrain: 4WD

by johnburgelin » Mon Jul 26, 2010 5:19 pm

KE7WOX wrote:It seems that the pictures have vanished.


I see em, and it looks great! Reminds me of how badly I want a welder :(
User avatar
johnburgelin
Off-Roader
 
Posts: 171
Joined: Sun May 23, 2010 9:29 am
Name: John
Vehicle Year: 2003
Vehicle: Chevrolet TrailBlazer
DriveTrain: 4WD

by Trail X » Mon Jul 26, 2010 6:05 pm

Philberto wrote:Solution for weight issue of 2 cans: dual swingouts. That's my plan anyways.


I considered that, but it adds cost and makes the rear a little more difficult to access (2 actions vs. 1 simple motion). The main reason was that I think it'd really confine the space when camping. As it is, the plan is to basically build the campsite off the driver's side with the swingout hinge on the pass.side, so it doesn't get in the way. Or, at least that's my thoughts.
8-) Build Thread | ExPo Build | YouTube Videos
Not all who wander are lost. -Tolkien
User avatar
Trail X
Founder
 
Posts: 9935
Joined: Mon Sep 07, 2009 10:22 pm
Location: VA, Roanoke
Name: James Downing
Vehicle Year: 2005
Vehicle: Chevrolet TrailBlazer
DriveTrain: 4WD w/ Aftermarket Locker
Rank: Expedition Guide

by aaronrules » Mon Jul 26, 2010 7:02 pm

Can I call dibs on your spare tire carrier you have now? Seriously!? When you get this done, I will totally take it off your hands! Let me know how much!
Lift, shocks, wheels and tires installed...need some armor now.
aaronrules
Off-Roader
 
Posts: 155
Joined: Thu Apr 01, 2010 2:21 am
Name: Aaron
Vehicle Year: 2004
Vehicle: Chevrolet TrailBlazer
DriveTrain: 4WD

by glfredrick » Mon Jul 26, 2010 7:45 pm

Nice work. Even better design work! Some high-zoot software. I have Bend-Tech Pro, which works great for cages and tube work.

Image

One caveat, it is possible to build too heavy. All that weight has to be carried around and boosted up on every sort of surface imaginable.

I've actually built a number of box tube bumpers for various projects. In many cases, I hollow out the back for a considerable weight reduction. In your case, the air tank negates that, but you can make the end caps lighter.

Here's one I built for the rear of my 'Sploder. The bumper had to ride in that spot due to the frame rails, so I made the tubing to compensate and add interest and light-weight sliders to protect the rear windows (which I lost on more than one occaision before the bumper).

Image
http://www.UCORA.org == The United Christian Off-Road Alliance, a family friendly place
2003 Trailblazer = got groceries?
1995 Dodge RAM 2500 w/Cummins = got tow rig?
1986-90 Ford Ranger truggy = got rock?
User avatar
glfredrick
Contributing Author
 
Posts: 130
Joined: Mon Jul 26, 2010 3:28 pm
Location: Eagle, WI
Name: Guy
Vehicle Year: 2003
Vehicle: Chevrolet TrailBlazer
DriveTrain: 4WD

by Trail X » Mon Jul 26, 2010 8:05 pm

Hey Guy! Very cool bumper. I appreciate the input too. I actually have been considering getting rid of the back panel of the wings. My hesitation comes from it just becoming a place for mud to gunk up since it's right behind the wheels. Plus, the pass. wing will be supporting the hinge... so I'm not sure if I want to open it up too much.

My fabricator has bendtech - I use the software at work to do the analysis and design.

Aaron, the old tire carrier may already be spoken for. We'll see how it pans out. If it does go on the market, I think I'd like to get $200 for it. They go for $350 new.
8-) Build Thread | ExPo Build | YouTube Videos
Not all who wander are lost. -Tolkien
User avatar
Trail X
Founder
 
Posts: 9935
Joined: Mon Sep 07, 2009 10:22 pm
Location: VA, Roanoke
Name: James Downing
Vehicle Year: 2005
Vehicle: Chevrolet TrailBlazer
DriveTrain: 4WD w/ Aftermarket Locker
Rank: Expedition Guide

by aaronrules » Mon Jul 26, 2010 8:12 pm

JamesDowning wrote:Hey Guy! Very cool bumper. I appreciate the input too. I actually have been considering getting rid of the back panel of the wings. My hesitation comes from it just becoming a place for mud to gunk up since it's right behind the wheels. Plus, the pass. wing will be supporting the hinge... so I'm not sure if I want to open it up too much.

My fabricator has bendtech - I use the software at work to do the analysis and design.

Aaron, the old tire carrier may already be spoken for. We'll see how it pans out. If it does go on the market, I think I'd like to get $200 for it. They go for $350 new.


You tell me when and where to send the money, and I will literally send the second you tell me man! If it's not already spoken for...since your TB is everything I wish mine can be...what better way than to get THE original JAMES DOWNING tire carrier! :drool3:
Lift, shocks, wheels and tires installed...need some armor now.
aaronrules
Off-Roader
 
Posts: 155
Joined: Thu Apr 01, 2010 2:21 am
Name: Aaron
Vehicle Year: 2004
Vehicle: Chevrolet TrailBlazer
DriveTrain: 4WD

by tbangert » Mon Jul 26, 2010 8:35 pm

I am really liking the idea of an air tank incorporated in the bumper. I've been trying to figure out a location for an air tank, so I may have to ponder this idea.
MarcMC - Bilstien - BDS - WheelAdapters - Treadwright - K&N - Gibson - Hayden - Zone
My Build Thread
User avatar
tbangert
Off-Roader
 
Posts: 157
Joined: Mon Jun 07, 2010 5:05 pm
Location: ME, Berwick
Name: Tyler
Vehicle Year: 2005
Vehicle: Chevrolet TrailBlazer
DriveTrain: 4WD

by Zero » Tue Jul 27, 2010 10:32 am

Just wondering if having an airtank in the bumper would cause a vehicle to fail a safety check?????????

Also, what would happen if you got rear ended with the tank filled to 100 - 150psi? Would the air just hiss out slowly? Would it cause an explosive effect sending metal or other material towards the person driving behind you?
Zero
Veteran
 
Posts: 1048
Joined: Thu Sep 10, 2009 5:07 pm
Location: Los Angeles, CA / Toronto, ON
Name: Brendan
Vehicle Year: 2005
Vehicle: Chevrolet Trailblazer EXT
DriveTrain: 4WD w/ G80
Rank: Offroad Rated

Next

Return to Fab Work

cron