Offroad Trailblazers and Envoys

Another Rear Bumper Fab Thread

Any special projects involving a decent amount of fab work (bumpers, sliders, roof racks, etc)

by mason10198 » Sat Feb 03, 2018 4:00 am

Got the main step plate in! Unfortunately had to cut it as two halves because my CNC isn't big enough to cut the whole thing. Put 2 massive gussets under each "half" (post a pic of those later). Should be getting more done this weekend... It almost looks like a bumper now!ImageImage
User avatar
mason10198
Moderator
 
Posts: 504
Joined: Thu Sep 17, 2015 11:49 pm
Location: AR, Bryant
Name: Mason
Vehicle Year: 2005
Vehicle: Chevrolet TrailBlazer
DriveTrain: 4WD w/ Aftermarket Locker
Rank: Offroad Rated

by bartonmd » Wed Feb 07, 2018 4:47 pm

Looks like a good start!

Mike
bartonmd
Moderator
 
Posts: 4469
Joined: Wed Sep 09, 2009 9:35 am
Location: IN, Indianapolis
Name: Mike
Vehicle Year: 2007
Vehicle: Chevrolet TrailBlazer
DriveTrain: 4WD w/ G80
Rank: Offroad Rated

by mason10198 » Thu Feb 08, 2018 7:29 pm

Decisions on hinge design... This is what I have to work with: https://goo.gl/cfDf9p
I had originally planned on cutting off the bottom "tab" of the bracket and welding it into the bumper where it is sitting here-
IMG_20180203_114743943.jpg
realbracket

-and then drilling a hole in the bumper (what i'm calling the "step plate") for the hinge bolt to go through where the bottom tab of the bracket would have been, and then welding the nut inside the bumper, on the underside of the step plate.
On paper, that would look like this from the top-
IMG_20180208_150306967.jpg
idea1sketch

-and when chucked into the Fusion model, looks like this-
Screen Shot 2018-02-08 at 3.38.12 PM.png
idea1model

BUT with a little more thinking, I think it might be better to essentially forget that bracket, and just fully incorporate one into the bumper itself. Which would be almost exactly the same as what I just showed above, except 'pushed' towards the passenger side, into the 'box' that the step plate wall and passenger wing come together to make. Which, on paper, looks like this-
IMG_20180208_151224687.jpg
idea2sketch

-and wait, what do you know... I'm so ignorant i didn't realize thats exactly what Mike did right here, just with heims instead of a bought hinge-
IMAG1145-1.jpg
mikeissmarterthanme

SO, when I modify that idea a little bit to work with my big phat hinge instead of heim links, I get this-
hinge.png
betteridea

-which I think will be a way better option both functionally and aesthetically.
User avatar
mason10198
Moderator
 
Posts: 504
Joined: Thu Sep 17, 2015 11:49 pm
Location: AR, Bryant
Name: Mason
Vehicle Year: 2005
Vehicle: Chevrolet TrailBlazer
DriveTrain: 4WD w/ Aftermarket Locker
Rank: Offroad Rated

by HARDTRAILZ » Fri Feb 09, 2018 9:35 am

I searched a good while on the rear bumper and gave Mike a ton of ideas. I really liked the heim for adjustability if needed at all and it did prove to work well.

I need to get the swings back on my truck, but been wanting to redo the jerry can mount side with a platform that could hold either a couple jerry cans of a cooler or similar. Something a bit more useful since I really dont need to haul fuel around constantly
I hate to advocate weird chemicals, alcohol, violence or insanity to anyone...but
they've always worked for me.
User avatar
HARDTRAILZ
Moderator
 
Posts: 6342
Joined: Sat Sep 12, 2009 1:49 am
Location: IN, Batesville
Name: Kyle
Vehicle Year: 2006
Vehicle: Chevrolet TrailBlazer
DriveTrain: 4WD w/ Aftermarket Locker
Rank: Extreme Offroader

by mason10198 » Fri Feb 09, 2018 11:30 am

I wanna go the RotoPax route as far as fuel storage. Everyone knows it's dumb expensive, but it is super convenient to be able to switch sizes and have water cans/dry storage that work with the mounts.
User avatar
mason10198
Moderator
 
Posts: 504
Joined: Thu Sep 17, 2015 11:49 pm
Location: AR, Bryant
Name: Mason
Vehicle Year: 2005
Vehicle: Chevrolet TrailBlazer
DriveTrain: 4WD w/ Aftermarket Locker
Rank: Offroad Rated

by mason10198 » Fri Feb 09, 2018 3:20 pm

After a little more work in Fusion:
GIFs are so much fun...
Image
Image
User avatar
mason10198
Moderator
 
Posts: 504
Joined: Thu Sep 17, 2015 11:49 pm
Location: AR, Bryant
Name: Mason
Vehicle Year: 2005
Vehicle: Chevrolet TrailBlazer
DriveTrain: 4WD w/ Aftermarket Locker
Rank: Offroad Rated

by Trail X » Fri Feb 09, 2018 6:15 pm

Looks good, just don't forget to draw in your welds. I think you're going to run into your welds on full open. It'd make sense to also have some space between the between the arm and the step plate. Normally you want it to at least ride on a washer or two so you're not scraping your arm across the step plate.
8-) Build Thread | ExPo Build | YouTube Videos
Not all who wander are lost. -Tolkien
User avatar
Trail X
Founder
 
Posts: 9935
Joined: Mon Sep 07, 2009 10:22 pm
Location: VA, Roanoke
Name: James Downing
Vehicle Year: 2005
Vehicle: Chevrolet TrailBlazer
DriveTrain: 4WD w/ Aftermarket Locker
Rank: Expedition Guide

by mason10198 » Sat Feb 10, 2018 12:56 pm

Yes, I still have to raise everything up a fraction or two to get it to fit, I just hadn't done that in the model yet. Working on that part and the radius today hopefully
User avatar
mason10198
Moderator
 
Posts: 504
Joined: Thu Sep 17, 2015 11:49 pm
Location: AR, Bryant
Name: Mason
Vehicle Year: 2005
Vehicle: Chevrolet TrailBlazer
DriveTrain: 4WD w/ Aftermarket Locker
Rank: Offroad Rated

by mason10198 » Wed Feb 14, 2018 5:51 pm

Mostly finished with the hinge side. Nasty welds until the gap fill on the sides of the radius. Underside hasn't been welded yet either, gotta go refill my bottles. Those random looking plates on the bottom of the mounting arms are just spacers to help line up the 90 degree on the angle fit up in the rounded corners of the frame rail, so didnt spend much time measuring or cutting those. Just kinda threw them in there and welded them on.
1.jpeg

3.jpeg

6.jpeg

5.jpeg

13.jpeg

8.jpeg
User avatar
mason10198
Moderator
 
Posts: 504
Joined: Thu Sep 17, 2015 11:49 pm
Location: AR, Bryant
Name: Mason
Vehicle Year: 2005
Vehicle: Chevrolet TrailBlazer
DriveTrain: 4WD w/ Aftermarket Locker
Rank: Offroad Rated

by ETB1 » Sun Feb 18, 2018 12:30 am

Looks good, can’t wait to see it finished. I have to cut mine out piece by piece and weld together, only have a plasma cutter, grinder and a welder lol
ETB1
Off-Roader
 
Posts: 149
Joined: Thu Nov 10, 2016 3:24 am
Location: Dry ridge,, ky
Name: Josh Walton
Vehicle Year: 2008
Vehicle: Chevrolet TrailBlazer
DriveTrain: 4WD w/ G80
Rank: Expedition Rated

by Trail X » Sun Feb 18, 2018 10:46 pm

Good looking welds!
8-) Build Thread | ExPo Build | YouTube Videos
Not all who wander are lost. -Tolkien
User avatar
Trail X
Founder
 
Posts: 9935
Joined: Mon Sep 07, 2009 10:22 pm
Location: VA, Roanoke
Name: James Downing
Vehicle Year: 2005
Vehicle: Chevrolet TrailBlazer
DriveTrain: 4WD w/ Aftermarket Locker
Rank: Expedition Guide

by mason10198 » Tue Apr 17, 2018 6:17 pm

Update time! Phew, it's been a short while. Lets see...
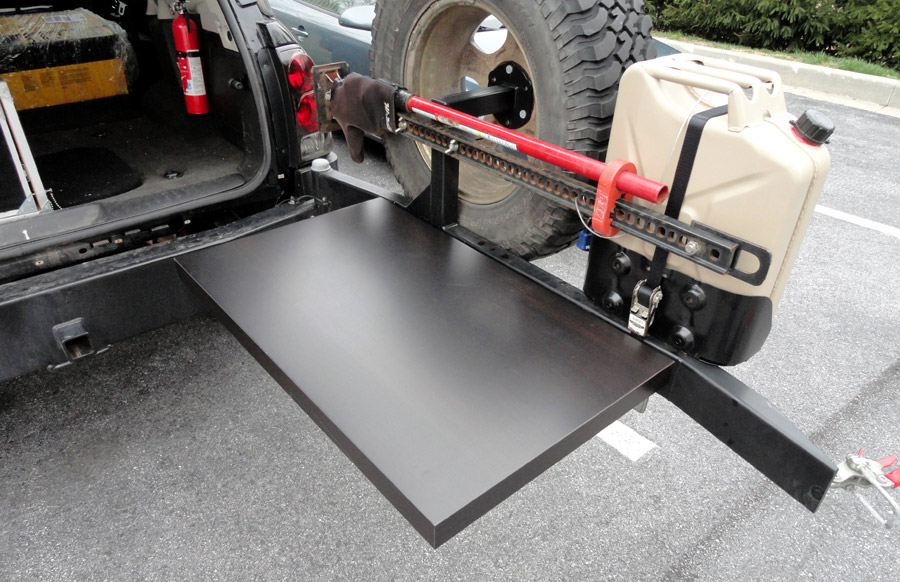
I've build most of the arm, tire mount, and passenger side of the main bumper. I added some more structure to the hinge side to minimize deflection when in the open position. I took a plasma cutter to an old front hub assembly for use as a tire mounting plate, which was full of grease and probably gave me cancer. After plasma, I ground the backside of it down relatively flat and welded it to a *45 on the end of some 2x2 to form the stick out angle. I had a piece of scrap laying on the ground from a hole saw that just so happened to fit perfectly in the center of the hub, so I used it to fill in the CV shaft hole and seal it all off. Did some more measuring and chopping until I came up with a good mounting stand and welded it to the arm. There is plenty of room for the back glass to open with the arm closed (new 35" tire shown), probably enough room for a 37".

Sidenote as I sit here looking at my welds... I am by no means a welder. My dad taught, er... told, me how to half-moon a puddle with a 110V/90A FCAW when I was 13, and I've been self/youtube taught ever since. I built my front MDB kit winch bumper with the same 90A machine. I just recently upgraded to a nicer 240V/220A multiprocess machine, this bumper being the first project I've used it on. With that said, I've been MIG'in this thing together with little to no clue what I'm doing. Sometimes I lay down pretty beads, sometimes I try to wipe it off because I'm so convinced it came out of the backside of a bird with the flu. Just throwing that in there for anyone looking through the pics trying to contain their laughter :lol:

Geez, can we get back on track now???

I had planned on using the Rotopax system for fuel/water storage since it's fairly modular and robust. I have since decided against Rotopax for a few reasons. Everything about them is stupid expensive for what they can hold. A plastic 2gal Rotopax can costs just as much as a brand name steel 5.3gal NATO Wavian jerrycan. The best I could do with Rotopax is (2x) side-by-side stacks of (2x) 2gal cans totaling my aux fuel storage at 8gal, and that would cost an upwards of $500+. I can easily use (2x) 5.3gal NATO cans totaling almost 11gal.

BUT I have to either find some type of NATO mounting bracket online that I can use, or make my own. I'd really love to put one of THESE on each side of the tire mount "pillar" like this...
22251.jpg

...but I'm not sure. Please let me know if anyone has suggestions for this.

Onto the pictures. Uploading here sucks, but uploading to a third party risks broken pics when someone comes to look at this thread later on. So if you're reading this in 2019 or later, you're welcome for the next few hours I'll spend attaching these one by one...
Attachments
IMG_20180304_112529768.jpg
IMG_20180304_123950716.jpg
IMG_20180304_163609409.jpg
IMG_20180310_112556232.jpg
IMG_20180310_112603652.jpg
IMG_20180310_122219358.jpg
IMG_20180310_131122283.jpg
IMG_20180311_132631222.jpg
IMG_20180311_133028732.jpg
IMG_20180311_133037250.jpg
IMG_20180311_152005619.jpg
IMG_20180311_152013087.jpg
IMG_20180311_155627048.jpg
IMG_20180311_155636176.jpg
IMG_20180311_155651854.jpg
IMG_20180311_155916757.jpg
IMG_20180311_155926419.jpg
IMG_20180311_160150956.jpg
IMG_20180316_135538203.jpg
IMG_20180316_135615838.jpg
30652331_1783979088328831_3325059080929673216_n.jpg
30629156_1783979404995466_7808091930985758720_n.jpg
User avatar
mason10198
Moderator
 
Posts: 504
Joined: Thu Sep 17, 2015 11:49 pm
Location: AR, Bryant
Name: Mason
Vehicle Year: 2005
Vehicle: Chevrolet TrailBlazer
DriveTrain: 4WD w/ Aftermarket Locker
Rank: Offroad Rated

by ETB1 » Tue Apr 17, 2018 6:46 pm

Looks good brother. I personally like the jerry can idea. That is why i chose to do the dual swing arms. Jerry cans are cheaper and in my opinion will last longer. Though i may be partial being from military background and all.
ETB1
Off-Roader
 
Posts: 149
Joined: Thu Nov 10, 2016 3:24 am
Location: Dry ridge,, ky
Name: Josh Walton
Vehicle Year: 2008
Vehicle: Chevrolet TrailBlazer
DriveTrain: 4WD w/ G80
Rank: Expedition Rated

by Trail X » Wed Apr 18, 2018 10:16 am

Image

My jerry can holder seems to work pretty well. Granted, my old holder bracket rusted out (the one pictured here), but the single ratchet strap concept works really well. Just needs some oiling from time to time.
8-) Build Thread | ExPo Build | YouTube Videos
Not all who wander are lost. -Tolkien
User avatar
Trail X
Founder
 
Posts: 9935
Joined: Mon Sep 07, 2009 10:22 pm
Location: VA, Roanoke
Name: James Downing
Vehicle Year: 2005
Vehicle: Chevrolet TrailBlazer
DriveTrain: 4WD w/ Aftermarket Locker
Rank: Expedition Guide

by mason10198 » Wed Apr 18, 2018 12:43 pm

I made a quick sheet metal copy of these mounts in Fusion, should be pretty easy to bam these out of some... lets say 14 gauge... on the plasma and bend them up. A couple of small hinges and padlockable draw latches from McMaster will cover hardware. Then I'm thinking I'll put some adhesive neoprene foam in there to keep it from rattling. Eh?
Attachments
canmount v2.png
canmount v2.2.png
canholder.gif
canholder.gif (3.15 MiB) Viewed 28390 times
User avatar
mason10198
Moderator
 
Posts: 504
Joined: Thu Sep 17, 2015 11:49 pm
Location: AR, Bryant
Name: Mason
Vehicle Year: 2005
Vehicle: Chevrolet TrailBlazer
DriveTrain: 4WD w/ Aftermarket Locker
Rank: Offroad Rated

by mason10198 » Wed Apr 18, 2018 6:22 pm

These will fit back behind the tire perfectly!
bumper.gif
bumper.gif (3.9 MiB) Viewed 28368 times
User avatar
mason10198
Moderator
 
Posts: 504
Joined: Thu Sep 17, 2015 11:49 pm
Location: AR, Bryant
Name: Mason
Vehicle Year: 2005
Vehicle: Chevrolet TrailBlazer
DriveTrain: 4WD w/ Aftermarket Locker
Rank: Offroad Rated

by Trail X » Thu Apr 19, 2018 9:26 am

Those look good too! I like the little gifs Mason. Pretty sweet!

I always try to keep the cap accessable, because I use a siphon. Much easier to siphon from where its mounted than to pick one of those things and try to pour them in your tank.

Also, the gas cans are rather thin. They hold up for a while, but I'd recommend putting some rubber or something under them. Mine finally rusted through (I think where the mounting screws were rubbing) on the bottom and started leaking gas.
8-) Build Thread | ExPo Build | YouTube Videos
Not all who wander are lost. -Tolkien
User avatar
Trail X
Founder
 
Posts: 9935
Joined: Mon Sep 07, 2009 10:22 pm
Location: VA, Roanoke
Name: James Downing
Vehicle Year: 2005
Vehicle: Chevrolet TrailBlazer
DriveTrain: 4WD w/ Aftermarket Locker
Rank: Expedition Guide

by mason10198 » Thu Apr 19, 2018 2:01 pm

Trail X wrote:I always try to keep the cap accessible, because I use a siphon. Much easier to siphon from where its mounted than to pick one of those things and try to pour them in your tank.

I thought about the cap being accessible as well, but as easy as it will be to just pop the latch and get the 'strap' out of the way, it wasn't worth designing around that idea. I did go ahead and move the crosspiece back towards the handles, where it can help hold the can down better. I'm not sure why 4x4innovations has that piece there, I assume just to help keep the lid from opening on its own?

Trail X wrote:Also, the gas cans are rather thin. They hold up for a while, but I'd recommend putting some rubber or something under them. Mine finally rusted through (I think where the mounting screws were rubbing) on the bottom and started leaking gas.

Yeah, good idea. I'm going to get some of this rubber sheet and put it in between the can and the holder in a few places like under the crosspiece and on the bottom. Also just to help with rattling.

I ordered some cute little weatherproof Master locks for the draw latches to keep the bad guys at bay too.
Attachments
canmount v3.jpg
Moved crosspiece back towards can handles
User avatar
mason10198
Moderator
 
Posts: 504
Joined: Thu Sep 17, 2015 11:49 pm
Location: AR, Bryant
Name: Mason
Vehicle Year: 2005
Vehicle: Chevrolet TrailBlazer
DriveTrain: 4WD w/ Aftermarket Locker
Rank: Offroad Rated

by mason10198 » Wed Jul 25, 2018 5:28 pm

Dropped it off at the powdercoat shop today. Didn't end up making the fuel can mounts, I will make a bolt on version of those later. Right now I just want to get this thing coated and on the truck.
User avatar
mason10198
Moderator
 
Posts: 504
Joined: Thu Sep 17, 2015 11:49 pm
Location: AR, Bryant
Name: Mason
Vehicle Year: 2005
Vehicle: Chevrolet TrailBlazer
DriveTrain: 4WD w/ Aftermarket Locker
Rank: Offroad Rated

by Flyingfischer5 » Wed Jul 25, 2018 8:08 pm

Nice, Can't wait to see it.
User avatar
Flyingfischer5
Off-Roader
 
Posts: 153
Joined: Sun Feb 21, 2010 9:43 pm
Location: Spokane, WA
Name: Craig
Vehicle Year: 2004
Vehicle: Chevrolet TrailBlazer
DriveTrain: 4WD

PreviousNext

Return to Fab Work