Offroad Trailblazers and Envoys

The Best Ways to Mount to the TB Roof

Any special projects involving a decent amount of fab work (bumpers, sliders, roof racks, etc)

by Trail X » Mon Apr 05, 2010 11:06 am

This is something that we've all thought about when designing/mounting a roof rack.

There are many ways of going about this... here are a few I have seen/heard of so far:

  • JB welding a nut to a plate
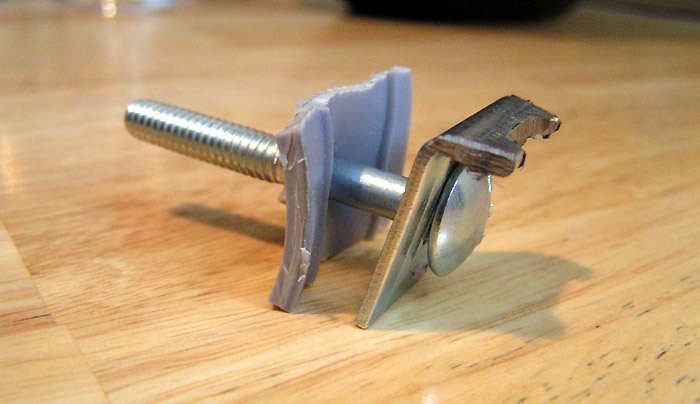
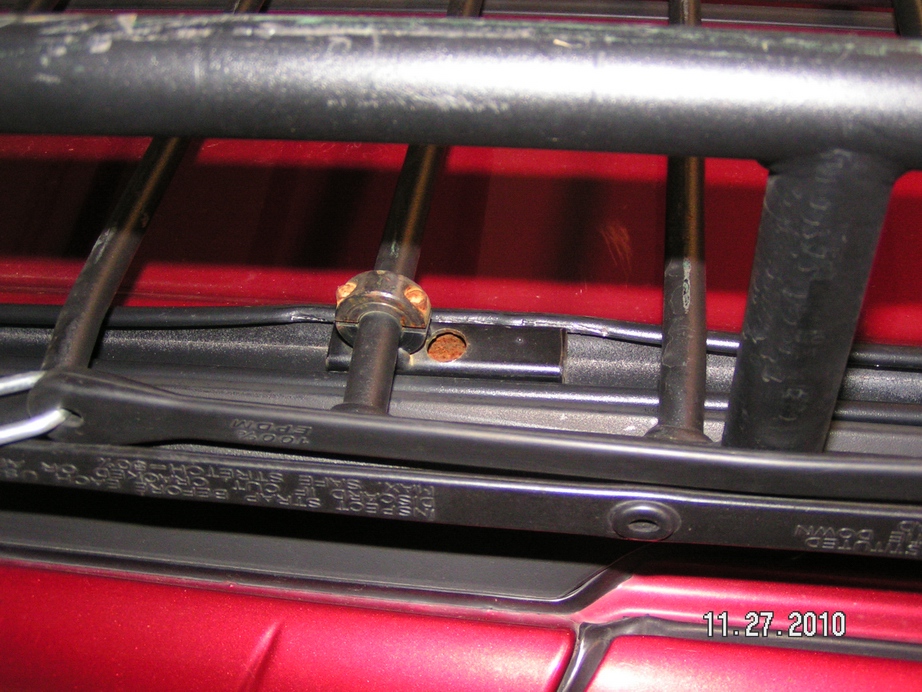
  • Using a square-holed square washer with a carrier bolt
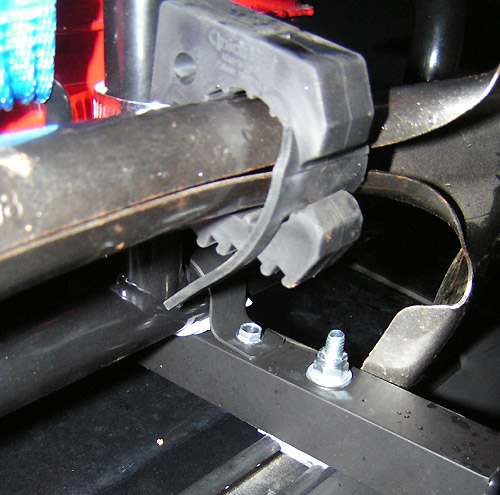
  • Bolting through the entire rack
  • Screwing into the roof rack mounting holes
  • Using a wood screw into the roof rack
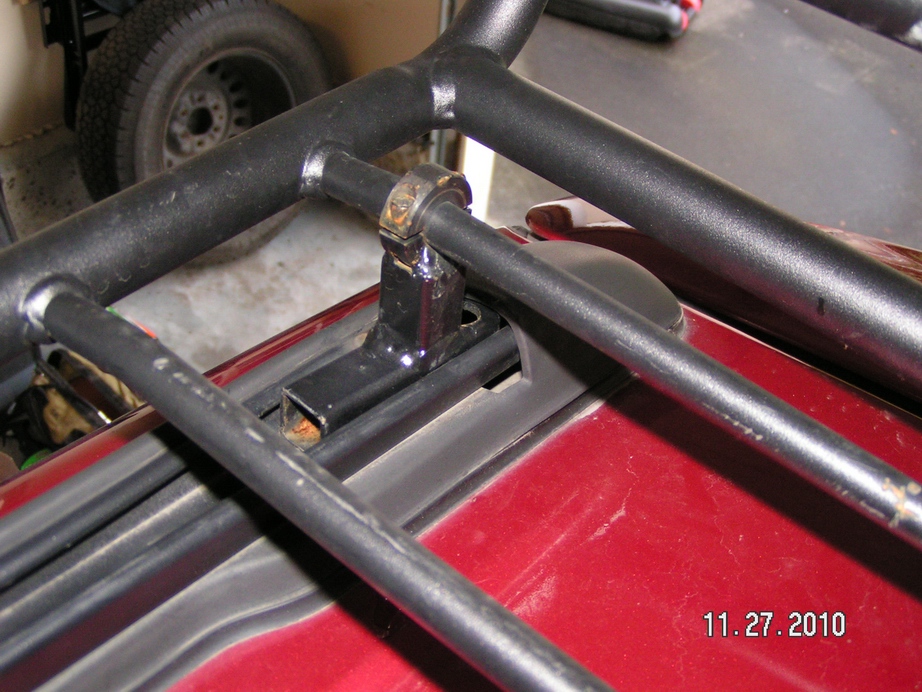
  • Making your own mount

Lots of options...

So even if I listed your idea here, please explain your method fully and provide pictures/etc.
Let us know if it's worked for you and what you would do differently if done again.
Any pictures of long-term results?


I'll chime in with my own ideas/experiences in a bit... :fro:
8-) Build Thread | ExPo Build | YouTube Videos
Not all who wander are lost. -Tolkien
User avatar
Trail X
Founder
 
Posts: 9935
Joined: Mon Sep 07, 2009 10:22 pm
Location: VA, Roanoke
Name: James Downing
Vehicle Year: 2005
Vehicle: Chevrolet TrailBlazer
DriveTrain: 4WD w/ Aftermarket Locker
Rank: Expedition Guide

by Gordinho80 » Mon Apr 05, 2010 11:37 am

Spring Nuts...

I've picked up a few 3/8 spring nuts from Home Depot. They measure 1.375" x 0.75". The rails are slightly angled, 1" at the top and approx. 0.92" at the bottom. So a slight taper...

I plan on grinding down the spring nuts to that they fit snug in the rails.

Attached is a pic of approx. how much grinding would need to be done.

spring-nut.jpg
(17.89 KiB) Downloaded 956 times
Mario - Build Thread
User avatar
Gordinho80
Lifer
 
Posts: 2787
Joined: Tue Sep 08, 2009 9:27 am
Location: NJ, Jackson
Name: Mario Almeida
Vehicle Year: Other
Vehicle: Other Vehicle
DriveTrain: 4WD

by Trail X » Mon Apr 05, 2010 1:00 pm

I've done mine two different ways so far...

------------------------------------------------------------------------------------------

First was the roof lightbar setup:

It was a nut that was JB-welded to the bottom of a 1" wide aluminum plate.


It works fine for light weights, but the JB-weld isn't as strong as I'd hoped. Mine has cracked and been re-welded a few times. PITA. Although the system does seem to otherwise work fine for light loads. For heavy loads I would be concerned that it could slip within the roof rack channel.


------------------------------------------------------------------------------------------

Second was the roof rack setup, which was an improvement:

This used a carrier bolt inserted into a square washer with a square hole. This is permanently housed in the roof rail for easy on/off of the roof rack. The key here to carrying the heavy loads is the rubber. The rubber increases the friction between the rack components, so the only stresses that the carrier bolts see are tension. All lateral loads are transferred through the rubber.


It works well, but I wonder if there is a more elegant solution...

8-) Build Thread | ExPo Build | YouTube Videos
Not all who wander are lost. -Tolkien
User avatar
Trail X
Founder
 
Posts: 9935
Joined: Mon Sep 07, 2009 10:22 pm
Location: VA, Roanoke
Name: James Downing
Vehicle Year: 2005
Vehicle: Chevrolet TrailBlazer
DriveTrain: 4WD w/ Aftermarket Locker
Rank: Expedition Guide

by janesy86 » Mon Apr 05, 2010 1:27 pm

I just took off my lightbar since I haven't really been using it and while unbolting it my JB weld cracked on both sides and the bolts were just spinning so I had to bang it off with a hammer...

But like you said its fine for lighter loads.
Build Thread
Back to stock, had fun while it lasted...
janesy86
Veteran
 
Posts: 1291
Joined: Thu Sep 10, 2009 2:29 pm
Location: MA, Salem
Name: Nick Janes
Vehicle Year: 2007
Vehicle: Chevrolet TrailBlazer
DriveTrain: 4WD w/ G80
Rank: Offroad Rated

by Saxis » Mon Apr 05, 2010 1:47 pm

For something like the lightbar, would it be possible to take a stock crossbar and drill through it to mount the lights? I know the stock crossbar is composite or something, so not sure if it would crack or not...
User avatar
Saxis
Trail-Blazer
 
Posts: 324
Joined: Fri Sep 18, 2009 1:47 pm
Location: Elma, WA
Name: Jesse
Vehicle Year: 2007
Vehicle: Other Vehicle
DriveTrain: 4WD w/ G80

by The Roadie » Tue Apr 06, 2010 12:47 am

I can't be happier with a solution that can't be stronger unless I added more rivnuts to the roof. Just take the entire rack off, drill through the bottom of the metal rails, and go upwards with hardened 5/16" bolts. I worry about other stuff before I worry about 500 pounds of overloaded roof rack flying off the vehicle. After my first two experiments with rectangular nuts failed by starting to loosen up, I just said ENOUGH IS ENOUGH and jumped all the way to bulletproof. Non-adjustable.

Image

Image

Image

Image

Image

Image
User avatar
The Roadie
Founder
 
Posts: 5011
Joined: Mon Sep 07, 2009 11:29 pm
Location: CA, Vista, San Diego County
Name: Bill Carton
Vehicle Year: 2004
Vehicle: GMC Envoy
DriveTrain: 4WD w/ G80
Rank: Expedition Guide

by KE7WOX » Wed Apr 07, 2010 12:44 am

Hey Mario, did you find those in the hardware section with all the bolts and nuts?
This is an aggressive post. You probably won’t like it. It is quite doubtful that you have the taste or sophistication to be able to appreciate a post of this quality and depth.

Build Thread
User avatar
KE7WOX
Veteran
 
Posts: 1226
Joined: Tue Sep 29, 2009 2:10 pm
Location: OH, Dublin (Columbus)
Name: Felipe G
Vehicle Year: 2004
Vehicle: Chevrolet TrailBlazer
DriveTrain: 4WD

by Gordinho80 » Wed Apr 07, 2010 12:49 am

They were actually in the electrical section at Home Depot...
Mario - Build Thread
User avatar
Gordinho80
Lifer
 
Posts: 2787
Joined: Tue Sep 08, 2009 9:27 am
Location: NJ, Jackson
Name: Mario Almeida
Vehicle Year: Other
Vehicle: Other Vehicle
DriveTrain: 4WD

by KE7WOX » Wed Apr 07, 2010 7:11 pm

k thanks.
This is an aggressive post. You probably won’t like it. It is quite doubtful that you have the taste or sophistication to be able to appreciate a post of this quality and depth.

Build Thread
User avatar
KE7WOX
Veteran
 
Posts: 1226
Joined: Tue Sep 29, 2009 2:10 pm
Location: OH, Dublin (Columbus)
Name: Felipe G
Vehicle Year: 2004
Vehicle: Chevrolet TrailBlazer
DriveTrain: 4WD

by bgwolfpack » Tue Apr 13, 2010 2:10 pm

Just want to throw this out. I found, what looks to be a good maker of light bars. http://www.carr.com

Has anyone used this product?
bgwolfpack
Veteran
 
Posts: 1794
Joined: Fri Sep 18, 2009 7:19 pm
Name: Randy
Vehicle Year: Other
Vehicle: Other Vehicle
DriveTrain: 4WD

by irishboy02 » Tue Apr 13, 2010 6:18 pm

Wow i like those. Will these mount into the tracks on the roofrack or will the attach into the doors like it shows in the picture?
Gettin' Dirrty in Jersey :flex dirty:

2003 GMC Sierra z71
7" FTS lift
35x12.5 Toyo MT on 18x9 MotoMetal 962
User avatar
irishboy02
Addict
 
Posts: 840
Joined: Thu Oct 15, 2009 9:28 pm
Location: Jurzie boy
Name: Brendan
Vehicle Year: 2005
Vehicle: Chevrolet TrailBlazer
DriveTrain: 4WD
Rank: Offroad Rated

by bgwolfpack » Wed Apr 14, 2010 1:49 pm

If you're new here be sure to check out the AlekG blog site for another option and other ideas. :coffee2:
bgwolfpack
Veteran
 
Posts: 1794
Joined: Fri Sep 18, 2009 7:19 pm
Name: Randy
Vehicle Year: Other
Vehicle: Other Vehicle
DriveTrain: 4WD

by Jon A » Sun Nov 28, 2010 12:16 am

In shopping for a roof rack, I wanted something big, strong but low profile (garage fitment issues). Although Baja recommends the standard Mule for Trailblazers, I was convinced the Mega would fit better and I needed the space.

It did look pretty lousy just mounted to the stock crossbars:

Image

But with the custom brackets it looks nearly made for the vehicle:

Image

<SNIP>

I made the brackets from 3/4" square tubing and 1/2" clamps (both from McMaster):

Image

Image

They fit inside the tracks but you do have to spread them a bit--so don't use this method if you want to use the stock crossbars in those locations in the future.

Image

Image

With six total locations and a direct loadpath you have many times the strength of the stock setup. Do a better job of prep and paint on them that I did though as you can see a bit of rust on mine already...I'm going to have to take those off and hit them again.
Last edited by Trail X on Mon Nov 29, 2010 10:59 am, edited 2 times in total.
Reason: COPIED THREAD INTO THIS TOPIC FOR FUTURE SEARCHING PURPOSES
Jon A
Member
 
Posts: 81
Joined: Wed Jun 16, 2010 4:59 am
Location: Everett, WA
Name: Jon Aadland
Vehicle Year: 2002
Vehicle: Chevrolet TrailBlazer
DriveTrain: 4WD w/ G80

by jolly01 » Mon Dec 06, 2010 9:17 am

I have a kayak rack idea knocking around my head. I made my measured drawings (would upload, but the scanner is packed) I will post pics and updates as I go through the fab work. Think of a clamp for the factory cross rails, a vertical riser, and horizontal rollers like the chassis of an old roller skate. That is the best way I can describe it.
Heaven on Earth is Hell on wheels
User avatar
jolly01
Cruiser
 
Posts: 14
Joined: Thu Dec 02, 2010 5:42 am
Location: SC Sumter
Name: Michael
Vehicle Year: 2003
Vehicle: Chevrolet TrailBlazer
DriveTrain: 4WD w/ G80

by dirty anton » Tue Dec 07, 2010 12:55 pm

with the surco roof rack to me it sat too tall with their mounting brackets with a tire up there. so i got some flat metal stock and bent and cut my own brackets with 3 holes drilled through them. i used the threaded squares that came with the surco mounting kit. got 8 bolts med and 4 bolts long and bolted it(lock washers) to the track. the 4 long bolts go through the existing strap and holes that hold the rack together then drilled through bottom of surco rack and bolted in to threaded square in existing roof track.hope this does not confuse :scratch:also there is now 3 bolts at all four corners compared to 2 bolts that come with the surco kit. the rack now sits flat on the trucks rack. alot sturdier. i just check the bolts every month,no problems at all.
Attachments
594735924_2117467627_0.jpeg
(12.03 KiB) Downloaded 580 times
594735725_2117466853_0.jpeg
(11.67 KiB) Downloaded 580 times
594734293_2117461156_0.jpeg
(11.47 KiB) Downloaded 580 times
User avatar
dirty anton
Trail-Blazer
 
Posts: 426
Joined: Thu Aug 19, 2010 12:21 am
Location: upper marlboro md
Name: mike
Vehicle Year: 2002
Vehicle: Chevrolet TrailBlazer
DriveTrain: 4WD w/ Aftermarket Locker
Rank: Extreme Offroader

by dirty anton » Tue Dec 07, 2010 12:59 pm

home made brackets
Attachments
576286211_2046378945_0.jpeg
(9.49 KiB) Downloaded 580 times
594734064_2117460222_0.jpeg
(12.84 KiB) Downloaded 580 times
User avatar
dirty anton
Trail-Blazer
 
Posts: 426
Joined: Thu Aug 19, 2010 12:21 am
Location: upper marlboro md
Name: mike
Vehicle Year: 2002
Vehicle: Chevrolet TrailBlazer
DriveTrain: 4WD w/ Aftermarket Locker
Rank: Extreme Offroader

by jolly01 » Sun Dec 12, 2010 2:42 pm

jolly01 wrote:I have a kayak rack idea knocking around my head. I made my measured drawings (would upload, but the scanner is packed) I will post pics and updates as I go through the fab work. Think of a clamp for the factory cross rails, a vertical riser, and horizontal rollers like the chassis of an old roller skate. That is the best way I can describe it.

I just done my materials pricing and I can bring this in for less than $50.00!
Heaven on Earth is Hell on wheels
User avatar
jolly01
Cruiser
 
Posts: 14
Joined: Thu Dec 02, 2010 5:42 am
Location: SC Sumter
Name: Michael
Vehicle Year: 2003
Vehicle: Chevrolet TrailBlazer
DriveTrain: 4WD w/ G80

by jolly01 » Mon Jan 03, 2011 11:23 pm

Had to change the plan like five times, but we finished up the Fab work and tried a dry fit. Looks good just a little high. The camera batteries were dead. Pics will be posted by the weekend. The paint work should be done by then.
Heaven on Earth is Hell on wheels
User avatar
jolly01
Cruiser
 
Posts: 14
Joined: Thu Dec 02, 2010 5:42 am
Location: SC Sumter
Name: Michael
Vehicle Year: 2003
Vehicle: Chevrolet TrailBlazer
DriveTrain: 4WD w/ G80

by jolly01 » Tue Jan 11, 2011 10:43 am

When the weather warms back up I am going to redo the finish, but they work well for now.
Here is a shot from the back. The rollers flip to near vertical to help with the intial lift.
Image

once the boat is up the front saddles are a non slip coverd foam to prevent the boat from going to far forward and onto the hood
Image

The next thing to do is trim down the front a little and that should allow a full raising of the rear gate.
Image

I replaced the factory cross bars with 1 inch square tubing. I was afraid that the factory rails would not be strong enough. The boat rack is actually four peices that slip on and simply bolt on. A moderatly easy mod saving over $100 from buying a similar set up that may not even clear the lights.
Heaven on Earth is Hell on wheels
User avatar
jolly01
Cruiser
 
Posts: 14
Joined: Thu Dec 02, 2010 5:42 am
Location: SC Sumter
Name: Michael
Vehicle Year: 2003
Vehicle: Chevrolet TrailBlazer
DriveTrain: 4WD w/ G80

by v7guy » Tue May 12, 2015 4:34 am

Looks pretty alright! How much have you used it so far?
build thread

All things in moderation, including moderation.
Some people never go crazy... what truly horrible lives they must lead
User avatar
v7guy
Moderator
 
Posts: 3712
Joined: Wed Mar 09, 2011 10:17 pm
Location: NY, long island
Name: Jason
Vehicle Year: 2004
Vehicle: Chevrolet TrailBlazer
DriveTrain: 4WD
Rank: Offroad Rated

Next

Return to Fab Work