***NEW PRODUCT - Massive GMT360 Adj Rr Suspension Parts***
Moderator: K STYLEZ
Forum rules
All posts in this section pertain to our vendor:

There is a big difference between 6mm and 0.07mm. I'm guessing the brackets bend easier than we think, or sometimes the bushings are harder to compress. All in all, looks like a nice product that is on my "someday when I'm rich" list. lol
It's not how fast you go. It's how quick you get there. Lifted TBSS Build
-

ErikSS - Lifer
- Posts: 2044
- Joined: Fri Apr 26, 2013 5:23 pm
- Location: IL, Flossmoor
- Name: Erik
- Vehicle Year: 2008
- Vehicle: Chevrolet TrailBlazer
- DriveTrain: 4WD w/ Limited Slip
- Rank: Offroad Rated
Glad to say my order is in. A very nice contact <Ingrid> helped me out tremendously as there are issues with shipping to Canada, in terms of costs and travel times.
I haven't had a US mail box address for quite some time but there are some services in Niagara Falls that will receive packages even without renting a mailbox. With the shipping being a flat $5 and the package fee of around $6, I cannot go wrong with this method. Sure, its a bit of a drive, but combining it with a Saturday outing will do the trick.
As for the measurement ... I got the inside length of the mount to be 2.265 inches with is 57.5 mm, which is spot on. So I will just have to make sure to tell my mechanic to PRESS those suckers nice and tight.
That's all for now, will be posting more in other sections in the coming days/weeks.
AlekG

|| Documenting and sharing overland travels ||
|| adventures and expeditions ||
|| Trailblazer modifications ||
-

AlekG - Off-Roader
- Posts: 116
- Joined: Tue Sep 15, 2009 9:29 pm
- Location: Guelph, Ontario, CANADA
- Name: Alek
- Vehicle Year: 2006
- Vehicle: Chevrolet TrailBlazer
- DriveTrain: 4WD w/ Aftermarket Locker
- Rank: Expedition Rated
Installed my set today, it went in with mostly no problems. But here is the story with some questions. The rear axle lower control arms are easy to replace. For removing the upper control arms I had to trim the inner fender plastic part to remove the front bolt. For the lower control arms I used the bolts delivered with the kit. Are there any specifications for tightening the bolts in this kit? I used the factory tightening specifications, is that okay?

How is it possible to tighten the securing nut in that position when the upper control arm is mounted? I mean if you wish to extend or adjust the arm it is not possible to loosen or to fasten that nut when the control arm is mounted. Are there any ideas or did you have to remove it, extend it and secure it and install it then back in?

I used the factory bolts and nuts for the upper control arms, as I had no chance to get on the nut in the frame for the front mounting bolt. So how will it be possible to remove the nut in the frame and use the bolt and the nut from the kit? The bolts from the kit didn´t even fit into the factory nuts, I have tried that way.
As I have my rear stabilizer bar installed with the stabilizer shaft I found out that when twisting the axle it will hit the upper control arms, is that correct?
If so okay so there is a reason now to remove the stabilizer bar.
The pan hard was a PITA to get in on the passenger side! The bushings haven´t getting in even if I had them compressed them in a parallel vise before. I had to extend the mounting point and I had to remove 1mm from the bushing and event then it was a pain. Finally it went in, but I think it never would get out.

Drivers side was no problem:

I used the factory bolts for the pan hard as I didn´t had any idea to get the nut in position on the drivers side mounting point. It is much easier to use the factory nut and bolt as the factory nut has a extended part that the nut is stopping from twisting.
I really like the fact that I can easy adjust the pan hard now, wish I could do that in the same way easily with the upper control arms.
Overall I am happy with the product and the good quality! So massive did a really good job on that product!
Karsten
How is it possible to tighten the securing nut in that position when the upper control arm is mounted? I mean if you wish to extend or adjust the arm it is not possible to loosen or to fasten that nut when the control arm is mounted. Are there any ideas or did you have to remove it, extend it and secure it and install it then back in?
I used the factory bolts and nuts for the upper control arms, as I had no chance to get on the nut in the frame for the front mounting bolt. So how will it be possible to remove the nut in the frame and use the bolt and the nut from the kit? The bolts from the kit didn´t even fit into the factory nuts, I have tried that way.
As I have my rear stabilizer bar installed with the stabilizer shaft I found out that when twisting the axle it will hit the upper control arms, is that correct?
If so okay so there is a reason now to remove the stabilizer bar.
The pan hard was a PITA to get in on the passenger side! The bushings haven´t getting in even if I had them compressed them in a parallel vise before. I had to extend the mounting point and I had to remove 1mm from the bushing and event then it was a pain. Finally it went in, but I think it never would get out.
Drivers side was no problem:
I used the factory bolts for the pan hard as I didn´t had any idea to get the nut in position on the drivers side mounting point. It is much easier to use the factory nut and bolt as the factory nut has a extended part that the nut is stopping from twisting.
I really like the fact that I can easy adjust the pan hard now, wish I could do that in the same way easily with the upper control arms.
Overall I am happy with the product and the good quality! So massive did a really good job on that product!
Karsten

-

Karo - Trail-Blazer
- Posts: 342
- Joined: Fri Sep 11, 2009 3:02 am
- Location: Berlin Germany 52°30'35.16"N, 13°15'31.99"E
- Name: Karsten
- Vehicle Year: 2002
- Vehicle: Chevrolet TrailBlazer
- DriveTrain: 4WD w/ G80
- Rank: Trail Ready
Wow! Nice write up Karo! 
It's not how fast you go. It's how quick you get there. Lifted TBSS Build
-
ErikSS - Lifer
- Posts: 2044
- Joined: Fri Apr 26, 2013 5:23 pm
- Location: IL, Flossmoor
- Name: Erik
- Vehicle Year: 2008
- Vehicle: Chevrolet TrailBlazer
- DriveTrain: 4WD w/ Limited Slip
- Rank: Offroad Rated
First off, thank you for a great product and fast shipping!
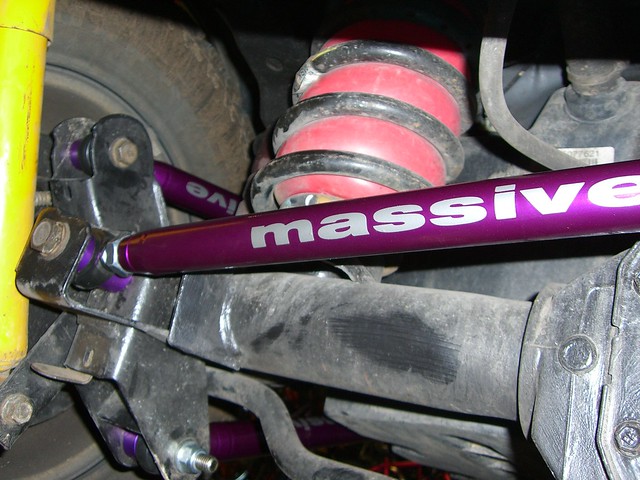
I am having an installation issue with the panhard bar. I have upgraded to the 9.5" 14 bolt Trailblazer SS rear end. I have the axle pushed back 1.75" from stock and the panhard bar is making contact with the rear diff cover. The rear axle is lower then resting height in this picture, there is not any further up travel.
I am not sure if anyone has experienced this issue yet, but it looks like there needs to be some design modification for a work around.
Twenty years from now you will be more disappointed by the things that you didn’t do than by the ones you did do.
So throw off the bowlines. Sail away from the safe harbor. Catch the trade winds in your sails. Explore. Dream. Discover.
- Mark Twain
--Build--
So throw off the bowlines. Sail away from the safe harbor. Catch the trade winds in your sails. Explore. Dream. Discover.
- Mark Twain
--Build--
-

Regulator1175 - Veteran
- Posts: 1048
- Joined: Wed Mar 17, 2010 3:48 pm
- Location: IN, Warsaw
- Name: Matthew McClelland
- Vehicle Year: 2002
- Vehicle: GMC Envoy
- DriveTrain: 4WD w/ G80
- Rank: Extreme Offroader
Your workaround is reducing the amount of axle stretch... 
-

Trail X - Founder
- Posts: 9935
- Joined: Mon Sep 07, 2009 10:22 pm
- Location: VA, Roanoke
- Name: James Downing
- Vehicle Year: 2005
- Vehicle: Chevrolet TrailBlazer
- DriveTrain: 4WD w/ Aftermarket Locker
- Rank: Expedition Guide
JamesDowning wrote:Your workaround is reducing the amount of axle stretch...
That makes no sense when the whole purpose of buying these was to push the axle back. Thanks so much for your helpful input though!
Sent from my SCH-I545 using Tapatalk 4
Twenty years from now you will be more disappointed by the things that you didn’t do than by the ones you did do.
So throw off the bowlines. Sail away from the safe harbor. Catch the trade winds in your sails. Explore. Dream. Discover.
- Mark Twain
--Build--
So throw off the bowlines. Sail away from the safe harbor. Catch the trade winds in your sails. Explore. Dream. Discover.
- Mark Twain
--Build--
-
Regulator1175 - Veteran
- Posts: 1048
- Joined: Wed Mar 17, 2010 3:48 pm
- Location: IN, Warsaw
- Name: Matthew McClelland
- Vehicle Year: 2002
- Vehicle: GMC Envoy
- DriveTrain: 4WD w/ G80
- Rank: Extreme Offroader
Not to second guess your decision, but do you really need 1.75" of stretch? I thought you could basically stuff 35s with only ~1/2" of extra stretch.
Another thought, not that it's ideal, but can you put your purple rod spacers both on one side of the rod end? That would essentially offset the whole panhard by an extra inch or so.
I don't think that bending the panhard would really be a good option for you (it was the first thing that came to my mind), only because that bar rotates to adjust. Otherwise, that could work.
-
Trail X - Founder
- Posts: 9935
- Joined: Mon Sep 07, 2009 10:22 pm
- Location: VA, Roanoke
- Name: James Downing
- Vehicle Year: 2005
- Vehicle: Chevrolet TrailBlazer
- DriveTrain: 4WD w/ Aftermarket Locker
- Rank: Expedition Guide
JamesDowning wrote:Not to second guess your decision, but do you really need 1.75" of stretch? I thought you could basically stuff 35s with only ~1/2" of extra stretch.
Another thought, not that it's ideal, but can you put your purple rod spacers both on one side of the rod end? That would essentially offset the whole panhard by an extra inch or so.
I don't think that bending the panhard would really be a good option for you (it was the first thing that came to my mind), only because that bar rotates to adjust. Otherwise, that could work.
The wheel wells on the Envoy or smaller than the trailblazer. Yes I will need to push the axle back an inch and a half to 2 inches to be able to wheel with 35s.
No, moving the spacers will not work. I looked at that option already. I need at least two inches, preferably three, for sufficient clearance.
Having the bar bent is an acceptable option, ask it means is you have to make your adjustments before installation.
Sent from my SCH-I545 using Tapatalk 4
Twenty years from now you will be more disappointed by the things that you didn’t do than by the ones you did do.
So throw off the bowlines. Sail away from the safe harbor. Catch the trade winds in your sails. Explore. Dream. Discover.
- Mark Twain
--Build--
So throw off the bowlines. Sail away from the safe harbor. Catch the trade winds in your sails. Explore. Dream. Discover.
- Mark Twain
--Build--
-
Regulator1175 - Veteran
- Posts: 1048
- Joined: Wed Mar 17, 2010 3:48 pm
- Location: IN, Warsaw
- Name: Matthew McClelland
- Vehicle Year: 2002
- Vehicle: GMC Envoy
- DriveTrain: 4WD w/ G80
- Rank: Extreme Offroader
I saw Karl has responded to your question in the other thread so I hope everything clears out!
Karl I would remind you to hopefully answer my 6 questions in THIS Thread. The kit was not delivered with some install instructions so there are open questions and the answers are maybe interesting for other customers, not only for me.
Thank you
Karsten
Karl I would remind you to hopefully answer my 6 questions in THIS Thread. The kit was not delivered with some install instructions so there are open questions and the answers are maybe interesting for other customers, not only for me.
Thank you
Karsten
-
Karo - Trail-Blazer
- Posts: 342
- Joined: Fri Sep 11, 2009 3:02 am
- Location: Berlin Germany 52°30'35.16"N, 13°15'31.99"E
- Name: Karsten
- Vehicle Year: 2002
- Vehicle: Chevrolet TrailBlazer
- DriveTrain: 4WD w/ G80
- Rank: Trail Ready
Karl, do you have many SS trucks running these arms?
It's not how fast you go. It's how quick you get there. Lifted TBSS Build
-
ErikSS - Lifer
- Posts: 2044
- Joined: Fri Apr 26, 2013 5:23 pm
- Location: IL, Flossmoor
- Name: Erik
- Vehicle Year: 2008
- Vehicle: Chevrolet TrailBlazer
- DriveTrain: 4WD w/ Limited Slip
- Rank: Offroad Rated
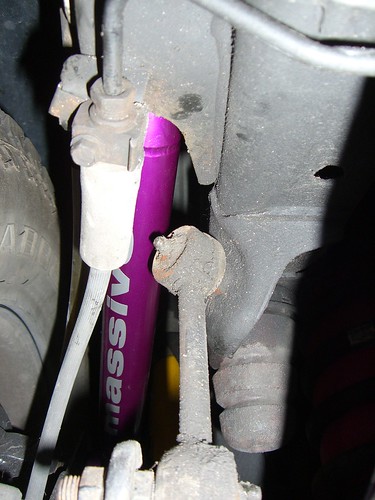
Now that I have started to work on my build, there are some concerns with the Massive pan hard bar that I purchased a few months back for my '02 Trailblazer. First, the neoprene boots that everyone else received with their purchase, said to be standard now, was not standard with my purchase. Second, both sets of the included aluminum bushings are at a minimum of 4 mm too big for my passenger side mount/bracket. It will work fine for the driver's side as that bracket is bigger and so is the original sleeve bushing that is in the OEM pan hard bar. Finally, there is no compressing these solid aluminum bushings any further than they will butt together. See pics below
- No neoprene boots.
 Viewed 27265 times")
- Measured at the ends of the sleeve bushing mounted in the passenger's side of the OEM pan hard bar.
 Viewed 27265 times")
- Driver's side of OEM pan hard bar.
 Viewed 27265 times")
- Loose Massive bushings, compressed with hand strength.
 Viewed 27265 times")
- The other Massive bushings, still zip tied in place but compressed by my vice with as much torque as I could crank down on it.
 Viewed 27265 times")
- JoeyV
- Cruiser
- Posts: 22
- Joined: Fri May 02, 2014 3:02 am
- Location: IA, Des Moines
- Name: Joe
- Vehicle Year: 2002
- Vehicle: Chevrolet TrailBlazer
- DriveTrain: 4WD w/ Limited Slip
PM'd you JoeyV!!!
- K STYLEZ
- Off-Road Vendor
- Posts: 97
- Joined: Wed Apr 20, 2011 6:32 pm
- Location: IL, Spring Grove
- Name: Karl
- Vehicle Year: 2005
- Vehicle: Chevrolet TrailBlazer
- DriveTrain: 4WD
I know this is an old subject, but are these difficult to install and adjust correctly?
-

Ole Blue - Off-Roader
- Posts: 191
- Joined: Tue Jul 09, 2013 3:34 pm
- Location: Durham, NC
- Name: Cedd
- Vehicle Year: 2002
- Vehicle: Chevrolet TrailBlazer
- DriveTrain: 4WD
I've never installed a set of these. I've never heard anyone complain about adjusting them. I've had a set in my hands. They DO feel like great quality. On the flip side, most everyone I've heard install them has run into fitment issues. To my knowledge, everyone who's bought them ended up with them installed... Not sent back or given up on. I am undecided between buying a set and making my own.
It's not how fast you go. It's how quick you get there. Lifted TBSS Build
-
ErikSS - Lifer
- Posts: 2044
- Joined: Fri Apr 26, 2013 5:23 pm
- Location: IL, Flossmoor
- Name: Erik
- Vehicle Year: 2008
- Vehicle: Chevrolet TrailBlazer
- DriveTrain: 4WD w/ Limited Slip
- Rank: Offroad Rated
this will likely be my next truck purchase unless i get around to making some swaybar links. do all the new kits have the boot and right size bushings so i don't need to cut them down to fit?
-

Grimor - Trail-Blazer
- Posts: 296
- Joined: Thu Mar 28, 2013 12:28 pm
- Location: Chicago-ish
- Name: Dennis
- Vehicle Year: 2006
- Vehicle: Chevrolet TrailBlazer
- DriveTrain: 4WD
- Rank: Driveway Rated
Good evening all, brand new to the site as a result of being a member at GMTNATION and occasionally lurking, I was looking for information on the Massive kit and was sent over here so I decided to join as I recognize a lot of the members here. So I see a lot of you have installed the Massive kits and sound pleased with them, the question that I have is how much does this change the ride quality, is it harder or relitivly the same? This is my everyday ride for now and I do enjoy the nice ride, I do have a lift on the truck and larger tires, Bilsteins etc., future plans are to go a bit more extreme on the off road and turn it into my toy but for now status quo with some nice mods. 
Don't look back, you're not going that way.
- SMT59
- Cruiser
- Posts: 13
- Joined: Mon Jan 04, 2016 7:50 pm
- Location: Richmond Hill, Ontario, Canada
- Name: Stephen
- Vehicle Year: 2005
- Vehicle: GMC Envoy
- DriveTrain: 4WD w/ G80
Control arms do not affect your ride quality. Your shocks and springs will.
Twenty years from now you will be more disappointed by the things that you didn’t do than by the ones you did do.
So throw off the bowlines. Sail away from the safe harbor. Catch the trade winds in your sails. Explore. Dream. Discover.
- Mark Twain
--Build--
So throw off the bowlines. Sail away from the safe harbor. Catch the trade winds in your sails. Explore. Dream. Discover.
- Mark Twain
--Build--
-
Regulator1175 - Veteran
- Posts: 1048
- Joined: Wed Mar 17, 2010 3:48 pm
- Location: IN, Warsaw
- Name: Matthew McClelland
- Vehicle Year: 2002
- Vehicle: GMC Envoy
- DriveTrain: 4WD w/ G80
- Rank: Extreme Offroader
you might maybe get a smidge more clunking over bumps through the rod ended pieces, but given the body is fairly well isolated from the frame I doubt it's noticeable at all. Matt covered the rest.
build thread
All things in moderation, including moderation.
Some people never go crazy... what truly horrible lives they must lead
All things in moderation, including moderation.
Some people never go crazy... what truly horrible lives they must lead
-

v7guy - Moderator
- Posts: 3712
- Joined: Wed Mar 09, 2011 10:17 pm
- Location: NY, long island
- Name: Jason
- Vehicle Year: 2004
- Vehicle: Chevrolet TrailBlazer
- DriveTrain: 4WD
- Rank: Offroad Rated
Good to know guys thanks, I was asking this question as the stock equipment that I want to replace have rubber bushings and the Massive have aluminium and I thought that it may cause clunking that would just p}*% me off every time I heard it if it did. Thanks again.
Don't look back, you're not going that way.
- SMT59
- Cruiser
- Posts: 13
- Joined: Mon Jan 04, 2016 7:50 pm
- Location: Richmond Hill, Ontario, Canada
- Name: Stephen
- Vehicle Year: 2005
- Vehicle: GMC Envoy
- DriveTrain: 4WD w/ G80