Offroad Trailblazers and Envoys

Rear Cargo Storage Drawer

Any special projects involving a decent amount of fab work (bumpers, sliders, roof racks, etc)

by Trail X » Fri Sep 11, 2009 6:40 pm

I spent some time making a rear cargo drawer. Loosely following the Roadie's design (http://forums.trailvoy.com/showthread.php?t=13550) I built up something similar:

Image

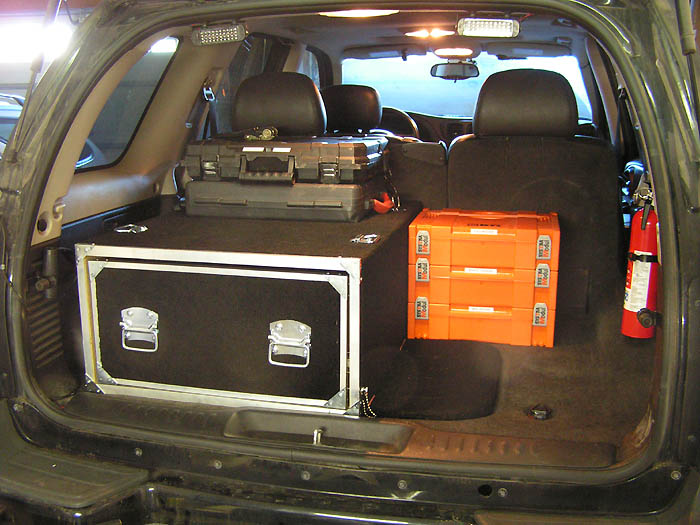
I've also spent a lot of time organizing my equipment into rugged (dewalt) carrying cases. I'll make a thread about all my equipment and cases at another time. The drawer comes fully out of the enclosure and is removable. The drawer can probably hold about 200 lbs, but I won't stress it that much. I currently have approx 80 lbs in there.

Image

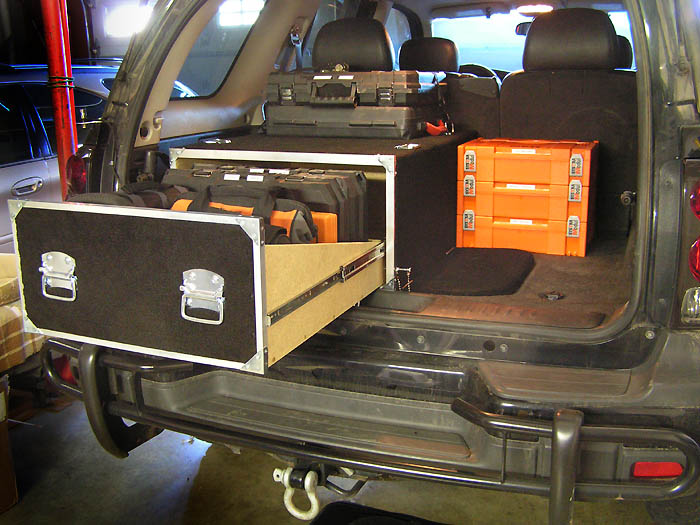
I couldn't justify losing any storage space, so I retained the use of the under-bed storage by having a flap attached to the drawer enclosure.

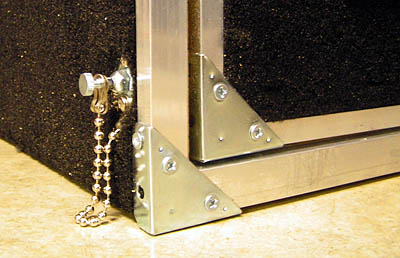
Also visible in the below picture is one of the retaining pins. The pins hold the drawer in and also out (in case I park facing downhill). The top of the box also has tie down positions for securing cargo on top.

Image

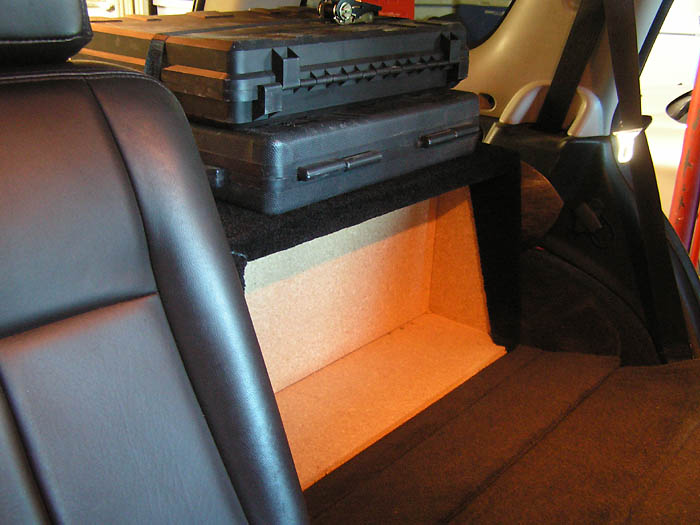
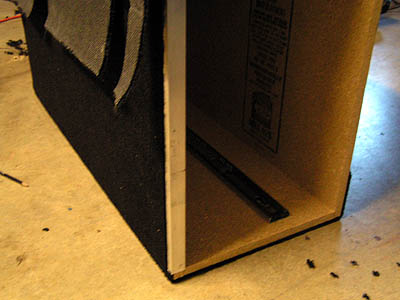
The forepart of the box has a cavity built in. This could be used as extra storage, but I have some bigger plans (more info to come later!).

Image

Sadly I don't have many pictures from when it was in its initial construction phase. Lots of test fitting and measuring was involved. I based my measurements off of the modified Dewalt cases that I was using for equipment cases. I knew I wanted to fit those in the drawer; so those were the dimensions that I built around. Since I didn't have good pictures, heres a quick schematic of the internals:

Image

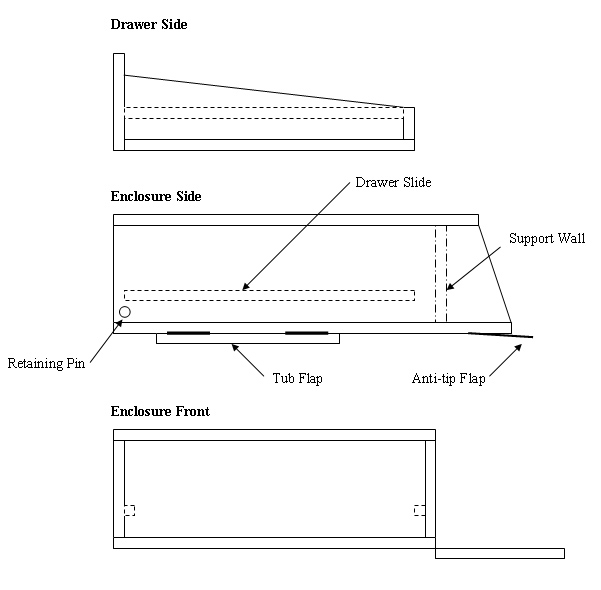
The "Anti-Tip Flaps":
(They wedge under the rear seat hinge flap to prevent the case from tipping forward.)
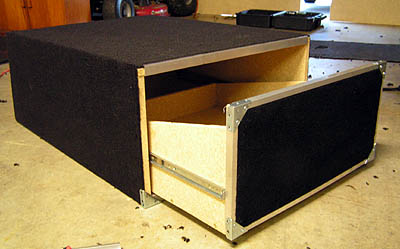
Image

Mostly assembled:
Image

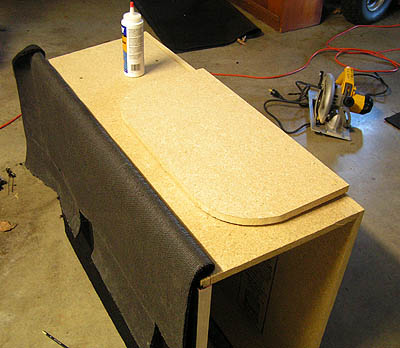
Applying carpet. Carpet glue and heavy duty staples helped the job get done. As you can see, the carpet did not curve around the front lip of the enclosure, but it does in the back and bottom.
Image

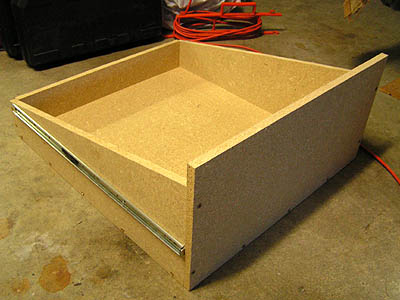
Completed drawer without carpet. I tapered the sides for easier access and to make insertion easier. The slides are a little tricky to align.
Image

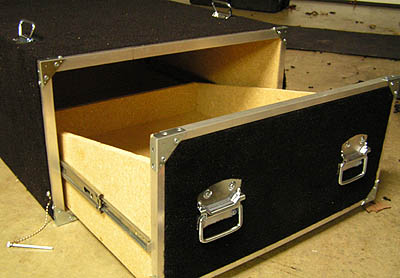
Test fit with carpet and trim on the drawer. I used an extruded peice of aluminum U to protect the carpet edges. The corner brackets helped hold on the aluminum and protected the corners well.
Image

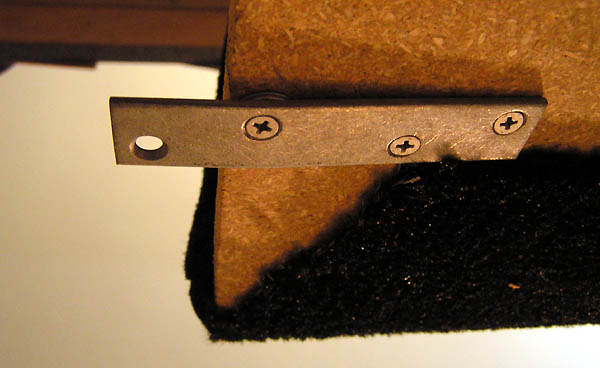
Close up of the retaining pin. They're made for sliding glass doors as a security device. I especially like the retaining chain so I don't loose the pins.
Image

Completed with hardware installed. i just screwed the handles and tie-downs over the carpet to give it a finished look.
Image

==============================================================
UPDATE, Nov 20, 2009

The prior, unfastened design worked well, but I did notice that the unit slid a couple inches during some of my off road travels. I guess the bumpiness of the trail allows it to walk around a bit.

I wanted to keep it from moving around anymore, so I set about to use the left rear tiedown bolt in the rear of the truck. Well, to summarize, the bolt wouldn't cooperate, I stripped the T45 socket, broke a bolt extractor, and broke the welds on the nut. So I had to cut it off. Below is the bolt, post domination.

Image

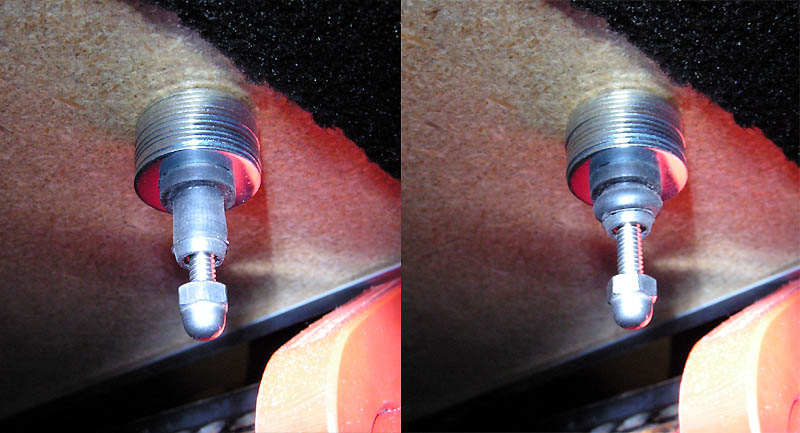
So all I had to work with was a hole in the body. With a visit to the hardware store, I found what I needed, a collapsable rubber nut insert. This would be screwed to the main drawer housing, and inserted into the hole in the floor.

Image

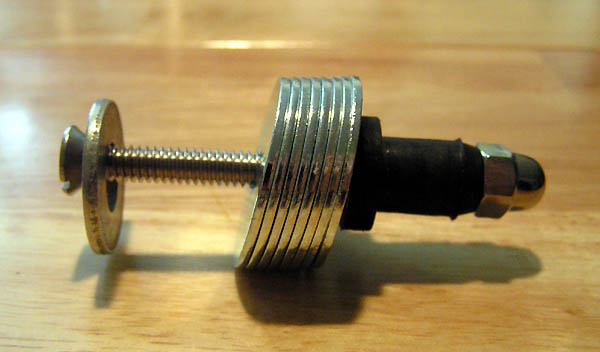
Below shows how it mounts to the base of the drawer system. The right picture shows how the rubber part collapses to capture the body sheet metal.

Image

Pictures of the installed parts. The screw head is very low profile (there was not much clearance between the drawer and the drawer housing)... sticks up maybe 1/16" from the wood base.

Image

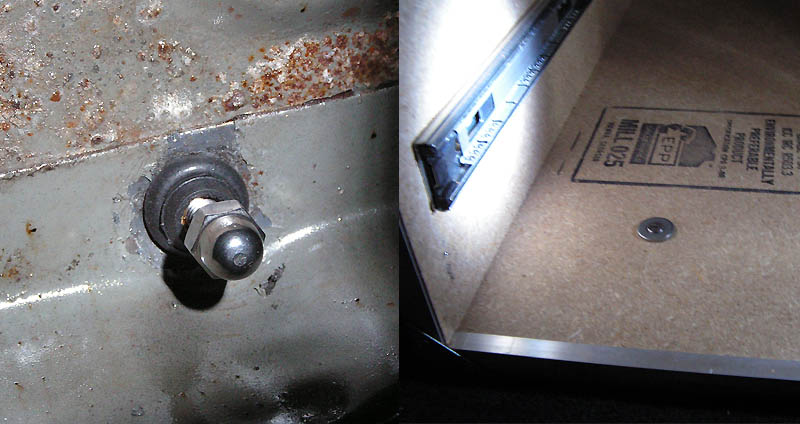
Would I have rather used the body nut?... Yes. But this is a fine alternative, and doesn't require welding a new nut in place.
8-) Build Thread | ExPo Build | YouTube Videos
Not all who wander are lost. -Tolkien
User avatar
Trail X
Founder
 
Posts: 9935
Joined: Mon Sep 07, 2009 10:22 pm
Location: VA, Roanoke
Name: James Downing
Vehicle Year: 2005
Vehicle: Chevrolet TrailBlazer
DriveTrain: 4WD w/ Aftermarket Locker
Rank: Expedition Guide

by MrSmithsTB » Sat Sep 12, 2009 9:23 pm

Thanks for bringing this one back. I'm working on plans right now to integrate my sound system into a unit like yours. I like my music. :safari:
back in the saddle
TB BUILD
User avatar
MrSmithsTB
Veteran
 
Posts: 1756
Joined: Thu Sep 10, 2009 2:28 pm
Location: EHT, NJ
Name: Bob
Vehicle Year: 2006
Vehicle: Other GMT360/370
DriveTrain: AWD w/ G80
Rank: Offroad Rated

by That1Guy » Sun Sep 13, 2009 12:56 am

MrSmithsTB wrote:Thanks for bringing this one back. I'm working on plans right now to integrate my sound system into a unit like yours. I like my music. :safari:

Hey if you come up with something decent please post it. I have to 12 inch subs and two amps to hide!
04 T.B. with McMeister lift, airraid CAI, flowmaster 40 series, Bridgestone Dueler apt 4's, and a G-80!

Previously known as NickNorie
User avatar
That1Guy
Addict
 
Posts: 909
Joined: Fri Sep 11, 2009 6:03 pm
Location: Oceanside, Ca
Name: Nick
Vehicle Year: Other
Vehicle: Chevrolet TrailBlazer
DriveTrain: 2WD w/ G80
Rank: Trail Ready

by Dizzlenator » Mon Sep 14, 2009 10:48 am

I plan to do the same Bob. Drawing stuff up on paper for a 12" sub, because I, too, like my music. I plan to do a second battery to support my system, and lights (4 roof, 2 grille, 2 rears and 2 on each side) which will be included. I'll hide my amp in a hidden area, much like James' setup. We should share some ideas at TECORE! lol!
04 TB LT Jacked Up
My Build Thread
User avatar
Dizzlenator
Off-Roader
 
Posts: 156
Joined: Wed Sep 09, 2009 6:22 pm
Location: Meriden CT
Vehicle Year: Other
Vehicle: Chevrolet TrailBlazer
DriveTrain: 4WD
Rank: Offroad Rated

by The Roadie » Mon Sep 14, 2009 12:12 pm

Because you guys expect me to post some small protest of disapproval - how about this lame attempt: "Tread Lightly includes reasonable music volume on the trails." :happy whip:

Seriously, I keep it low or off while on narrow trails so I can open the windows (even if it's hot) so I can hear traffic coming the other way.

Yeah, but I wish I had a large fold-down flat screen in the back and a surround system for those campsite movies. :thumright:
User avatar
The Roadie
Founder
 
Posts: 5011
Joined: Mon Sep 07, 2009 11:29 pm
Location: CA, Vista, San Diego County
Name: Bill Carton
Vehicle Year: 2004
Vehicle: GMC Envoy
DriveTrain: 4WD w/ G80
Rank: Expedition Guide

by Gordinho80 » Mon Sep 14, 2009 12:17 pm

Bill,

The audiophile offroaders follow Tread Lightly as well. We just like to have our tunes off the trails. I keep my radio very very low, just enough to hear the music but low enough to hear almost everything going on outside.

However, when I'm driving down the highway, I like bumpin' some beats, nah'mean? LOL :dj:
Mario - Build Thread
User avatar
Gordinho80
Lifer
 
Posts: 2787
Joined: Tue Sep 08, 2009 9:27 am
Location: NJ, Jackson
Name: Mario Almeida
Vehicle Year: Other
Vehicle: Other Vehicle
DriveTrain: 4WD

by MrSmithsTB » Mon Sep 14, 2009 1:57 pm

Yup yup. Lord knows I couldn't got back to those puny little door speakers after having an amphitheater. Initial build is looking like I will hide the subs underneath, facing down, with port facing up. 2 Drawers on each side, one of them a dummy to house batteries, amp, cooling fan, and capacitor and the other three functional. No one will even know I have bump :twisted:
back in the saddle
TB BUILD
User avatar
MrSmithsTB
Veteran
 
Posts: 1756
Joined: Thu Sep 10, 2009 2:28 pm
Location: EHT, NJ
Name: Bob
Vehicle Year: 2006
Vehicle: Other GMT360/370
DriveTrain: AWD w/ G80
Rank: Offroad Rated

by That1Guy » Thu Sep 17, 2009 2:49 am

So these are my thoughts. pic 1 is the box from the side. Arrow points at the angled part which will be angled to the back of the seat.
Pic 2 is a front view where the amps and subs will be mounted. Where they will be mounted will be recessed back probably 2 inches. the amps will be bolted to the box and the wiring will be semi hidden. I will probably also throw some 6x9 component speakers in there.
P1c 1


Pic 2

(blue is amps, black is subs, grey is box, and green is port choice #1)
Last edited by Trail X on Sat Nov 21, 2009 12:19 am, edited 1 time in total.
Reason: thumbnailed pics
04 T.B. with McMeister lift, airraid CAI, flowmaster 40 series, Bridgestone Dueler apt 4's, and a G-80!

Previously known as NickNorie
User avatar
That1Guy
Addict
 
Posts: 909
Joined: Fri Sep 11, 2009 6:03 pm
Location: Oceanside, Ca
Name: Nick
Vehicle Year: Other
Vehicle: Chevrolet TrailBlazer
DriveTrain: 2WD w/ G80
Rank: Trail Ready

by A-Train » Wed Oct 28, 2009 5:39 pm

I was thinking of building a unit very close to what you've done here. About how much did it cost you materials and all, and about how much time did it take you to complete the whole thing; how did you secure the bottom of it and can I see a picture of the bottom for some idea's I have? I'd appreciate the help...
A-Train
Cruiser
 
Posts: 13
Joined: Thu Oct 22, 2009 12:38 pm
Location: Nolensville, TN
Vehicle Year: 2002
Vehicle: Chevrolet TrailBlazer
DriveTrain: 4WD

by Trail X » Wed Oct 28, 2009 11:45 pm

Everything cost about $200. That included the MDF, carpet, slides, hardware, etc.

I have no pictures of the bottom to show you, however if you look at the below diagram, you see the 'anti-tip flaps'. These are actually two small metal bars that extend from the rear of the case and tuck under the rear seat hinge cover. The rest of the dimensions were measured precisely to make the box wedge into place (plus it has about 80 lbs of stuff in it at all times).

Image
8-) Build Thread | ExPo Build | YouTube Videos
Not all who wander are lost. -Tolkien
User avatar
Trail X
Founder
 
Posts: 9935
Joined: Mon Sep 07, 2009 10:22 pm
Location: VA, Roanoke
Name: James Downing
Vehicle Year: 2005
Vehicle: Chevrolet TrailBlazer
DriveTrain: 4WD w/ Aftermarket Locker
Rank: Expedition Guide

by cbbryan » Thu Oct 29, 2009 2:20 am

Why did you choose MDF over regular plywood which would have been lighter?
User avatar
cbbryan
Trail-Blazer
 
Posts: 270
Joined: Tue Sep 22, 2009 2:26 pm
Location: MS, Amory
Name: Chris
Vehicle Year: 2005
Vehicle: Chevrolet TrailBlazer
DriveTrain: 4WD

by Trail X » Thu Oct 29, 2009 11:31 am

My apologies, MDF was not the correct term... it was a fine particle board.

Image

I used it instead of plywood because plywood isn't really meant for screwing into the end of. Plywood tends to splinter easier if you screw into the cut-end. Plywood is generally meant to screw through or nail through... like flooring.
8-) Build Thread | ExPo Build | YouTube Videos
Not all who wander are lost. -Tolkien
User avatar
Trail X
Founder
 
Posts: 9935
Joined: Mon Sep 07, 2009 10:22 pm
Location: VA, Roanoke
Name: James Downing
Vehicle Year: 2005
Vehicle: Chevrolet TrailBlazer
DriveTrain: 4WD w/ Aftermarket Locker
Rank: Expedition Guide

by cbbryan » Thu Oct 29, 2009 11:44 am

My dad has been making cabinets for years and I asked for his help to build mine and he said that plywood would work fine and MDF would be much heavier and more expensive. He suggested I use 3/4" plywood; we will glue and staple all the sides like he does his cabinets. He said that the drawer runners will most likely fail before the wood does.
User avatar
cbbryan
Trail-Blazer
 
Posts: 270
Joined: Tue Sep 22, 2009 2:26 pm
Location: MS, Amory
Name: Chris
Vehicle Year: 2005
Vehicle: Chevrolet TrailBlazer
DriveTrain: 4WD

by bgwolfpack » Thu Oct 29, 2009 11:58 am

cbbryan wrote:My dad has been making cabinets for years and I asked for his help to build mine and he said that plywood would work fine and MDF would be much heavier and more expensive. He suggested I use 3/4" plywood; we will glue and staple all the sides like he does his cabinets. He said that the drawer runners will most likely fail before the wood does.

Your father is correct.
bgwolfpack
Veteran
 
Posts: 1794
Joined: Fri Sep 18, 2009 7:19 pm
Name: Randy
Vehicle Year: Other
Vehicle: Other Vehicle
DriveTrain: 4WD

by Trail X » Thu Oct 29, 2009 12:47 pm

Sounds good to me. I am not a cabinet maker... I just was going off what I'd experienced in the past.

What is your plan, screw + staple + glue? I only screwed mine at the edges, giving about 6" or so between screws. Might be a bit overkill.
8-) Build Thread | ExPo Build | YouTube Videos
Not all who wander are lost. -Tolkien
User avatar
Trail X
Founder
 
Posts: 9935
Joined: Mon Sep 07, 2009 10:22 pm
Location: VA, Roanoke
Name: James Downing
Vehicle Year: 2005
Vehicle: Chevrolet TrailBlazer
DriveTrain: 4WD w/ Aftermarket Locker
Rank: Expedition Guide

by cbbryan » Thu Oct 29, 2009 3:02 pm

I don't plan on using any screws in framing up the box, just glue the whoe side and 5 or so staples on the outside of each corner. That's how my dad builds his cabinets; he also said the the plywood would hold up better than particle board if it ever got wet. Theres no need for us to use screws since we have staple guns which make it go a lot faster.

IMOP screws are a bit over kill for this application. They are study and work great if you don't want your wood to come up on a deck or something similar. Even the furniture factory I worked in once didn't use a single screw from framing to upholstery and they held up; only exception was when they were installing brackets for reclining parts.
User avatar
cbbryan
Trail-Blazer
 
Posts: 270
Joined: Tue Sep 22, 2009 2:26 pm
Location: MS, Amory
Name: Chris
Vehicle Year: 2005
Vehicle: Chevrolet TrailBlazer
DriveTrain: 4WD

by Trail X » Thu Oct 29, 2009 4:07 pm

Very interesting. I wouldn't have ever figured it could be strong enough without some screws. I routinely load this thing up inside... and strap a lot of tools to the top, I wanted it to be stout. Sounds like I may have overkilled it... but I guess thats better than underkilling it and having it fall apart.

I will say that having a vertical board that runs side-to side really makes sense here, as its the main part that stiffens the whole unit. So maybe with that present I can see using glue and staples.

Are you also planning to tongue and groove the joints? That would add even more to the overall strength of the unit.
8-) Build Thread | ExPo Build | YouTube Videos
Not all who wander are lost. -Tolkien
User avatar
Trail X
Founder
 
Posts: 9935
Joined: Mon Sep 07, 2009 10:22 pm
Location: VA, Roanoke
Name: James Downing
Vehicle Year: 2005
Vehicle: Chevrolet TrailBlazer
DriveTrain: 4WD w/ Aftermarket Locker
Rank: Expedition Guide

by A-Train » Thu Oct 29, 2009 4:33 pm

Thanx to James for all the help. I'm trying to do as much planning as possible for this because I want it to fit my needs exactly and your help( posting this build mod ) has been great...I was also wondering if you thought that rear compartment that is open in the back would fit an amp?
A-Train
Cruiser
 
Posts: 13
Joined: Thu Oct 22, 2009 12:38 pm
Location: Nolensville, TN
Vehicle Year: 2002
Vehicle: Chevrolet TrailBlazer
DriveTrain: 4WD

by bgwolfpack » Thu Oct 29, 2009 4:43 pm

A-Train wrote:I was also wondering if you thought that rear compartment that is open in the back would fit an amp?

Are you speaking of a 110 converter for running things like a refrigerator while off road? :scratch:
bgwolfpack
Veteran
 
Posts: 1794
Joined: Fri Sep 18, 2009 7:19 pm
Name: Randy
Vehicle Year: Other
Vehicle: Other Vehicle
DriveTrain: 4WD

by A-Train » Thu Oct 29, 2009 5:42 pm

I was asking if it would fit an amp...a speaker amp, I'd like to have a good place to hide my amp that runs my 6x9's that are under my backseat...but I was also curious about a 110 comverter like what you are talking about.
A-Train
Cruiser
 
Posts: 13
Joined: Thu Oct 22, 2009 12:38 pm
Location: Nolensville, TN
Vehicle Year: 2002
Vehicle: Chevrolet TrailBlazer
DriveTrain: 4WD

Next

Return to Fab Work