Offroad Trailblazers and Envoys

Custom Radiator Skid Plate

Any special projects involving a decent amount of fab work (bumpers, sliders, roof racks, etc)

by Cable810 » Wed Jan 16, 2013 1:16 pm

Seeing my TB is up for the winter and I found a local wheeler who does fab work who just moved up from Indy aera. I asked him if he would be willing to give me a hand with the skid plate.

He was able to come over Sunday and we got The Template accomplished.

Image


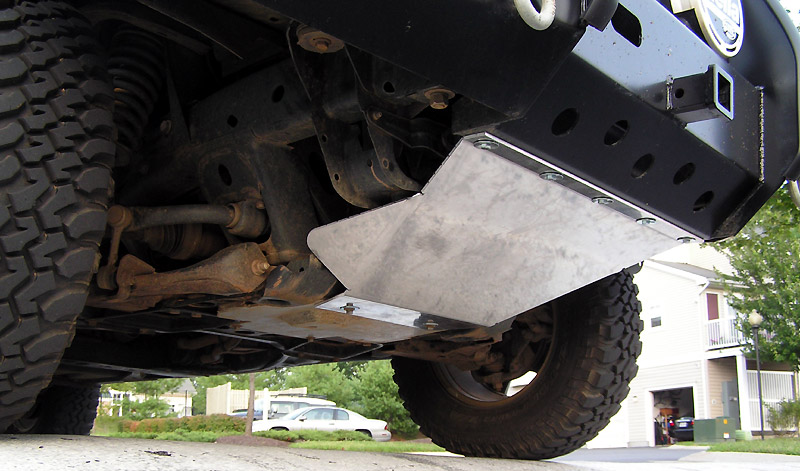
The design is going to be different than the way Mike has his. Its going to bolt the same way Mikes does at the Oil Skid Plate. Then it will have a 20 Degree bend after 9" bolting to the Oil Skid. But instead of havin it bolt with the tow hooks we decided to bring it up and bolt to the front of the bumper. This might change due to the possiability of a tube bumper.

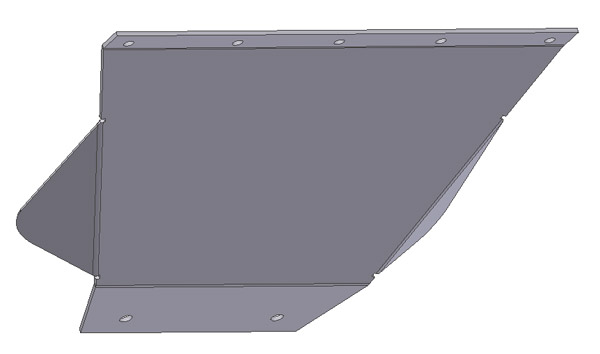
Tho whole design of the skid plate will be something like this:

Image


Dimentions are 27"Width x 40"Length using 3/16" steel. Bolt Protectors, and holes allowing air to flow will be added. We are also going to add some supports in the skid for added strength. For a 5'x5' sheet of 3/16" steel is $150+tax. Sadly no local junyards keep anything project worthy... So he is goin to check places in Indy where he got most of his stell while living in Indy.

He metioned that he has talked to Kyle a few times when he was living in the Indy Area.
Last edited by Cable810 on Mon Apr 07, 2014 9:51 pm, edited 1 time in total.
The FIRST Solid Axle Swapped Trailblazer in Presque Isle County MI
My Build
The Roadie wrote:Research, plan your mods, fund the plan, then GO DO THEM. THEN WHEEL IT.
User avatar
Cable810
Veteran
 
Posts: 1989
Joined: Thu Feb 09, 2012 6:43 pm
Location: MI, Rogers City
Name: Caleb
Vehicle Year: 2002
Vehicle: Chevrolet TrailBlazer
DriveTrain: 4WD w/ Aftermarket Locker
Rank: Offroad Rated

by HARDTRAILZ » Wed Jan 16, 2013 2:02 pm

You know the skid in that picture is more for look than function right?
I hate to advocate weird chemicals, alcohol, violence or insanity to anyone...but
they've always worked for me.
User avatar
HARDTRAILZ
Moderator
 
Posts: 6342
Joined: Sat Sep 12, 2009 1:49 am
Location: IN, Batesville
Name: Kyle
Vehicle Year: 2006
Vehicle: Chevrolet TrailBlazer
DriveTrain: 4WD w/ Aftermarket Locker
Rank: Extreme Offroader

by Cable810 » Wed Jan 16, 2013 2:26 pm

Its not going to be the exact same as the one in the picture just kinda the same concept. So the overall design should be changed? Add more bends? Make it fit closer to the Rad?
The FIRST Solid Axle Swapped Trailblazer in Presque Isle County MI
My Build
The Roadie wrote:Research, plan your mods, fund the plan, then GO DO THEM. THEN WHEEL IT.
User avatar
Cable810
Veteran
 
Posts: 1989
Joined: Thu Feb 09, 2012 6:43 pm
Location: MI, Rogers City
Name: Caleb
Vehicle Year: 2002
Vehicle: Chevrolet TrailBlazer
DriveTrain: 4WD w/ Aftermarket Locker
Rank: Offroad Rated

by bartonmd » Wed Jan 16, 2013 3:00 pm

I get steel for less than that, but you'd be looking at 4'x5' of steel, since pieces normally come in 4'x10' plates. 3/16" steel is 7.66#/sq-ft, so your 25sqft piece of steel is 192#, or $0.78/lb. For not having any kind of hook-up, that's a STEAL on steel! I pay less than that, but I get steel for our cost (at my real job), and we have the best multipliers that the distributors give. If you can find steel in anything less than full sheets for anything less than $1.00/lb, that's a steal! Now, if you typod it, and you're getting a 4'x5' piece for $150, you're still getting it for right around $1.00/lb, which is about right.

IMO, do it similar to mine. You can take a couple bends out of it (the ones right under the radiator), but unless you're going to bolt it to a real bumper of some kind, THE place to mount it is the frame, where the bumper bolts mount. Even on a tube bumper, you're going to want to mount it (the bumper) there via sheetmetal, anyway. You absolutely don't want to go below the plastic bumper facia like the picture you posted. I'd have to see a bad MS Paint on a picture of the lower part of the front end, to really tell you, but I can tell by the not-very-different widths that you're just planning on going under the radiator tank, itself, rather than frame rail to frame rail. IMO, this is a mistake. With mine, if somebody were somehow ever to bend it up under the radiator, it would bend the mounts up, and raise the radiator up. With something just under the plastic end tanks, if you bend the skid, you'll hit the end tank, itself, and probably break it, or knock it off of the finned section, thus breaking the radiator. e.g. if the wide part isn't 36" wide, it's not wide enough IMO.

Mike
bartonmd
Moderator
 
Posts: 4469
Joined: Wed Sep 09, 2009 9:35 am
Location: IN, Indianapolis
Name: Mike
Vehicle Year: 2007
Vehicle: Chevrolet TrailBlazer
DriveTrain: 4WD w/ G80
Rank: Offroad Rated

by v7guy » Thu Jan 17, 2013 5:00 pm

yeah, 27" wide seems awful narrow. I could see coming straight up to the frame rails and then folding it backwards like so

______
\
\

instead of

_______
]
]________


Obviously you'd have to drill a couple holes in the angled plate to access the frame bolts. I had considered doing it like that so it would flow better with the bumper. But I'd already had the rad skid built and was tired of working on it, so I left it.


I'm with Mike, you want that forward mount to be on the frame or on a beefy bumper. If it's just sticking out there in the air, in front of the bumper your probably going to fold it into the truck with a good hit. Also like Mike mentioned, it would be best if it's up against those rad mounts just to help protect the radiator/mounts better. Roadie has some pics where it shows his lower radiator brackets are bent all to shit. You want those things covered. Keep in mind that it's going to be potentially taking almost all the weight of the vehicle while it slides over an obstacle.

It's a nifty design, I like seeing something different, but it definitely needs tweaked a bit so that it'll function as intended.
build thread

All things in moderation, including moderation.
Some people never go crazy... what truly horrible lives they must lead
User avatar
v7guy
Moderator
 
Posts: 3712
Joined: Wed Mar 09, 2011 10:17 pm
Location: NY, long island
Name: Jason
Vehicle Year: 2004
Vehicle: Chevrolet TrailBlazer
DriveTrain: 4WD
Rank: Offroad Rated

by Cable810 » Fri Jan 18, 2013 11:10 am

Gotchya. Makes lots of sense as why not to do it our planned way. Dunno why I never thought of that issue with the planned design....

Thanks Guys!!
The FIRST Solid Axle Swapped Trailblazer in Presque Isle County MI
My Build
The Roadie wrote:Research, plan your mods, fund the plan, then GO DO THEM. THEN WHEEL IT.
User avatar
Cable810
Veteran
 
Posts: 1989
Joined: Thu Feb 09, 2012 6:43 pm
Location: MI, Rogers City
Name: Caleb
Vehicle Year: 2002
Vehicle: Chevrolet TrailBlazer
DriveTrain: 4WD w/ Aftermarket Locker
Rank: Offroad Rated

by The Roadie » Sun Jan 20, 2013 10:14 am

v7guy wrote:... it's going to be potentially taking almost all the weight of the vehicle while it slides over an obstacle....
Even with the strongest one Mike makes, if I had a choice of lines, and mine hit something, I'd get out and look to see if I could take another path. It's a great noisemaker, and exploratory hits if you don't have a spotter shouldn't take out your radiator. But an obstacle tall enough to hit the skid is tall enough to cause great worry as it travels aft underneath you.
User avatar
The Roadie
Founder
 
Posts: 5011
Joined: Mon Sep 07, 2009 11:29 pm
Location: CA, Vista, San Diego County
Name: Bill Carton
Vehicle Year: 2004
Vehicle: GMC Envoy
DriveTrain: 4WD w/ G80
Rank: Expedition Guide

by HARDTRAILZ » Sun Jan 20, 2013 10:18 am

I know why...

You don't have a decade n a half of building n customizing vehicles and 2 plus decades of wheeling various vehicles. Years researching via books, magazines, internet, and personal experience.
I hate to advocate weird chemicals, alcohol, violence or insanity to anyone...but
they've always worked for me.
User avatar
HARDTRAILZ
Moderator
 
Posts: 6342
Joined: Sat Sep 12, 2009 1:49 am
Location: IN, Batesville
Name: Kyle
Vehicle Year: 2006
Vehicle: Chevrolet TrailBlazer
DriveTrain: 4WD w/ Aftermarket Locker
Rank: Extreme Offroader

by Cable810 » Sun Jan 20, 2013 5:00 pm

HARDTRAILZ wrote:I know why...

You don't have a decade n a half of building n customizing vehicles and 2 plus decades of wheeling various vehicles. Years researching via books, magazines, internet, and personal experience.


Tis the reason for posting the project and joining ORTB
The FIRST Solid Axle Swapped Trailblazer in Presque Isle County MI
My Build
The Roadie wrote:Research, plan your mods, fund the plan, then GO DO THEM. THEN WHEEL IT.
User avatar
Cable810
Veteran
 
Posts: 1989
Joined: Thu Feb 09, 2012 6:43 pm
Location: MI, Rogers City
Name: Caleb
Vehicle Year: 2002
Vehicle: Chevrolet TrailBlazer
DriveTrain: 4WD w/ Aftermarket Locker
Rank: Offroad Rated

by bartonmd » Sun Jan 20, 2013 8:43 pm

The Roadie wrote:
v7guy wrote:... it's going to be potentially taking almost all the weight of the vehicle while it slides over an obstacle....
Even with the strongest one Mike makes, if I had a choice of lines, and mine hit something, I'd get out and look to see if I could take another path. It's a great noisemaker, and exploratory hits if you don't have a spotter shouldn't take out your radiator. But an obstacle tall enough to hit the skid is tall enough to cause great worry as it travels aft underneath you.


I don't typically hit mine on tall stuff on flat trails. It normally gets hit, and hit under the radiator itself, on climbs, or coming down something steep. Up and down steps, mainly. I've hit it quite hard by getting halfway up a step, then slipping back down, or having the rock slip out from under a tire.

Mike
bartonmd
Moderator
 
Posts: 4469
Joined: Wed Sep 09, 2009 9:35 am
Location: IN, Indianapolis
Name: Mike
Vehicle Year: 2007
Vehicle: Chevrolet TrailBlazer
DriveTrain: 4WD w/ G80
Rank: Offroad Rated

by Moots1288 » Sun Jan 20, 2013 9:29 pm

It saved my radiator.. Falling off a steep rock.
User avatar
Moots1288
Veteran
 
Posts: 1964
Joined: Fri Feb 24, 2012 8:42 pm
Location: Long island
Name: Moots
Vehicle Year: 2006
Vehicle: GMC Envoy
DriveTrain: 4WD
Rank: Offroad Rated

by HARDTRAILZ » Sun Jan 20, 2013 9:37 pm

Never even hit mine. Its just for looks. ;)
I hate to advocate weird chemicals, alcohol, violence or insanity to anyone...but
they've always worked for me.
User avatar
HARDTRAILZ
Moderator
 
Posts: 6342
Joined: Sat Sep 12, 2009 1:49 am
Location: IN, Batesville
Name: Kyle
Vehicle Year: 2006
Vehicle: Chevrolet TrailBlazer
DriveTrain: 4WD w/ Aftermarket Locker
Rank: Extreme Offroader

by Moots1288 » Sun Jan 20, 2013 9:38 pm

HARDTRAILZ wrote:Never even hit mine. Its just for looks. ;)

We know.. Slacker
User avatar
Moots1288
Veteran
 
Posts: 1964
Joined: Fri Feb 24, 2012 8:42 pm
Location: Long island
Name: Moots
Vehicle Year: 2006
Vehicle: GMC Envoy
DriveTrain: 4WD
Rank: Offroad Rated

by fishsticks » Sun Jan 20, 2013 9:40 pm

Or use it as a pivot point...

11 Silverado LTZ - 6.2L/6l80, 2/3 drop, self tuned
85 Hilux - 3RZ, dual cases, caged, 40s, chromo everything
02 TrailBlazer LTZ - 35s, lockers, balls - Gone but not forgotten - Build
User avatar
fishsticks
Moderator
 
Posts: 4356
Joined: Thu Apr 01, 2010 11:30 pm
Location: WA, Vancouver
Name: Donny
Vehicle Year: Other
Vehicle: Other Vehicle
DriveTrain: 4WD w/ Aftermarket Locker
Rank: Extreme Offroader

by v7guy » Mon Jan 21, 2013 2:24 am

Caleb, you got to start somewhere.
build thread

All things in moderation, including moderation.
Some people never go crazy... what truly horrible lives they must lead
User avatar
v7guy
Moderator
 
Posts: 3712
Joined: Wed Mar 09, 2011 10:17 pm
Location: NY, long island
Name: Jason
Vehicle Year: 2004
Vehicle: Chevrolet TrailBlazer
DriveTrain: 4WD
Rank: Offroad Rated

by Cable810 » Sat Feb 09, 2013 8:18 pm

I found this here in one of JDs threads. I know that JD has it mounted to a "bumper". Seeing that a "bumper" is out of the question right now(it is planned though) what if I was to mount it the same way to the stock bumper but re-enforced with some steel. Welding some steel inside the bumper where the skid would mount for added strength? Thoughts??

With the original design, the radiator stuck down below the bumper by a few inches. I've been very cautious lately with rocks because of this. The lower endcap of the radiator is extremely susceptible to road and trail damage when it's hanging out like that. So it was time for some protection.

First, the foam-board prototype:

Image


The 3D model designed around the foam prototype:

Image

Finally, the finished product, thanks to BartonMD! Thanks Mike!

[img]http://www.thedownings.us/images/tb/frontbumper/20.jpg[/imgl]

I went with an aluminum design. I had done FEA analysis, and found that for most hits, I didn't need steel (for this design). Granted, if i were to drive it straight into a large rock, it will bend... but that's why I have a spare... :laugh: (you heard right, Mike made me two!)

The bolts used are Mike's bolts from the oil pan skidplate, and five grade 5 bolts attach at the bumper. Should be plenty to keep the skidplate in place.

Image


This photo gives you a view of the inside of the plate. It mounts to the bottom of the bumper so the bolts won't be stressed in tension if the plate takes a hit. On the engine side it is further reinforced by the oilpan skidplate, as it shares the same bend point.

There's about a 1/4" of clearance to the radiator brackets... just enough to provide protection in case I bend the plate.

Image
The FIRST Solid Axle Swapped Trailblazer in Presque Isle County MI
My Build
The Roadie wrote:Research, plan your mods, fund the plan, then GO DO THEM. THEN WHEEL IT.
User avatar
Cable810
Veteran
 
Posts: 1989
Joined: Thu Feb 09, 2012 6:43 pm
Location: MI, Rogers City
Name: Caleb
Vehicle Year: 2002
Vehicle: Chevrolet TrailBlazer
DriveTrain: 4WD w/ Aftermarket Locker
Rank: Offroad Rated

by bartonmd » Sat Feb 09, 2013 8:47 pm

I really fail to see what good that would do you, with the stock bumper, as opposed to mounting to the bumper mounting bolts. They're at the same height at the bottom of the stock bumper reinforcement bar, as the bumper mounting bolts.

Mike
bartonmd
Moderator
 
Posts: 4469
Joined: Wed Sep 09, 2009 9:35 am
Location: IN, Indianapolis
Name: Mike
Vehicle Year: 2007
Vehicle: Chevrolet TrailBlazer
DriveTrain: 4WD w/ G80
Rank: Offroad Rated

by Cable810 » Mon Apr 07, 2014 8:01 pm

Alright its been a while since I've updated this thread :facepalm: 
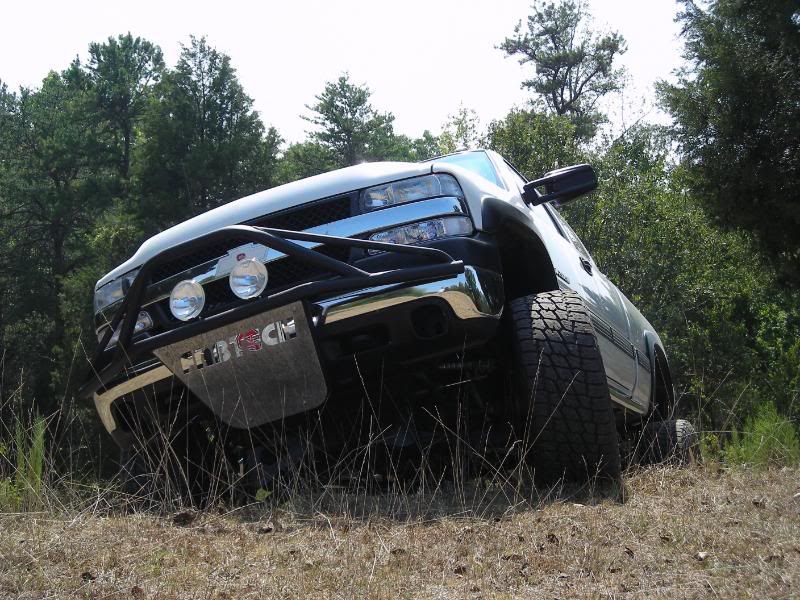
. The skid plate is done. Now this design probably isn't the best but its taken a decent hit when I was climbing Marble Head Steps on Drummond, it just bent a bit and didn't make any contact with anything under the vehicle. Here is a link to the video of me climbing Marble Head Steps when I but the dent in the skid http://youtu.be/Y_SWAXHtZMw?t=4m38s

Let the hazing begin :happy whip:

Image

Image
The FIRST Solid Axle Swapped Trailblazer in Presque Isle County MI
My Build
The Roadie wrote:Research, plan your mods, fund the plan, then GO DO THEM. THEN WHEEL IT.
User avatar
Cable810
Veteran
 
Posts: 1989
Joined: Thu Feb 09, 2012 6:43 pm
Location: MI, Rogers City
Name: Caleb
Vehicle Year: 2002
Vehicle: Chevrolet TrailBlazer
DriveTrain: 4WD w/ Aftermarket Locker
Rank: Offroad Rated


Return to Fab Work