Offroad Trailblazers and Envoys

building a radiator skid from plate

Any special projects involving a decent amount of fab work (bumpers, sliders, roof racks, etc)

by v7guy » Mon Apr 09, 2012 3:47 pm

I've been working towards expanding my fab skills. I have a half dozen various small projects under my belt at this point, nothing with as many angles or seams as this rad skid though. I figure it's a relatively small piece that's going to get beat to hell and if things are a little off and I learn from it no harm, no foul. With any luck i can get some input on some extra touches to add and I can inspire some more people to give it a try. Outside of a welder I'm using fairly basic tools. Jigsaw, 4.5" grinder, pliers, vise grips, drills, markers and rulers

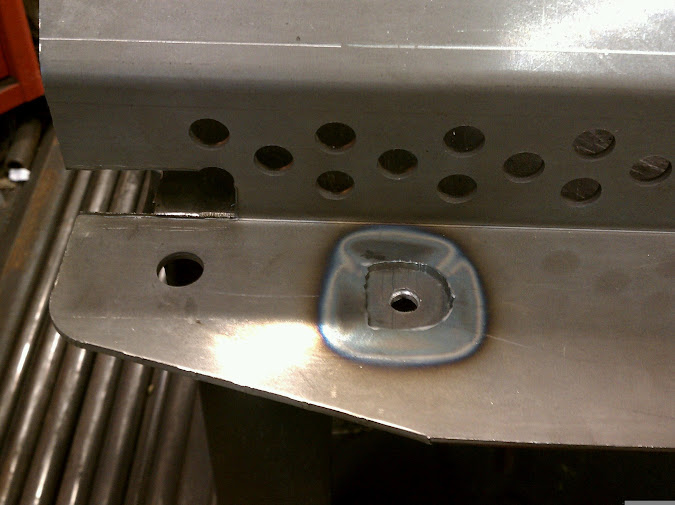
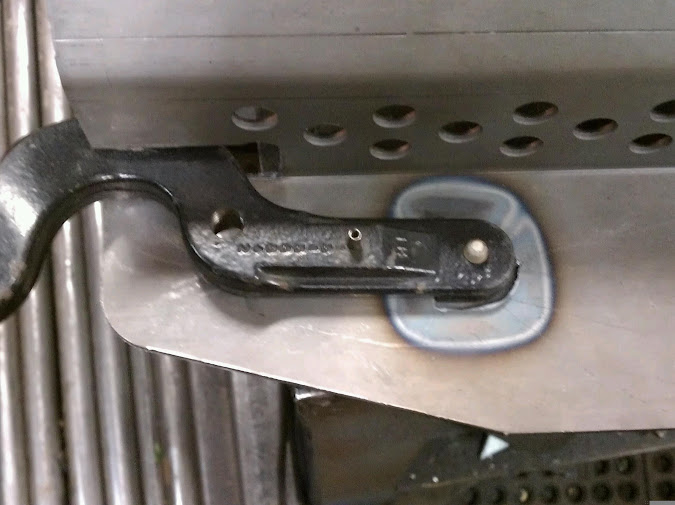
I started out with a piece of 3/16" plate. Cut a couple brackets, drilled some holes with a hand drill and made sure they lined up on the truck then welded them to a flat piece that will cover the bottom of the radiator. I didn't have a piece quite long enough so the bracket got tacked to the end.
Image

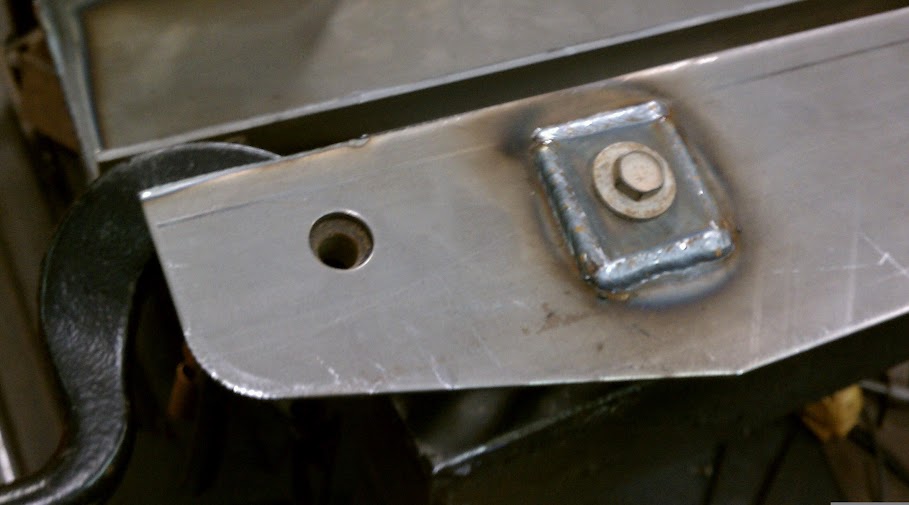
later I took some scrap and filled in the extra space. I'm pretty much at the limit of my welder with my current skill at 3/16" plate. I really have to spend time getting heat into the joint to get a good weld, consequently my welds are a bit higher than I'd like. I've cut across and it appears I have good penetration and beating a piece I welded together with a sledge hammer while clamped in the vise leads to it deforming without breaking. I've also resorted to a pretty heavy bevel.

Image

Image

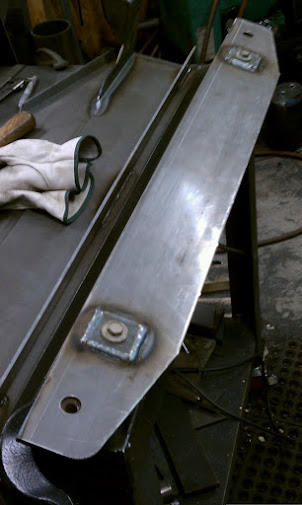
Next I started laying out the span between the oil pan skid and the radiator cover part.

Image

This is when I realized I wasn't going to have enough room on the piece for the corners so I cut some triangles, beveled the edges to make it easier to weld and clamped em down.

Image


I figured it might be easier to take my 4.5" grinder with a cut off wheel and score the areas that needed to fold so that I could fold them over with a hammer as opposed to fully welding it. It seemed to work out alright. I just had to measure the angle from the radiator cover part to the oil pan skid on the vehicle and duplicate it in the garage when I was folding it.

Image

Image

Then I stitched the seam to make sure it staid put while I was test fitting that piece over and over and over

Image

After that I cut out the piece that will cover the transmission cooler. I've found that scoring the metal with the cutoff wheel and then using the channel to hold cutting oil works well to keep the jig saw blade in good shape. I started using the jig saw for no other reason than to cut down on the massive mess the cutoff wheel makes.

Image

I laid out the lines where I'll score the piece with the 4.5" grinder and started use my punch to mark where the holes for airflow will go.

Image

The first couple holes I did with my hand drill, but it was wearing me out. So I assembled a drill press I was working on to start drilling the holes. It's still taking a tremendous amount of time.

Image

This is about where I'm at now, I'm hoping to finish up tomorrow. Just gotta add reinforcement on the open span at the outside edge and finish up this front mount.
build thread

All things in moderation, including moderation.
Some people never go crazy... what truly horrible lives they must lead
User avatar
v7guy
Moderator
 
Posts: 3712
Joined: Wed Mar 09, 2011 10:17 pm
Location: NY, long island
Name: Jason
Vehicle Year: 2004
Vehicle: Chevrolet TrailBlazer
DriveTrain: 4WD
Rank: Offroad Rated

by Trail X » Mon Apr 09, 2012 4:25 pm

Looks like a real nice start! Is this essentially a MDB clone?
8-) Build Thread | ExPo Build | YouTube Videos
Not all who wander are lost. -Tolkien
User avatar
Trail X
Founder
 
Posts: 9935
Joined: Mon Sep 07, 2009 10:22 pm
Location: VA, Roanoke
Name: James Downing
Vehicle Year: 2005
Vehicle: Chevrolet TrailBlazer
DriveTrain: 4WD w/ Aftermarket Locker
Rank: Expedition Guide

by bartonmd » Mon Apr 09, 2012 4:27 pm

Looks good!

I'll just add that the reinforcement just on the edges of the open spans work on mine, because my open span goes from the under-radiator portion to the under-oil pan skid portion, directly. Since yours has a step, where the angled edges are away from the middle portion under the oil pan skid, I'd put a lip across the back of the stepped part, as well as a couple welded-on ribs for-aft more toward the center, to tie it all together. Like the below... 1" wide should be fine, and of course, the edge of them welded to the plate, and them being at 90-degrees to the plate, regardless of my poop-tastic MSPaint rendering (that may or may not look like them sitting flat on the plate)...

Image
bartonmd
Moderator
 
Posts: 4469
Joined: Wed Sep 09, 2009 9:35 am
Location: IN, Indianapolis
Name: Mike
Vehicle Year: 2007
Vehicle: Chevrolet TrailBlazer
DriveTrain: 4WD w/ G80
Rank: Offroad Rated

by v7guy » Mon Apr 09, 2012 5:45 pm

James-it should be very similar to the MDB piece, there's a few small things I want to try just to change it up a bit and get some more experience working with metal this thick.

Mike- I was actually considering bring the plate down and boxing in the front edge of the A arm mount area to provide stiffness in the stepped in part and then have the wing like your piece does on the side. I'll be sure to add a couple ribs in the center like you have painted there. Does that sound like a bad idea? Seemed reasonable when I was thinking it out and would give me more opportunity to work the material.
build thread

All things in moderation, including moderation.
Some people never go crazy... what truly horrible lives they must lead
User avatar
v7guy
Moderator
 
Posts: 3712
Joined: Wed Mar 09, 2011 10:17 pm
Location: NY, long island
Name: Jason
Vehicle Year: 2004
Vehicle: Chevrolet TrailBlazer
DriveTrain: 4WD
Rank: Offroad Rated

by Mudwheelin » Tue Apr 10, 2012 11:27 pm

Nice work man! Any updates on it so far? Looking forward to the finished product!
Markmc 2.5 lift, 2"Markmc body lift. Markmc 1.5 spacers, 33" Dynapro MT's, exhaust, EMT cams, CAI, Chipped, Light Bar. T.L. Guards
Build Thread:
viewtopic.php?f=25&t=2349
User avatar
Mudwheelin
Trail-Blazer
 
Posts: 441
Joined: Tue May 31, 2011 11:47 pm
Location: Calgary, AB
Name: Christian
Vehicle Year: 2007
Vehicle: Chevrolet TrailBlazer
DriveTrain: 4WD w/ G80

by v7guy » Wed Apr 11, 2012 2:09 am

I had some issues with my drill press and ended up drilling the last dozen holes by hand. That slowed me down quite a bit. Going out now to score the part of the plate that mounts at the bumper so I can bend it up, and weld it to the rest and check fitment again. I can't even count the number of times this thing has been on and off the vehicle.
I'll probably finish up the ribs and the a arm plate covers tomorrow. We'll see. I imagine I'll have some more pics in a couple hours.
build thread

All things in moderation, including moderation.
Some people never go crazy... what truly horrible lives they must lead
User avatar
v7guy
Moderator
 
Posts: 3712
Joined: Wed Mar 09, 2011 10:17 pm
Location: NY, long island
Name: Jason
Vehicle Year: 2004
Vehicle: Chevrolet TrailBlazer
DriveTrain: 4WD
Rank: Offroad Rated

by v7guy » Thu Apr 19, 2012 12:29 pm

Progress has unfortunately been pretty darn slow. Partially due to screw ups while welding and unforseen issues trying to get it all to fit. When I build a bumper I'm definitely pulling the truck up to the garage and fabbing it all on the vehicle. This taking shit on and off and correcting for the 1/4" off here and there has been murder.

First off I really wanted to keep the front tow hooks. I have no idea if I'll build a bumper in a month or two or wait until next summer so I really wanted to make sure I had some easy recovery points. I had no clue how much this would complicate things.

Image

You'll notice in this picture that the right hand side is flat.. That's the part that mounts to the bottom of the metal bumper. The bottom of the metal bumper isn't flat and has a row of ribs, and that also where the town hooks mount. The only way the skid/tow hooks was going to fit was to make space for each rib. So I cut rectangles out and welded them back on a bit higher.
Unfortunately that caused the piece to curve in a banana shape since I had to weld one side of each of the rectangles on before I could fill in the other. In hind sight it was completely predictable since I basically made a bunch of slits and heated the piss out it with the welder. What was an angled piece that was rigid turned into a flat plate that I was welding onto the side of after I cut out all those pieces. Rookie mistake.

I ended up having to clamp it to a piece of angle iron to pull it back into shape. It's still not perfect. But it's close enough for government work. You can never have enough clamps.

Image

Image

After all that I realized the hooks needed material to the back removed so they would fit so I had to cut behind the hook as well. Then after it was all made to clear it remembered the inside bolt of the hook bolted from inside the bumper. Since the long bolts go through the hooks from the top and effectively sandwich the skid when it's bolted in there's no way to bolt the inner tow hooks bolt to the bumper. I ended up welding some sheet metal to the inside of the bumper to hopefully distribute the load and then welded a nut to the inside of the bumper so the inner bolt of the hook can be bolted in from the bottom. Then I mocked it up to ensure it all still fits.
Image

So far so good. I still need to make about 473 small brackets to reinforce around the edges, around the material removed for the hooks etc. I'm also removing the top bolt hole area from the skid (where the trans cooler mounts) since it would probably be bad if the skid did sustain damage and it ripped up the trans cooler puking all the fluid out.
I'll take some better pics this weekend when I put some more work into it. Hopefully more pics makes all this rambling make more sense
build thread

All things in moderation, including moderation.
Some people never go crazy... what truly horrible lives they must lead
User avatar
v7guy
Moderator
 
Posts: 3712
Joined: Wed Mar 09, 2011 10:17 pm
Location: NY, long island
Name: Jason
Vehicle Year: 2004
Vehicle: Chevrolet TrailBlazer
DriveTrain: 4WD
Rank: Offroad Rated

by bartonmd » Thu Apr 19, 2012 12:54 pm

Wow, I really hate to MMQB, here, but you know what takes 3.75 shitloads less work, but works as well or better than what you did to make the tow hooks work?

Use a flat plate like you started with, locate the bumper bolt holes, then figure out where the offset mount of the tow hook lands. From there, you can mark around it, cut out a clearance hole, and put another piece (2"x2") on the top side of that hole, with the bolt hole in it. The tow hook then mounts to the radiator skid, and you just cut the bottom of the stock bumper support for clearance. The tow hook still mounts flat on its mounting surfaces (happens to be right around 3/16" offset, as luck has it), you still have a flat plate across, and the tow hooks mount easily. You're still going to have to cut the bottom of your bumper out, either way, to get that second bolt into the tow hook, and still be able to mount the bumper and skid separately. (ETA: I see from the text between the pictures that you made that 300% more difficult than it needed to be, as well)

From our conversations about it, I didn't know you were doing the stock tow hook thing, or I'd have told you how to do it, then...

Also, when you do make your bumper, you're going to have to cut this whole front offset part off, and make a whole new under-bumper plate, because of the offsets, depending on how you mount your bumper.

Mike
Last edited by bartonmd on Thu Apr 19, 2012 1:05 pm, edited 2 times in total.
bartonmd
Moderator
 
Posts: 4469
Joined: Wed Sep 09, 2009 9:35 am
Location: IN, Indianapolis
Name: Mike
Vehicle Year: 2007
Vehicle: Chevrolet TrailBlazer
DriveTrain: 4WD w/ G80
Rank: Offroad Rated

by navigator » Thu Apr 19, 2012 1:01 pm

nice progress.
Looking at skids, I might could do an oil skid but this rad skid is so complex, this is where when the time comes I'll place an order with Mike!
"Please consider a search before posting. Folks on this site PIONEERED functional offroad use of these trucks."
The answer to many common lift questions can be found
here
My Build Thread
User avatar
navigator
Moderator
 
Posts: 4651
Joined: Wed Mar 09, 2011 10:16 am
Location: NC, Winnabow
Name: Chris
Vehicle Year: 2006
Vehicle: Chevrolet TrailBlazer
DriveTrain: 4WD
Rank: Trail Ready

by v7guy » Thu Apr 19, 2012 1:41 pm

Mike. I hadn't even thought of going that route. lol this is all a learning experience for me and I obviously don't always see the simplest solutions. The tow hooks were really an after thought.

As it sits now the metal bumper piece slides onto the truck, then I drop the long bolts in and then the skid place is held in position while I hold the hooks up and turn the long bolts into the hooks. The offset bolt is now put in from the bottom and threads into a nut I welded to the inside of the metal bumper piece. Not sure if I really explained that very well up above, I don't understand why you're saying I'm going to have to cut out the bottom of the bumper.
The way you described it does sound massively easier. I spent an entire night working on that.

While I was bolting it up I was thinking how this is all going to get cut away for a bumper build. Wasn't one of my happiest thoughts.

But like I mentioned earlier I'm posting this up in all it ugliness and mistakes hoping I learn through experience and some MMQB. I have very very little experience and don't know anyone that has even a passing interest in building anything. I'm really winging it and just building what seems obvious at the time. I need all the pointers I can get. lol

Chris, as mike mentioned it can be done a lot easier... you've seen how to do it the hardest way possible, show us the easy way!
build thread

All things in moderation, including moderation.
Some people never go crazy... what truly horrible lives they must lead
User avatar
v7guy
Moderator
 
Posts: 3712
Joined: Wed Mar 09, 2011 10:17 pm
Location: NY, long island
Name: Jason
Vehicle Year: 2004
Vehicle: Chevrolet TrailBlazer
DriveTrain: 4WD
Rank: Offroad Rated

by bartonmd » Thu Apr 19, 2012 1:51 pm

Jason,

I'm glad you're taking it how I meant it; As constructive criticism and for posterity of anyone wanting to also make one of these for themself!

Where I was saying that the bottom of the bumper would have to be cut out is for clearance for the bolt head, if you were still going to bolt from the top of the radiator skid, not grabbing the bumper at all. I use the stock bolt from the top, into the stock threads in the tow hooks, mounting them just to the radiator skid. I then cut a couple slits in the bottom of the bumper support, and bend the "flap" up, and out of the way of the bolt head.

I'm doing one this weekend, like this, so I'll post pics of what it looks like. Doing it my way takes me like 25 minutes to modify one from a standard radiator skid, and modify the bumper support. In fact, it took me longer to type/explain what to do than it actually takes to do it.

Mike
bartonmd
Moderator
 
Posts: 4469
Joined: Wed Sep 09, 2009 9:35 am
Location: IN, Indianapolis
Name: Mike
Vehicle Year: 2007
Vehicle: Chevrolet TrailBlazer
DriveTrain: 4WD w/ G80
Rank: Offroad Rated

by v7guy » Fri Apr 20, 2012 1:52 pm

Mike, I think I understand what you're talking about, and pics would be cool. I'm going to get some more time in on it today and tomorrow so I should have some more pictures detailing things a good bit better.
It's probably difficult to make any suggestions or to have further thoughts on what's left to do with such vague pictures.

In the future I think I'm going to make sure I use some poster board to create some patterns so the project is better planned. Lack of planning in general has greatly increased the difficulty/time involved in building this.


As I mentioned before, any input is appreciated... positive, negative or just thinking out loud.
build thread

All things in moderation, including moderation.
Some people never go crazy... what truly horrible lives they must lead
User avatar
v7guy
Moderator
 
Posts: 3712
Joined: Wed Mar 09, 2011 10:17 pm
Location: NY, long island
Name: Jason
Vehicle Year: 2004
Vehicle: Chevrolet TrailBlazer
DriveTrain: 4WD
Rank: Offroad Rated

by bartonmd » Fri Apr 20, 2012 3:09 pm

Yeah, I typically cut and tape stuff together out of cardboard, then trace the cardboard on steel, then cut it.

I'll post some pics after this weekend.

Mike
bartonmd
Moderator
 
Posts: 4469
Joined: Wed Sep 09, 2009 9:35 am
Location: IN, Indianapolis
Name: Mike
Vehicle Year: 2007
Vehicle: Chevrolet TrailBlazer
DriveTrain: 4WD w/ G80
Rank: Offroad Rated

by bartonmd » Sun Apr 22, 2012 9:56 pm

Like so:

Image

Image

Image

Image

Image

Image
bartonmd
Moderator
 
Posts: 4469
Joined: Wed Sep 09, 2009 9:35 am
Location: IN, Indianapolis
Name: Mike
Vehicle Year: 2007
Vehicle: Chevrolet TrailBlazer
DriveTrain: 4WD w/ G80
Rank: Offroad Rated

by dvanbramer88 » Wed Apr 25, 2012 10:09 am

bartonmd wrote:Wow, I really hate to MMQB, here, but you know what takes 3.75 shitloads less work,

Mike


I died reading that.

Also: to the OP :cheers: looks good!
Chevy Power!
Long live the Republic
"Violence is not always evil. The judicious use of violence and those willing to use it without hesitation is often all that stands between wolves and sheep."

Build Thread
User avatar
dvanbramer88
Lifer
 
Posts: 2283
Joined: Tue Jul 05, 2011 3:12 pm
Location: PA, Bristol
Name: Dave
Vehicle Year: 2002
Vehicle: Chevrolet TrailBlazer
DriveTrain: 4WD
Rank: Trail Ready


Return to Fab Work

cron