 472759c7669a36de.jpg
- (3.7 KiB) Downloaded 767 times
Help me build my rear storage!
66 posts
• Page 2 of 4 • 1, 2, 3, 4
I've got one like this and two larger ones. Even this size may be too large and/or heavy.
- bgwolfpack
- Veteran
- Posts: 1794
- Joined: Fri Sep 18, 2009 7:19 pm
- Name: Randy
- Vehicle Year: Other
- Vehicle: Other Vehicle
- DriveTrain: 4WD
I like the idea, but weight is a concern for me... I took measurements, 36x42x13 using the bottom of the cargo area between the wheel wells as a guideline, so I'll be making a 3d CAD model to rough things out.
My Build Thread | 2006 Trailblazer LS Desert Camping Edition **SOLD**
2013 Nissan Xterra S "ReXterra"
2013 Nissan Xterra S "ReXterra"
-

Philberto - Lifer
- Posts: 2046
- Joined: Fri Sep 11, 2009 5:30 pm
- Location: CA, Oxnard
- Name: Philip Cruz
- Vehicle Year: Other
- Vehicle: Other Vehicle
- DriveTrain: 4WD
- Rank: Offroad Rated
Philberto wrote:I like the idea, but weight is a concern for me... I took measurements, 36x42x13 using the bottom of the cargo area between the wheel wells as a guideline, so I'll be making a 3d CAD model to rough things out.
Rough opening size I'm working on (leaving 1/2 on either size for carpet) is 451/2" X 311/2" height at 23" with a set back angle, for the door, for a raised portion 10" above with tapered ends. Much different than yours.
- bgwolfpack
- Veteran
- Posts: 1794
- Joined: Fri Sep 18, 2009 7:19 pm
- Name: Randy
- Vehicle Year: Other
- Vehicle: Other Vehicle
- DriveTrain: 4WD
Well, my height is lower because I'm using the top of the lower trim half in the rear as a guideline for the height, and I can go longer because I'm angling the front and rear of the drawers for clearance... that way there's no space wasted. I'm probably going to go with two small drawers on each side of the center area, which will have a cubby over where the floor panel goes, so that I can access that and put things on top of it such as books and maps. Then there will be a platform with tons of tie-down points to put my aquatainers and actionpacker on top and secure them. The tool box will probably go in the center. I'll be able to figure out space more once I get my cad up and running... need to find a good CAD software for linux.
My Build Thread | 2006 Trailblazer LS Desert Camping Edition **SOLD**
2013 Nissan Xterra S "ReXterra"
2013 Nissan Xterra S "ReXterra"
-
Philberto - Lifer
- Posts: 2046
- Joined: Fri Sep 11, 2009 5:30 pm
- Location: CA, Oxnard
- Name: Philip Cruz
- Vehicle Year: Other
- Vehicle: Other Vehicle
- DriveTrain: 4WD
- Rank: Offroad Rated
In need to sharpen my pencil, its alittle dull.Philberto wrote:Well, my height is lower because I'm using the top of the lower trim half in the rear as a guideline for the height, and I can go longer because I'm angling the front and rear of the drawers for clearance... that way there's no space wasted. I'm probably going to go with two small drawers on each side of the center area, which will have a cubby over where the floor panel goes, so that I can access that and put things on top of it such as books and maps. Then there will be a platform with tons of tie-down points to put my aquatainers and actionpacker on top and secure them. The tool box will probably go in the center. I'll be able to figure out space more once I get my cad up and running... need to find a good CAD software for linux.

- bgwolfpack
- Veteran
- Posts: 1794
- Joined: Fri Sep 18, 2009 7:19 pm
- Name: Randy
- Vehicle Year: Other
- Vehicle: Other Vehicle
- DriveTrain: 4WD
Unfortunately, my laptop doesn't have a scanner, so I can't share drawings with you guys... hence the need for CAD.
My Build Thread | 2006 Trailblazer LS Desert Camping Edition **SOLD**
2013 Nissan Xterra S "ReXterra"
2013 Nissan Xterra S "ReXterra"
-
Philberto - Lifer
- Posts: 2046
- Joined: Fri Sep 11, 2009 5:30 pm
- Location: CA, Oxnard
- Name: Philip Cruz
- Vehicle Year: Other
- Vehicle: Other Vehicle
- DriveTrain: 4WD
- Rank: Offroad Rated
Philberto wrote:Wow, nice CAD work! Thanks for the info, looks a little like what James did on his setup, but with some extra goodies accessible when the seats are pushed forward. I like the idea of using it for gun storage, but have some trepidation about whether that would constitute a "concealed weapon" under my state's $hitty gun laws.
Yes, my drawings are based on Mr. Downing's rear storage unit.
Thanks, but it's only paint not CAD. My measurements may not be perfect either. I love the gun laws here in Mississippi; my vehicle is an extension of my home. Basically I can have every weapon I own loaded up in my car with the exception of when hunting. Aparently when you're hunting you can not have a loaded weapon in your vehicle. I'm not sure how CA is, but if you don't get caught then you have nothing to worry about.
If you wanna carry a long gun, but don't want to worry about it being "concealed" you should get one of these:
http://www.swps.com/procovgunrac.html
Back to the root of the thread; I'd like to see what you come up with. It may influence my final decision.
-

cbbryan - Trail-Blazer
- Posts: 270
- Joined: Tue Sep 22, 2009 2:26 pm
- Location: MS, Amory
- Name: Chris
- Vehicle Year: 2005
- Vehicle: Chevrolet TrailBlazer
- DriveTrain: 4WD
Does your states gun laws really say if you put guns in the rear its considered concealed??? wow im sorry if it's true
For Nevada it's not considered concealed unless it's loaded otherwise its fine im actually making a rear storage for my TB to hold ammo guns tools and all of that im actually seeing how i can mount my loaded pistols all over my TB
But I was going to buile one similar to JD's but decided not to as i wanted to have my own idea of one so i made mine based on how i can hold pistols and mount rifles and shotty's on it
pics will follow when i actually build the beast
Go Big & Go Broke
-
SteveTB03 - Addict
- Posts: 600
- Joined: Fri Sep 11, 2009 6:11 pm
- Location: Las Vegas, NV
- Name: Steve Darras
- Vehicle Year: Other
- Vehicle: Other Vehicle
- DriveTrain: 4WD
- Rank: Trail Ready
I plan on mounting one or two holtsers with pistols throughout my TB as well; one up front and one in the rear, that way I'll always have one close. I also plan on mounting my extra flashlight charger somewhere handy so I will always have a light. Customization should fit your needs and be functional, not just look cool.
-
cbbryan - Trail-Blazer
- Posts: 270
- Joined: Tue Sep 22, 2009 2:26 pm
- Location: MS, Amory
- Name: Chris
- Vehicle Year: 2005
- Vehicle: Chevrolet TrailBlazer
- DriveTrain: 4WD
yeah i dont know which holster to use for mounting all over i want one in a holster next to my leg where my visor is and one in the way back of my tb then of course ill have one in an IWB in my pants 
Go Big & Go Broke
-
SteveTB03 - Addict
- Posts: 600
- Joined: Fri Sep 11, 2009 6:11 pm
- Location: Las Vegas, NV
- Name: Steve Darras
- Vehicle Year: Other
- Vehicle: Other Vehicle
- DriveTrain: 4WD
- Rank: Trail Ready
Philberto wrote:Here are my needs:
*Removable toolbox (I only have one set of tools)
*Room for (2) 7-gallon aquatainers, preferably towards the front of the vehicle for easier plumbing
*Must retain usage of rear seats, but don't need to be able to have headrests folded down.
*Rear window visibility isn't necessary, but it would be nice when I'm not fully packed
*Retains access to storage cubbies or incorporate them into design, including the one on the cargo area floor.
*Room for fridge... Dimensions will be same as Engel 45 (I'm looking at an edgestar 45) on sliding drawer or fridge drop slide (roadie and james should know what this is)
*Of course, must strap down/turnbuckle down securely to vehicle...
*Area for 800w inverter
So back to the original post (sorry I didn't see this earlier Phil).
Looks like you have a big job ahead of you. Lets take a look at some of your bullets:
First, a removable tool kit. I've found no-one kit can really hold everything you need. I have a few boxes. First is a nice laid-out hand tool kit... then a separate bag with my impact drivers and adapters... and lastly a case with all the random extra junk. Keep your tool kit modular. This can make it easier to pack (and unpack). I wouldn't use a fancy drawer'd metal tool box, those things are already fairly heavy.
Your two aquatainers will be some of your biggest cargo. If you place them at the back of the seats, you will have to limit your drawer depths. Not a big deal, and you should be able to fit about four of them standing up side to side... so two should only take up half your width.
I've wondered if its possible to remove those pesky rear head rests... but never looked into it. You may want to see if you can remove them altogether. Big question here... do you need 3 rear seats? If not, maybe remove the single seat altogether, and retain the drivers side (wider) seats to fit your two rear passengers.
So you don't want any permanent structures above the level of your rear glass. Makes logical sense to me. That space is normally used to fill with cases or soft equipment like camp chairs anyways. I don't think you'll have a problem keeping your setup low.
Retaining use of your lower cargo compartment will be tricky, especially if you have a full-width setup. I had originally considered a full width, and had drawn up the plans with a hole in the bottom of the drawer enclosure. The top would be kept off of the tub storage compartment, and could only be accessed by removing one of the drawers entirely from the enclosure.
Mount your fridge above a drawer if possible. You're less likely to pack too much on top of your fridge, so having it higher with storage space below it seems to make sense.
As for strapping the enclosure down, my setup is not secured down, however wedges itself in. It stays fine and maybe shifts an inch or so when on extended trips off road. However, a better alternative is to remove your tie-downs altogether from the rear of your vehicle and obtain a longer bolt to use in the same hole. Just bolt your enclosure directly do your rear floor.
An inverter doesn't take up much space... they are fairly thin. You may be able to mount it under your rear seats even. If nothing else, mount it in the void space between the seats and the drawers.
Philberto wrote:And here are my wants:
*Locking drawers/cabinets/fridge slides/etc. (If somebody breaks into the back, I want them to leave empty-handed.
*Kitchen counter/Cooking area
*Tie-down hooks on any flat surfaces.
*convertible or contains room to sit for one person with legs hanging out of rear of TB
*Would like some way to utilize space between pillars and windows (not much space, I know, but it could make for a nice cubby or for heating stuff idk)
*Would prefer to not drill holes in vehicle
*Possible extra functionality if rear seats are folded down (like more storage, fold-down shelves, etc...)
*Trash bag hanger!
A kitchen counter will be tricky, and will need to be determined by your situation. Its a fun idea, but I fear it may be more trouble than it's worth. I'd prefer to carry a roll up table or two instead, which allows you more versatility. However if you don't need much space, you could have a simple drawer-type counter that rolls out. or even a covered drawer that can be used as a counter. Make sure it's at an appropriate height.
Good luck finding void room for someone to sit back there. With as much stuff as you want to stick in there... have your extra passenger sit on the bumper.
What space between pillars and windows? I thought this was interesting use of closet shelving to create more storage space:
The rear seat void is very useful, and you should certainly plan to use it. Place items that don't need a lot of access, but would be nice to easily service.
Trash bags can be hung anywhere if you get the kind with a built in draw string. However, a good method that I have heard of (but have not used personally) is using a metal wire hanger, and bending it into a circle. It holds the bag open while allowing you to hang it off your vehicle while at camp.
Anyways...

-

Trail X - Founder
- Posts: 9935
- Joined: Mon Sep 07, 2009 10:22 pm
- Location: VA, Roanoke
- Name: James Downing
- Vehicle Year: 2005
- Vehicle: Chevrolet TrailBlazer
- DriveTrain: 4WD w/ Aftermarket Locker
- Rank: Expedition Guide
Thanks everyone for your input! And James, it's fine, we can't expect you to do everything for us!
I saw that setup with the shelving, and thought about it while I was at Target.... I'd have to mount it on the sides, since the headliner isn't useful for supporting anything, and I'd like to not alter the roof. It does look like an awesome idea though. That, combined with a cargo net mounted on the liftgate should give me some nice supplemental space. And gotta remember to put an LED work light up there for cooking.
I did think about using the existing tie-down holes, and will almost certainly try that approach, since I'm all about using existing holes rather than creating new ones. I'll probably be creating my supports around the hole locations now, so more precise measuring is needed I suppose (or just a lot of cardboard for mockups).
As far as the tool situation goes... I'm currently using one toolbox for all my tools, but it's near its limit. I'm with you on the metal toolbox, and I think I'll just be using the plastic one I currently have for sockets, wrenches, and common tools like screwdrivers, hammers, and electrical things. I'll probably put the other stuff in another toolbox, since it's not used nearly as often, and it's almost exclusive to automotive use (gear pullers and the like).
In regards to rear seating, I was simply referring to being able to sit and chill in the back when stopped and not completely unpacked. I'm thinking I'll use two small drawers on each side for holding the small stuff, and then have a removable shelf in the center or simply use it for my aquatainer storage, since those are easy to remove and put back (though they're pretty heavy). That'll also solve the floor storage access problem, even if I end up having to modify the lid for clearance or remove it completely.
Rear seats need to stay the way they are, since I have nowhere to put a spare rear seat, and I'm not going to sell or toss it, since I want to be able to return the truck to mostly stock at least. That, and the solo rear seat covers up and stores my pump and hoses for my water system at the moment.
I'll look into removing those rear head rests though. My passengers never like using them anyways, so they're just useless...
The only thing I'm worried about with the inverter is adequate cooling. I'm probably not going to end up using it too much, but I'm all-too-aware how hot it can get on desert trips (hot enough to overheat inverters in normal cabin areas).
My kitchen counter may necessitate a "mini hitchgate" that mounts inside the cargo area just between the drawers and liftgate, but I've also thought of a novel way that uses a hinged panel under each drawer which can be unfolded and secured by cables w/turnbuckles... I'll have to see how that pans out, and may have to go with only one drawer on each side and possibly increase the height of the whole unit. Come to think of it, I'll have to increase the height for the aquatainers anyways, unless I want to make a cutout for them... hmmm decisions decisions...
As far as the second level, it's definitely for the soft stuff, like chairs, tents, sleeping bags, etc. This may change when I get the roof rack, but I'll probably keep the sleeping stuff in the truck so it stays dry for sure. It'll all be held down with those wonderful ratchet straps, hooking into a plethora of hooks on top of the drawer assembly. I'll also be installing a cargo divider mounted to the roof and to the drawer assy. to keep the cargo out of the passenger compartment and to keep my curious German Shepherd out of the cargo compartment
I think I'm going to heed your advice and mount the fridge on top of the driver-side drawer. Then, I can mount the action-packer on the passenger side. Center is for whatever else/laptop bag. Now I have to measure things and crunch numbers to make it all fit
And as far as gun laws, if it's stored anywhere out of sight either loaded or right next to its ammo, it's a concealed weapon... 's okay though, cuz I'm getting my CCW permit as soon as our new sheriff is elected. Then it'll just be a Service Springfield XD45
My Build Thread | 2006 Trailblazer LS Desert Camping Edition **SOLD**
2013 Nissan Xterra S "ReXterra"
2013 Nissan Xterra S "ReXterra"
-
Philberto - Lifer
- Posts: 2046
- Joined: Fri Sep 11, 2009 5:30 pm
- Location: CA, Oxnard
- Name: Philip Cruz
- Vehicle Year: Other
- Vehicle: Other Vehicle
- DriveTrain: 4WD
- Rank: Offroad Rated
I'm not very CAD savvy, but I have come up with some preliminary designs. Looks like I and going to be building a box on each side to go over my fender wells. Each will house one subwoofer. I low box(6" or so) will be constructed to fill out the rest of the rear floor, with a removable cutout in the middle to access the stock cargo area. Half of the top will be a flip up lid with two separate removable compartments within for recovery equipment and replacement parts. The other half will have a removable rack to hold removable tool kits. This will leave plenty of space for additional storage. As of right now, I am still deciding whether or not to incorporate a fridge into the rear design, or just to use a plug in unit to throw into the back seat for trips. Camping gear will also be stowed wherever there is room when I need it.
-

MrSmithsTB - Veteran
- Posts: 1756
- Joined: Thu Sep 10, 2009 2:28 pm
- Location: EHT, NJ
- Name: Bob
- Vehicle Year: 2006
- Vehicle: Other GMT360/370
- DriveTrain: AWD w/ G80
- Rank: Offroad Rated
MrSmithsTB wrote:I'm not very CAD savvy, but I have come up with some preliminary designs. Looks like I and going to be building a box on each side to go over my fender wells. Each will house one subwoofer. I low box(6" or so) will be constructed to fill out the rest of the rear floor, with a removable cutout in the middle to access the stock cargo area. Half of the top will be a flip up lid with two separate removable compartments within for recovery equipment and replacement parts. The other half will have a removable rack to hold removable tool kits. This will leave plenty of space for additional storage. As of right now, I am still deciding whether or not to incorporate a fridge into the rear design, or just to use a plug in unit to throw into the back seat for trips. Camping gear will also be stowed wherever there is room when I need it.
No need to be CAD savvy... just download Google Sketchup 7 and watch about 20-30 mins of tutorial videos. It's like using paint in 3d, and so simple anybody who knows how to use a mouse and keyboard can use it. I highly recommend and I'd be using it except for the ubuntu linux issue... gotta get windows working on it again. I hadn't planned on incorporating subs into the rear, since I'm planning on using dual 8" subs in the doors if I go that route. How are you planning on getting the fit over the fender wells right? cardboard mockup? I don't like designing around curves.
My Build Thread | 2006 Trailblazer LS Desert Camping Edition **SOLD**
2013 Nissan Xterra S "ReXterra"
2013 Nissan Xterra S "ReXterra"
-
Philberto - Lifer
- Posts: 2046
- Joined: Fri Sep 11, 2009 5:30 pm
- Location: CA, Oxnard
- Name: Philip Cruz
- Vehicle Year: Other
- Vehicle: Other Vehicle
- DriveTrain: 4WD
- Rank: Offroad Rated
Philberto wrote:MrSmithsTB wrote:I'm not very CAD savvy, but I have come up with some preliminary designs. Looks like I and going to be building a box on each side to go over my fender wells. Each will house one subwoofer. I low box(6" or so) will be constructed to fill out the rest of the rear floor, with a removable cutout in the middle to access the stock cargo area. Half of the top will be a flip up lid with two separate removable compartments within for recovery equipment and replacement parts. The other half will have a removable rack to hold removable tool kits. This will leave plenty of space for additional storage. As of right now, I am still deciding whether or not to incorporate a fridge into the rear design, or just to use a plug in unit to throw into the back seat for trips. Camping gear will also be stowed wherever there is room when I need it.
No need to be CAD savvy... just download Google Sketchup 7 and watch about 20-30 mins of tutorial videos. It's like using paint in 3d, and so simple anybody who knows how to use a mouse and keyboard can use it. I highly recommend and I'd be using it except for the ubuntu linux issue... gotta get windows working on it again. I hadn't planned on incorporating subs into the rear, since I'm planning on using dual 8" subs in the doors if I go that route. How are you planning on getting the fit over the fender wells right? cardboard mockup? I don't like designing around curves.
What I actually plan to do is bring the boxes to the edge of the wells so I can bring the cover straight across. The relief will be cut at 90deg angles but will be kept out of sight. When the storage box in the middle slides in, everything will end up flush.
-
MrSmithsTB - Veteran
- Posts: 1756
- Joined: Thu Sep 10, 2009 2:28 pm
- Location: EHT, NJ
- Name: Bob
- Vehicle Year: 2006
- Vehicle: Other GMT360/370
- DriveTrain: AWD w/ G80
- Rank: Offroad Rated
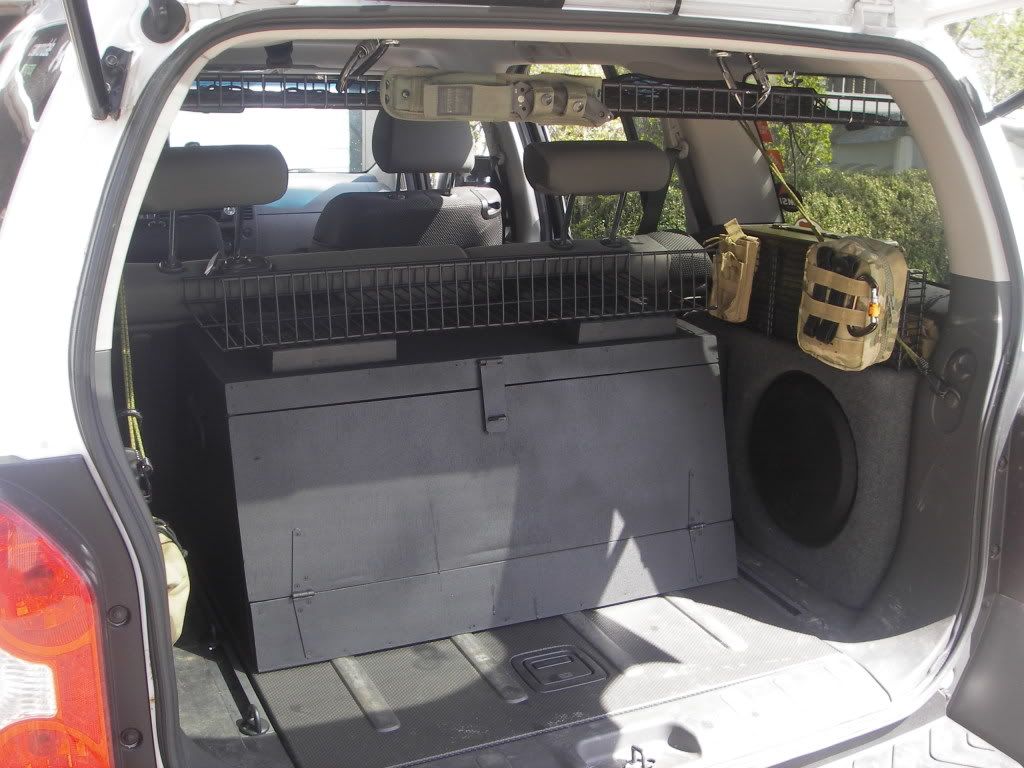
So, this is what I ended up doing for the time being. This will hold everything I need until the point I build a trailer in the fashion of what Teebes bought.
It takes up the complete rear storage area now but can be resized at any point if needed.
I constructed a list of essentials from different threads, mostly Roadies, and have 90% of the list on hand.
It takes up the complete rear storage area now but can be resized at any point if needed.
I constructed a list of essentials from different threads, mostly Roadies, and have 90% of the list on hand.
- IMG_4959.JPG
- (149.65 KiB) Downloaded 850 times
- IMG_4960.JPG
- (192.87 KiB) Downloaded 850 times
- IMG_4961.JPG
- (171.29 KiB) Downloaded 850 times
- bgwolfpack
- Veteran
- Posts: 1794
- Joined: Fri Sep 18, 2009 7:19 pm
- Name: Randy
- Vehicle Year: Other
- Vehicle: Other Vehicle
- DriveTrain: 4WD
I think I am going to encorporate several ideas to to make mine; isn't that what we're all here for anyway?
I'm still going to use my basic design based off of James'. Then I am going to add a pet barrier, this will keep dirty animals off the seats as well as give me a place to attach those closet shelving units.
I've also pondered the possibility of pulling out that carpet and replacing with rhino liner or something similar. This would give me a place to put dirty/muddy/wet stuff without haveing to worry about the carpet. I thought about this while hunting the other day, "where will I put a something if I kill it?" and thats when I decided that a liner would be very beneficial.
- Attachments
-
- pet barrier.jpg
- it has adjustable legs
- (84.76 KiB) Downloaded 846 times
-
- cargo2.jpg
- (56.58 KiB) Not downloaded yet
-
- cargo1.jpg
- (38.51 KiB) Not downloaded yet
-
cbbryan - Trail-Blazer
- Posts: 270
- Joined: Tue Sep 22, 2009 2:26 pm
- Location: MS, Amory
- Name: Chris
- Vehicle Year: 2005
- Vehicle: Chevrolet TrailBlazer
- DriveTrain: 4WD
cbbryan wrote:. I thought about this while hunting the other day, "where will I put a something if I kill it?" and thats when I decided that a liner would be very beneficial.
We've used the Safari Rack before
-

OregTrailBlazin - Off-Road Vendor
- Posts: 610
- Joined: Wed Sep 09, 2009 2:34 pm
- Location: OR, Grants Pass
- Name: Johnathan Kurz
- Vehicle Year: 2004
- Vehicle: Chevrolet TrailBlazer
- DriveTrain: 4WD
Well damn Randy! I'm impressed! What's the plan for above the storage box? Do you have tiedowns or a retainer net to keep things from falling forward into the rear seats?
Didn't you also have plans for a refrigerator?
Lets see pics of everything in the drawers! Maybe you can give me ideas for my wishlist.
Didn't you also have plans for a refrigerator?
Lets see pics of everything in the drawers! Maybe you can give me ideas for my wishlist.
-
Trail X - Founder
- Posts: 9935
- Joined: Mon Sep 07, 2009 10:22 pm
- Location: VA, Roanoke
- Name: James Downing
- Vehicle Year: 2005
- Vehicle: Chevrolet TrailBlazer
- DriveTrain: 4WD w/ Aftermarket Locker
- Rank: Expedition Guide
-

Gordinho80 - Lifer
- Posts: 2787
- Joined: Tue Sep 08, 2009 9:27 am
- Location: NJ, Jackson
- Name: Mario Almeida
- Vehicle Year: Other
- Vehicle: Other Vehicle
- DriveTrain: 4WD
66 posts
• Page 2 of 4 • 1, 2, 3, 4