Offroad Trailblazers and Envoys

Light bar with guard

Any special projects involving a decent amount of fab work (bumpers, sliders, roof racks, etc)

by galacticfuzz » Tue Nov 08, 2011 6:09 pm

So, I've been running with just a regular bar like the one that James had shown and it's worked great. After taking a look at some of the different vehicles out there, some on Expedition Portal and various others, I really liked the idea of having a guard of sorts in front of my lights. Here is a pic of the non painted and non finished piece that I've come up with as well as one half of the lights that I plan on using. The guards won't be a "lights are 100% safe type" but more to help add some deflection for lower branches and such. Being that I am not well versed in welding and metal work, I think this turned out pretty well. I have access to welding equipment (I've been using the MIG), brake, shear, horizontal band saw and a small hand bender to make the various pieces. Unfortunately I couldn't bend the 3/4 in square tubing to match the 1/2 tubing with the equipment that I have in my classroom.

Image

Shot with two of the lights
Image

Side view. I like that it doesn't stick out too far from where the lights will end up.
Image

Should have this painted soon and then wired up and installed.
Build Thread
“Set out from any point. They are all alike. They all lead to a point of departure.”
― Antonio Porchia
galacticfuzz
Off-Roader
 
Posts: 245
Joined: Sun Apr 24, 2011 11:16 am
Location: IL, Lake Vila
Name: Drew
Vehicle Year: 2007
Vehicle: Chevrolet TrailBlazer
DriveTrain: 4WD w/ G80
Rank: Trail Ready

by janesy86 » Tue Nov 08, 2011 6:34 pm

I dig it! Nice work.
Build Thread
Back to stock, had fun while it lasted...
janesy86
Veteran
 
Posts: 1291
Joined: Thu Sep 10, 2009 2:29 pm
Location: MA, Salem
Name: Nick Janes
Vehicle Year: 2007
Vehicle: Chevrolet TrailBlazer
DriveTrain: 4WD w/ G80
Rank: Offroad Rated

by yalchga » Tue Nov 08, 2011 6:57 pm

that looks good let me know when you are getting rid of your old one
yalchga
Member
 
Posts: 88
Joined: Mon Aug 29, 2011 12:23 pm
Location: NM, ALbuquerque
Name: Gabe
Vehicle Year: 2007
Vehicle: Chevrolet TrailBlazer
DriveTrain: 4WD

by SomeOffPave » Tue Nov 08, 2011 7:35 pm

galacticfuzz wrote:Side view.
Image

.

Looks good. Definately adds a finished look.

Please do not take my next comment the wrong way. I am NOT critizing, I am just asking a question: Why did you extend the mounting straps for the lights past the lights and then bend them up? In other words, why did you not just stop the strap short and have the aiming bracket that came with the lights under the lights instead of behind the lights?
SomeOffPave
Cruiser
 
Posts: 36
Joined: Wed Sep 30, 2009 1:44 pm
Vehicle Year: 2002
Vehicle: Chevrolet TrailBlazer
DriveTrain: 4WD w/ G80

by Trail X » Tue Nov 08, 2011 8:23 pm

Looks good overall.

Guy-who-posted-above - the reason the studs are pointing back is probably because he's worried about scratching his roof. The light bar rods come very close to the roofline. So he solved that issue with the bent up tabs.

However, upon solving one issue, you create another. Your lights are going to vibrate like an electric toothbrush.

You need to make your mounting tabs much more rigid. You need to mount to a tube of some sort. Something with substantial thickness.
8-) Build Thread | ExPo Build | YouTube Videos
Not all who wander are lost. -Tolkien
User avatar
Trail X
Founder
 
Posts: 9935
Joined: Mon Sep 07, 2009 10:22 pm
Location: VA, Roanoke
Name: James Downing
Vehicle Year: 2005
Vehicle: Chevrolet TrailBlazer
DriveTrain: 4WD w/ Aftermarket Locker
Rank: Expedition Guide

by OregTrailBlazin » Tue Nov 08, 2011 9:24 pm

Looking Great, though I agree with what James said, I would also put some tails going rearward over the mounting points, that way if you hit a branch hard enough, it won't try and fold the whole assembly backwards...


That shop looks So clean :awesome: , almost seems photoshoped.. :mrgreen:
Johnny Kurz
General Manager
541-474-2879
Wheeler's Off-Road Inc.
Our Vendor Section
User avatar
OregTrailBlazin
Off-Road Vendor
 
Posts: 610
Joined: Wed Sep 09, 2009 2:34 pm
Location: OR, Grants Pass
Name: Johnathan Kurz
Vehicle Year: 2004
Vehicle: Chevrolet TrailBlazer
DriveTrain: 4WD

by fishsticks » Tue Nov 08, 2011 9:38 pm

Good craftsmanship. The biggest problem I see that hasn't been pointed out is the angle of your guard will deflect debris downward towards your roof rather than up and over the lights. If it were me, I'd take what you have and flip it upside down. Join all the light tabs with some angle for rigidity then build downwards from there to make a new roof mounting point. Cut off the ends of the old roof mounting point and put crossbars between there and the new mounting point. Then you've got a super strong structure that solves all of the problems people have pointed out.


EDIT: Bad paint illustration...

Image
11 Silverado LTZ - 6.2L/6l80, 2/3 drop, self tuned
85 Hilux - 3RZ, dual cases, caged, 40s, chromo everything
02 TrailBlazer LTZ - 35s, lockers, balls - Gone but not forgotten - Build
User avatar
fishsticks
Moderator
 
Posts: 4356
Joined: Thu Apr 01, 2010 11:30 pm
Location: WA, Vancouver
Name: Donny
Vehicle Year: Other
Vehicle: Other Vehicle
DriveTrain: 4WD w/ Aftermarket Locker
Rank: Extreme Offroader

by galacticfuzz » Wed Nov 09, 2011 12:56 am

SomeOffPave, I didn't take it as criticism, since, well, I posted this to get some feedback on how this may be improved upon (though not stated).

James, partially right on the reason the studs are pointing back. Other reason was to help keep a slightly lower profile.
Definitely see the points you guys are making, especially with the mounting and the vibration. I had been thinking about taking some of the left over 1/2 pipe and welding it from tab to tab for support, but didn't know if that would be really needed.

OregTrailBlazin, as for the shop, right now I don't have any students that were able to be enrolled (new program and newly reopened school) so it's basically my playground with my construction classroom across the hall. I have a whole area all to myself lol

Donny, I will have to look at playing around with flipping it, since that's something that I thought about slightly with the angles and direction that any debris would be pushed.

Thank you for the thoughts guys, really gives me some things to look at. Haven't done a lot of fabrication stuff before, so it's kind of a new thing.
Build Thread
“Set out from any point. They are all alike. They all lead to a point of departure.”
― Antonio Porchia
galacticfuzz
Off-Roader
 
Posts: 245
Joined: Sun Apr 24, 2011 11:16 am
Location: IL, Lake Vila
Name: Drew
Vehicle Year: 2007
Vehicle: Chevrolet TrailBlazer
DriveTrain: 4WD w/ G80
Rank: Trail Ready

by galacticfuzz » Wed Nov 09, 2011 9:22 am

Quick update,

Had a little bit to check it out this morning, Donny, flipping it seems that it would actually work really well. I can also take and run a small screw through the plastic guard of the light (not the housing) and secure it additionaly to it's mounting tab. Still gonna end up running some of the tubing to give additional rigidity since that is one thing that I went back and looked at as well. Thanks for the tip there James. Next comes just re-working the mounting set up. Camera is at home so no pic unfortunately.
Build Thread
“Set out from any point. They are all alike. They all lead to a point of departure.”
― Antonio Porchia
galacticfuzz
Off-Roader
 
Posts: 245
Joined: Sun Apr 24, 2011 11:16 am
Location: IL, Lake Vila
Name: Drew
Vehicle Year: 2007
Vehicle: Chevrolet TrailBlazer
DriveTrain: 4WD w/ G80
Rank: Trail Ready

by djthumper » Wed Nov 09, 2011 1:14 pm

Image

hehehe
User avatar
djthumper
Moderator
 
Posts: 2702
Joined: Wed Mar 24, 2010 6:04 pm
Location: NV, Las Vegas
Name: Larry
Vehicle Year: 2006
Vehicle: Chevrolet TrailBlazer
DriveTrain: 4WD
Rank: Offroad Rated

by galacticfuzz » Wed Nov 09, 2011 2:52 pm

djthumper wrote:Image

hehehe


:finger:

yeah yeah yeah....i'm working on it LOL. There is only so much time during the middle of the day when busy teaching....
Build Thread
“Set out from any point. They are all alike. They all lead to a point of departure.”
― Antonio Porchia
galacticfuzz
Off-Roader
 
Posts: 245
Joined: Sun Apr 24, 2011 11:16 am
Location: IL, Lake Vila
Name: Drew
Vehicle Year: 2007
Vehicle: Chevrolet TrailBlazer
DriveTrain: 4WD w/ G80
Rank: Trail Ready

by fishsticks » Wed Nov 09, 2011 3:40 pm

:lurk:
11 Silverado LTZ - 6.2L/6l80, 2/3 drop, self tuned
85 Hilux - 3RZ, dual cases, caged, 40s, chromo everything
02 TrailBlazer LTZ - 35s, lockers, balls - Gone but not forgotten - Build
User avatar
fishsticks
Moderator
 
Posts: 4356
Joined: Thu Apr 01, 2010 11:30 pm
Location: WA, Vancouver
Name: Donny
Vehicle Year: Other
Vehicle: Other Vehicle
DriveTrain: 4WD w/ Aftermarket Locker
Rank: Extreme Offroader

by djthumper » Wed Nov 09, 2011 9:30 pm

If I didn't do it you know someone else would have Drew. :D
User avatar
djthumper
Moderator
 
Posts: 2702
Joined: Wed Mar 24, 2010 6:04 pm
Location: NV, Las Vegas
Name: Larry
Vehicle Year: 2006
Vehicle: Chevrolet TrailBlazer
DriveTrain: 4WD
Rank: Offroad Rated

by galacticfuzz » Mon Nov 14, 2011 9:24 pm

No problem Larry. I was a gamer, so used to the pics or didn't happen thing.

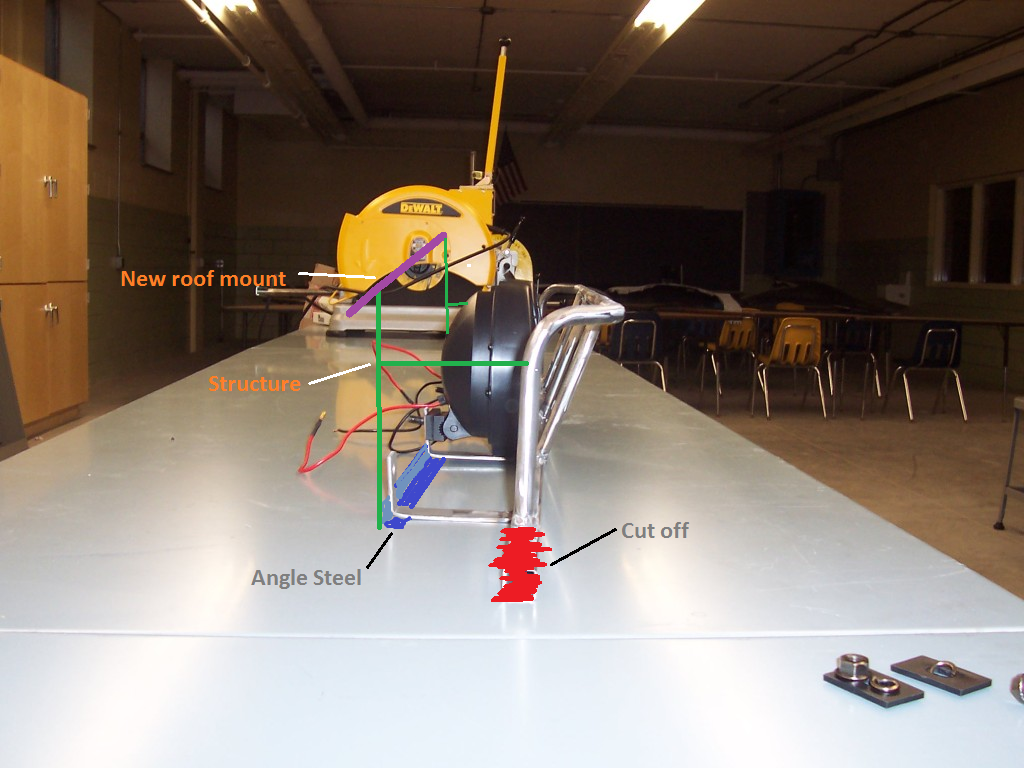
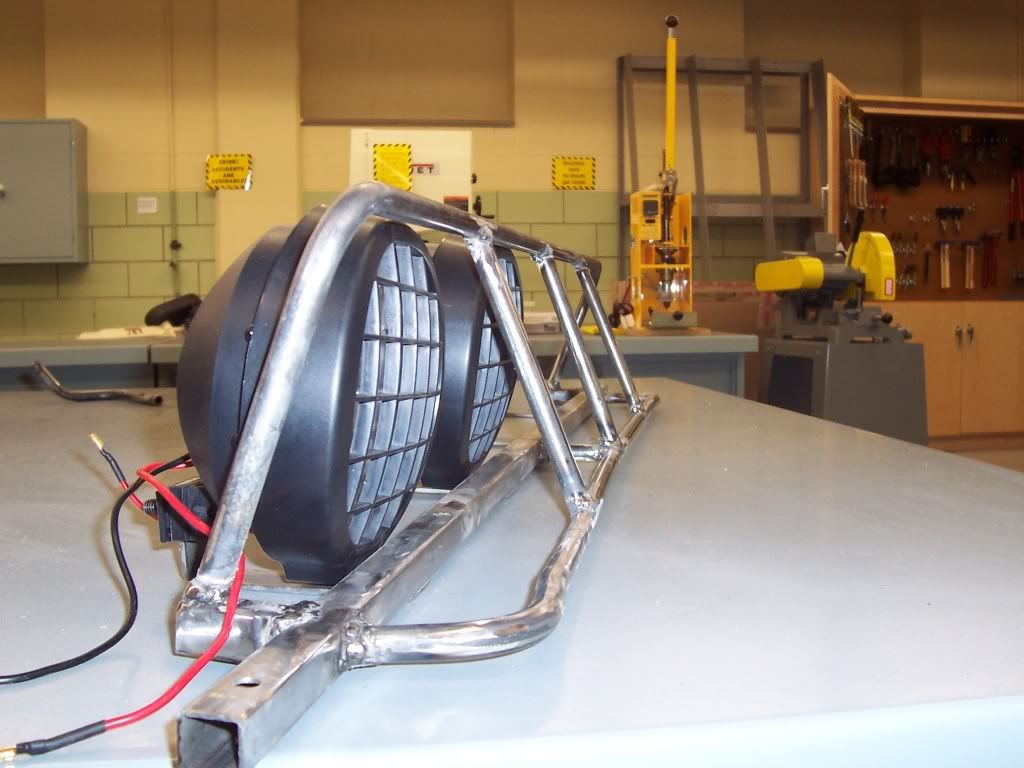
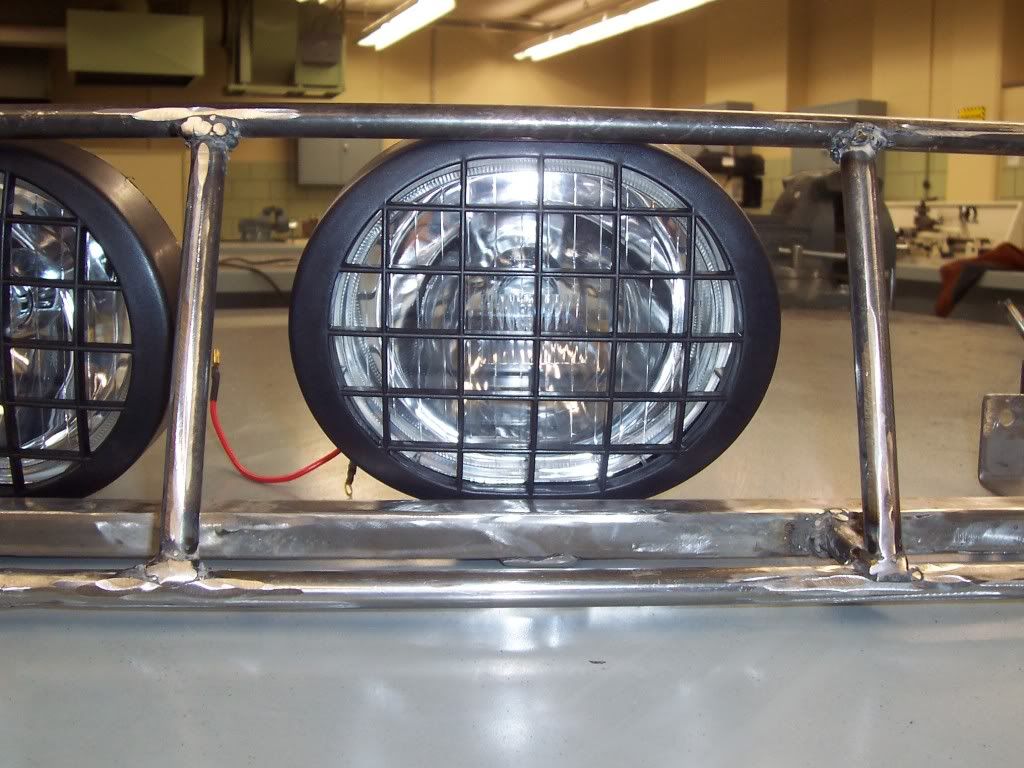
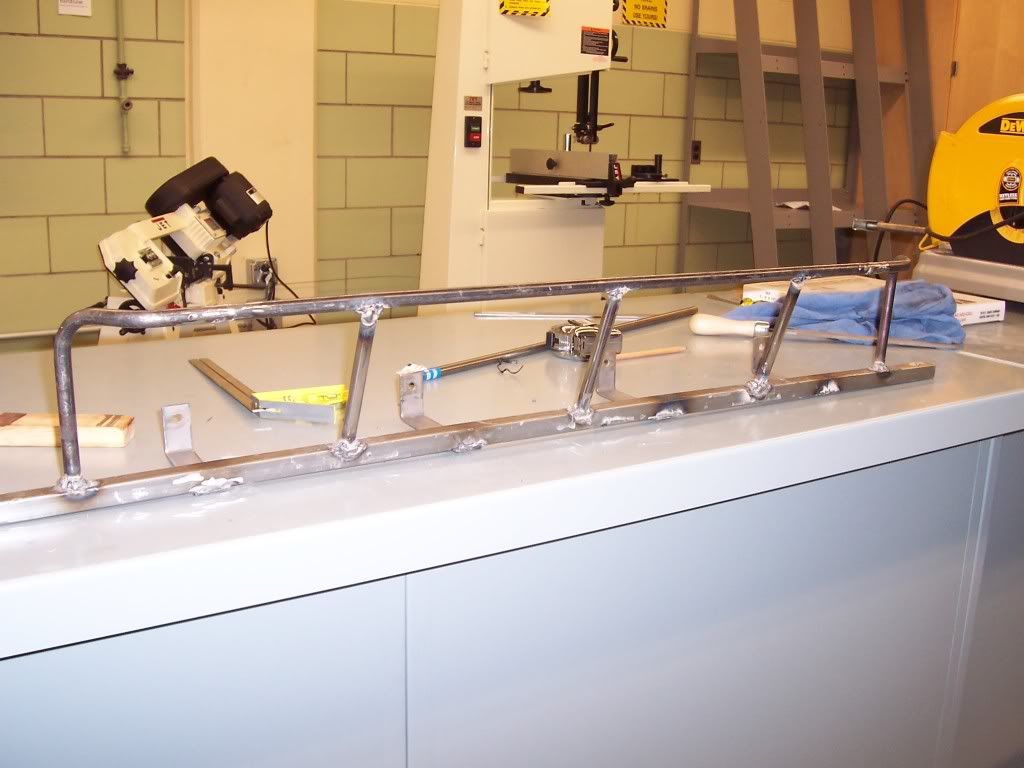
So I went back and took some of the ideas that were posted before and revamped the bar. I redid the guard to help deflect away from the roof. I still need to add the tubing or a support for the tabs. I will probably be looking at the tubing since with some spacing at the tab points, I could then run the wiring through that to give a nice look. I'm also going to probably add one more vertical bar on either end to help protect the outer lights, since they are a bit exposed. Here are the pics.

Image

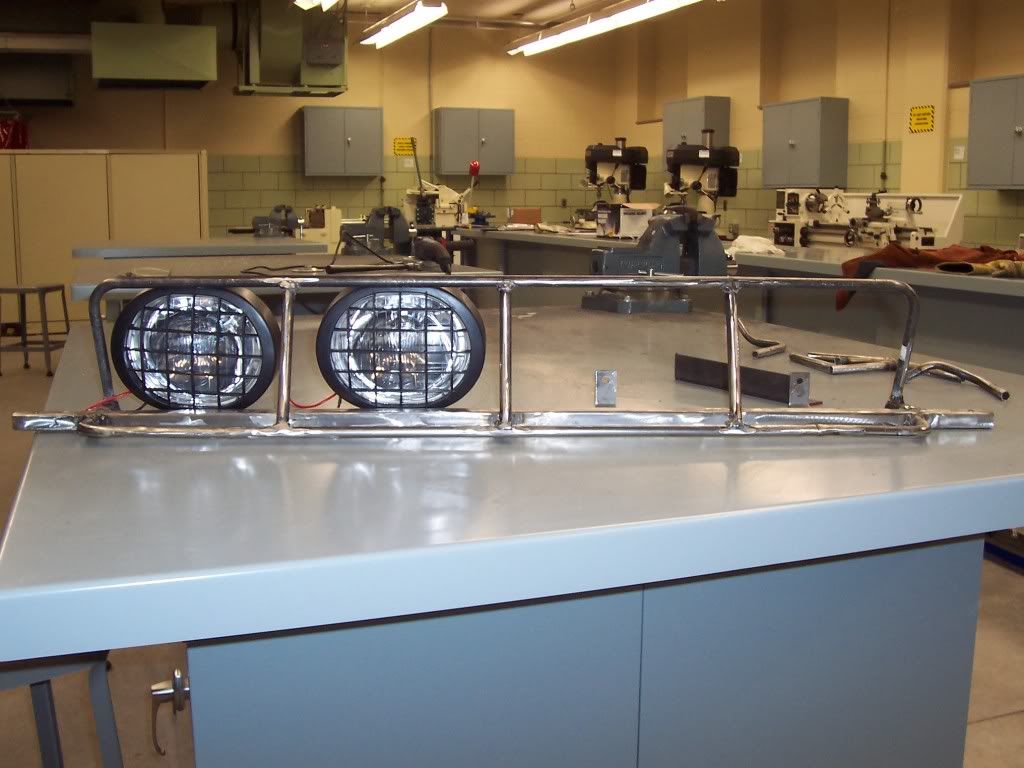
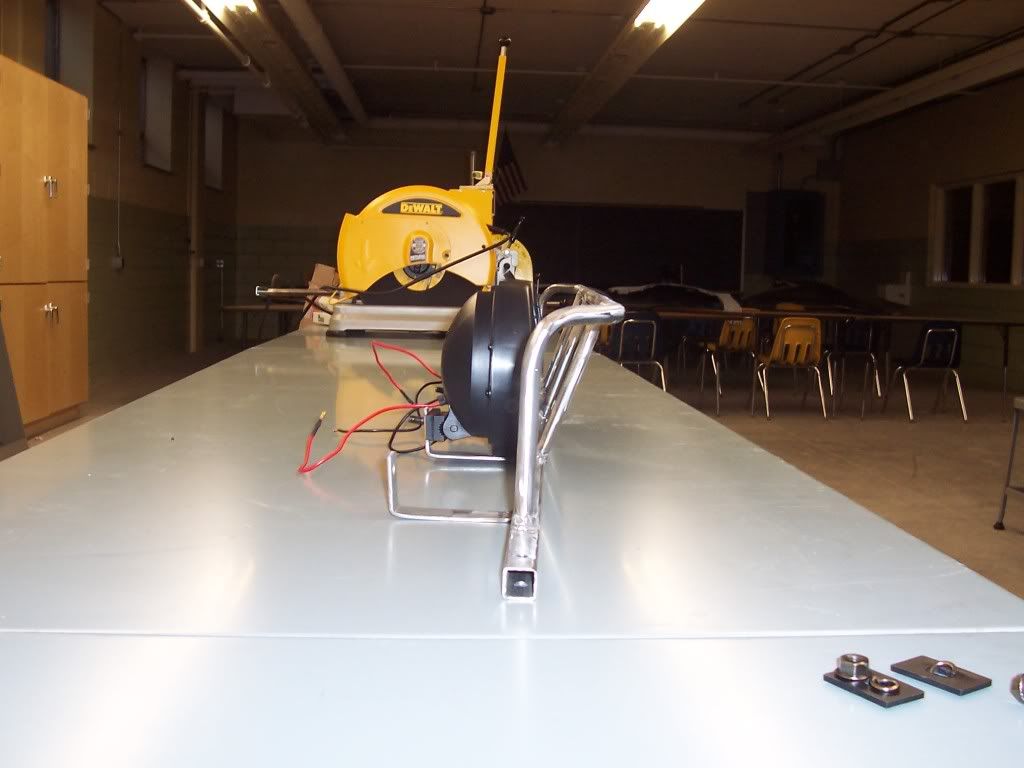
Corner where I will probably add another bar (on both sides).
Image

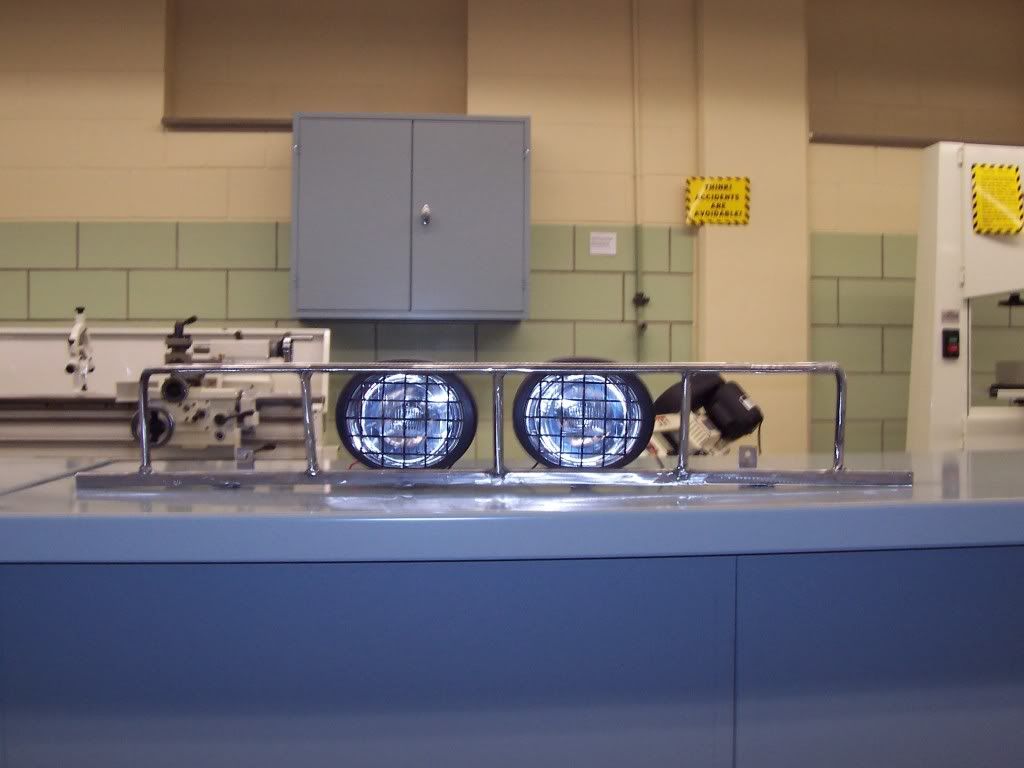
Close up on how the light sits. There is also enough room to manipulate (if needed) the light behind the bar.
Image

Edit: And yes, I am aware that the front support bar is not straight....
Build Thread
“Set out from any point. They are all alike. They all lead to a point of departure.”
― Antonio Porchia
galacticfuzz
Off-Roader
 
Posts: 245
Joined: Sun Apr 24, 2011 11:16 am
Location: IL, Lake Vila
Name: Drew
Vehicle Year: 2007
Vehicle: Chevrolet TrailBlazer
DriveTrain: 4WD w/ G80
Rank: Trail Ready

by HARDTRAILZ » Mon Nov 14, 2011 9:33 pm

Lookin good
I hate to advocate weird chemicals, alcohol, violence or insanity to anyone...but
they've always worked for me.
User avatar
HARDTRAILZ
Moderator
 
Posts: 6342
Joined: Sat Sep 12, 2009 1:49 am
Location: IN, Batesville
Name: Kyle
Vehicle Year: 2006
Vehicle: Chevrolet TrailBlazer
DriveTrain: 4WD w/ Aftermarket Locker
Rank: Extreme Offroader

by NC_IslandRunner » Mon Nov 14, 2011 10:14 pm

Looks Great! may need something Like that before I reinstall light bar.
IF THE FISH STOP BITING... HUNT FOR SHELLS!!!
User avatar
NC_IslandRunner
Moderator
 
Posts: 3022
Joined: Fri Dec 03, 2010 4:49 pm
Location: NC, Sanford
Name: Rory
Vehicle Year: 2004
Vehicle: Chevrolet TrailBlazer
DriveTrain: 4WD w/ G80
Rank: Offroad Rated

by fishsticks » Tue Nov 15, 2011 1:51 am

Me likey... my poor roof lights have been so battered by tree branches I'm surprised none have broken yet. I've considered pulling them off...
11 Silverado LTZ - 6.2L/6l80, 2/3 drop, self tuned
85 Hilux - 3RZ, dual cases, caged, 40s, chromo everything
02 TrailBlazer LTZ - 35s, lockers, balls - Gone but not forgotten - Build
User avatar
fishsticks
Moderator
 
Posts: 4356
Joined: Thu Apr 01, 2010 11:30 pm
Location: WA, Vancouver
Name: Donny
Vehicle Year: Other
Vehicle: Other Vehicle
DriveTrain: 4WD w/ Aftermarket Locker
Rank: Extreme Offroader

by Hatchet669 » Tue Nov 15, 2011 8:07 am

looking good... harbor freight lights? they work awesome...
User avatar
Hatchet669
Trail-Blazer
 
Posts: 257
Joined: Wed Sep 30, 2009 8:23 pm
Location: IL, Worth
Name: Joe
Vehicle Year: 2003
Vehicle: Chevrolet TrailBlazer
DriveTrain: 4WD
Rank: Trail Ready

by galacticfuzz » Tue Nov 15, 2011 8:29 am

Thanks for the feedback guys. The lights I have up there at the moment have all gotten cracked lenses (elements more than debris) and will end up being relocated under the rear end. Hopefully with the bar still. Harbor Freight lights the new ones are, coupon in FourWheeler Magazine drops them to $17.00 a pair if I recall, so snagged them up right away. Just need to make another trip for the other side.
Build Thread
“Set out from any point. They are all alike. They all lead to a point of departure.”
― Antonio Porchia
galacticfuzz
Off-Roader
 
Posts: 245
Joined: Sun Apr 24, 2011 11:16 am
Location: IL, Lake Vila
Name: Drew
Vehicle Year: 2007
Vehicle: Chevrolet TrailBlazer
DriveTrain: 4WD w/ G80
Rank: Trail Ready

by navigator » Tue Nov 15, 2011 10:54 am

your home made light bar looks better than my home made roof rack but the important thing is they both work!
I'm curious though if you could have made the front hoop at the bottom a little deeper and then just mounted the lights to the horizontal bar/tubing?
"Please consider a search before posting. Folks on this site PIONEERED functional offroad use of these trucks."
The answer to many common lift questions can be found
here
My Build Thread
User avatar
navigator
Moderator
 
Posts: 4651
Joined: Wed Mar 09, 2011 10:16 am
Location: NC, Winnabow
Name: Chris
Vehicle Year: 2006
Vehicle: Chevrolet TrailBlazer
DriveTrain: 4WD
Rank: Trail Ready

Next

Return to Fab Work