SteveRoche's front bumper
43 posts
• Page 2 of 3 • 1, 2, 3
Looking forward to seeing the final piece Steve. Like what you've got shown so far. I thought paint made it indestructible though.... lol
Build Thread
“Set out from any point. They are all alike. They all lead to a point of departure.”
― Antonio Porchia
“Set out from any point. They are all alike. They all lead to a point of departure.”
― Antonio Porchia
- galacticfuzz
- Off-Roader
- Posts: 245
- Joined: Sun Apr 24, 2011 11:16 am
- Location: IL, Lake Vila
- Name: Drew
- Vehicle Year: 2007
- Vehicle: Chevrolet TrailBlazer
- DriveTrain: 4WD w/ G80
- Rank: Trail Ready
Well today was greatly productive...unfortunately all was not completed. I ran into quite a big speed bump at the last piece of the bumper. My sawzall blade broke and i was all out of metal cutting sawzall blades and my grinder was acting funny so that wouldn't work...and oh yea my hack saw blades were for the wrong kind of metal so they were cutting like butter knives...and my hole saw lost a couple teeth...So up until that point it was a productive day and i got 90% of the build completed. In the morning i will have my friend with every tool known to man drop by in his Reading truck and help me finish up so i can throw on a few coats of paint before this damn hurricane hits us.
So here is a little progression of pictures of what has been completed so far. Notice the passenger side lower piece still has to be mounted, that was the last remaining piece giving me all that trouble. I am extremely pleased with how it is turning out and look forward to seeing this all finished up soon!
So here is a little progression of pictures of what has been completed so far. Notice the passenger side lower piece still has to be mounted, that was the last remaining piece giving me all that trouble. I am extremely pleased with how it is turning out and look forward to seeing this all finished up soon!
 Viewed 10237 times")
 Viewed 10237 times")
 Viewed 10237 times")
-

steveroche - Addict
- Posts: 550
- Joined: Fri Apr 08, 2011 12:34 pm
- Location: CT, Ridgefield
- Name: Steve Roche
- Vehicle Year: 2003
- Vehicle: Chevrolet TrailBlazer
- DriveTrain: 4WD
- Rank: Offroad Rated
And here is the final picture from today, only one missing piece to the puzzle...
- Attachments
-
 Viewed 10237 times")
-
steveroche - Addict
- Posts: 550
- Joined: Fri Apr 08, 2011 12:34 pm
- Location: CT, Ridgefield
- Name: Steve Roche
- Vehicle Year: 2003
- Vehicle: Chevrolet TrailBlazer
- DriveTrain: 4WD
- Rank: Offroad Rated
It's coming along nicely...
I'd throw in a brace from the back of the bumper, to meet the back side of one of those tubes, though, for some strength to not bend if you slide it off of a small tree or something
Mike
I'd throw in a brace from the back of the bumper, to meet the back side of one of those tubes, though, for some strength to not bend if you slide it off of a small tree or something
Mike
- bartonmd
- Moderator
- Posts: 4469
- Joined: Wed Sep 09, 2009 9:35 am
- Location: IN, Indianapolis
- Name: Mike
- Vehicle Year: 2007
- Vehicle: Chevrolet TrailBlazer
- DriveTrain: 4WD w/ G80
- Rank: Offroad Rated
I've got some 3/16th steel plate I will be cutting out into triangles and then welding them to the bases of the main pieces for extra strength.
-
steveroche - Addict
- Posts: 550
- Joined: Fri Apr 08, 2011 12:34 pm
- Location: CT, Ridgefield
- Name: Steve Roche
- Vehicle Year: 2003
- Vehicle: Chevrolet TrailBlazer
- DriveTrain: 4WD
- Rank: Offroad Rated
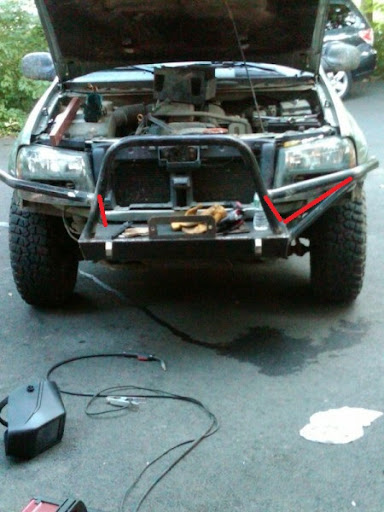
That does help the tubes not coming un-welded from the bumper, but it doesn't stop the tubes from bending out farther... IMO, it's really not even an optional thing if you want it to be durable... 4 more straight tubes... Bad MS Paint below... A tube from the side rear of the bumper meeting at the connection point (node) out near the headlight, to make a triangle out of the sides... Also, you need to put a short one going from the top rear on each side, to the node on the center section where the top outside tube joins it... That will give you a decently strong setup...
Mike
Mike
- bartonmd
- Moderator
- Posts: 4469
- Joined: Wed Sep 09, 2009 9:35 am
- Location: IN, Indianapolis
- Name: Mike
- Vehicle Year: 2007
- Vehicle: Chevrolet TrailBlazer
- DriveTrain: 4WD w/ G80
- Rank: Offroad Rated
Thanks for the picture, I will do all that today when i run over to my buddy's shop.
-
steveroche - Addict
- Posts: 550
- Joined: Fri Apr 08, 2011 12:34 pm
- Location: CT, Ridgefield
- Name: Steve Roche
- Vehicle Year: 2003
- Vehicle: Chevrolet TrailBlazer
- DriveTrain: 4WD
- Rank: Offroad Rated
See the following thread for why I also suggest a brace to the outer ends of the bumper. Mine folded back pretty easy and took out the marker light and fender on the 4runner.
The best, in my opinion, way to support those ends, is with a leg back in to the frame and not just the bumper itself. Basically a top view of this > where the outer bars angle back, then the support angles back to the frame.
viewtopic.php?f=11&t=2300
The best, in my opinion, way to support those ends, is with a leg back in to the frame and not just the bumper itself. Basically a top view of this > where the outer bars angle back, then the support angles back to the frame.
viewtopic.php?f=11&t=2300
-

chevycrew - Veteran
- Posts: 1088
- Joined: Tue Mar 08, 2011 2:42 pm
- Location: UT, Salt Lake City
- Name: Steve
- Vehicle Year: 2002
- Vehicle: Chevrolet TrailBlazer
- DriveTrain: 4WD
- Rank: Trail Ready
So far so good Steve. Looking forward to seeing it all put together.
-

Trail X - Founder
- Posts: 9935
- Joined: Mon Sep 07, 2009 10:22 pm
- Location: VA, Roanoke
- Name: James Downing
- Vehicle Year: 2005
- Vehicle: Chevrolet TrailBlazer
- DriveTrain: 4WD w/ Aftermarket Locker
- Rank: Expedition Guide
Well, after another full day of fabrication, welding and other annoying speed bumps, the bumper is finally done that is...without the paint. If the rain goes away mid day tomorrow then I will be sure to paint as much as possible and get this baby mounted and ready to rock.
I just have one...shotty picture of the truck with it thrown on in a hurry.
I just have one...shotty picture of the truck with it thrown on in a hurry.
 Viewed 10189 times")
-
steveroche - Addict
- Posts: 550
- Joined: Fri Apr 08, 2011 12:34 pm
- Location: CT, Ridgefield
- Name: Steve Roche
- Vehicle Year: 2003
- Vehicle: Chevrolet TrailBlazer
- DriveTrain: 4WD
- Rank: Offroad Rated
Good placement on the 2 on either side of the winch...
So what did the scoop end up being on the necessary 2 pieces going out from the back of the bumper and meeting at the node in front of the headlight? Are there, and I just can't see them?
Mike
So what did the scoop end up being on the necessary 2 pieces going out from the back of the bumper and meeting at the node in front of the headlight? Are there, and I just can't see them?
Mike
- bartonmd
- Moderator
- Posts: 4469
- Joined: Wed Sep 09, 2009 9:35 am
- Location: IN, Indianapolis
- Name: Mike
- Vehicle Year: 2007
- Vehicle: Chevrolet TrailBlazer
- DriveTrain: 4WD w/ G80
- Rank: Offroad Rated
I wasn't able to fit them...It's a tight fit so i ended up taking my 3/16th steel plate and welding on large triangles behind it for support. I may end up getting some smaller steel rod around 1in thickness and welding that in since i can fit it there better than 1 3/4in steel tube. When i get it back on the truck after this storm blows over I will be able to better analyze my options.
-
steveroche - Addict
- Posts: 550
- Joined: Fri Apr 08, 2011 12:34 pm
- Location: CT, Ridgefield
- Name: Steve Roche
- Vehicle Year: 2003
- Vehicle: Chevrolet TrailBlazer
- DriveTrain: 4WD
- Rank: Offroad Rated
steveroche wrote:I wasn't able to fit them...It's a tight fit so i ended up taking my 3/16th steel plate and welding on large triangles behind it for support. I may end up getting some smaller steel rod around 1in thickness and welding that in since i can fit it there better than 1 3/4in steel tube. When i get it back on the truck after this storm blows over I will be able to better analyze my options.
I had wondered about that... It looked like it went pretty close to the headlight...
Be really careful about what you push out of the way with it, because with where it is, if it bends, it'll take out the headlight and fend, instead of just bending under them for the first little bit...
Mike
- bartonmd
- Moderator
- Posts: 4469
- Joined: Wed Sep 09, 2009 9:35 am
- Location: IN, Indianapolis
- Name: Mike
- Vehicle Year: 2007
- Vehicle: Chevrolet TrailBlazer
- DriveTrain: 4WD w/ G80
- Rank: Offroad Rated
Well here you have it, my front bumper, completed...well almost. I still have to weld on two small light tabs and hang two rectangular fog lights from the bottom side of the main bar, but it's finished enough for me for now.
- Attachments
-
-
-
 Viewed 10116 times")
 Viewed 10116 times")
 Viewed 10118 times")
Last edited by steveroche on Tue Aug 30, 2011 4:19 pm, edited 1 time in total.
-
steveroche - Addict
- Posts: 550
- Joined: Fri Apr 08, 2011 12:34 pm
- Location: CT, Ridgefield
- Name: Steve Roche
- Vehicle Year: 2003
- Vehicle: Chevrolet TrailBlazer
- DriveTrain: 4WD
- Rank: Offroad Rated
Cool!
Angle views?
Mike
Angle views?
Mike
- bartonmd
- Moderator
- Posts: 4469
- Joined: Wed Sep 09, 2009 9:35 am
- Location: IN, Indianapolis
- Name: Mike
- Vehicle Year: 2007
- Vehicle: Chevrolet TrailBlazer
- DriveTrain: 4WD w/ G80
- Rank: Offroad Rated
Updated with a couple more pics...
-
steveroche - Addict
- Posts: 550
- Joined: Fri Apr 08, 2011 12:34 pm
- Location: CT, Ridgefield
- Name: Steve Roche
- Vehicle Year: 2003
- Vehicle: Chevrolet TrailBlazer
- DriveTrain: 4WD
- Rank: Offroad Rated
Welcome to the front bumper club.
Don't forget to cap the tips of the mustache.
Don't forget to cap the tips of the mustache.
-
Trail X - Founder
- Posts: 9935
- Joined: Mon Sep 07, 2009 10:22 pm
- Location: VA, Roanoke
- Name: James Downing
- Vehicle Year: 2005
- Vehicle: Chevrolet TrailBlazer
- DriveTrain: 4WD w/ Aftermarket Locker
- Rank: Expedition Guide
JamesDowning wrote:Welcome to the front bumper club.
Don't forget to cap the tips of the mustache.
haha yea, i forgot about that...I was trying to finish it up the day the hurricane hit so i was in a bit of a rush...I'll throw on something temporary then I am going to weld on some end caps.
-
steveroche - Addict
- Posts: 550
- Joined: Fri Apr 08, 2011 12:34 pm
- Location: CT, Ridgefield
- Name: Steve Roche
- Vehicle Year: 2003
- Vehicle: Chevrolet TrailBlazer
- DriveTrain: 4WD
- Rank: Offroad Rated
That turned out real nice. Well done. 
How much farther out did the new bumper end up then the original bumper?
How much farther out did the new bumper end up then the original bumper?
- bgwolfpack
- Veteran
- Posts: 1794
- Joined: Fri Sep 18, 2009 7:19 pm
- Name: Randy
- Vehicle Year: Other
- Vehicle: Other Vehicle
- DriveTrain: 4WD
Nice work! Better than my stock one thats held on with about 2 bolts. I have no choice but to ditch the stocker no matter how careful I was, its trashed.
-

BSalty - Trail-Blazer
- Posts: 323
- Joined: Wed Oct 13, 2010 1:33 am
- Location: UT, Salt Lake
- Name: Brandon
- Vehicle Year: 2003
- Vehicle: Chevrolet TrailBlazer
- DriveTrain: 4WD
- Rank: Offroad Rated
43 posts
• Page 2 of 3 • 1, 2, 3