Thanks both of you, its guys like you that gave me the inspiration to even try it.
Its funny when I think about it.... less than 30 days ago off-roading was just something I wanted to do "someday" , like when I could go buy a used Jeep to wrench on someday..... and less than a month later Its getting there, lift + tires + trail gear, I am very happy.
I definitely like the idea of using extra nuts to hold the stuff in place for the tire carrier and the high lift mount, Just having a heck of a time finding bolts that are fully threaded in the length / thread / and size I need. I'll have to go look and see what sizes I need as I cant remember off the top of my head and see if I can order them from mcmaster.com as you suggested.
Hitch Mounted Spare going on this weekend
61 posts
• Page 2 of 4 • 1, 2, 3, 4
-

snowmirage - Off-Roader
- Posts: 232
- Joined: Sun Jun 26, 2011 12:13 pm
- Location: MD, Baltimore
- Name: Brandon
- Vehicle Year: 2003
- Vehicle: Chevrolet TrailBlazer
- DriveTrain: 4WD w/ G80
if you think about it you can lift a TB about 3 inches for very similar to what it would cost to lift a jeep and they ride much better.
"Please consider a search before posting. Folks on this site PIONEERED functional offroad use of these trucks."
The answer to many common lift questions can be found here
My Build Thread
The answer to many common lift questions can be found here
My Build Thread
-

navigator - Moderator
- Posts: 4651
- Joined: Wed Mar 09, 2011 10:16 am
- Location: NC, Winnabow
- Name: Chris
- Vehicle Year: 2006
- Vehicle: Chevrolet TrailBlazer
- DriveTrain: 4WD
- Rank: Trail Ready
Gordinho80 wrote:I guess I can take credit for the spacer idea... LOL. It would allow you to lock the bolts in place so that they don't dangle when you take the wheel off.
I agree with James on the Hi-Lift mount. Looks pretty good. I also like his idea of threading the bolt from the bottom and adding a nut to secure it to the box steel.

I have to admit, when I saw your using a dremel for the carrier, I was very worried. Overall, though, I think you did a pretty good job.
Regarding the hitch tightener... you may not be able to mount it from the outside since you moved the carrier that far in to the receiver. You might have to mount it from the back side... which should still work.
I see what you mean about it not fitting hmm wish I had the tightener with me when I did this as it never even crossed my mind.... O well it just came in today i suppose I'll find a way to make it work this evening.
-
snowmirage - Off-Roader
- Posts: 232
- Joined: Sun Jun 26, 2011 12:13 pm
- Location: MD, Baltimore
- Name: Brandon
- Vehicle Year: 2003
- Vehicle: Chevrolet TrailBlazer
- DriveTrain: 4WD w/ G80
You should be able to mount it from the back... it should work the same...
Mario - Build Thread
-

Gordinho80 - Lifer
- Posts: 2787
- Joined: Tue Sep 08, 2009 9:27 am
- Location: NJ, Jackson
- Name: Mario Almeida
- Vehicle Year: Other
- Vehicle: Other Vehicle
- DriveTrain: 4WD
JamesDowning wrote:Again, a good solution for you may be to run the two hi-lift mounting bolts up from below, and securing them to the steel tubes with a nut. Then place the hi-lift on top of that nut, and secure with a wing nut. That way you won't need a wrench to remove the hi-lift.
Why not place the nut inside of the tubes? Then you can still use wing nuts above the hi-lift and keep it against the tubes.
-

djthumper - Moderator
- Posts: 2702
- Joined: Wed Mar 24, 2010 6:04 pm
- Location: NV, Las Vegas
- Name: Larry
- Vehicle Year: 2006
- Vehicle: Chevrolet TrailBlazer
- DriveTrain: 4WD
- Rank: Offroad Rated
Well I took a look at the hitch tightener and I dont know how I am going to fit it on there as it is.
there is an over hang on the upper part of the hitch there which makes it wider than the tighteners U-bolt.
Here's a few pictures anyone have any ideas?
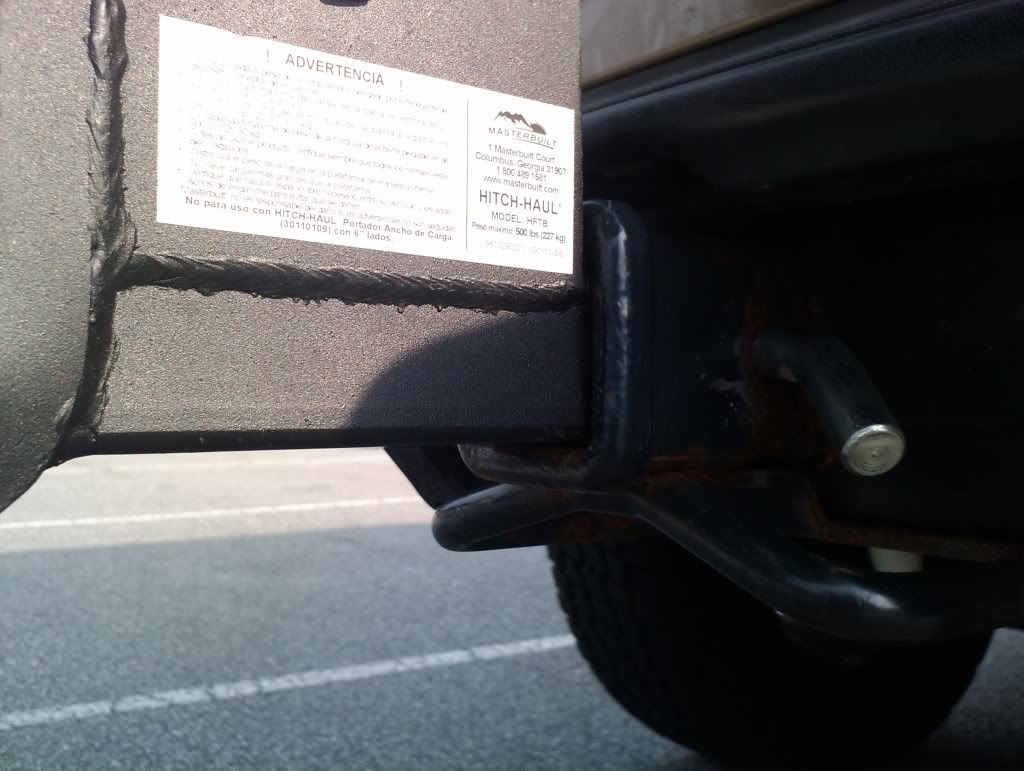
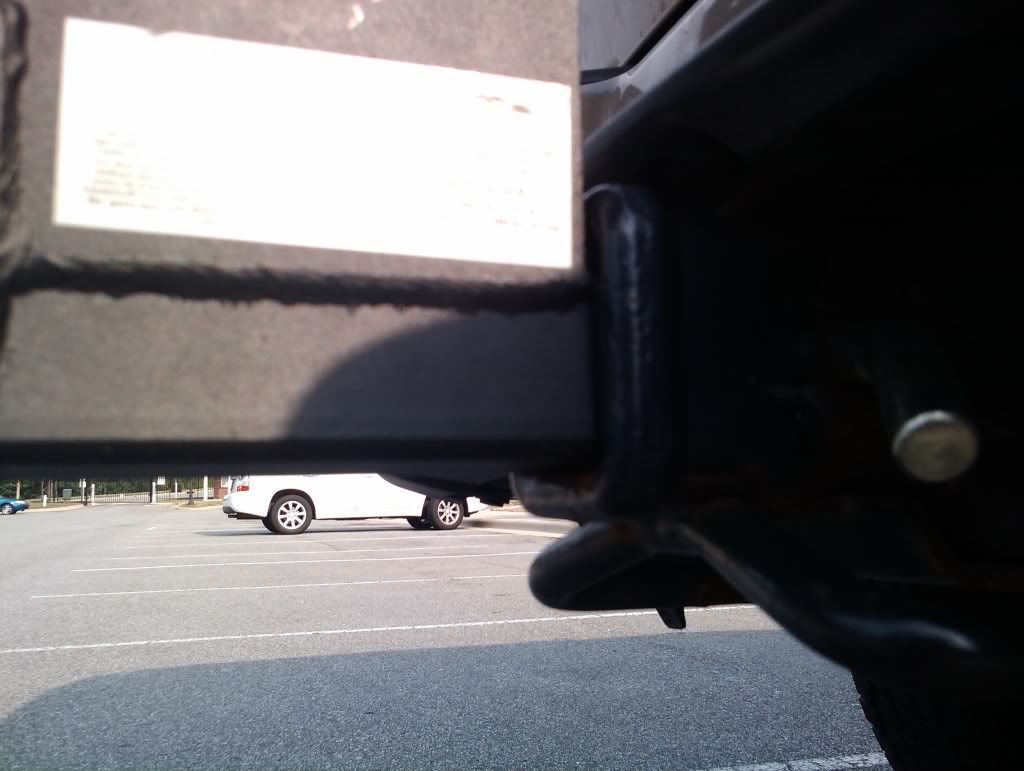
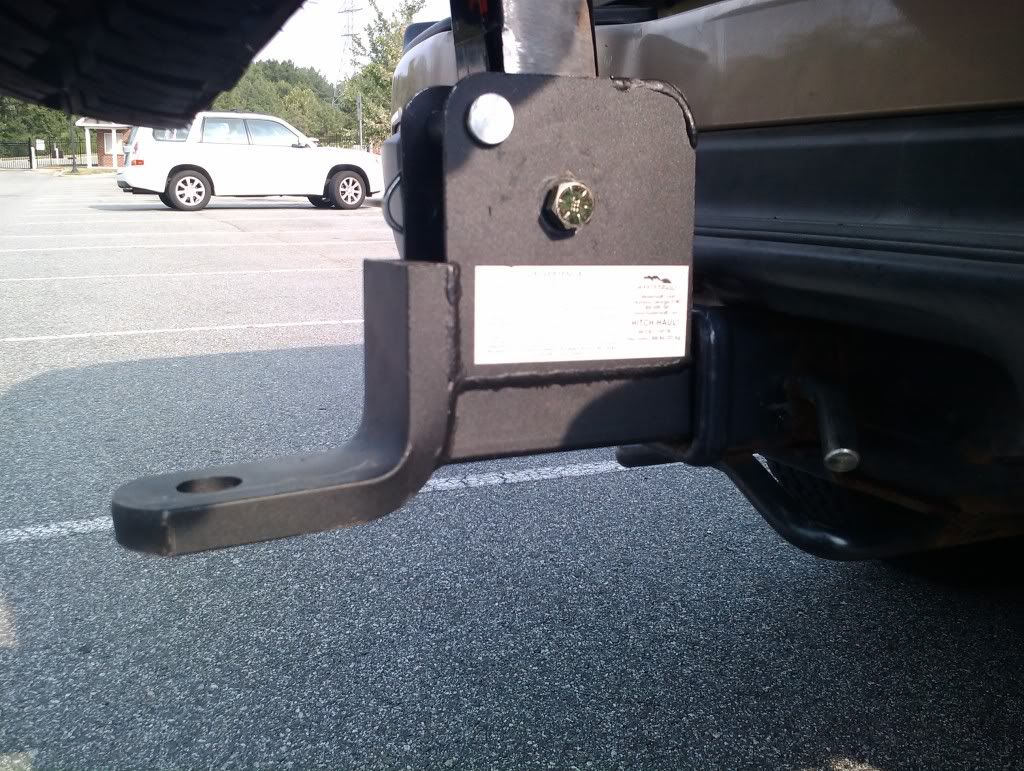
I think I rather royally screw this up DOH!
there is an over hang on the upper part of the hitch there which makes it wider than the tighteners U-bolt.
Here's a few pictures anyone have any ideas?
I think I rather royally screw this up DOH!
-
snowmirage - Off-Roader
- Posts: 232
- Joined: Sun Jun 26, 2011 12:13 pm
- Location: MD, Baltimore
- Name: Brandon
- Vehicle Year: 2003
- Vehicle: Chevrolet TrailBlazer
- DriveTrain: 4WD w/ G80
Do you have a picture of the tightener? There are a few different designs.
-

Trail X - Founder
- Posts: 9935
- Joined: Mon Sep 07, 2009 10:22 pm
- Location: VA, Roanoke
- Name: James Downing
- Vehicle Year: 2005
- Vehicle: Chevrolet TrailBlazer
- DriveTrain: 4WD w/ Aftermarket Locker
- Rank: Expedition Guide
Didnt snap a picture of mine but its this one
http://www.amazon.com/StowAway-Hitch-Ti ... 031&sr=8-1
Only difference is I think the metal plate on mine isnt as wide, I'll get some pics of it in the morning.
http://www.amazon.com/StowAway-Hitch-Ti ... 031&sr=8-1
Only difference is I think the metal plate on mine isnt as wide, I'll get some pics of it in the morning.
-
snowmirage - Off-Roader
- Posts: 232
- Joined: Sun Jun 26, 2011 12:13 pm
- Location: MD, Baltimore
- Name: Brandon
- Vehicle Year: 2003
- Vehicle: Chevrolet TrailBlazer
- DriveTrain: 4WD w/ G80
As Mario said, can you put it on the side sticking into the inside of the bumper?
-
Trail X - Founder
- Posts: 9935
- Joined: Mon Sep 07, 2009 10:22 pm
- Location: VA, Roanoke
- Name: James Downing
- Vehicle Year: 2005
- Vehicle: Chevrolet TrailBlazer
- DriveTrain: 4WD w/ Aftermarket Locker
- Rank: Expedition Guide
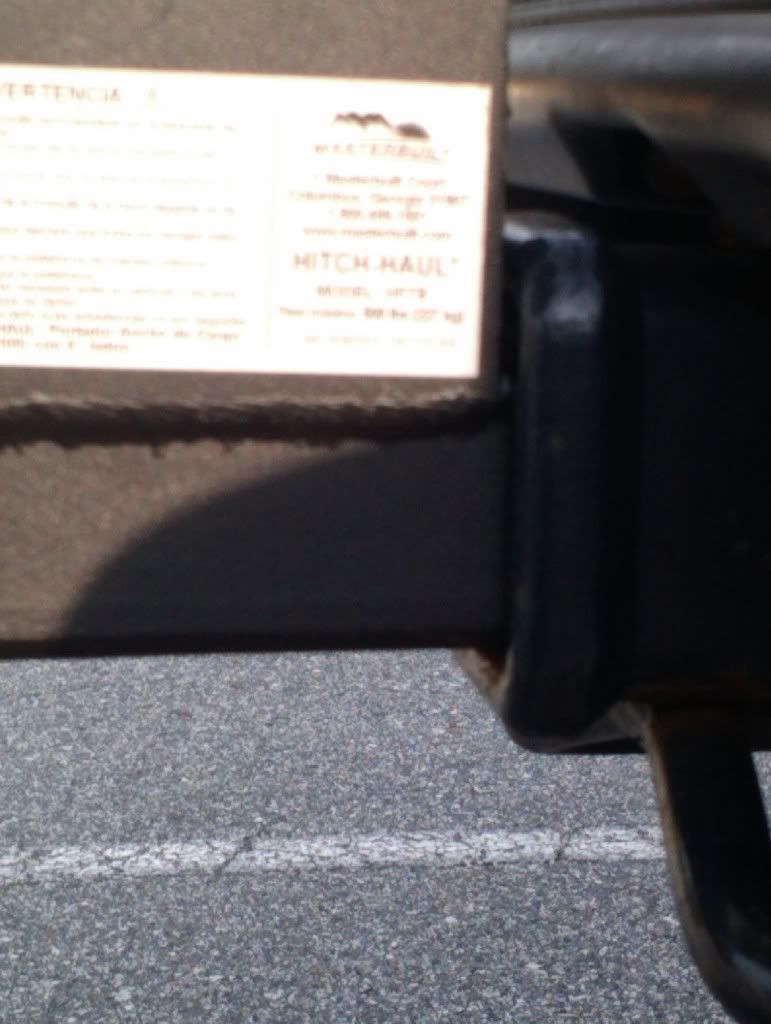
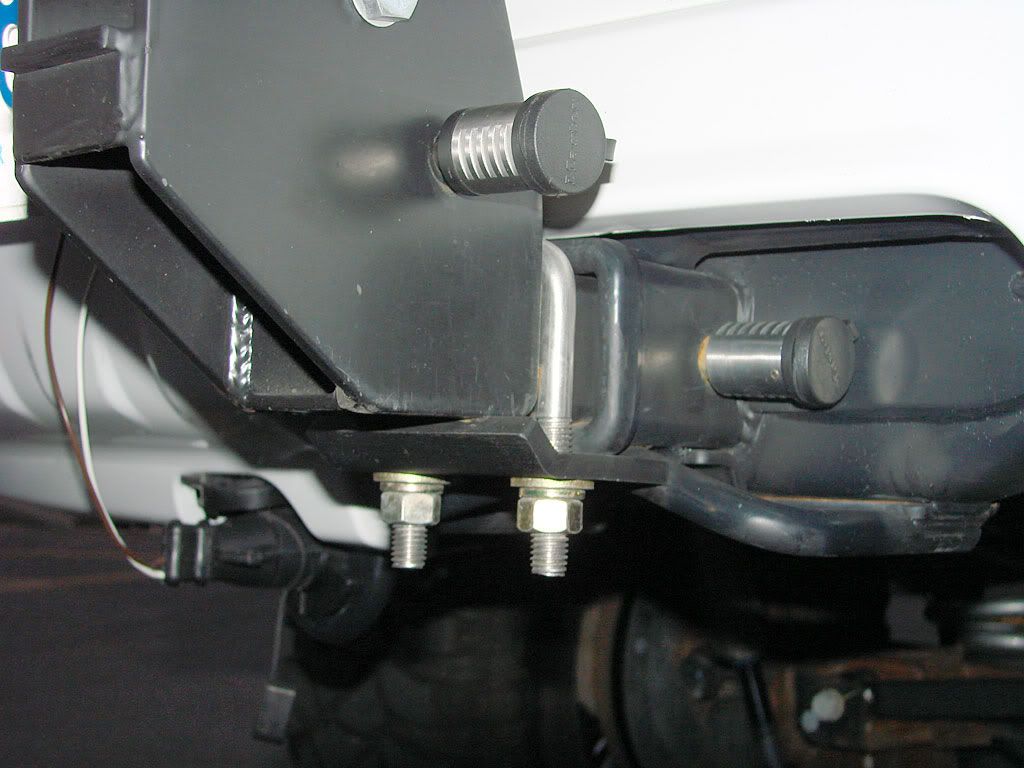
If you mean can I place the U-bolt around the hitch (the square tube that is part of the truck) such as below
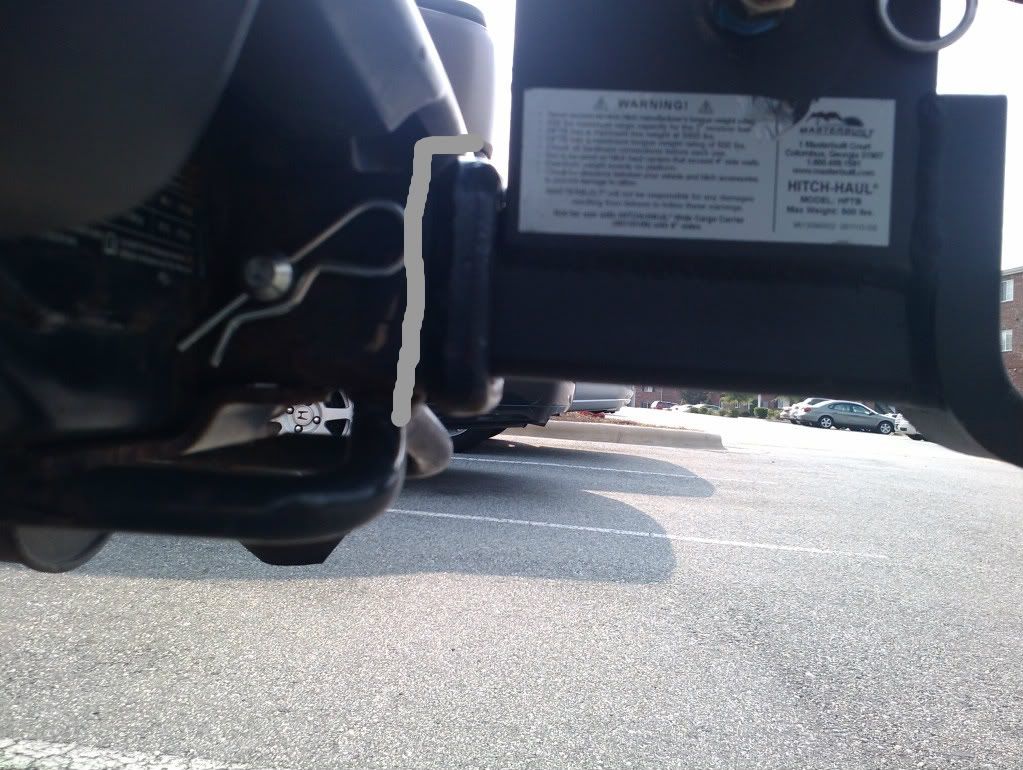
No I'm afraid not its larger than the receiver, has to be since the receiver slides into it.
Or am I miss understanding what you mean?
This picture shows how it "should" work.
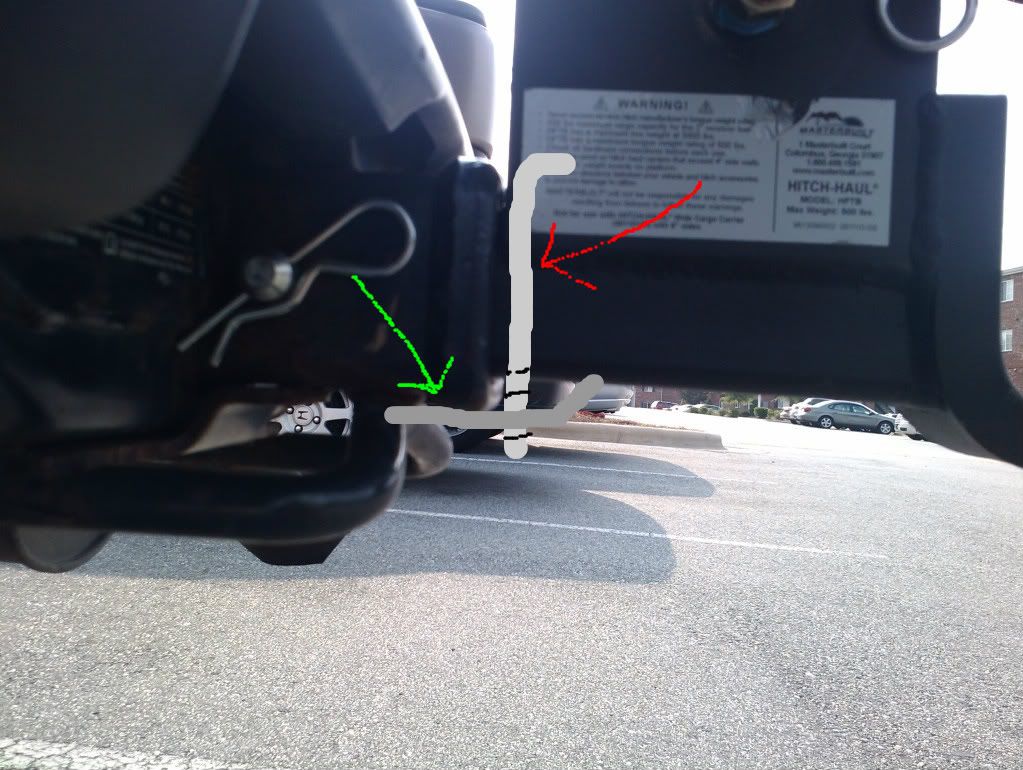
The green arrow points to the metal plate that the U-bolt bolts through. The red arrow points to the U-bolt with threads pointing down. The red arrow also shows where the upper lip on that receiver is that prevents the U-bolt from fitting.
I've been thinking about it for a while and short of cutting grinding part of that down, which would be a bad idea I think and weaken it, not sure what else I can do.
I dont think I can redrill the receiver where the pin fits so it sticks out farther as it would over lap the current whole and instead of a whole it would be a big long oval.
But I'm open to ideas other than my only other thought of buying a new one and trying again ....
No I'm afraid not its larger than the receiver, has to be since the receiver slides into it.
Or am I miss understanding what you mean?
This picture shows how it "should" work.
The green arrow points to the metal plate that the U-bolt bolts through. The red arrow points to the U-bolt with threads pointing down. The red arrow also shows where the upper lip on that receiver is that prevents the U-bolt from fitting.
I've been thinking about it for a while and short of cutting grinding part of that down, which would be a bad idea I think and weaken it, not sure what else I can do.
I dont think I can redrill the receiver where the pin fits so it sticks out farther as it would over lap the current whole and instead of a whole it would be a big long oval.
But I'm open to ideas other than my only other thought of buying a new one and trying again ....
-
snowmirage - Off-Roader
- Posts: 232
- Joined: Sun Jun 26, 2011 12:13 pm
- Location: MD, Baltimore
- Name: Brandon
- Vehicle Year: 2003
- Vehicle: Chevrolet TrailBlazer
- DriveTrain: 4WD w/ G80
There's a different style you can use, it slides inside the tubing and uses a bolt and lock to tighten and hold so it doesn't rattle.
I ordered mine from Sears, but they are available online as well. I'll see if I can find it again and post for you as an option.
I ordered mine from Sears, but they are available online as well. I'll see if I can find it again and post for you as an option.
- Diacom
- Addict
- Posts: 882
- Joined: Fri Jul 23, 2010 9:08 pm
- Location: NV, Yerington
- Name: Noel
- Vehicle Year: 2003
- Vehicle: Chevrolet TrailBlazer
- DriveTrain: 4WD w/ Aftermarket Locker
http://www.youtube.com/watch?v=PsTXRBXm8Lw
I'm guessing that might be what your talking about. Was looking at it to see how it worked.
Looks like it might do the trick if I can find one.
I'm guessing that might be what your talking about. Was looking at it to see how it worked.
Looks like it might do the trick if I can find one.
-
snowmirage - Off-Roader
- Posts: 232
- Joined: Sun Jun 26, 2011 12:13 pm
- Location: MD, Baltimore
- Name: Brandon
- Vehicle Year: 2003
- Vehicle: Chevrolet TrailBlazer
- DriveTrain: 4WD w/ G80
Close, the one I have doesn't have the extra brass bar, otherwise it's very similar.
http://www.google.com/products/catalog?q=Softride+25219&rls=com.microsoft:en-us&oe=UTF-8&startIndex=&startPage=1&um=1&ie=UTF-8&cid=10573912605947053925&sa=X&ei=516aTdeCHZO6sQPhm_X-Aw&ved=0CDkQ8wIwAg#
http://www.google.com/products/catalog?q=Softride+25219&rls=com.microsoft:en-us&oe=UTF-8&startIndex=&startPage=1&um=1&ie=UTF-8&cid=10573912605947053925&sa=X&ei=516aTdeCHZO6sQPhm_X-Aw&ved=0CDkQ8wIwAg#
- Diacom
- Addict
- Posts: 882
- Joined: Fri Jul 23, 2010 9:08 pm
- Location: NV, Yerington
- Name: Noel
- Vehicle Year: 2003
- Vehicle: Chevrolet TrailBlazer
- DriveTrain: 4WD w/ Aftermarket Locker
Still haven't figured out how that works.... I'm way to tired i guess.... haha
Also just saw this, which could do the trip possibly?
http://www.amazon.com/Boone-Outdoor-Wed ... B001IBHVNY
Have to give it some thought I guess.... would've been easier if I'd just stopped and thought about it at first grrrrrrr...
O well live and learn
*EDIT* I think I get it, the brass wedge there was throwing me off, didnt realize that was part of their own receiver.
Looks like it will eliminate side to side movement but not up and down but still better than nothing.
Last edited by snowmirage on Fri Jul 29, 2011 12:03 am, edited 2 times in total.
-
snowmirage - Off-Roader
- Posts: 232
- Joined: Sun Jun 26, 2011 12:13 pm
- Location: MD, Baltimore
- Name: Brandon
- Vehicle Year: 2003
- Vehicle: Chevrolet TrailBlazer
- DriveTrain: 4WD w/ G80
Diacom wrote:Close, the one I have doesn't have the extra brass bar, otherwise it's very similar.
http://www.google.com/products/catalog?q=Softride+25219&rls=com.microsoft:en-us&oe=UTF-8&startIndex=&startPage=1&um=1&ie=UTF-8&cid=10573912605947053925&sa=X&ei=516aTdeCHZO6sQPhm_X-Aw&ved=0CDkQ8wIwAg#
If you go for this one, you can lock it in place as well so that someone with greedy fingers doesn't try to swipe your carrier. That always worried me about mine, but it's bolted in anyway, so it'd be a PITA to take out without someone noticing
-

Blackout - Trail-Blazer
- Posts: 310
- Joined: Fri Oct 08, 2010 6:12 pm
- Location: OH, Columbus
- Name: Brian
- Vehicle Year: 2004
- Vehicle: Chevrolet TrailBlazer
- DriveTrain: 4WD
Ya I planned to do that anyway once I got everything set, i had to cut the one I had off earlier 
Wish sears or someone had it in stock in store. O well flying out on vacation Saturday anyway i guess. I'll just have to finish it all up when I get back. Thanks for the help shame I screwed up and cant use the one I have.
Wish sears or someone had it in stock in store. O well flying out on vacation Saturday anyway i guess. I'll just have to finish it all up when I get back. Thanks for the help shame I screwed up and cant use the one I have.
-
snowmirage - Off-Roader
- Posts: 232
- Joined: Sun Jun 26, 2011 12:13 pm
- Location: MD, Baltimore
- Name: Brandon
- Vehicle Year: 2003
- Vehicle: Chevrolet TrailBlazer
- DriveTrain: 4WD w/ G80
Does the unit stick out of the back of the receiver? Mount the bracket inside.... Imagine in Alek's pic, you're under your truck with the back of your head sitting on the axle.... Mount it like this...
Mario - Build Thread
-
Gordinho80 - Lifer
- Posts: 2787
- Joined: Tue Sep 08, 2009 9:27 am
- Location: NJ, Jackson
- Name: Mario Almeida
- Vehicle Year: Other
- Vehicle: Other Vehicle
- DriveTrain: 4WD
^^^^ I agree. It looks like the pin hole was moved 4 or 5 inches? If thats the case then there should be some sticking forward under the body.
Climb under and install...
Climb under and install...
-

chevycrew - Veteran
- Posts: 1088
- Joined: Tue Mar 08, 2011 2:42 pm
- Location: UT, Salt Lake City
- Name: Steve
- Vehicle Year: 2002
- Vehicle: Chevrolet TrailBlazer
- DriveTrain: 4WD
- Rank: Trail Ready
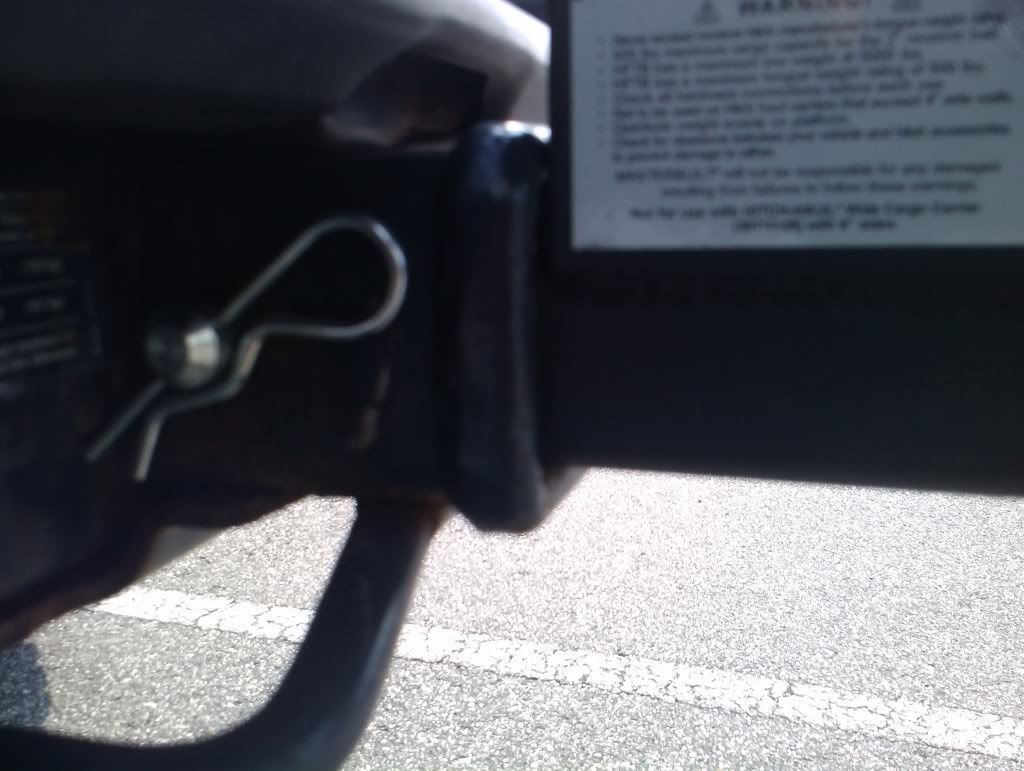
OOOOO I GET IT!
and the last horse crosses the finish line.....
Can't believe I didn't see that earlier!
I'll go take a look and give it a shot during lunch
and the last horse crosses the finish line.....
Can't believe I didn't see that earlier!
I'll go take a look and give it a shot during lunch
-
snowmirage - Off-Roader
- Posts: 232
- Joined: Sun Jun 26, 2011 12:13 pm
- Location: MD, Baltimore
- Name: Brandon
- Vehicle Year: 2003
- Vehicle: Chevrolet TrailBlazer
- DriveTrain: 4WD w/ G80
does that mean you have to unbolt it to remove the hitch?
My stuff rattles but I switch between a cargo carrier, bed extender and trailer tri-ball to often to get out wrenches.
I had thought about some thin plastic shims to go inside the tube to quieten things down. Either that or wrap the receiver part in electrical tape or something to build up the size.
"Please consider a search before posting. Folks on this site PIONEERED functional offroad use of these trucks."
The answer to many common lift questions can be found here
My Build Thread
The answer to many common lift questions can be found here
My Build Thread
-
navigator - Moderator
- Posts: 4651
- Joined: Wed Mar 09, 2011 10:16 am
- Location: NC, Winnabow
- Name: Chris
- Vehicle Year: 2006
- Vehicle: Chevrolet TrailBlazer
- DriveTrain: 4WD
- Rank: Trail Ready
61 posts
• Page 2 of 4 • 1, 2, 3, 4