Mine will have a cover when it's all done... but no changing room.
Homemade Roof Top Tent
Yeah, yeah. Remember my profession... I have fun with this stuff. 
Mine will have a cover when it's all done... but no changing room.
Mine will have a cover when it's all done... but no changing room.
-

Trail X - Founder
- Posts: 9935
- Joined: Mon Sep 07, 2009 10:22 pm
- Location: VA, Roanoke
- Name: James Downing
- Vehicle Year: 2005
- Vehicle: Chevrolet TrailBlazer
- DriveTrain: 4WD w/ Aftermarket Locker
- Rank: Expedition Guide
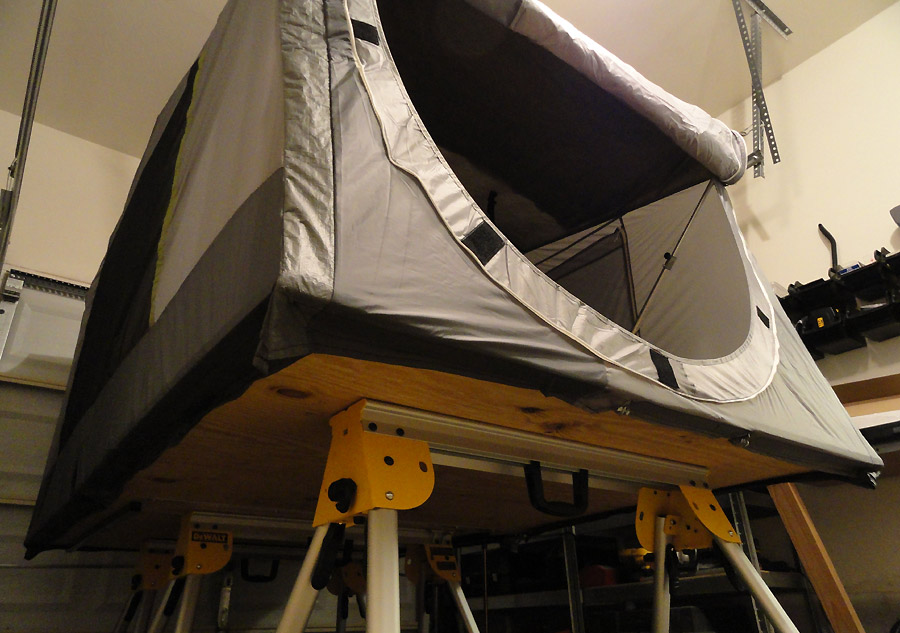
The left side is almost complete. That seam was a total PITA. Still need to secure the bottom on the left side.
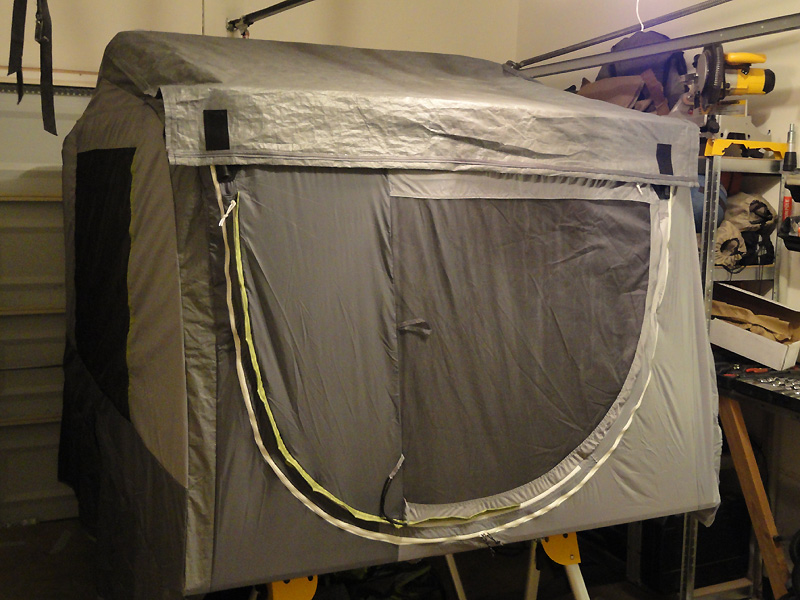
Front door and left side:
Rear window and sunroof:
Getting there...
Front door and left side:
Rear window and sunroof:
Getting there...
-
Trail X - Founder
- Posts: 9935
- Joined: Mon Sep 07, 2009 10:22 pm
- Location: VA, Roanoke
- Name: James Downing
- Vehicle Year: 2005
- Vehicle: Chevrolet TrailBlazer
- DriveTrain: 4WD w/ Aftermarket Locker
- Rank: Expedition Guide
Very cool! Nice work as always! 
Build Thread
Back to stock, had fun while it lasted...
Back to stock, had fun while it lasted...
- janesy86
- Veteran
- Posts: 1291
- Joined: Thu Sep 10, 2009 2:29 pm
- Location: MA, Salem
- Name: Nick Janes
- Vehicle Year: 2007
- Vehicle: Chevrolet TrailBlazer
- DriveTrain: 4WD w/ G80
- Rank: Offroad Rated
300 yards of thread later... the fabric portion of the tent is done:
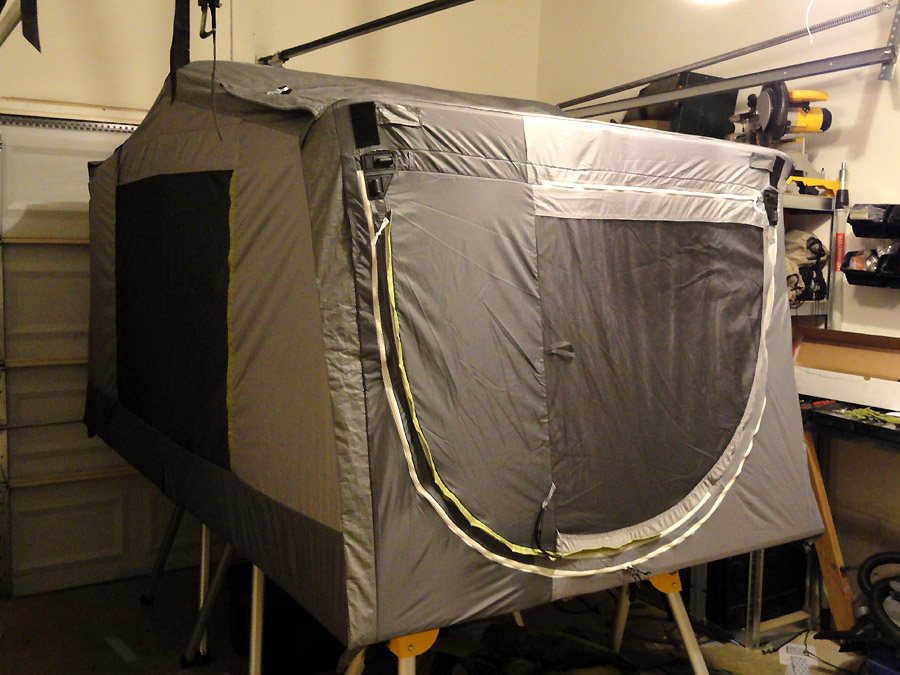

Still a lot to do, but it's looking much more like a tent now. I need to get a strong friend to come over sometime soon to help me mount this thing to the truck again.
Still a lot to do, but it's looking much more like a tent now. I need to get a strong friend to come over sometime soon to help me mount this thing to the truck again.
-
Trail X - Founder
- Posts: 9935
- Joined: Mon Sep 07, 2009 10:22 pm
- Location: VA, Roanoke
- Name: James Downing
- Vehicle Year: 2005
- Vehicle: Chevrolet TrailBlazer
- DriveTrain: 4WD w/ Aftermarket Locker
- Rank: Expedition Guide
The tent looks amazing James I had forgot all about this site after I got rid of my old Colorado but I'm looking to get a new and build it kind of expo style and I saw you build over on expo and Thought I would check in here also. I just got to say it again the tent looks bad a** man I'm very impressed and keep up the good work
2011 Colorado Z71 Crew Cab 5.3 v8 SASed, 37x12.5x16.5 wrangler MT/R,recentered h1 beadlocks, Doug thorley headers, mbrp exhaust , ARE topper , rtt, x20 10k winch
expo build http://www.expeditionportal.com/forum/t ... rado-build
expo build http://www.expeditionportal.com/forum/t ... rado-build
- onelow1ton
- Off-Roader
- Posts: 146
- Joined: Tue Oct 06, 2009 9:05 pm
- Location: Va, Spotsavania
- Name: Kenny
- Vehicle Year: Other
- Vehicle: Other Vehicle
- DriveTrain: 4WD w/ G80
-

Gordinho80 - Lifer
- Posts: 2787
- Joined: Tue Sep 08, 2009 9:27 am
- Location: NJ, Jackson
- Name: Mario Almeida
- Vehicle Year: Other
- Vehicle: Other Vehicle
- DriveTrain: 4WD
I am certain you have addressed what I am about to ask but I can't see the answer. Please explain to me. Thanks in advance.
Let us just say all the bows fold forward when the tent is collapsed. I see how the center bow will lay (lie?) over the front bow because it is mounted higher. What I can't figure is how the rear bow will fold forward and its top will not be several inches, or maybe even a foot, off the floor of the platform because when it folds forward it will be blocked by the middle bow. I am missing something because I would have placed the pivot point for the rear bow as far above the middle bow as the middle bow is above the front bow.
Let us just say all the bows fold forward when the tent is collapsed. I see how the center bow will lay (lie?) over the front bow because it is mounted higher. What I can't figure is how the rear bow will fold forward and its top will not be several inches, or maybe even a foot, off the floor of the platform because when it folds forward it will be blocked by the middle bow. I am missing something because I would have placed the pivot point for the rear bow as far above the middle bow as the middle bow is above the front bow.
- SomeOffPave
- Cruiser
- Posts: 36
- Joined: Wed Sep 30, 2009 1:44 pm
- Vehicle Year: 2002
- Vehicle: Chevrolet TrailBlazer
- DriveTrain: 4WD w/ G80
Allow me to help here…SomeOffPave wrote:I am certain you have addressed what I am about to ask but I can't see the answer. Please explain to me. Thanks in advance.
Let us just say all the bows fold forward when the tent is collapsed. I see how the center bow will lay (lie?) over the front bow because it is mounted higher. What I can't figure is how the rear bow will fold forward and its top will not be several inches, or maybe even a foot, off the floor of the platform because when it folds forward it will be blocked by the middle bow. I am missing something because I would have placed the pivot point for the rear bow as far above the middle bow as the middle bow is above the front bow.
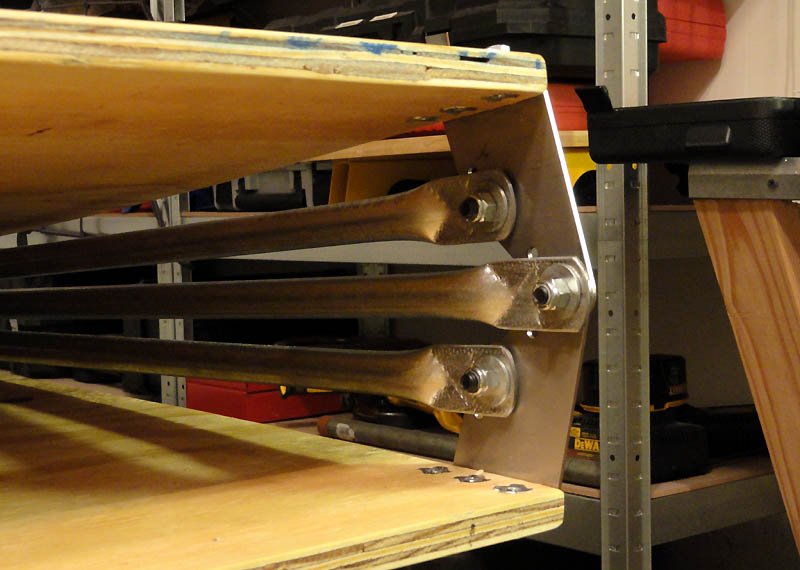
If you look at the first pic of this thread you will see James is using a scissor mount which will place the rear bar/mont bolt in the proper position when closed.
- bgwolfpack
- Veteran
- Posts: 1794
- Joined: Fri Sep 18, 2009 7:19 pm
- Name: Randy
- Vehicle Year: Other
- Vehicle: Other Vehicle
- DriveTrain: 4WD
If that gets to be a pain during your trip I will gladly give you a hand with it.
-

djthumper - Moderator
- Posts: 2702
- Joined: Wed Mar 24, 2010 6:04 pm
- Location: NV, Las Vegas
- Name: Larry
- Vehicle Year: 2006
- Vehicle: Chevrolet TrailBlazer
- DriveTrain: 4WD
- Rank: Offroad Rated
SomeOffPave wrote:I am certain you have addressed what I am about to ask but I can't see the answer. Please explain to me. Thanks in advance.
Let us just say all the bows fold forward when the tent is collapsed. I see how the center bow will lay (lie?) over the front bow because it is mounted higher. What I can't figure is how the rear bow will fold forward and its top will not be several inches, or maybe even a foot, off the floor of the platform because when it folds forward it will be blocked by the middle bow. I am missing something because I would have placed the pivot point for the rear bow as far above the middle bow as the middle bow is above the front bow.
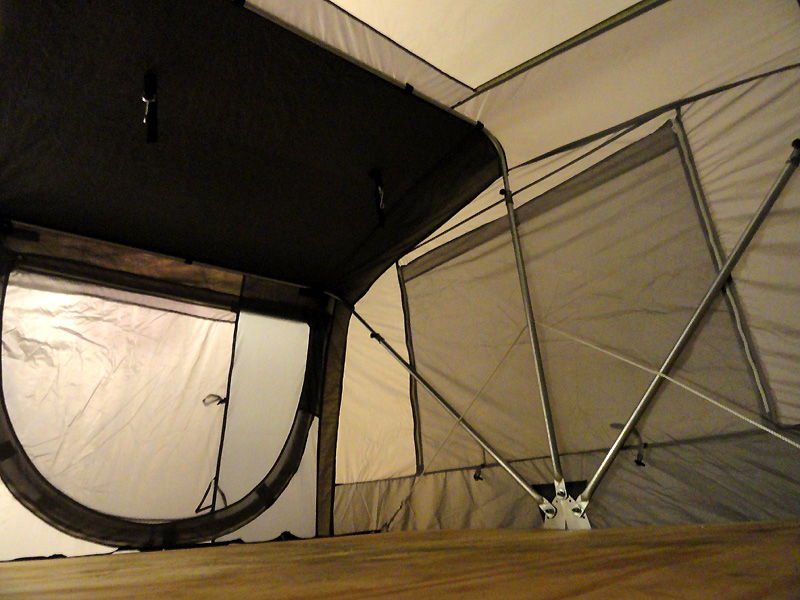
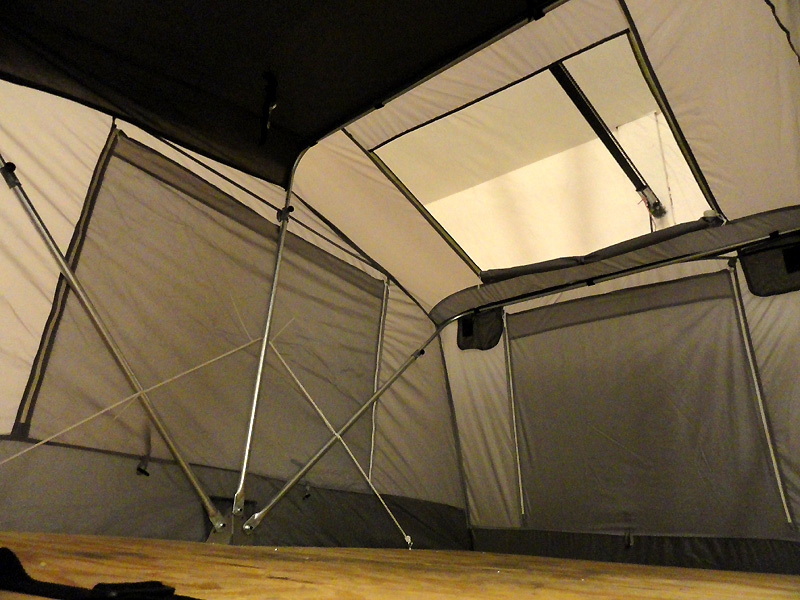
Maybe this picture can help you understand how it folds. The middle bow mounting point is also the hinge point.
-
Trail X - Founder
- Posts: 9935
- Joined: Mon Sep 07, 2009 10:22 pm
- Location: VA, Roanoke
- Name: James Downing
- Vehicle Year: 2005
- Vehicle: Chevrolet TrailBlazer
- DriveTrain: 4WD w/ Aftermarket Locker
- Rank: Expedition Guide
JamesDowning wrote:Maybe this picture can help you understand how it folds. The middle bow mounting point is also the hinge point.
The pic makes it perfectly clear.
Thanks
- SomeOffPave
- Cruiser
- Posts: 36
- Joined: Wed Sep 30, 2009 1:44 pm
- Vehicle Year: 2002
- Vehicle: Chevrolet TrailBlazer
- DriveTrain: 4WD w/ G80
 This is awesome
 -

NC_IslandRunner - Moderator
- Posts: 3022
- Joined: Fri Dec 03, 2010 4:49 pm
- Location: NC, Sanford
- Name: Rory
- Vehicle Year: 2004
- Vehicle: Chevrolet TrailBlazer
- DriveTrain: 4WD w/ G80
- Rank: Offroad Rated
So close to being done!
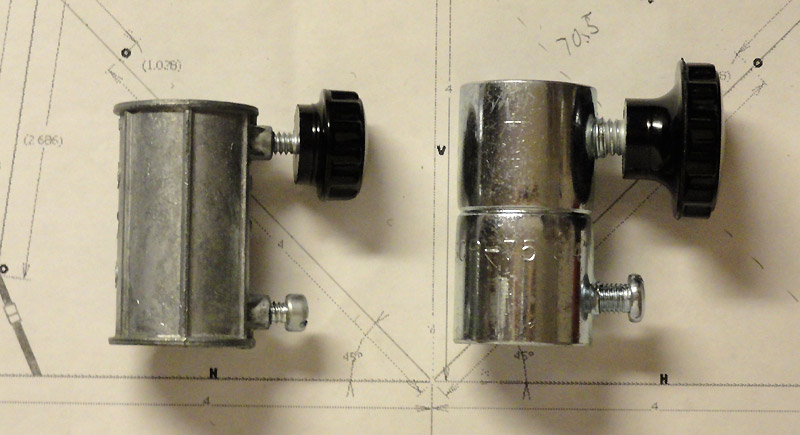
I got worried about the long term durability of the old cast zinc extension hardware (left) so I replaced it with a steel one (right) with a much larger thread and knob.
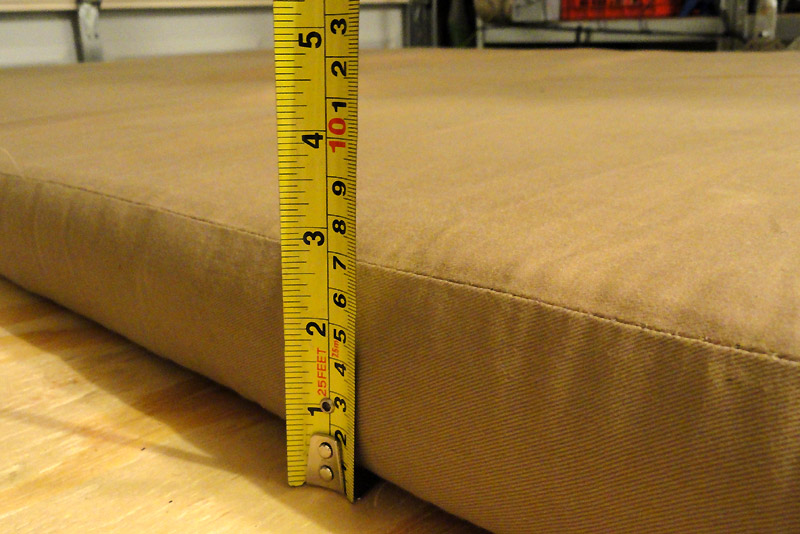
Foam mattress mounted. I used Velcro. Don't mind my extremely curvy thread line... running the mattress through the sewing machine proved harder than I thought.
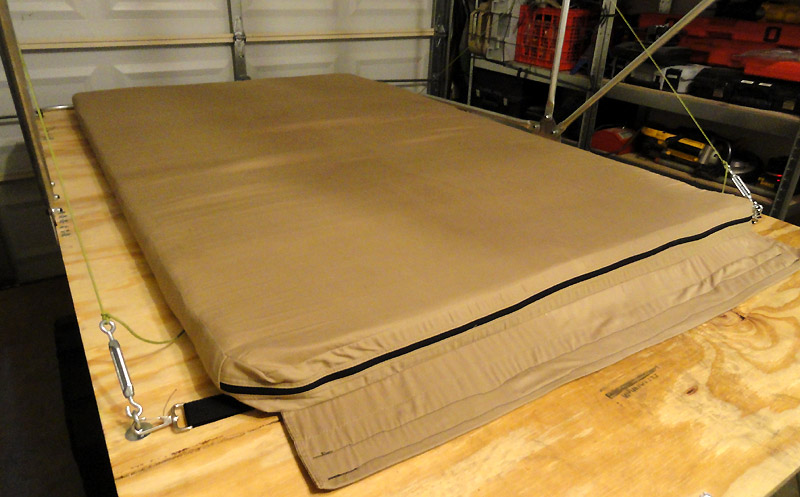
About 3" thick in the middle... 2.5 or so where the cover compresses it at the edges. The cover is a polyester/cotton blend.
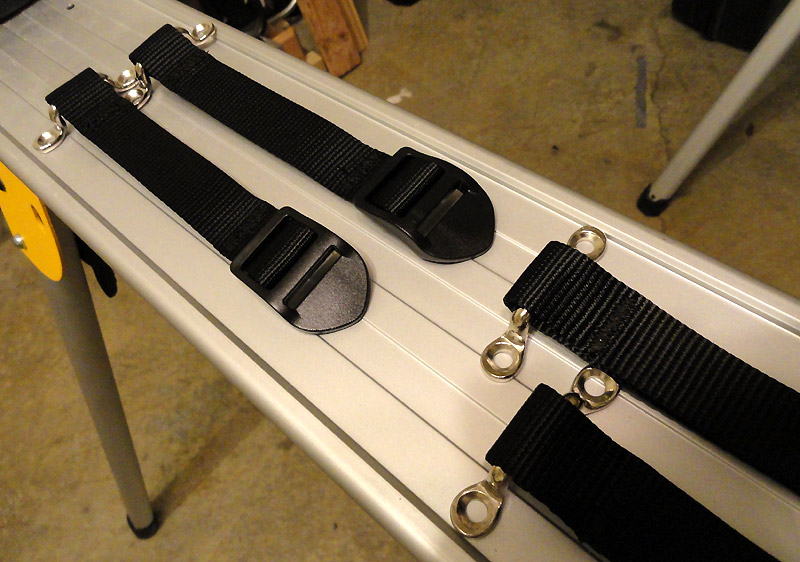
Some of the strap details. 1' polyester webbing, superloc adjusters, and steel footman loops.
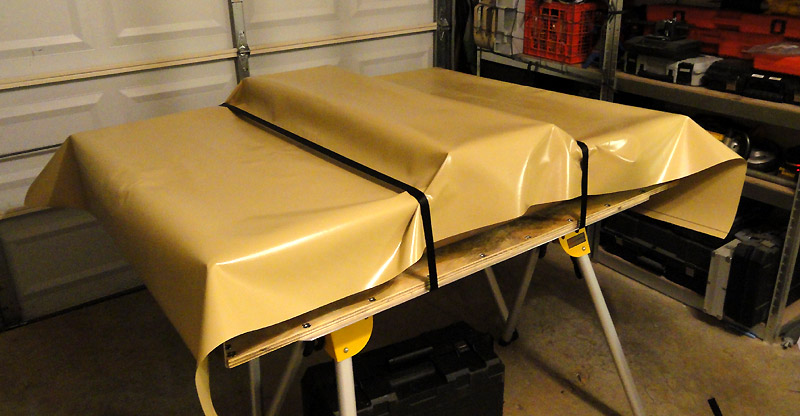
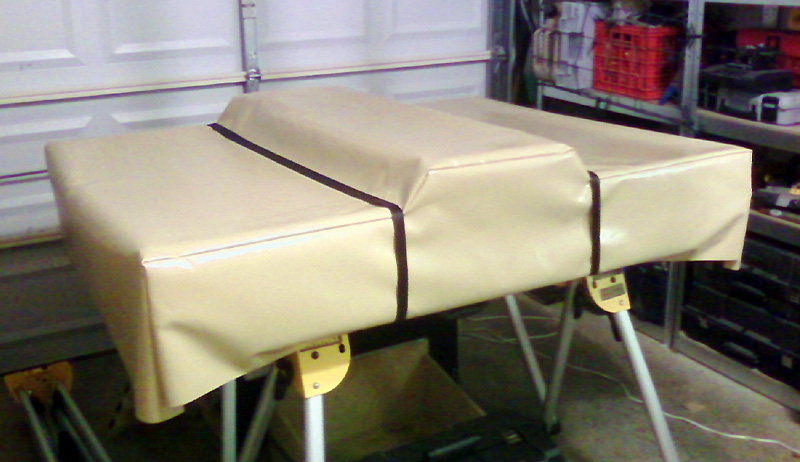
The first set of straps will help compress the bedding. Below shows how even a pillow can be left in the tent when it folds up.
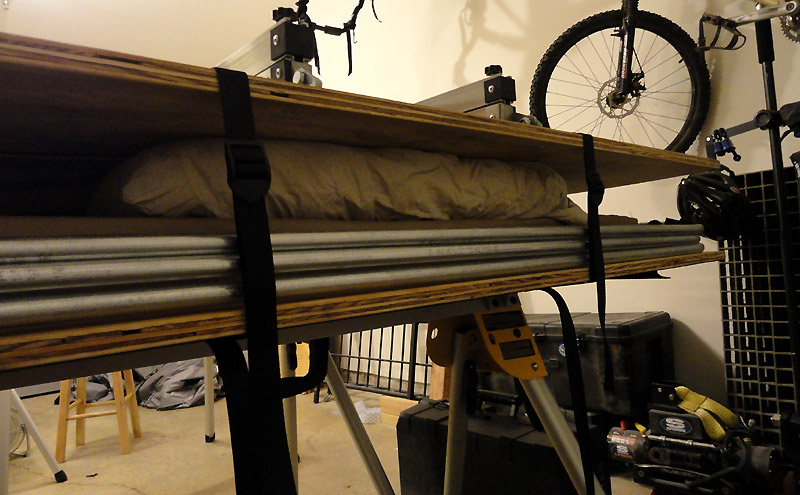
Then two long straps will go over the waterproof cover to further cinch things down, and keep the cover from billowing.
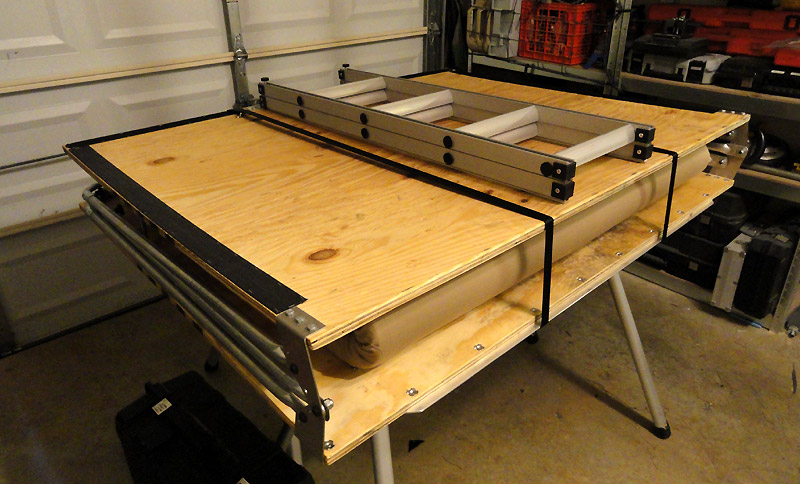
Here's my current stopping point... I didn't order enough of the cover fabric, so I'm playing the waiting game now.
I got worried about the long term durability of the old cast zinc extension hardware (left) so I replaced it with a steel one (right) with a much larger thread and knob.
Foam mattress mounted. I used Velcro. Don't mind my extremely curvy thread line... running the mattress through the sewing machine proved harder than I thought.
About 3" thick in the middle... 2.5 or so where the cover compresses it at the edges. The cover is a polyester/cotton blend.
Some of the strap details. 1' polyester webbing, superloc adjusters, and steel footman loops.
The first set of straps will help compress the bedding. Below shows how even a pillow can be left in the tent when it folds up.
Then two long straps will go over the waterproof cover to further cinch things down, and keep the cover from billowing.
Here's my current stopping point... I didn't order enough of the cover fabric, so I'm playing the waiting game now.
-
Trail X - Founder
- Posts: 9935
- Joined: Mon Sep 07, 2009 10:22 pm
- Location: VA, Roanoke
- Name: James Downing
- Vehicle Year: 2005
- Vehicle: Chevrolet TrailBlazer
- DriveTrain: 4WD w/ Aftermarket Locker
- Rank: Expedition Guide
Finally some more progress. The pic below was as of 10 last night, but I put a few more hours into it after that. All of the seams in the cover are done, inside is cleaned up and the bottom hemmed. I used a super tough fabric by TriVantage called "Coverlight". Here's the excerpt from the retailer:
Being that the fabric was extra tough, it provided more than a few frustrating moments with the sewing machine.
I'm thinking 2 or 3 more hours of work and I'll be done. Last steps are finishing the cinching system for the cover and mounting the interior tent light. Hoping to get it mounted to the truck this weekend for some road and wind trials.
Coverlight is a vinyl-coated nylon fabric. Excellent tear, puncture, abrasion resistance and overall durability. Coverlight is a great waterproof marine vinyl and is resistant to fungicidal growth. Unaffected by extreme temperature changes, will not become stiff due to volatility loss.
Being that the fabric was extra tough, it provided more than a few frustrating moments with the sewing machine.
I'm thinking 2 or 3 more hours of work and I'll be done. Last steps are finishing the cinching system for the cover and mounting the interior tent light. Hoping to get it mounted to the truck this weekend for some road and wind trials.
-
Trail X - Founder
- Posts: 9935
- Joined: Mon Sep 07, 2009 10:22 pm
- Location: VA, Roanoke
- Name: James Downing
- Vehicle Year: 2005
- Vehicle: Chevrolet TrailBlazer
- DriveTrain: 4WD w/ Aftermarket Locker
- Rank: Expedition Guide
-

Stoked - Off-Roader
- Posts: 130
- Joined: Mon Oct 18, 2010 10:19 am
- Location: Miami, FL
- Name: Juan
- Vehicle Year: 2006
- Vehicle: Other GMT360/370
- DriveTrain: AWD
- Rank: Offroad Rated
Lookin' good!
Mike
Mike
- bartonmd
- Moderator
- Posts: 4469
- Joined: Wed Sep 09, 2009 9:35 am
- Location: IN, Indianapolis
- Name: Mike
- Vehicle Year: 2007
- Vehicle: Chevrolet TrailBlazer
- DriveTrain: 4WD w/ G80
- Rank: Offroad Rated
So, when is this for sale?! This is great!
Better to remain silent and be thought a fool than to speak out and remove all doubt. - Abraham Lincoln
Boog2006 Build Thread
Boog2006 Build Thread
-

boog2006 - Addict
- Posts: 688
- Joined: Wed Jul 13, 2011 3:09 pm
- Location: KY, Paducah
- Name: Brent
- Vehicle Year: 2006
- Vehicle: Chevrolet TrailBlazer
- DriveTrain: 4WD
- Rank: Offroad Rated
yeah James, I think you need to scrap the whole RTT idea and build a teardrop trailer 
"Please consider a search before posting. Folks on this site PIONEERED functional offroad use of these trucks."
The answer to many common lift questions can be found here
My Build Thread
The answer to many common lift questions can be found here
My Build Thread
-

navigator - Moderator
- Posts: 4651
- Joined: Wed Mar 09, 2011 10:16 am
- Location: NC, Winnabow
- Name: Chris
- Vehicle Year: 2006
- Vehicle: Chevrolet TrailBlazer
- DriveTrain: 4WD
- Rank: Trail Ready
Looks great!
-
djthumper - Moderator
- Posts: 2702
- Joined: Wed Mar 24, 2010 6:04 pm
- Location: NV, Las Vegas
- Name: Larry
- Vehicle Year: 2006
- Vehicle: Chevrolet TrailBlazer
- DriveTrain: 4WD
- Rank: Offroad Rated
navigator wrote:yeah James, I think you need to scrap the whole RTT idea and build a teardrop trailer
I have put a little thought into one, but my prerequisite would be a larger garage. It's been hard enough doing the tent in a narrow one-car garage.
-
Trail X - Founder
- Posts: 9935
- Joined: Mon Sep 07, 2009 10:22 pm
- Location: VA, Roanoke
- Name: James Downing
- Vehicle Year: 2005
- Vehicle: Chevrolet TrailBlazer
- DriveTrain: 4WD w/ Aftermarket Locker
- Rank: Expedition Guide