winch carrier and rear Tire carrier
48 posts
• Page 3 of 3 • 1, 2, 3
The FIRST Solid Axle Swapped Trailblazer in Presque Isle County MI
My Build
My Build
The Roadie wrote:Research, plan your mods, fund the plan, then GO DO THEM. THEN WHEEL IT.
-

Cable810 - Veteran
- Posts: 1989
- Joined: Thu Feb 09, 2012 6:43 pm
- Location: MI, Rogers City
- Name: Caleb
- Vehicle Year: 2002
- Vehicle: Chevrolet TrailBlazer
- DriveTrain: 4WD w/ Aftermarket Locker
- Rank: Offroad Rated
You know, it's amazing GM couldn't come up with something similar, considering the tire carrier they had on the older Blazers. I really like your setup Karsten. It almost looks like it could of come from the factory that way. I've been tempted to try the same thing when I get my welder.
Have you considered coming up with a method for rear recovery points?
Have you considered coming up with a method for rear recovery points?
Once lifted 03 Trailblazer on 35's, gave it up to travel the USA with my family.
-

mikekey - Lifer
- Posts: 2585
- Joined: Sat Jan 15, 2011 4:08 am
- Location: North America
- Name: Mike
- Vehicle Year: 2003
- Vehicle: Chevrolet TrailBlazer
- DriveTrain: 4WD w/ G80
- Rank: Expedition Rated
Thank´s Mike you have reminded me to install my rear recovery points  Thank´s for more work, i can tell you my wife won´t be happy about that.
So this is another reason to remove the rear bumper plastic part to install the damper AND the recovery points and take some measurements from what´s behind the bumper for the tire carrier. Have I already told that the complete rear tire carrier is bolted to the frame? Nothing is welded to the frame that way it can be easily swapped to another TB.
I have borrowed a picture from AlekG, HE HAD THE IDEA FOR THE REAR RECOVERY POINTS! So here is the picture I really like:
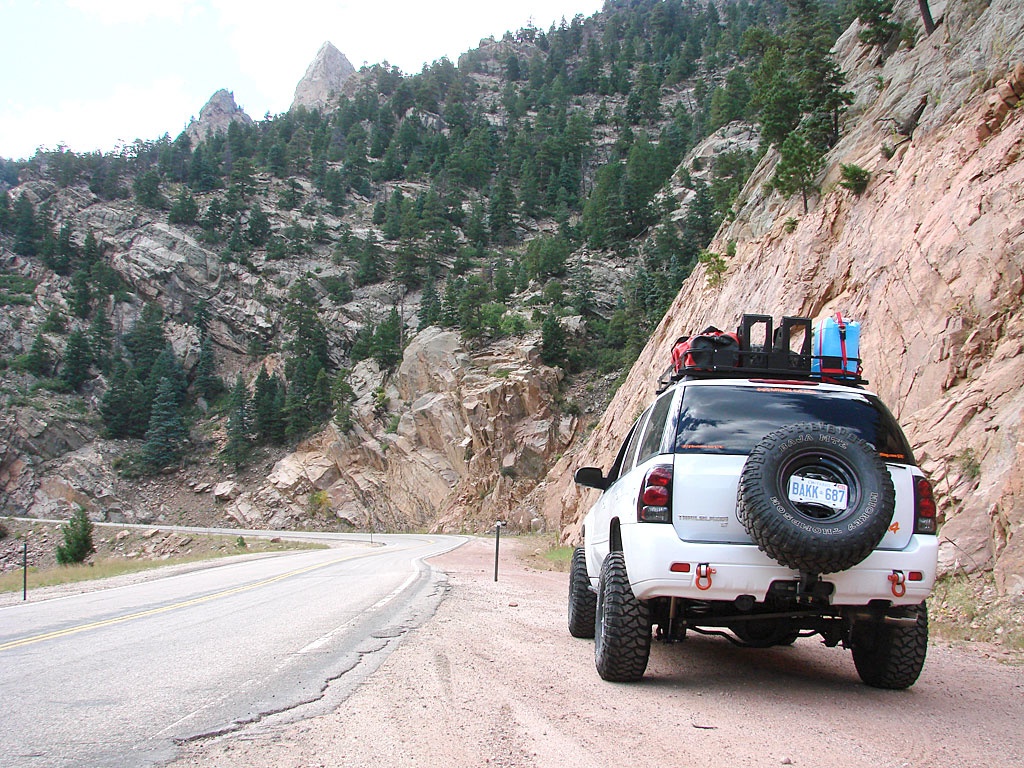
When I saw that picture I liked the fact that it looks functional and factory clean. The tire carrier was not what I have liked so I had to do it my way. But the Idea for the recovery points is excellent. I don´t wanted to bold / screw it to the bumper so I found another kind for attaching the recovery points with drilling only one hole for each recovery point.
Here is a picture of what I got and haven´t installed so far:
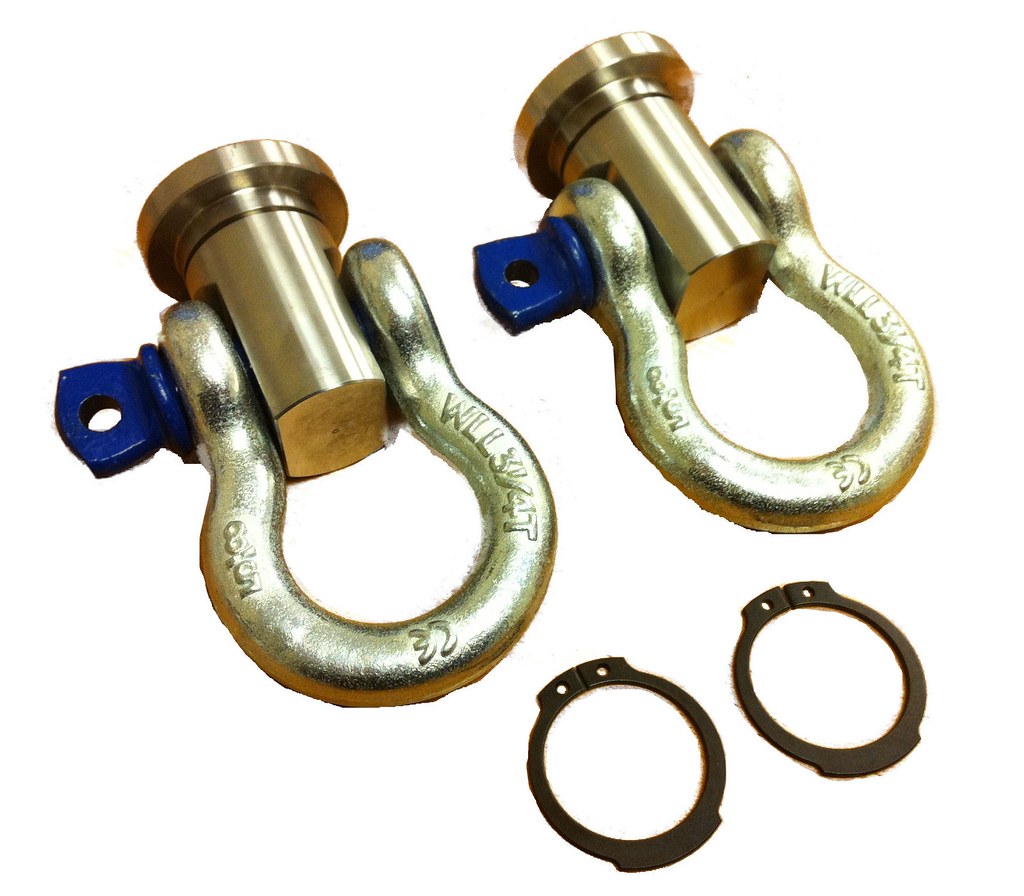
These recovery points can turn in the drilled hole and are secured with the retaining ring.
Simple installation one hole for every recover point drilled in the reinforcement bar. This is the view from behind on the reinforcement bar. Holes will be drilled to the left and the right parts that go into the rear frame of the TB.
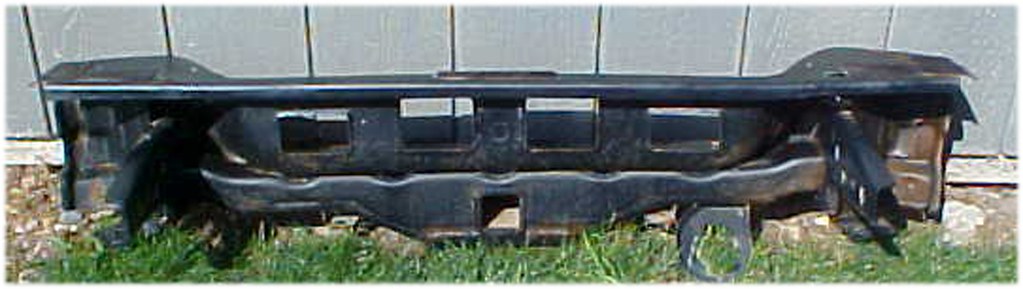
That´s the idea.
Karsten
So this is another reason to remove the rear bumper plastic part to install the damper AND the recovery points and take some measurements from what´s behind the bumper for the tire carrier. Have I already told that the complete rear tire carrier is bolted to the frame? Nothing is welded to the frame that way it can be easily swapped to another TB.
I have borrowed a picture from AlekG, HE HAD THE IDEA FOR THE REAR RECOVERY POINTS! So here is the picture I really like:
When I saw that picture I liked the fact that it looks functional and factory clean. The tire carrier was not what I have liked so I had to do it my way. But the Idea for the recovery points is excellent. I don´t wanted to bold / screw it to the bumper so I found another kind for attaching the recovery points with drilling only one hole for each recovery point.
Here is a picture of what I got and haven´t installed so far:
These recovery points can turn in the drilled hole and are secured with the retaining ring.
Simple installation one hole for every recover point drilled in the reinforcement bar. This is the view from behind on the reinforcement bar. Holes will be drilled to the left and the right parts that go into the rear frame of the TB.
That´s the idea.
Karsten

-

Karo - Trail-Blazer
- Posts: 342
- Joined: Fri Sep 11, 2009 3:02 am
- Location: Berlin Germany 52°30'35.16"N, 13°15'31.99"E
- Name: Karsten
- Vehicle Year: 2002
- Vehicle: Chevrolet TrailBlazer
- DriveTrain: 4WD w/ G80
- Rank: Trail Ready
Be sure to really beef that area of the stock bumper up if that's your plan. I had discussed this with Alec at one of the events we were attending and we agreed that his rear recovery points might be less than stellar, and might pull through the factory metal portion of the bumper.
If you are set on the location, I'd get something like a 2" x 2" tube, cap it with something thick. Put your mounting hole for your recovery shackle in the cap. Then bolt the tube to the outside of your frame rail (there should be room in the frame tube for some more nuts), pointing the shackle out the back, like Alek's. Then you just need to cut away a little of the steel bumper for clearance, but don't worry, the steel in that area isn't structural (and hence why Alek's shackles are potentially weak).
Hope that makes sense.
-

Trail X - Founder
- Posts: 9935
- Joined: Mon Sep 07, 2009 10:22 pm
- Location: VA, Roanoke
- Name: James Downing
- Vehicle Year: 2005
- Vehicle: Chevrolet TrailBlazer
- DriveTrain: 4WD w/ Aftermarket Locker
- Rank: Expedition Guide
Good point James, I think going directly into the frame horns and bolting some 2" x 2" which holding the recovery eyes is the better and safer idea. so this is more work but overall much saver!
Karsten
Karsten
-
Karo - Trail-Blazer
- Posts: 342
- Joined: Fri Sep 11, 2009 3:02 am
- Location: Berlin Germany 52°30'35.16"N, 13°15'31.99"E
- Name: Karsten
- Vehicle Year: 2002
- Vehicle: Chevrolet TrailBlazer
- DriveTrain: 4WD w/ G80
- Rank: Trail Ready
Ok i have a question about this pic:
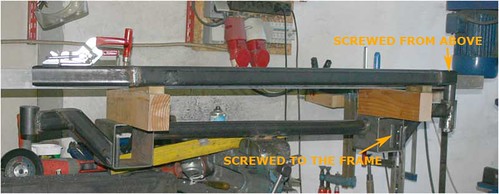
Is that piece with the round tubing in the middle just a mock up to get the correct spacing or is it part of the mount itself? From what im seeing im guessing its a mock up and your actual mounts are just on pieces of angle iron that were bolted to the outside of the trucks chassis possibly using some of the bolt holes from the OE bumper.
Is that piece with the round tubing in the middle just a mock up to get the correct spacing or is it part of the mount itself? From what im seeing im guessing its a mock up and your actual mounts are just on pieces of angle iron that were bolted to the outside of the trucks chassis possibly using some of the bolt holes from the OE bumper.
- Darkrider_LS
- Cruiser
- Posts: 32
- Joined: Thu Nov 22, 2012 2:47 am
- Name: Chris
- Vehicle Year: 2008
- Vehicle: Chevrolet TrailBlazer
- DriveTrain: 4WD
JamesDowning wrote:Be sure to really beef that area of the stock bumper up if that's your plan. I had discussed this with Alec at one of the events we were attending and we agreed that his rear recovery points might be less than stellar, and might pull through the factory metal portion of the bumper.
If you are set on the location, I'd get something like a 2" x 2" tube, cap it with something thick. Put your mounting hole for your recovery shackle in the cap. Then bolt the tube to the outside of your frame rail (there should be room in the frame tube for some more nuts), pointing the shackle out the back, like Alek's. Then you just need to cut away a little of the steel bumper for clearance, but don't worry, the steel in that area isn't structural (and hence why Alek's shackles are potentially weak).
Hope that makes sense.
James is correct ... what happened back then was that there was a time crunch to get the build finished before my trip out to Colorado (where the picture was taken). The recovery points were the last item to be worked on and due to my departure date, the shop could not get a reinforced solution done up. They asked me if I wanted them bolted only to the reinforcement bar or left off. I decided to get them bolted up and revisit later ... but unfortunately ... never did.

|| Documenting and sharing overland travels ||
|| adventures and expeditions ||
|| Trailblazer modifications ||
-

AlekG - Off-Roader
- Posts: 116
- Joined: Tue Sep 15, 2009 9:29 pm
- Location: Guelph, Ontario, CANADA
- Name: Alek
- Vehicle Year: 2006
- Vehicle: Chevrolet TrailBlazer
- DriveTrain: 4WD w/ Aftermarket Locker
- Rank: Expedition Rated
That is some amazing work. Great job!
'A “burro” is an ass, and a “burrow” is a hole in the ground, but your typical English-speaking person can’t tell one from the other.'
- JHogg419
- Member
- Posts: 51
- Joined: Tue Apr 08, 2014 12:17 pm
- Location: Central TX
- Name: Jarrod Hogg
- Vehicle Year: 2004
- Vehicle: GMC Envoy
- DriveTrain: 4WD
48 posts
• Page 3 of 3 • 1, 2, 3