Offroad Trailblazers and Envoys

Custom Roof Rack/Basket

Any special projects involving a decent amount of fab work (bumpers, sliders, roof racks, etc)

by HighSierraTB » Tue Nov 09, 2010 7:40 pm

Well I decided to make a Roof Basket/Rack instead of buying one.

Rather than just build one like the more popular roof baskets - Surco or Baja Racks, I though I'd list the reasons I needed a rack in the first place:

1. I do a lot of home improvements and projects around the house, so I need to occasionally bring lumber home. I have a 4x8 folding Harbor freight trailer, but I don't always like bring it out. The stock roof crossbars are too weak and don't offer a very good tie down anchors.
2. When we go camping or on long road trips, I found that we pack a lot of gear around my son and his car seat. I really want to have the cargo area more secure with fewer things that can fly around. Packing items up top works.
3. I only get about 14-16 MPG overall, so I'm not too worried about the rack's effect on that.
4. I'm not a big fan of roof lights (yet) but I thought I should build it to accomodate lights front and back.

Design requirements:

1. Width - I need to be able to carry a couple of 4 x 8 sheets of plywood
2. Height - I need to be able to carry 4 x 4 posts
3. Needs to be in expensive
4. It can't increase the wind noise much more - I intend to keep the rack on year round.
5. Since I'm fabricating it, it needs to be steel
6. Would like to keep the rack's weight to a minimum.
7. Light mounts 4 in the front and 2 in the back.

Materials:
3/4" EMT conduit
2 hole and one hole brackets for 3/4" conduit


Finish:
Rustoleum primer and black hammer finish spray paint

Tools:
3/4" conduit bender
Lincoln 100HD 110V wire feed welder (flux core)
wire wheels and sanding disks for my angle grinder and drill
1" hole saw for my drill press (for notching the upright pieces of the rack)

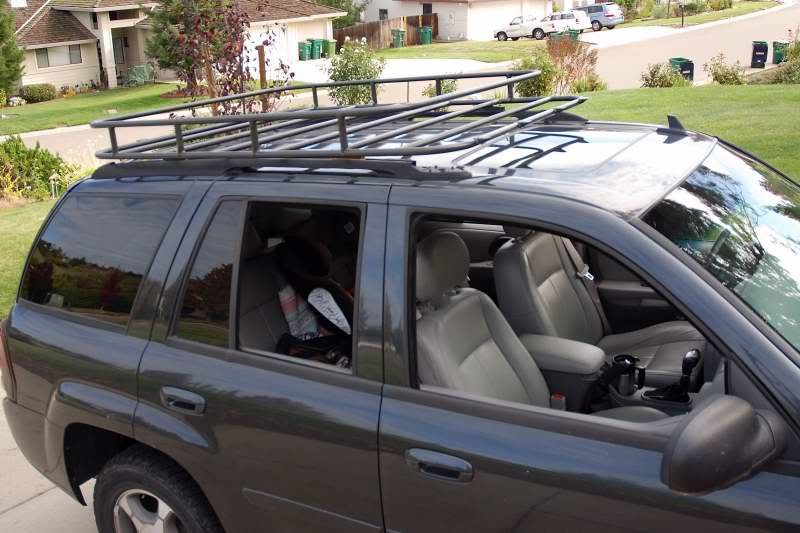
Well after wasting a couple of pieces of conduit learning how to use the bender and lot of practice welding to dial in the welder I built this:

Image
Image

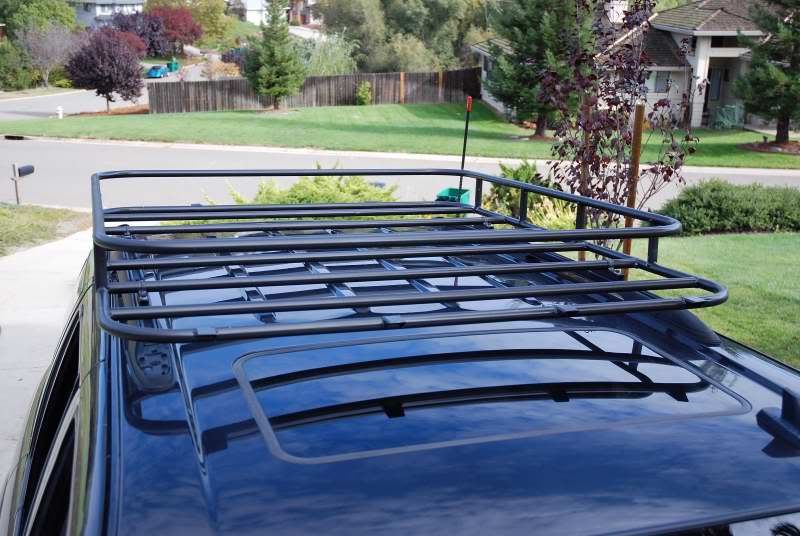
Height: 5 1/2 inches, 3 3/4 inches between top and bottom tubes
Width: 50 inches, 48 1/4 inches between uprights
Length: 64 inches not including light mount tabs
Crossbars mounted 9-10 inches on center
Weight: I'll have to get this next time I remove it.

The closest the basket comes to the roof rails is 3/8" the closest it come to the roof itself is 1 1/4 ", so it sits pretty low. At the front and rear of the basket the top bars sits just shy of 8" off the roof (because of the curve of the roof line front to back).

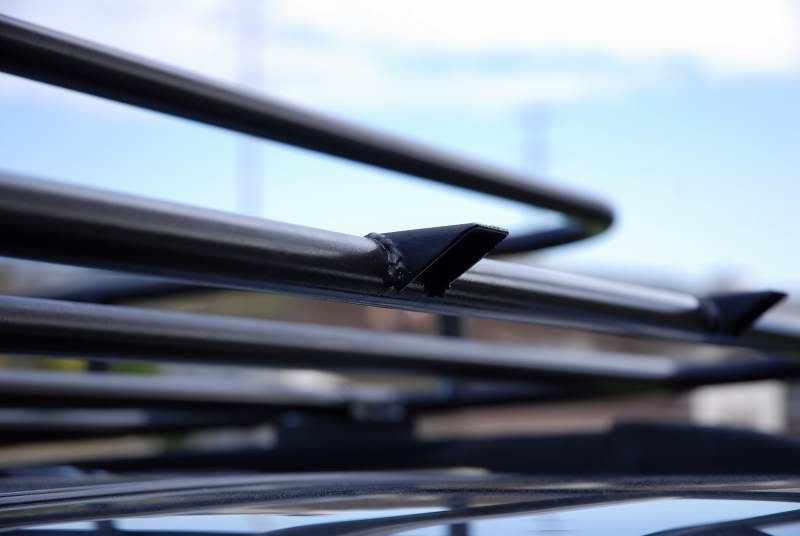
I fab'd up some light mounts from some square tubing I had in the garage. 4 up front and 2 in the back. I didn't drill mounting holes yet. I'll do that when I get lights.

Image

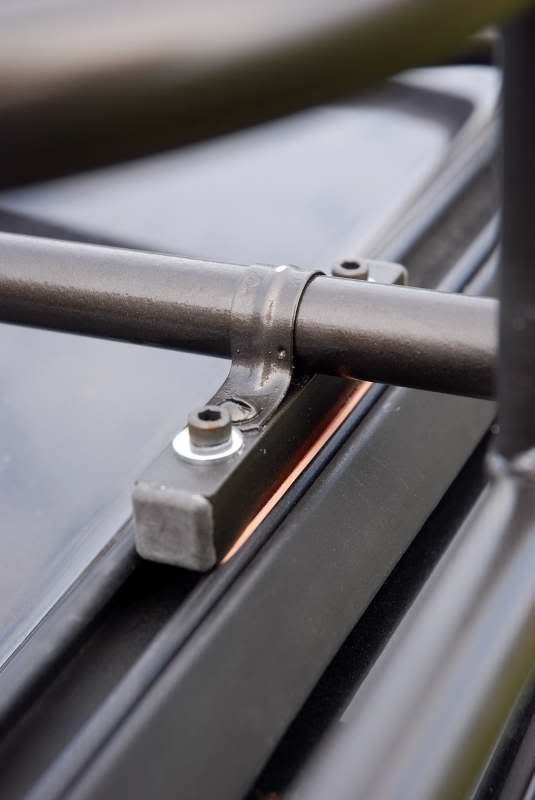
I used some 1x1 aluminum square tubing and some 2 hole conduit mounting brackets to fab some mounts for the rack. 4 in total. I'm not sure I like the mounts. They seem too narrow and right now there are two sets of hardware on each "foot". 1 set to mount the rack to the "foot" and a second set to mount the "foot" to the roof rails. I think I'm going to simplify this and use 1.5" wide 1/2 inch steel bar stock (scrap) using one set of hardware to both mount the rack and secure it to the rails. I did reuse some Yakima rack hardware I had they are SS threaded rectangular pieces that the allen head bolts thread into to secure the "foot" to the rails. I also added some pieces of rubber under each foot between the foot an the top of the rail. It very solid none the less. In the end though I will bolt the "feet" through the roof rails for and even more secure mount.

Image

The wind fairing is a flat piece of Plexiglas mounted to the straight portions of the two front horizontal bars of the basket which eliminates almost all the wind noise from the rack. I used one hole conduit mounting brackets and SS hardware to secure the fairing.
I'm still painting the fairing and I'll add pictures of the rack with the fairing later.

Objectives Met? I think so.

1. Width - I need to be able to carry a couple of 4 x 8 sheets of plywood.

Without any uprights in the front or rear, plywood sheets fit just perfect. The other day I slid a full 4' X 8' sheet of 1/2" particle board up top without the fairing mounted. The board overhangs the front and back only 1.5 ft each.

2. Height - I need to be able to carry 4 x 4 posts.
With a spacing of 3 3/4 inches between the top and bottom tubes I should be able to get 4x4 posts up there. 8' posts should only over hang the front and back by 1.5' each.

3. Needs to be in expensive

Still tallying the total cost. I used about ten 10' pieces of conduit and assorted hardware. The conduit bender and the SS hardware is the most expensive. Using scrap steel and Plexiglas that's lying around the garage saves $$.

4. It can't increase the wind noise much more - I intend to keep the rack on year round.

The fairing mounted to the front horizontal tubes makes the rack pretty quiet. I'm planning on making a fairing that wraps around the front curves of the basket. Tatstill in the works though.

5. Since I'm fabricating it, it needs to be steel.

The steel conduit worked great. did my grinding/sanding and welding outside with plenty of ventilation. My welding is not the best, so some of the welds are not pretty, but they are pretty solid. My welds got better as I went along.

6. Would like to keep the rack's weight to a minimum.

Still have to weight the whole thing next time its off the TB. Mounting or removing only takes about 10 minutes with one person (me). The rack really isn't that heavy

7. Light mounts: 4 in the front and 2 in the back.

Using scrap square tubing notched with the 1" hole saw and formed with a bench grinder these turned out nice and are pretty sturdy. I'll drill the mount holes later when I have lights.

I'll see how this rack works for me and how well it holds up. I do have some design changes I'll make with version 2.0 if that comes to be.
Last edited by HighSierraTB on Mon Nov 15, 2010 10:53 pm, edited 1 time in total.
User avatar
HighSierraTB
Member
 
Posts: 69
Joined: Mon Aug 09, 2010 6:18 pm
Location: Nor Cal - East of Sacramento
Name: Mike Johnson
Vehicle Year: 2006
Vehicle: Chevrolet TrailBlazer
DriveTrain: 4WD w/ G80

by HighSierraTB » Tue Nov 09, 2010 7:46 pm

Here is a photo of one of the "feet" that mount the basket to the rails.
DSC_0620.JPG


I'm having dificulty with the pictures, so they are attachments for now.
User avatar
HighSierraTB
Member
 
Posts: 69
Joined: Mon Aug 09, 2010 6:18 pm
Location: Nor Cal - East of Sacramento
Name: Mike Johnson
Vehicle Year: 2006
Vehicle: Chevrolet TrailBlazer
DriveTrain: 4WD w/ G80

by Philberto » Tue Nov 09, 2010 8:51 pm

Looks good! Still need to get a welder and learn to use it myself!
My Build Thread | 2006 Trailblazer LS Desert Camping Edition **SOLD**
2013 Nissan Xterra S "ReXterra"
User avatar
Philberto
Lifer
 
Posts: 2046
Joined: Fri Sep 11, 2009 5:30 pm
Location: CA, Oxnard
Name: Philip Cruz
Vehicle Year: Other
Vehicle: Other Vehicle
DriveTrain: 4WD
Rank: Offroad Rated

by djthumper » Tue Nov 09, 2010 9:20 pm

Looks good!! I probably would have just used square tubing since I hate dealing with the zinc coating.
User avatar
djthumper
Moderator
 
Posts: 2702
Joined: Wed Mar 24, 2010 6:04 pm
Location: NV, Las Vegas
Name: Larry
Vehicle Year: 2006
Vehicle: Chevrolet TrailBlazer
DriveTrain: 4WD
Rank: Offroad Rated

by bartonmd » Wed Nov 10, 2010 8:54 am

You'll want to put a fairing pretty much all around it, if you can... Round tubes are incredibly un-aerodynamic, and there are a ton of them there, to ruin your mileage!

Mike
bartonmd
Moderator
 
Posts: 4469
Joined: Wed Sep 09, 2009 9:35 am
Location: IN, Indianapolis
Name: Mike
Vehicle Year: 2007
Vehicle: Chevrolet TrailBlazer
DriveTrain: 4WD w/ G80
Rank: Offroad Rated

by get_over_it » Wed Nov 10, 2010 10:33 am

HighSierraTB wrote:Here is a photo of one of the "feet" that mount the basket to the rails.
DSC_0620.JPG


Nice job on the basket, this is something that I have planed to do in the future. Just one question is that bracket going to be strong enough, there is 4 of them right? I would think that the weight of the items carried and the rack it self will put too much stress on those brackets stopping and launching and over time will fail. Just my thoughts, otherwise good job it's always nice to see custom fab! :thumright:
User avatar
get_over_it
Cruiser
 
Posts: 18
Joined: Mon May 03, 2010 12:48 pm
Location: Toronto, Ontario
Name: Jason
Vehicle Year: 2003
Vehicle: Chevrolet Trailblazer EXT
DriveTrain: 4WD w/ G80

by Trail X » Wed Nov 10, 2010 11:05 am

Is the EMT going to be strong enough for lumber? I just noticed there were no vertical supports on the load-bearing pieces if you're carrying a stack of 2x4s.

For the feet mounts, they should be fine. That's basically how mine is mounted... However if you wanted to get it a half-inch lower, you could take your hole saw to the square tube and notch out a half-circle... then weld the foot onto the basket.
8-) Build Thread | ExPo Build | YouTube Videos
Not all who wander are lost. -Tolkien
User avatar
Trail X
Founder
 
Posts: 9935
Joined: Mon Sep 07, 2009 10:22 pm
Location: VA, Roanoke
Name: James Downing
Vehicle Year: 2005
Vehicle: Chevrolet TrailBlazer
DriveTrain: 4WD w/ Aftermarket Locker
Rank: Expedition Guide

by bgwolfpack » Wed Nov 10, 2010 12:07 pm

JamesDowning wrote:Is the EMT going to be strong enough for lumber? I just noticed there were no vertical supports on the load-bearing pieces if you're carrying a stack of 2x4s.

For the feet mounts, they should be fine. That's basically how mine is mounted... However if you wanted to get it a half-inch lower, you could take your hole saw to the square tube and notch out a half-circle... then weld the foot onto the basket.

Very good advise from our venerable leader.

You did a great job on the rack. Well done.
bgwolfpack
Veteran
 
Posts: 1794
Joined: Fri Sep 18, 2009 7:19 pm
Name: Randy
Vehicle Year: Other
Vehicle: Other Vehicle
DriveTrain: 4WD

by MrSmithsTB » Wed Nov 10, 2010 12:19 pm

Looks excellent. I do agree that the EMT might not have the strength as is for some of the larger loads. The price/ft is cheap enough that it would be worth welding in some extra support risers to help spread the loads.
back in the saddle
TB BUILD
User avatar
MrSmithsTB
Veteran
 
Posts: 1756
Joined: Thu Sep 10, 2009 2:28 pm
Location: EHT, NJ
Name: Bob
Vehicle Year: 2006
Vehicle: Other GMT360/370
DriveTrain: AWD w/ G80
Rank: Offroad Rated

by HighSierraTB » Wed Nov 10, 2010 1:43 pm

Thanks for the kind words. It was a fun project to plan and build. Like I said I may be building version 2.0. I'll wait to see how this one holds up.
and what I might want to change. I may go with some real tubing at that point. If I don't use the full width of the rack much, I may even make it narrower.

bartonmd wrote:You'll want to put a fairing pretty much all around it, if you can... Round tubes are incredibly un-aerodynamic, and there are a ton of them there, to ruin your mileage!

Mike


I plan on making a fairing that wraps the whole front of the rack. right now a simple flat piece across the straight sections of the two front tubes stops almost all the wind noise. I was suprised. I looks kinda ghetto though, but it'll do for now. As far as gas mileage. . . I work from home, so I don't worry too much about that.


JamesDowning wrote:Is the EMT going to be strong enough for lumber? I just noticed there were no vertical supports on the load-bearing pieces if you're carrying a stack of 2x4s.

For the feet mounts, they should be fine. That's basically how mine is mounted... However if you wanted to get it a half-inch lower, you could take your hole saw to the square tube and notch out a half-circle... then weld the foot onto the basket.


As far as the strength of the EMT, I'm gonna use the rack lightly and keep an eye on the welds, finish, etc. I certainly wont load more than 3-4 2x4s (loaded and strapped to the sides of the racK) or 1-2 sheets of plywood. I have a 4'x8' trailer for the big loads. I'm not looking to put my spare tire or an ice chest up there (right now). Do you think adding some tubing length-wise to the floor and/or adding and expanded metal(more weight and cost) floor would help much to spread the weight of a load?

I do like your idea about modifying the "feet" I have some wider rectangular tubing I can use to do that.

Thanks for the ideas, praise and comments. This site is full of experience that I hope to be able to take advantage of (as well as contribute to).

Mike
User avatar
HighSierraTB
Member
 
Posts: 69
Joined: Mon Aug 09, 2010 6:18 pm
Location: Nor Cal - East of Sacramento
Name: Mike Johnson
Vehicle Year: 2006
Vehicle: Chevrolet TrailBlazer
DriveTrain: 4WD w/ G80

by Trail X » Wed Nov 10, 2010 2:19 pm

HighSierraTB wrote:As far as the strength of the EMT, I'm gonna use the rack lightly and keep an eye on the welds, finish, etc. I certainly wont load more than 3-4 2x4s (loaded and strapped to the sides of the racK) or 1-2 sheets of plywood. I have a 4'x8' trailer for the big loads. I'm not looking to put my spare tire or an ice chest up there (right now). Do you think adding some tubing length-wise to the floor and/or adding and expanded metal(more weight and cost) floor would help much to spread the weight of a load?


On my Bajarack, they have a similar flooring design, but they suppliment it with 1/2" (or maybe 3/8") bar stock running a few times down the length of the flooring to help distribute loads across the flooring. I can stand on one bar of my rack without it yeilding. I know EMT is fairly light weight, and with that sort of span, unsupported, it might have some issues. If you have some left over, try cutting it to the same span you have, and loading it down until it bends and yields. That will help you understand your weight rating based on different load configurations.
8-) Build Thread | ExPo Build | YouTube Videos
Not all who wander are lost. -Tolkien
User avatar
Trail X
Founder
 
Posts: 9935
Joined: Mon Sep 07, 2009 10:22 pm
Location: VA, Roanoke
Name: James Downing
Vehicle Year: 2005
Vehicle: Chevrolet TrailBlazer
DriveTrain: 4WD w/ Aftermarket Locker
Rank: Expedition Guide

by Gordinho80 » Wed Nov 10, 2010 3:02 pm

MMM... I know a professional electrician who bends EMT for a living and is a certified welder. I might have to steal this idea...
Mario - Build Thread
User avatar
Gordinho80
Lifer
 
Posts: 2787
Joined: Tue Sep 08, 2009 9:27 am
Location: NJ, Jackson
Name: Mario Almeida
Vehicle Year: Other
Vehicle: Other Vehicle
DriveTrain: 4WD


Return to Fab Work

cron