Offroad Trailblazers and Envoys

Jon's KMA Deer Thumper Bumper

Any special projects involving a decent amount of fab work (bumpers, sliders, roof racks, etc)

by Jon A » Tue Oct 12, 2010 3:06 pm

I first want to thank the board, especially JD, for the inspiration and the simple knowledge that these bumpers exist. I had no idea. I wish I had done this years ago as it accomplishes four things I have always wanted but didn't think were possible to get all at once:

1) Permanent spot for a winch.
2) Legit, substantial deer impact protection.
3) Dramatically improved approach angle.
4) Place for extra lighting that will be out of the way and protected.

It's not perfect, and some of that is my fault as I was very rushed in its build (big trip coming up) but I think it's hit the ball out of the park on all counts. Now for the eye candy:

Image

Image

Image

Image

Image

It'll look even better when I get the JD-style radiator skid from Mike.
Jon A
Member
 
Posts: 81
Joined: Wed Jun 16, 2010 4:59 am
Location: Everett, WA
Name: Jon Aadland
Vehicle Year: 2002
Vehicle: Chevrolet TrailBlazer
DriveTrain: 4WD w/ G80

by Jon A » Tue Oct 12, 2010 3:07 pm

A quick summary of the build:

Except for adding a couple reinforcements and foglight holes I didn't modify the bumper at all. As from KMA with the frame brackets tacked on:

Image

I welded them on three edges like this:

Image

Now for the hard work. Extra strength added by using this for most of the guard:

Image

The ends bent up:

Image

You can't match the body contour perfectly from all angles, so you have to sort of shoot for the middle compromise that looks the best from all angles. I believe it's about 28 degrees, angled aft and up.

Image
Jon A
Member
 
Posts: 81
Joined: Wed Jun 16, 2010 4:59 am
Location: Everett, WA
Name: Jon Aadland
Vehicle Year: 2002
Vehicle: Chevrolet TrailBlazer
DriveTrain: 4WD w/ G80

by Jon A » Tue Oct 12, 2010 3:08 pm

I had no way of bending that material to as tight a radius as I wanted so I did the corners ghetto-style. I located the outboard uprights sort of kitty-corner to the lights in that dead spot between the side marker and the blinker/headlight so the blinker wouldn't be blocked from view at any angle.

Center uprights attempting to match the angle of the headlights/grill:

Image

That's a big enough gap I figured a deer could fly right through to the radiator, so I added another crossbar:

Image

Image

Now for what gives the guard much of its strength:

Image

Instead of single tubes in bending or flat plates for the main uprights, a rear pair of tubes were added.

Image
Jon A
Member
 
Posts: 81
Joined: Wed Jun 16, 2010 4:59 am
Location: Everett, WA
Name: Jon Aadland
Vehicle Year: 2002
Vehicle: Chevrolet TrailBlazer
DriveTrain: 4WD w/ G80

by Jon A » Tue Oct 12, 2010 3:08 pm

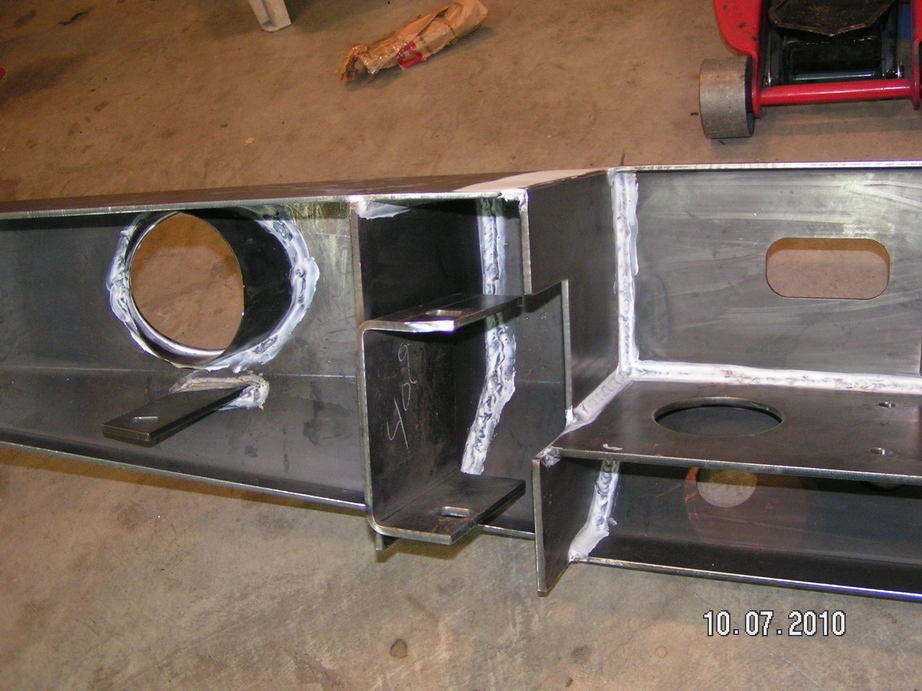
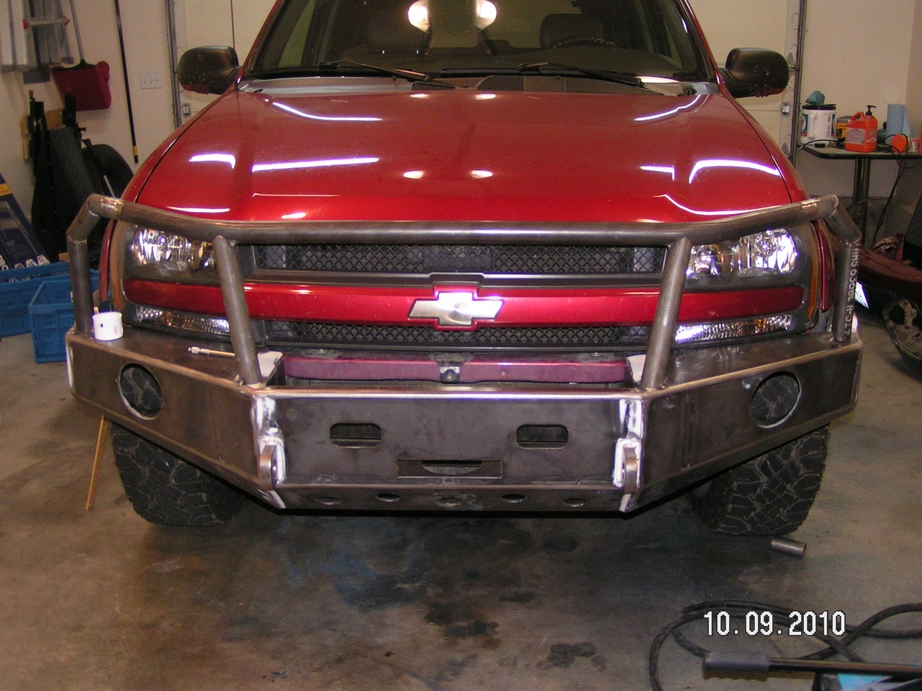
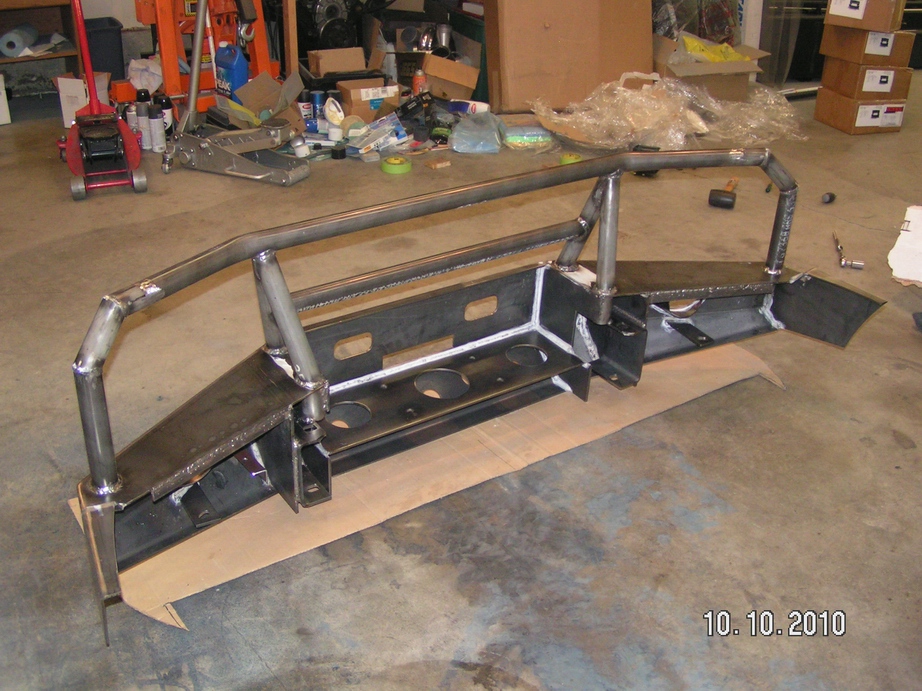
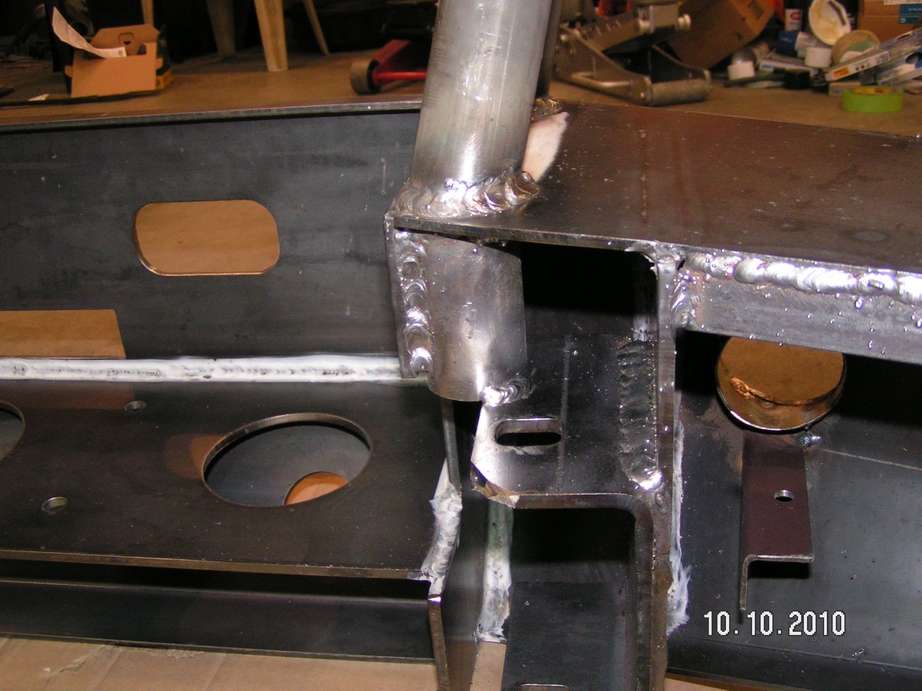
Backing up the rear compression tubes is another chunk of tube inside the bumper, basically acting as a compression block to feed the load directly into the frame instead of bending the top plate of the bumper. It also ties the frame bracket to the side plate of the center box.

Image

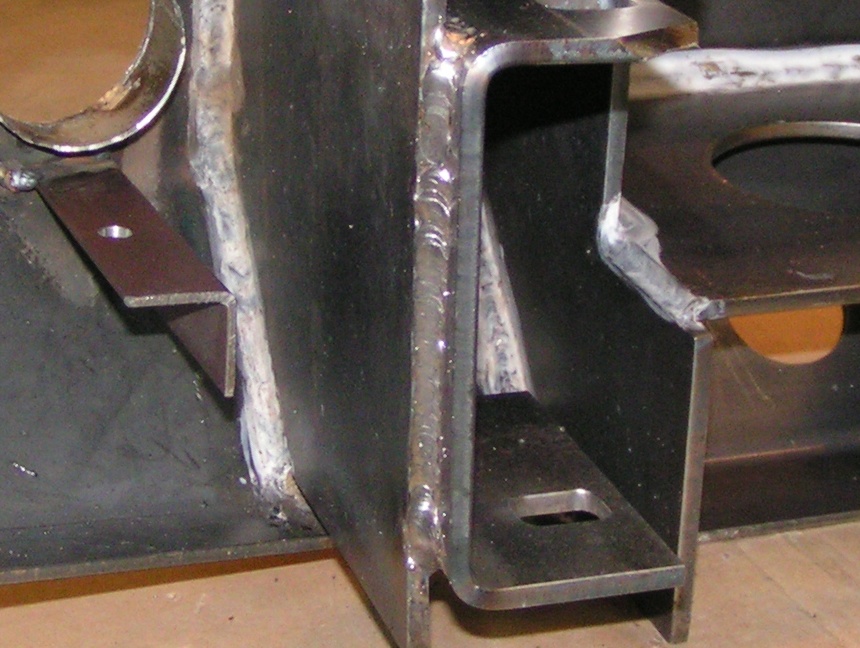
I also added a chunk on the outboard uprights:

Image

That one doesn't accomplish much, basically it just keeps the tube from locally distorting the top plate with a moment, spreading the load into the corner of the bumper.

You can see I also added a hefty angle along the back edge of the top plate. This was done to stabilize the edge of the top plate. It's probably overkill, but if something hits the corner of the bumper hard enough to fold the wing, the point of failure will be the compression crippling of the edge of that top plate allowing the plate to buckle, taking the rest of the bumper with it. By simply stabilizing that edge and keeping it straight, much strength is added to the whole wing of the bumper.

I know the weld looks especially crappy on that angle, but it's not critical so don't worry about it. I was just wasting wire at that point.

Image

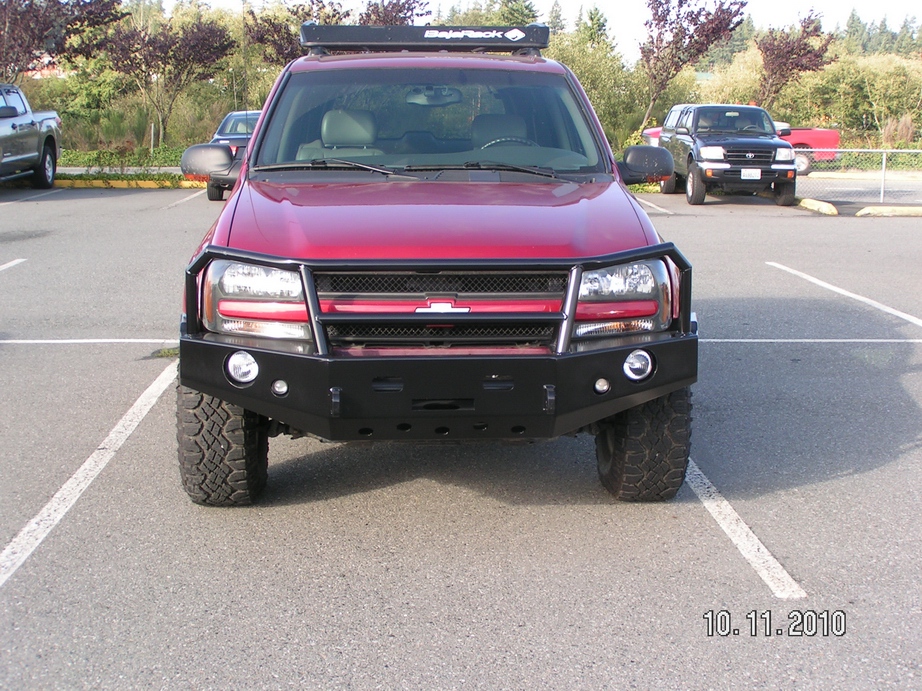
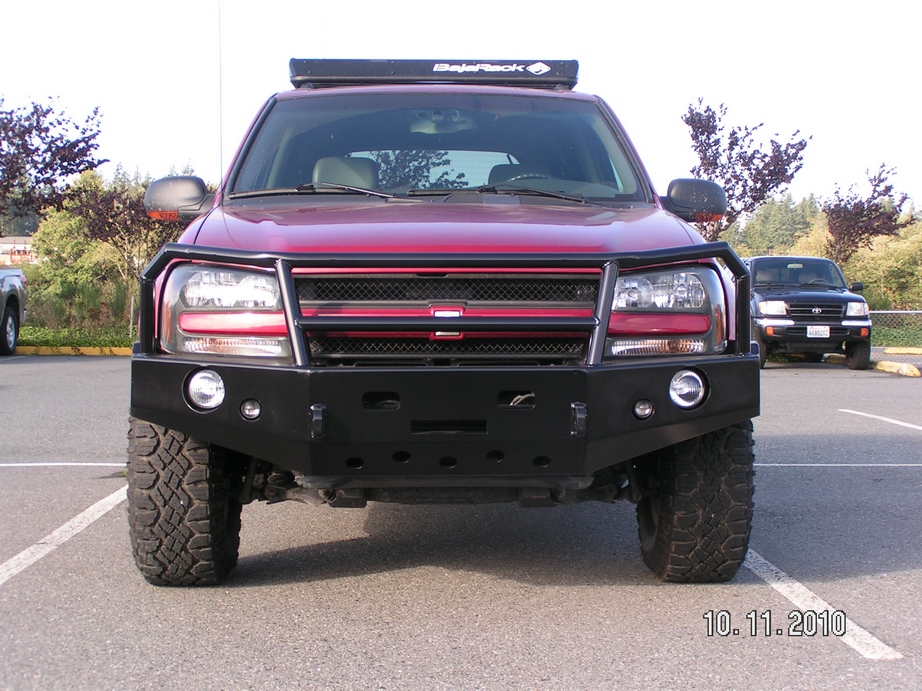
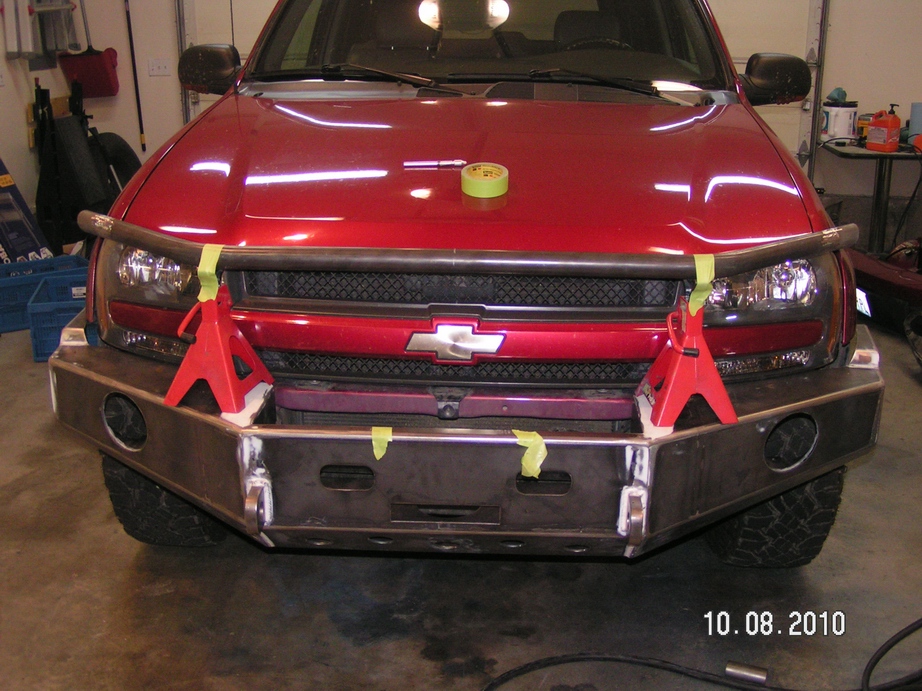
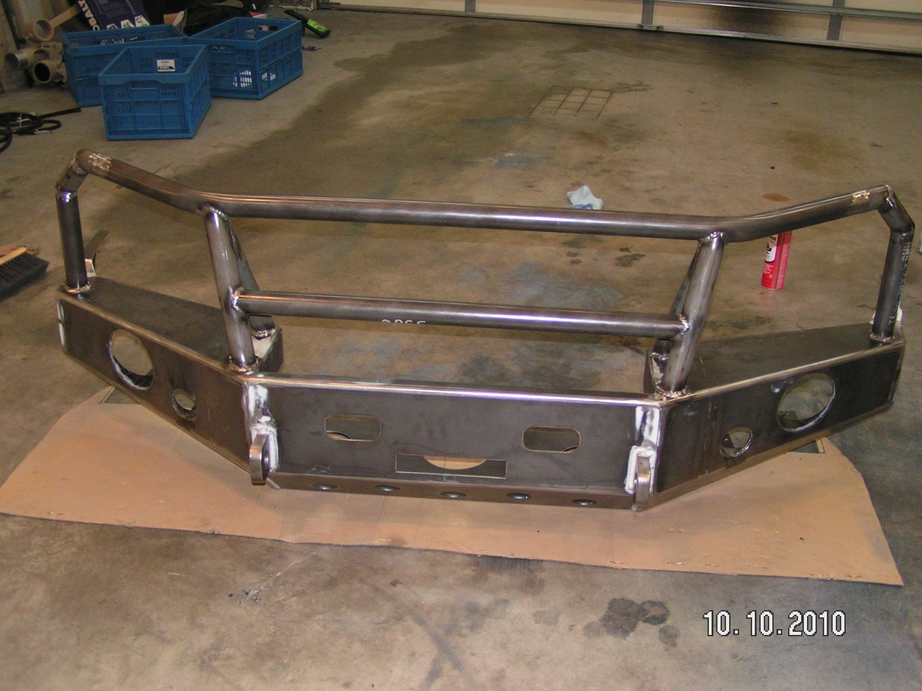
I didn't have KMA cut holes for the fog lights because I wasn't really sure if they'd fit, where I wanted them, how the bumper was constructed, etc. Knowing what I know now I'd have them do it to save me the effort. I'd have them move the 5" light hole outboard a couple inches or inboard about 6 inches and put the little hole outboard of it so they don't look so crowded.

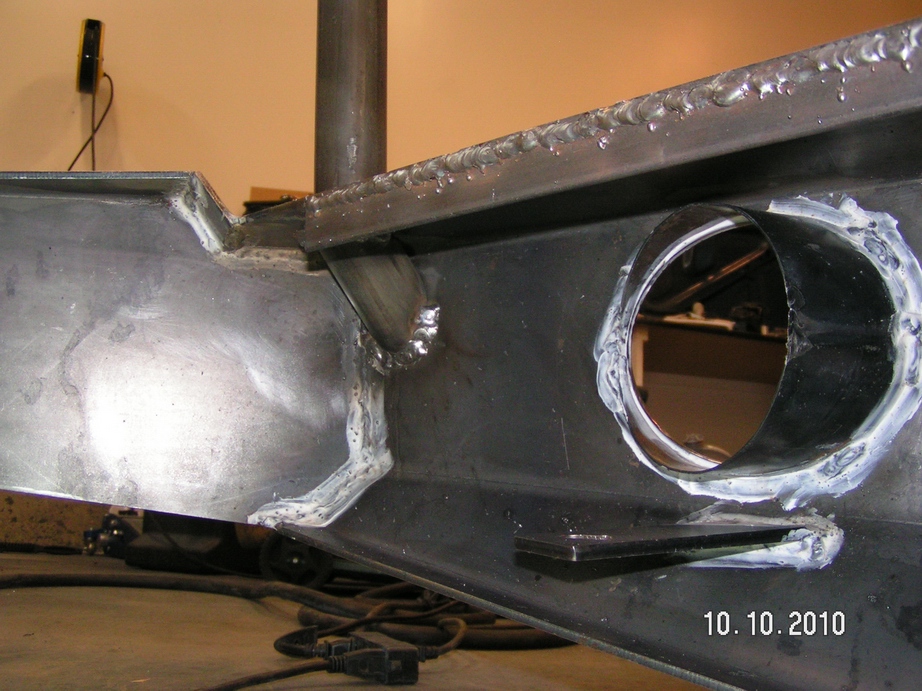
It's a 2.5" hole for Hella Micro DE fogs. I did put a chunk of tube behind it like KMA did with the big hole:

Image

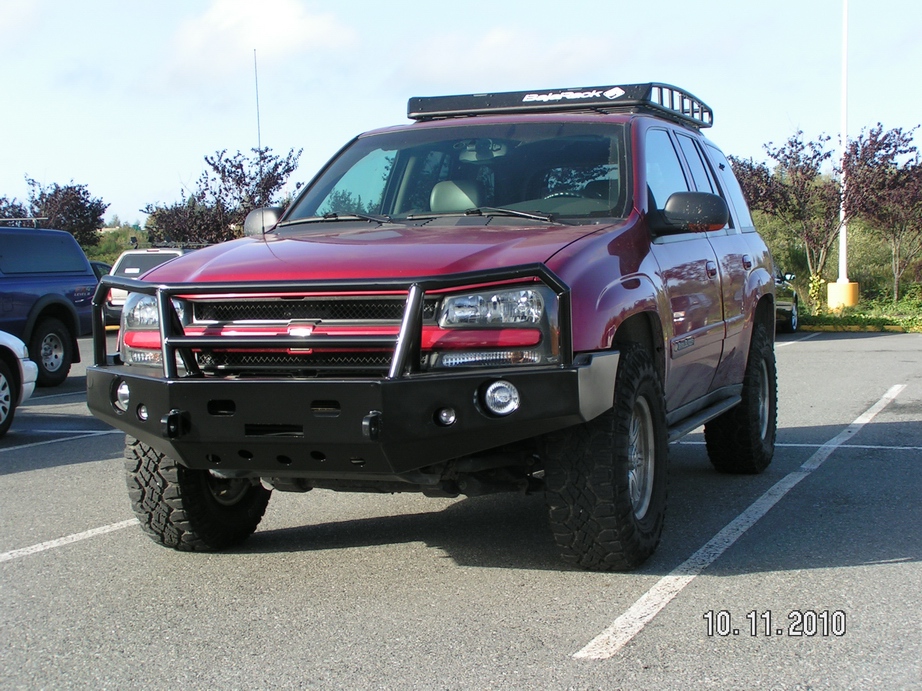
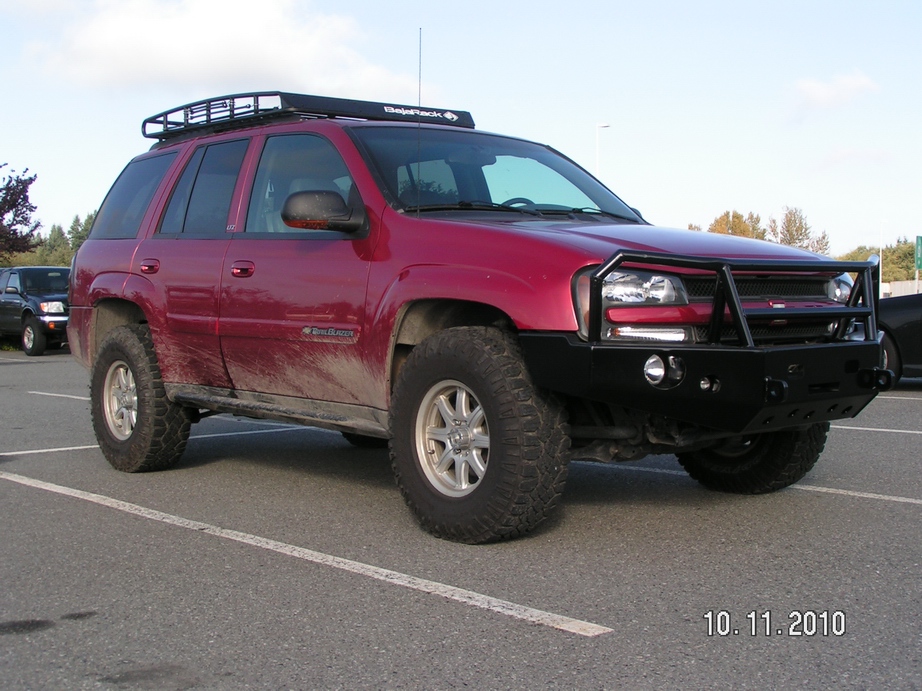
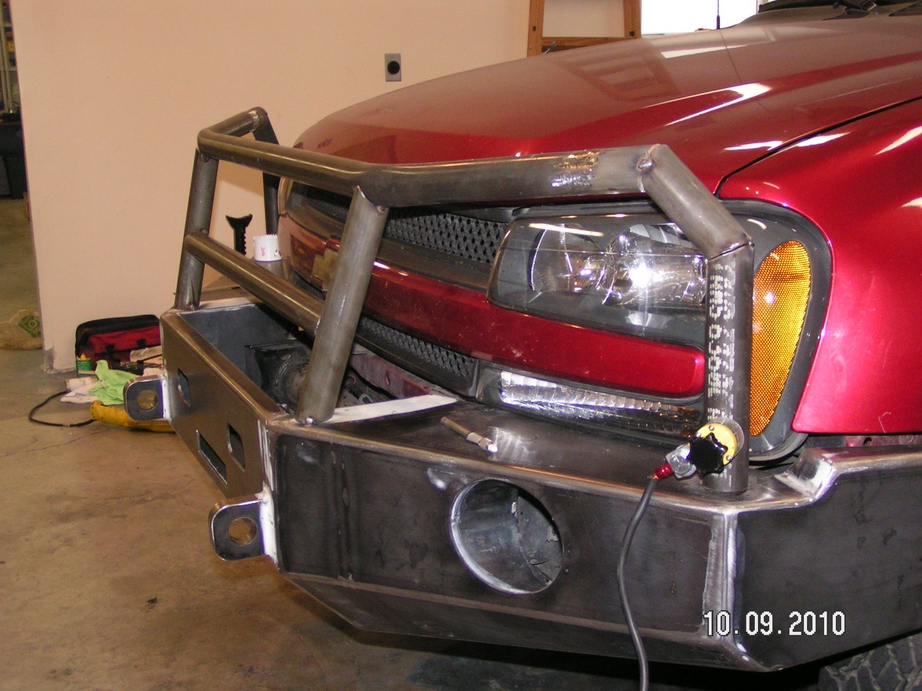
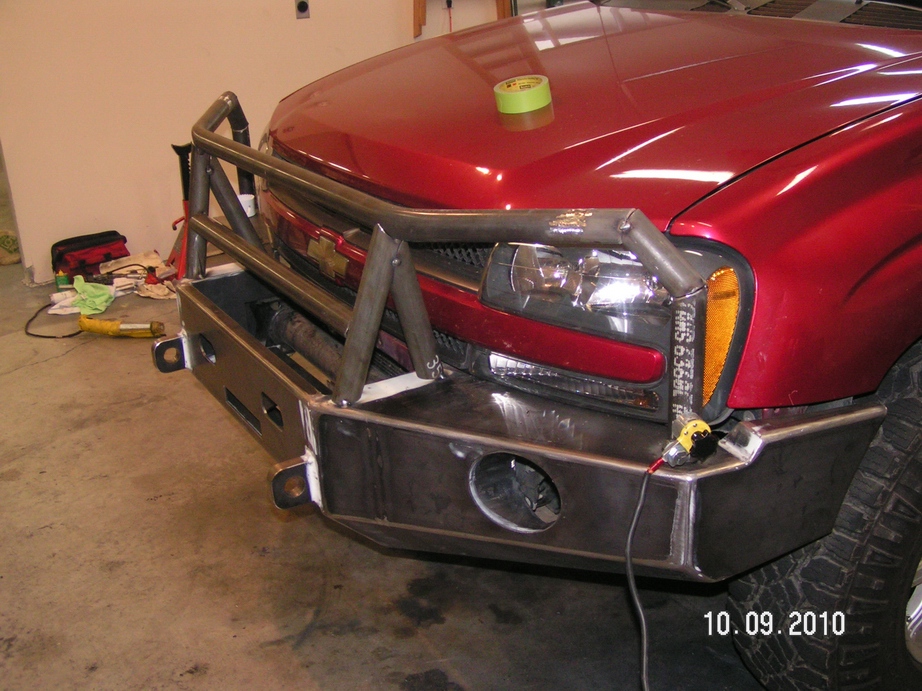
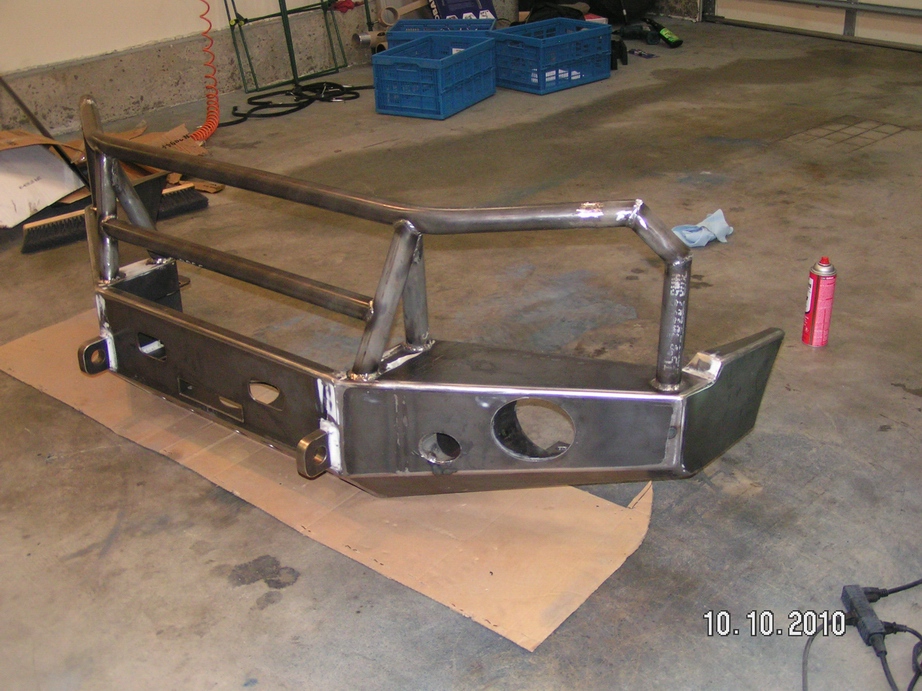
The big lights are 100 watt KC's, with the driving light beam pattern (supplied by KMA).
Last edited by Jon A on Tue Oct 12, 2010 3:17 pm, edited 2 times in total.
Jon A
Member
 
Posts: 81
Joined: Wed Jun 16, 2010 4:59 am
Location: Everett, WA
Name: Jon Aadland
Vehicle Year: 2002
Vehicle: Chevrolet TrailBlazer
DriveTrain: 4WD w/ G80

by Jon A » Tue Oct 12, 2010 3:09 pm

Done:

Image

Image

Image

Well, almost. Paint:

Image
Jon A
Member
 
Posts: 81
Joined: Wed Jun 16, 2010 4:59 am
Location: Everett, WA
Name: Jon Aadland
Vehicle Year: 2002
Vehicle: Chevrolet TrailBlazer
DriveTrain: 4WD w/ G80

by Jon A » Tue Oct 12, 2010 3:10 pm

Image

I used simple Krylon gloss black (on top of a couple of cans of primer). It's a lot more acreage than it looks like, it took a lot of paint.

Now it's done:

Well, except for installing the winch which will hopefully show up in the next day or two.

Like I said, it's not perfect. My fab skills are amateurish at best but overall I'm pretty happy with how it turned out. I think it'll be really nice to have. Anybody looking for a WAAG?

Anyway, hopefully this helps others who may be contemplating similar projects.
Jon A
Member
 
Posts: 81
Joined: Wed Jun 16, 2010 4:59 am
Location: Everett, WA
Name: Jon Aadland
Vehicle Year: 2002
Vehicle: Chevrolet TrailBlazer
DriveTrain: 4WD w/ G80

by Hpimichael02 » Tue Oct 12, 2010 3:16 pm

Great looking bumper, but I see a flaw in your design, that being you have to take the entire bumper off to have access to the winch for removal for maintence or if it breaks on trails or sumthing happens, the bumper got to come off, but looks great other wise
Last edited by Hpimichael02 on Tue Oct 12, 2010 3:21 pm, edited 1 time in total.
Hpimichael02
Trail-Blazer
 
Posts: 275
Joined: Thu Jul 29, 2010 5:20 pm
Name: Mike mcd
Vehicle Year: 2005
Vehicle: Chevrolet TrailBlazer
DriveTrain: 4WD
Rank: Trail Ready

by bartonmd » Tue Oct 12, 2010 3:17 pm

Looks good!

I'm actually going to do something really similar for a brush guard on the bumper I make for my Cummins truck... That's what I drive down to my grandparents' farm on Friday nights in deer season, and that's when the deer are a-runnin'...

I've got the order put in for your JD-style rad plate (out of 7ga steel), so when it gets done, I'll let you know...

Mike
bartonmd
Moderator
 
Posts: 4469
Joined: Wed Sep 09, 2009 9:35 am
Location: IN, Indianapolis
Name: Mike
Vehicle Year: 2007
Vehicle: Chevrolet TrailBlazer
DriveTrain: 4WD w/ G80
Rank: Offroad Rated

by janesy86 » Tue Oct 12, 2010 3:20 pm

Very nicely done! I for one am a fan and very cool you modded it yourself! :cheers:
Build Thread
Back to stock, had fun while it lasted...
janesy86
Veteran
 
Posts: 1291
Joined: Thu Sep 10, 2009 2:29 pm
Location: MA, Salem
Name: Nick Janes
Vehicle Year: 2007
Vehicle: Chevrolet TrailBlazer
DriveTrain: 4WD w/ G80
Rank: Offroad Rated

by OregTrailBlazin » Tue Oct 12, 2010 3:23 pm

Looks awesome!! :thumleft: :cheers: What did you use for tubing notcher, they came out real nice. I'm using a Sync180......

Hpimichael02 wrote:Great looking bumper, but I see a big flaw in your design, that being you have to take the entire bumper off to have accra to the winch for removal for maintence or if it breaks on trails or sumthing happens the bumper got to come off, but looks great other wise


Thats how most bumpers are, ARB, BudBuilt and many others are the same. I would prefer it that way, it makes it allot harder for someone to steal your winch.
Johnny Kurz
General Manager
541-474-2879
Wheeler's Off-Road Inc.
Our Vendor Section
User avatar
OregTrailBlazin
Off-Road Vendor
 
Posts: 610
Joined: Wed Sep 09, 2009 2:34 pm
Location: OR, Grants Pass
Name: Johnathan Kurz
Vehicle Year: 2004
Vehicle: Chevrolet TrailBlazer
DriveTrain: 4WD

by fishsticks » Tue Oct 12, 2010 3:25 pm

Well done sir, well done.


All these damned plate bumpers are showing up now. I feel behind the times... :shock:
11 Silverado LTZ - 6.2L/6l80, 2/3 drop, self tuned
85 Hilux - 3RZ, dual cases, caged, 40s, chromo everything
02 TrailBlazer LTZ - 35s, lockers, balls - Gone but not forgotten - Build
User avatar
fishsticks
Moderator
 
Posts: 4356
Joined: Thu Apr 01, 2010 11:30 pm
Location: WA, Vancouver
Name: Donny
Vehicle Year: Other
Vehicle: Other Vehicle
DriveTrain: 4WD w/ Aftermarket Locker
Rank: Extreme Offroader

by janesy86 » Tue Oct 12, 2010 3:29 pm

fishsticks wrote:Well done sir, well done.


All these damned plate bumpers are showing up now. I feel behind the times... :shock:


Hehe, but you will be rolling on 4.56's front and rear with lockers in both, so I'd say your well ahead of the game, function wise!
Build Thread
Back to stock, had fun while it lasted...
janesy86
Veteran
 
Posts: 1291
Joined: Thu Sep 10, 2009 2:29 pm
Location: MA, Salem
Name: Nick Janes
Vehicle Year: 2007
Vehicle: Chevrolet TrailBlazer
DriveTrain: 4WD w/ G80
Rank: Offroad Rated

by fishsticks » Tue Oct 12, 2010 4:12 pm

janesy86 wrote:
fishsticks wrote:Well done sir, well done.


All these damned plate bumpers are showing up now. I feel behind the times... :shock:


Hehe, but you will be rolling on 4.56's front and rear with lockers in both, so I'd say your well ahead of the game, function wise!


Funny you mention that. I had a moment of disciplinary weakness today. I broke down plugged my credit card into my Paypal account. Now I have packages arriving... I really wanted to do this in cash.

Anyway, back to drooling over bumpers. :)
11 Silverado LTZ - 6.2L/6l80, 2/3 drop, self tuned
85 Hilux - 3RZ, dual cases, caged, 40s, chromo everything
02 TrailBlazer LTZ - 35s, lockers, balls - Gone but not forgotten - Build
User avatar
fishsticks
Moderator
 
Posts: 4356
Joined: Thu Apr 01, 2010 11:30 pm
Location: WA, Vancouver
Name: Donny
Vehicle Year: Other
Vehicle: Other Vehicle
DriveTrain: 4WD w/ Aftermarket Locker
Rank: Extreme Offroader

by djthumper » Tue Oct 12, 2010 4:18 pm

That looks great!
User avatar
djthumper
Moderator
 
Posts: 2702
Joined: Wed Mar 24, 2010 6:04 pm
Location: NV, Las Vegas
Name: Larry
Vehicle Year: 2006
Vehicle: Chevrolet TrailBlazer
DriveTrain: 4WD
Rank: Offroad Rated

by Jon A » Tue Oct 12, 2010 4:23 pm

Thanks guys. That's a good point on the winch access, I knew that would be a trade-off with adding that center bar but I figured I needed the center bar's protection more than easy removal of winch. The bumper is only two bolts and I'm getting pretty fast at yanking it on and off (use two floorjacks simultaneously).

I can't wait to get the winch on now. Of course that's going to sink the front end even more. It was a little low before, now it really will be. I've been planning to upgrade the front lift and use 88 springs but that'll have to wait until after my trip.
Jon A
Member
 
Posts: 81
Joined: Wed Jun 16, 2010 4:59 am
Location: Everett, WA
Name: Jon Aadland
Vehicle Year: 2002
Vehicle: Chevrolet TrailBlazer
DriveTrain: 4WD w/ G80

by teebes » Tue Oct 12, 2010 4:34 pm

Well done :cheers: That extra fab work turned out great, IMO. The black on red of your truck really pops, too
:flex dirty:
User avatar
teebes
Founder
 
Posts: 1052
Joined: Thu Sep 03, 2009 1:05 am
Location: CA, San Diego
Name: Teebes
Vehicle Year: 2002
Vehicle: Chevrolet TrailBlazer
DriveTrain: 4WD w/ Aftermarket Locker
Rank: Expedition Rated

by Trail X » Tue Oct 12, 2010 6:51 pm

Looks great! I like the extra structure you added on the inside. We added all of that except for the anti-buckle strip on the back side of the wing. Good thinking there... I hadn't considered the plate buckling under a hit. Although, you want it to buckle some... better the bumper than the frame... right?

You'll love those Micro DE fogs... they are like a million times better than stock.

What winch are you going with?

Whats the big trip?
8-) Build Thread | ExPo Build | YouTube Videos
Not all who wander are lost. -Tolkien
User avatar
Trail X
Founder
 
Posts: 9935
Joined: Mon Sep 07, 2009 10:22 pm
Location: VA, Roanoke
Name: James Downing
Vehicle Year: 2005
Vehicle: Chevrolet TrailBlazer
DriveTrain: 4WD w/ Aftermarket Locker
Rank: Expedition Guide

by Jon A » Tue Oct 12, 2010 8:36 pm

Thanks. I’m headed back to Montana for some hunting. While the primary part of the hunt will be packing in on horseback into the mountains and camping for elk where the TB won’t be needed much, if we get lucky and find some within the first couple days we’ll come back down to the ranch for some deer hunting where it will be my hunting rig as always.

But even just on the drive there and back it’ll be much appreciated with the extra lighting and the peace of mind of knowing the chances of a severe deer impact stopping me out in the boonies where there’s no cell coverage and I’m hundreds of miles from family are virtually zilch.

I agree about those DE’s, they are great! Not just the brightness, but how wide the beam is—I have nearly 180 degree coverage in front of the vehicle with quite a bit of overlap in the middle. For seeing the ground around me when offroad and seeing deer in the ditches when I’m on road these should help a bunch. I haven’t hooked up the KC’s yet but they should augment my brights for more distance. That’s the idea anyway.

I’m getting an XRC-10 winch with the composite line. I’m going to try and hook a wireless remote to it as well, we’ll see how that goes in a couple of days. I can think of all sorts of handy uses for this even besides the main one of saving my rear when I’m stuck all by myself somewhere.

OregTrailBlazin wrote:Looks awesome!! :thumleft: :cheers: What did you use for tubing notcher, they came out real nice. I'm using a Sync180......


I'm using a Joint Jigger: http://www.northerntool.com/shop/tools/product_200003774_200003774 . I got it a few years ago for a different project. It works OK if you only do this sort of stuff every now and then.
Jon A
Member
 
Posts: 81
Joined: Wed Jun 16, 2010 4:59 am
Location: Everett, WA
Name: Jon Aadland
Vehicle Year: 2002
Vehicle: Chevrolet TrailBlazer
DriveTrain: 4WD w/ G80

by Blask3 » Wed Oct 13, 2010 7:39 am

Looks good. Ever thought of selling bumpers?
Jim Blask
GIT-R-DONE

The only Lifted TB in the Valley
Blask3
Member
 
Posts: 59
Joined: Thu Aug 26, 2010 7:22 pm
Location: Ansonia, CT
Name: Jim
Vehicle Year: 2003
Vehicle: Chevrolet TrailBlazer
DriveTrain: 4WD

by HARDTRAILZ » Wed Oct 13, 2010 8:43 am

Blask3 wrote:Looks good. Ever thought of selling bumpers?


He didnt build the bumper, just modified it quite micely. There are bumpers for sale out there if you search a bit.
I hate to advocate weird chemicals, alcohol, violence or insanity to anyone...but
they've always worked for me.
User avatar
HARDTRAILZ
Moderator
 
Posts: 6342
Joined: Sat Sep 12, 2009 1:49 am
Location: IN, Batesville
Name: Kyle
Vehicle Year: 2006
Vehicle: Chevrolet TrailBlazer
DriveTrain: 4WD w/ Aftermarket Locker
Rank: Extreme Offroader

Next

Return to Fab Work

cron