Offroad Trailblazers and Envoys

CBI Offroad Fab. - Rear Spare Carrier

Any special projects involving a decent amount of fab work (bumpers, sliders, roof racks, etc)

by Trail X » Tue Sep 08, 2009 1:18 am

Image
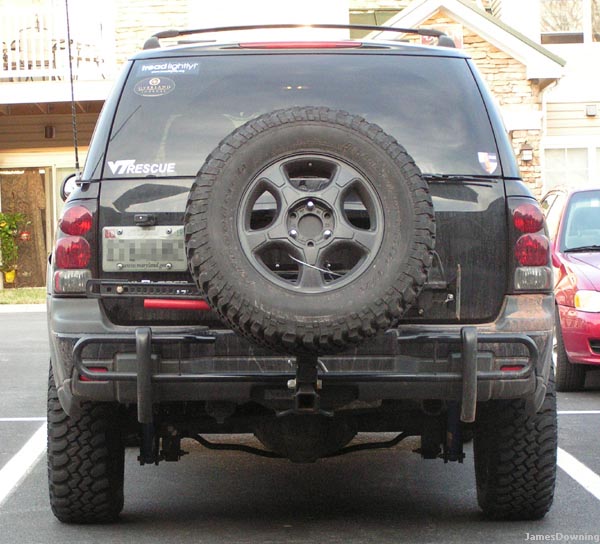
Teaser Pic! :woohoo:
---------------------------------------

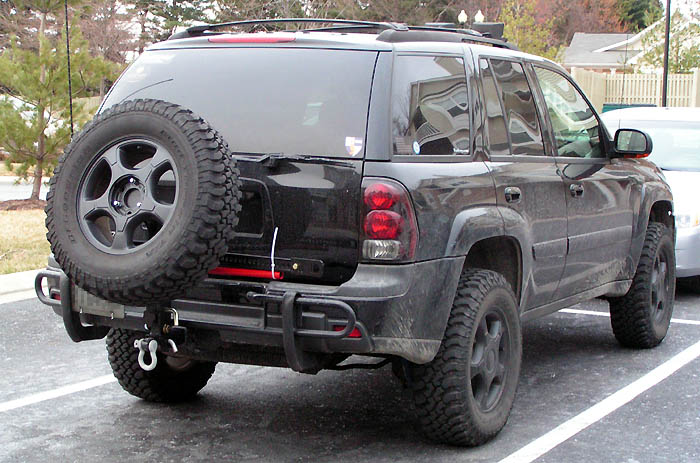
It was about time I had looked for a carrier for the full size spare. I was tired of carrying it around on the roof for two reasons. First, the weight and hassle of getting it up there. And second, the wind resistance... my gas mileage is noticeably lower with it on the roof. The hitch gate was one option, but while excellent, I feel its a bit bulky and expensive. If I was getting a custom bumper made, I would have gone the swing-out route. But I liked Alek G's custom job, as it was lightweight and simple.

I've been working with Steve at CBI Offroad for the past 4 months trying to work on a design that worked for the Trailblazer. He generally specializes in Toyotas, but was happy to work with me. I send him my desired dimensions, and key specifications, and he began working.

I had a few particular things I was looking for. First was a pass-through receiver, so that I can use a receiver shackle mount for the rear. Second was a hi-lift mount. I didn't want wobble, I wanted to be able to see out my rear view mirror, and I wanted to be able to open the glass without having to swing down the carrier. Lots of stipulations, I know. But Steve produced:

Image
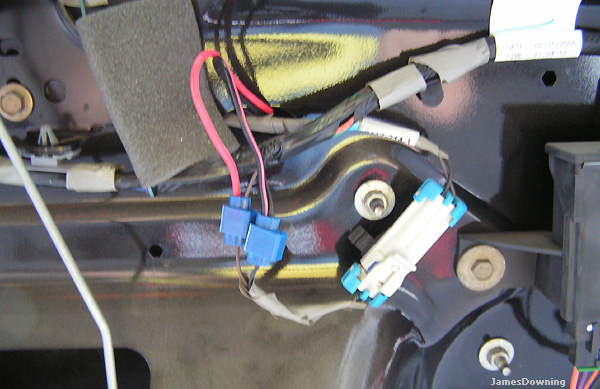
Note the pass thru receiver. Steve reinforced the central tube of the carrier to withstand recovery forces.


Image
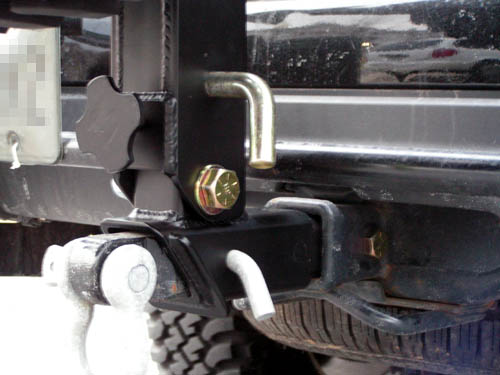
Instead of a hitch pin, the male end of the carrier is threaded. The bolts on either side are grade 8, and they take out all wiggle from that joint. Further back, you see the receiver tube. This is even cut at a angle to preserve the rear approach angle and act as a skid if necessary. Further up, you can see the tilt mechanism. This has a hand knob that allows you to tighten the carrier, and again get rid of rattles.


Image
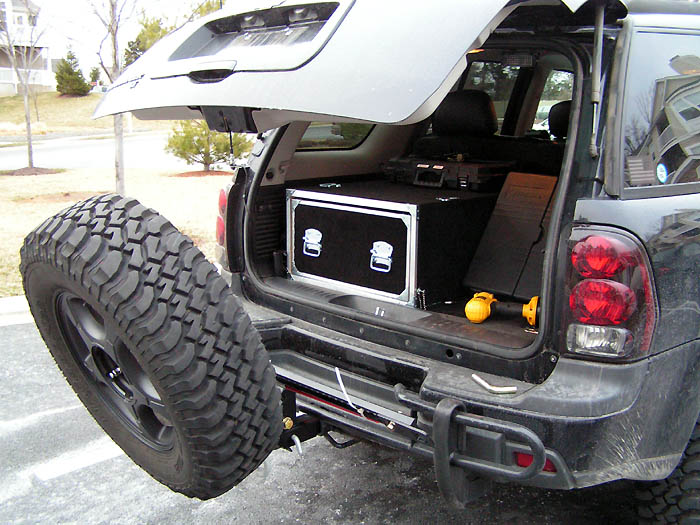
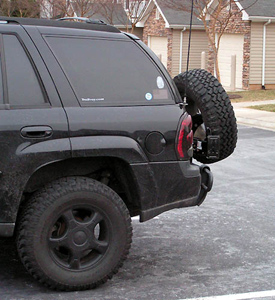
Use with the tire leaned back and the gate up. It's a bit of a tight squeeze to get into the trunk, but it's certainly workable.


Image
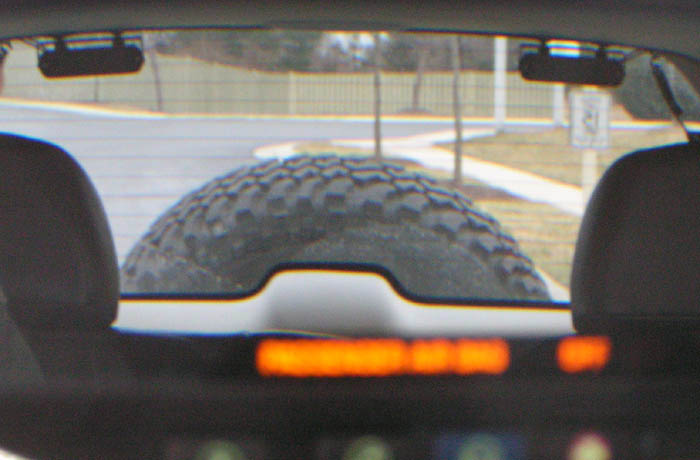
The view from the mirror. There's still lots of viewing room out the rear window.


Image
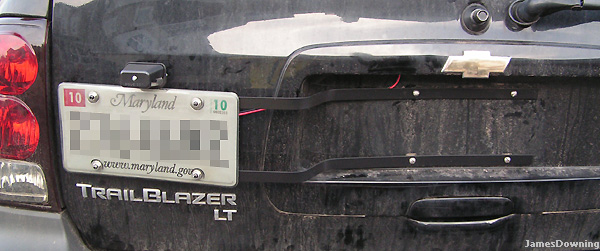
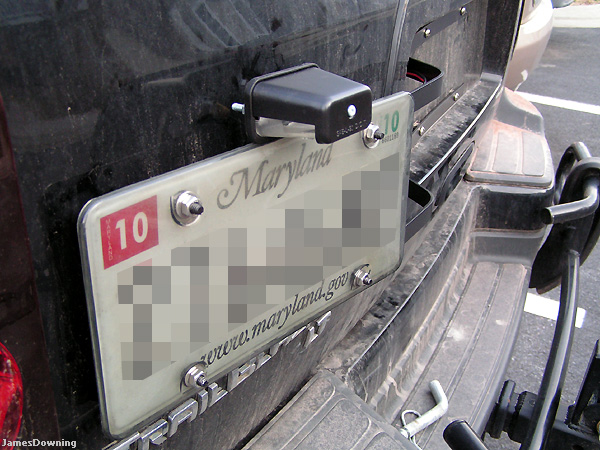
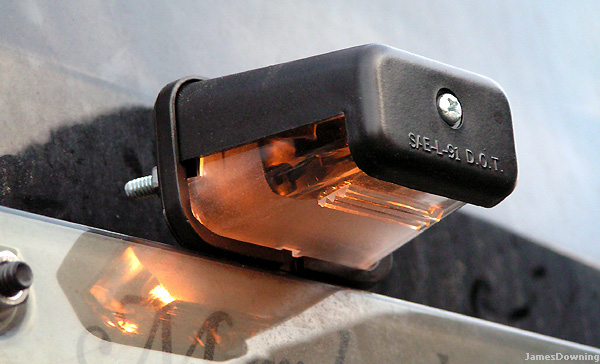
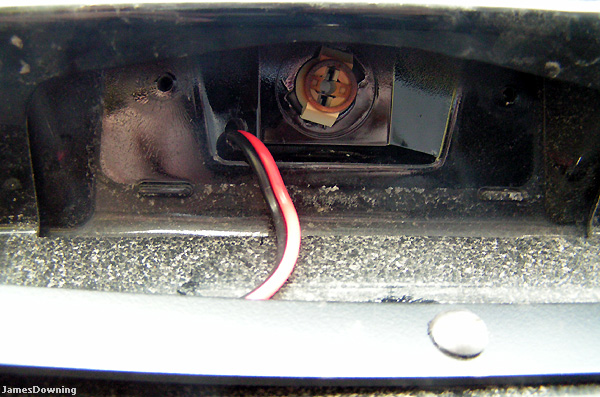
Ah yes, the license plate. This is a temporary solution for now. I plan on fabricating a bracket that throws the plate off to the side and relocates a light. But that's a project for another day.


Image
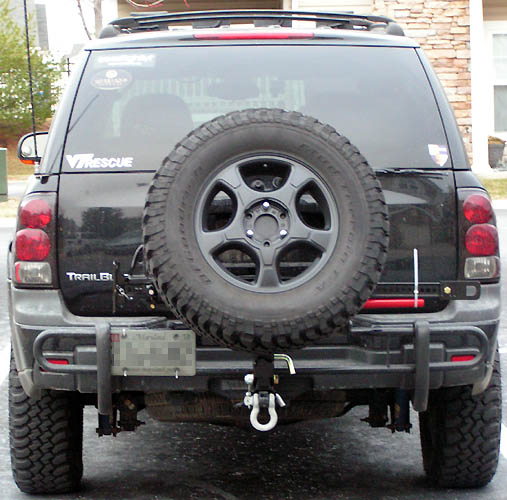
(Yeah, I was so excited to put it on, I completely forgot to remove the old spare... don't worry it's gone now... but so is the daylight. No more pictures today.)


Steve was great to deal with, as he understood my concerns and specifications, and delivered with a great product. I only have two gripes. One, is that I wish the carrier dropped down a bit more. Currently my shackle bracket interferes with the tightening knob. So, it can be lowered further if I take out the shackle bracket. Still, it cannot be lowered to a level point, which could be useful. The second gripe was shipping length. It was shipped by freight through Fastenal. I guess because I was anticipating the shipment, it seemed to take forever (two weeks). Hopefully it was just a fluke.


Overall I'm very pleased. If anyone is interested, Steve takes orders by e-mail (found on his website http://cbioffroadfab.com/) and then he makes them custom to your specifications. Plus, its a great value. I paid $320 with shipping included. Thanks again Steve for a great product and great customer service!
8-) Build Thread | ExPo Build | YouTube Videos
Not all who wander are lost. -Tolkien
User avatar
Trail X
Founder
 
Posts: 9935
Joined: Mon Sep 07, 2009 10:22 pm
Location: VA, Roanoke
Name: James Downing
Vehicle Year: 2005
Vehicle: Chevrolet TrailBlazer
DriveTrain: 4WD w/ Aftermarket Locker
Rank: Expedition Guide

by Trail X » Tue Sep 08, 2009 1:19 am

Well I finally got around to legalizing my license plate. I figured some of you may find this useful (Alek?)

Image
I think the new position looks better than before... plus it doesn't get in my way when accessing the rear.

Image
It mounts off the old license plate brackets and cantilevers to the side on two aluminum extrusions.


Image
The plate mounts to the two aluminum extrusions by bolt studs. The extrusions are bent so as to provide a spring force against the tailgate sheet metal.


Image
The light has a small bracket that attaches to the aluminum extrusion. It lights up!


Image
I had to take apart the inside of the gate in order to find the leads. Brown is power, black is ground. Seems to work well.


Image
The wires are fed through a hole I drilled next to the old LP lights. This hole is covered by the LP light covers. It should prevent most moisture/dust from entering the hole.

Now I just need to get some black zip ties to keep the wires hidden.

Project finished!
8-) Build Thread | ExPo Build | YouTube Videos
Not all who wander are lost. -Tolkien
User avatar
Trail X
Founder
 
Posts: 9935
Joined: Mon Sep 07, 2009 10:22 pm
Location: VA, Roanoke
Name: James Downing
Vehicle Year: 2005
Vehicle: Chevrolet TrailBlazer
DriveTrain: 4WD w/ Aftermarket Locker
Rank: Expedition Guide

by NeilageInc » Thu Sep 10, 2009 12:12 am

That is a great idea and everything but what about the guys that want the spare with them while the pull a trailer. You guys can give me feed back and let me know. I am going to build a rear bumper for these trucks and if your not partial to the spare being right in the middle, I can mount it off to one side and retail this idea. At the same time you would have your regular hitch.
NEILAGEINC.com
NeilageInc
Member
 
Posts: 84
Joined: Thu Sep 10, 2009 12:08 am
Location: CA, El Cajon
Name: Neil Talmadge
Vehicle Year: Other
Vehicle: Other Vehicle
DriveTrain: 4WD

by Trail X » Thu Sep 10, 2009 8:47 am

Actually... kinda hard to tell there, but the main tube actually has a receiver end on the bottom. So you can tow or use a receiver D-shackle with it attached.
8-) Build Thread | ExPo Build | YouTube Videos
Not all who wander are lost. -Tolkien
User avatar
Trail X
Founder
 
Posts: 9935
Joined: Mon Sep 07, 2009 10:22 pm
Location: VA, Roanoke
Name: James Downing
Vehicle Year: 2005
Vehicle: Chevrolet TrailBlazer
DriveTrain: 4WD w/ Aftermarket Locker
Rank: Expedition Guide

by Dizzlenator » Thu Sep 10, 2009 11:14 am

Unless Mario's guy can come through with a good carrier, then I may order one of these from Steve. I have gotten to see it up close and personal, and it's a great looking and functioning piece. And for the price, it's WELL worth it, IMO.

Also looking to get some ideas for my own rear bumper armor, like the Waag. Not sure where I want to go with that, and I won't even really think hard on it until after TECORE II.
04 TB LT Jacked Up
My Build Thread
User avatar
Dizzlenator
Off-Roader
 
Posts: 156
Joined: Wed Sep 09, 2009 6:22 pm
Location: Meriden CT
Vehicle Year: Other
Vehicle: Chevrolet TrailBlazer
DriveTrain: 4WD
Rank: Offroad Rated

by Gordinho80 » Thu Sep 10, 2009 11:19 am

My fab guy had to leave the country for a week to visit a sick family member... so I'm doubtful that mine will be ready by TECORE... I hope it is, though...

Once I have more information, I'll start my own thread...
Mario - Build Thread
User avatar
Gordinho80
Lifer
 
Posts: 2787
Joined: Tue Sep 08, 2009 9:27 am
Location: NJ, Jackson
Name: Mario Almeida
Vehicle Year: Other
Vehicle: Other Vehicle
DriveTrain: 4WD

by Dizzlenator » Thu Sep 10, 2009 4:07 pm

I'm with ya Mario...it's all good. I am just interested in how this comes out. Even if not done by TECORE, I'm still interested...wanna see it's functionality, etc. Already saw JD's...so if it is comparable, we'll see what happens...
04 TB LT Jacked Up
My Build Thread
User avatar
Dizzlenator
Off-Roader
 
Posts: 156
Joined: Wed Sep 09, 2009 6:22 pm
Location: Meriden CT
Vehicle Year: Other
Vehicle: Chevrolet TrailBlazer
DriveTrain: 4WD
Rank: Offroad Rated

by janesy86 » Thu Sep 24, 2009 12:00 pm

Gordinho80 wrote:My fab guy had to leave the country for a week to visit a sick family member... so I'm doubtful that mine will be ready by TECORE... I hope it is, though...

Once I have more information, I'll start my own thread...


Mario, any word from your guy recently? :poke:

I am looking to get one soon and actually just sent Steve an e-mail asking a few questions, so might just go thru him.

But just curious how yours is coming along... :angry whip:
Build Thread
Back to stock, had fun while it lasted...
janesy86
Veteran
 
Posts: 1291
Joined: Thu Sep 10, 2009 2:29 pm
Location: MA, Salem
Name: Nick Janes
Vehicle Year: 2007
Vehicle: Chevrolet TrailBlazer
DriveTrain: 4WD w/ G80
Rank: Offroad Rated

by Gordinho80 » Thu Sep 24, 2009 12:13 pm

Still no update from my fab guy. For the price, the CBI unit is incredible. I've seen it first hand and it is a great unit. Had my guy not started on one for me, I'd probably have the CBI unit by now too...
Mario - Build Thread
User avatar
Gordinho80
Lifer
 
Posts: 2787
Joined: Tue Sep 08, 2009 9:27 am
Location: NJ, Jackson
Name: Mario Almeida
Vehicle Year: Other
Vehicle: Other Vehicle
DriveTrain: 4WD

by janesy86 » Thu Sep 24, 2009 12:23 pm

Ok, cool. Yea I was just curious about yours anyway, but from what I can tell JD's is great, and def a good price for it. Just waiting to hear back from Steve and get it going so I can get my spare out of my cargo area and free up space... :coffee:
Build Thread
Back to stock, had fun while it lasted...
janesy86
Veteran
 
Posts: 1291
Joined: Thu Sep 10, 2009 2:29 pm
Location: MA, Salem
Name: Nick Janes
Vehicle Year: 2007
Vehicle: Chevrolet TrailBlazer
DriveTrain: 4WD w/ G80
Rank: Offroad Rated

by Gordinho80 » Thu Sep 24, 2009 12:30 pm

I don't know when I will be getting mine finished... but again, the CBI unit is VERY impressive... a real steal for just over $300 shipped...
Mario - Build Thread
User avatar
Gordinho80
Lifer
 
Posts: 2787
Joined: Tue Sep 08, 2009 9:27 am
Location: NJ, Jackson
Name: Mario Almeida
Vehicle Year: Other
Vehicle: Other Vehicle
DriveTrain: 4WD

by janesy86 » Tue Sep 29, 2009 11:50 am

Just got an email back from CBI:


Hello Nick, thanks for the interest in our product. We offer two version of the fold down tire carrier, the standard, which is a basic fold down carrier and is built to general specs and is $249.00 in bare metal. You can add a hi-lift mount and lighted license plate mount for $35.00. Then the deluxe, which is the fold down tire carrier and has a hi-lift mount and lighted license plate mount. It is also built to your specific specs for the most ground clearance and greatest departure angle. It is $349.00 in bare metal. Also either one can be fitted with a optional receiver, for $25.00, so you you can still tow if need be. They are shippable through any of the major shippers for actual shipping costs or we can ship it to the Fastenal store of your choice in the lower 48 states for $35.00. To find the closest store to you visit http://www.fastenal.com and click on store locator and enter your zip code. We do require a 50% non-refundable deposit on the product to get on the schedule and lead times vary depending on how many orders are on the books. Right now the lead time is 10 weeks.
Thank You,
Brant

CBI OffRoad Fab.
http://www.cbioffroadfab.com
info@cbioffroadfab.com
208-528-0664


So it is going to be more $$ than when JD got his but, I think I'm still going to get one started with them soon. I obviously need to give them some specs that I want... so JD I was just wondering what you told them. I did mention you in my email as I want one very similar to yours.

But after looking at your pics again I think I want to get the upright tube w/the tilt mechanism as close to the bumper as I can to get the tire a lil closer to th rear. I don't care if I cant open the glass with it not tilted as I nere open the glass anyway.

So what I'm asking is how much room do you have between the upright tube and the bumper? Did the rear bumper guard make it so its further from the bumper or was the main reason to be able to open the glass? :scratch:

Thanks in adavance.. :cheers:
Build Thread
Back to stock, had fun while it lasted...
janesy86
Veteran
 
Posts: 1291
Joined: Thu Sep 10, 2009 2:29 pm
Location: MA, Salem
Name: Nick Janes
Vehicle Year: 2007
Vehicle: Chevrolet TrailBlazer
DriveTrain: 4WD w/ G80
Rank: Offroad Rated

by Trail X » Tue Sep 29, 2009 1:58 pm

Well keep in mind I didn't get his LP holder... I made my own. So that may have contributed to a cheaper cost too.

Sounds like the difference between deluxe and non deluxe is if you get to spec your dimensions.

I had to leave room between the bumper and the vertical tube to accommodate the rear bumper guard... can't get rid of it because the wife was the one who bought it for me. (but it does provide a surprising amount of protection against rocks... works as a mini slider back there, kinda handy).

You can probably tuck yours a good 3" closer to the tail gate.

You definitely want to retain use of the glass... its not always convenient to lower the tire every time you need to grab something... really contemplate it.

I may be able to find some dimensions later, but not now, got to run to a meeting. :work:
8-) Build Thread | ExPo Build | YouTube Videos
Not all who wander are lost. -Tolkien
User avatar
Trail X
Founder
 
Posts: 9935
Joined: Mon Sep 07, 2009 10:22 pm
Location: VA, Roanoke
Name: James Downing
Vehicle Year: 2005
Vehicle: Chevrolet TrailBlazer
DriveTrain: 4WD w/ Aftermarket Locker
Rank: Expedition Guide

by Dizzlenator » Tue Sep 29, 2009 3:16 pm

Damn!! 10 weeks!?!? I guess I'll be ordering sooner than later. 3 months out, don't want to sit too long on this thing.
04 TB LT Jacked Up
My Build Thread
User avatar
Dizzlenator
Off-Roader
 
Posts: 156
Joined: Wed Sep 09, 2009 6:22 pm
Location: Meriden CT
Vehicle Year: Other
Vehicle: Chevrolet TrailBlazer
DriveTrain: 4WD
Rank: Offroad Rated

by janesy86 » Tue Sep 29, 2009 3:22 pm

Yea... thats what I'm sayin'. I'd like to put my order in really soon. :angry whip:
Build Thread
Back to stock, had fun while it lasted...
janesy86
Veteran
 
Posts: 1291
Joined: Thu Sep 10, 2009 2:29 pm
Location: MA, Salem
Name: Nick Janes
Vehicle Year: 2007
Vehicle: Chevrolet TrailBlazer
DriveTrain: 4WD w/ G80
Rank: Offroad Rated

by Trail X » Tue Sep 29, 2009 4:30 pm

Yeah, that's the way it is... but mainly because he sets aside like one week per couple months where all he does is drop down carriers... otherwise he is working on bigger items like bumpers or custom cages.

I beleive I put my order in early January, and received it sometime in March...
8-) Build Thread | ExPo Build | YouTube Videos
Not all who wander are lost. -Tolkien
User avatar
Trail X
Founder
 
Posts: 9935
Joined: Mon Sep 07, 2009 10:22 pm
Location: VA, Roanoke
Name: James Downing
Vehicle Year: 2005
Vehicle: Chevrolet TrailBlazer
DriveTrain: 4WD w/ Aftermarket Locker
Rank: Expedition Guide

by janesy86 » Tue Sep 29, 2009 4:52 pm

Yea, I mean it does sound bout right for a product of that caliber...

Another thing I forgot to ask: How much of a pain/effort is it to lower/raise?

I'm asking because now that I;m thinking about it, which is the reason I don't ever really open the glass, is because I use my TB for work (at a quarry) and I'm constantly getting samples of the product (5 gal. buckets) and put them in the rear.
So I'm trying to get the tire out of my rear and on a carrier so I have more room in there. But if its more of a hassle to do lower/raise I'll have to compromise. :scratch:

Ideally I'd like to have a swinging carrier so it would be easier, but I hate the look of the Hitchgate and how high it mounts the tire, but I suppose that could be modified as well... :wallbash:

Or just have a custom rear bumper!! :angry whip:
Build Thread
Back to stock, had fun while it lasted...
janesy86
Veteran
 
Posts: 1291
Joined: Thu Sep 10, 2009 2:29 pm
Location: MA, Salem
Name: Nick Janes
Vehicle Year: 2007
Vehicle: Chevrolet TrailBlazer
DriveTrain: 4WD w/ G80
Rank: Offroad Rated

by Trail X » Tue Sep 29, 2009 6:01 pm

Hmm... hard to really tell you by words...

It's not much effort... of course, you're kinda lifting a tire... so theres a little effort involved... just lean into it a bit - no problem. I'd say it's similar time-wise to a swing-out.

The biggest issue, which I remedied, is the pin that they use. They use a hitch pin with an annoying safety clip, like the one below... bad bad bad... takes forever to put that stupid clip on and off...

Image

However, there is a solution... get one of these guys with a "pivot lock" and it will make your life much more enjoyable.

Image
8-) Build Thread | ExPo Build | YouTube Videos
Not all who wander are lost. -Tolkien
User avatar
Trail X
Founder
 
Posts: 9935
Joined: Mon Sep 07, 2009 10:22 pm
Location: VA, Roanoke
Name: James Downing
Vehicle Year: 2005
Vehicle: Chevrolet TrailBlazer
DriveTrain: 4WD w/ Aftermarket Locker
Rank: Expedition Guide

by janesy86 » Tue Sep 29, 2009 6:24 pm

Thanks man. :cheers: And yea, I've seen those before, good idea.

I'll have to think about it before I put in an order. Or wait for something to come along.


Perhaps the bumper Neil was talking about... :poke: Haha.
Build Thread
Back to stock, had fun while it lasted...
janesy86
Veteran
 
Posts: 1291
Joined: Thu Sep 10, 2009 2:29 pm
Location: MA, Salem
Name: Nick Janes
Vehicle Year: 2007
Vehicle: Chevrolet TrailBlazer
DriveTrain: 4WD w/ G80
Rank: Offroad Rated

by Dizzlenator » Tue Sep 29, 2009 7:47 pm

I'll be putting my order in mid Oct, when I get my bonus installment, I think. 10 weeks, it'll be a Christmas present, like I thought before!! :excited:
04 TB LT Jacked Up
My Build Thread
User avatar
Dizzlenator
Off-Roader
 
Posts: 156
Joined: Wed Sep 09, 2009 6:22 pm
Location: Meriden CT
Vehicle Year: Other
Vehicle: Chevrolet TrailBlazer
DriveTrain: 4WD
Rank: Offroad Rated

Next

Return to Fab Work