Getting my ducks in a row
I rent the tool from Autozone. Seems like Regulator had a trick for it though. Maybe he'd respond to a PM.
It's not how fast you go. It's how quick you get there. Lifted TBSS Build
-

ErikSS - Lifer
- Posts: 2044
- Joined: Fri Apr 26, 2013 5:23 pm
- Location: IL, Flossmoor
- Name: Erik
- Vehicle Year: 2008
- Vehicle: Chevrolet TrailBlazer
- DriveTrain: 4WD w/ Limited Slip
- Rank: Offroad Rated
Shdwdrgn wrote:ok progress is disappointingly slow... however I have the disconnect out on the bench and almost disassembled. HOW do I get the outside seal out? I punched the bearing from inside and have it flopping against the seal, but I can't get the seal to budge.
Also, I read I'm supposed to remove the center axle from the disconnect side of the oil pan, but it doesn't seem to want to move, and I have no idea how I would grab ahold of it except with my fingertips...
take out those 4 bolts and then get a chain and hook it to the fan somehow and UN screw that big nut and the whole fan and shroud come out togetherShdwdrgn wrote:I'm trying to follow Regulator's suggestion for pulling the diff up through the engine compartment... Everything is loose on the bottom end (finally got the half-shaft out, and the diff is unbolted and popped loose from the pan)... HOW do you pull out the fan? I see four bolts on the pulley, and four bolts holding the blade to the fan clutch... but I don't see how the fan actually comes out?
-

Moots1288 - Veteran
- Posts: 1964
- Joined: Fri Feb 24, 2012 8:42 pm
- Location: Long island
- Name: Moots
- Vehicle Year: 2006
- Vehicle: GMC Envoy
- DriveTrain: 4WD
- Rank: Offroad Rated
I replace one of the 4 bolts with a longer one threaded through a chain. Then take the chain to the drivers side control arm and wrap it and bolt the chain to itself snug. Then it is just a matter of getting a big wrench to break the fan from the water pump. The fan and shroud will lift out in one piece.
Twenty years from now you will be more disappointed by the things that you didn’t do than by the ones you did do.
So throw off the bowlines. Sail away from the safe harbor. Catch the trade winds in your sails. Explore. Dream. Discover.
- Mark Twain
--Build--
So throw off the bowlines. Sail away from the safe harbor. Catch the trade winds in your sails. Explore. Dream. Discover.
- Mark Twain
--Build--
-

Regulator1175 - Veteran
- Posts: 1048
- Joined: Wed Mar 17, 2010 3:48 pm
- Location: IN, Warsaw
- Name: Matthew McClelland
- Vehicle Year: 2002
- Vehicle: GMC Envoy
- DriveTrain: 4WD w/ G80
- Rank: Extreme Offroader
When you say UNscrew, you mean the regular way, right? Its not a left-hand thread?
Of course my crescent wrench only opens up to about 33mm... just shy of this stupid thing.
Of course my crescent wrench only opens up to about 33mm... just shy of this stupid thing.
GT5/G80, 265/70-16, PCMforLess + personal tuning, quad headlights
Self-made steel front bumper / pushbar / skid / CAI / lightbar
Self-made steel front bumper / pushbar / skid / CAI / lightbar
- Shdwdrgn
- Contributing Author
- Posts: 436
- Joined: Wed Dec 07, 2011 4:04 pm
- Location: CO, Longmont
- Name: Jeff Taylor
- Vehicle Year: 2004
- Vehicle: Chevrolet TrailBlazer
- DriveTrain: 4WD w/ G80
Yes, it is a standard thread.
Twenty years from now you will be more disappointed by the things that you didn’t do than by the ones you did do.
So throw off the bowlines. Sail away from the safe harbor. Catch the trade winds in your sails. Explore. Dream. Discover.
- Mark Twain
--Build--
So throw off the bowlines. Sail away from the safe harbor. Catch the trade winds in your sails. Explore. Dream. Discover.
- Mark Twain
--Build--
-
Regulator1175 - Veteran
- Posts: 1048
- Joined: Wed Mar 17, 2010 3:48 pm
- Location: IN, Warsaw
- Name: Matthew McClelland
- Vehicle Year: 2002
- Vehicle: GMC Envoy
- DriveTrain: 4WD w/ G80
- Rank: Extreme Offroader
Ugh, must be really stuck on good. Also still trying to figure out how you get to all the bolts on the alternator (looks like there are 6?), and then I have to figure out how to get the AC pump. I don't have any tools to unhook the AC... sure hoping it will move far enough.
Does the part of the fan shroud bolted to the radiator also have to come out, or did you just remove the fan blade portion?
Does the part of the fan shroud bolted to the radiator also have to come out, or did you just remove the fan blade portion?
GT5/G80, 265/70-16, PCMforLess + personal tuning, quad headlights
Self-made steel front bumper / pushbar / skid / CAI / lightbar
Self-made steel front bumper / pushbar / skid / CAI / lightbar
- Shdwdrgn
- Contributing Author
- Posts: 436
- Joined: Wed Dec 07, 2011 4:04 pm
- Location: CO, Longmont
- Name: Jeff Taylor
- Vehicle Year: 2004
- Vehicle: Chevrolet TrailBlazer
- DriveTrain: 4WD w/ G80
In regards to the fan, usually if you put your wrench on that big nut, and give it a good smack to break if free, it will pretty much spin right off. And same thing when you put it back on, after its snug, give it a smack to lock it down.
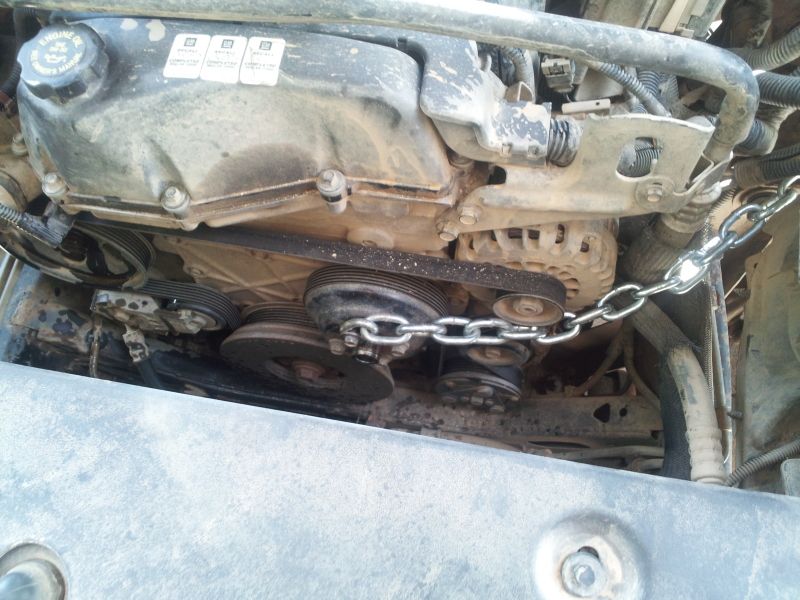
My motor has a lifting point similar to this one built in. I know Dirty Bacon just runs the chain to here. I've done the same on my truck. If you dont have chain readily available, you can back out 2 bolts on the fan pulley and wedge a screw driver between them to hold the pulley. It works, but can be a PITA. The chain is definatly easier.
My motor has a lifting point similar to this one built in. I know Dirty Bacon just runs the chain to here. I've done the same on my truck. If you dont have chain readily available, you can back out 2 bolts on the fan pulley and wedge a screw driver between them to hold the pulley. It works, but can be a PITA. The chain is definatly easier.
 Viewed 11169 times")
Chevy Power!
Long live the Republic
"Violence is not always evil. The judicious use of violence and those willing to use it without hesitation is often all that stands between wolves and sheep."
Build Thread
Long live the Republic
"Violence is not always evil. The judicious use of violence and those willing to use it without hesitation is often all that stands between wolves and sheep."
Build Thread
-

dvanbramer88 - Lifer
- Posts: 2283
- Joined: Tue Jul 05, 2011 3:12 pm
- Location: PA, Bristol
- Name: Dave
- Vehicle Year: 2002
- Vehicle: Chevrolet TrailBlazer
- DriveTrain: 4WD
- Rank: Trail Ready
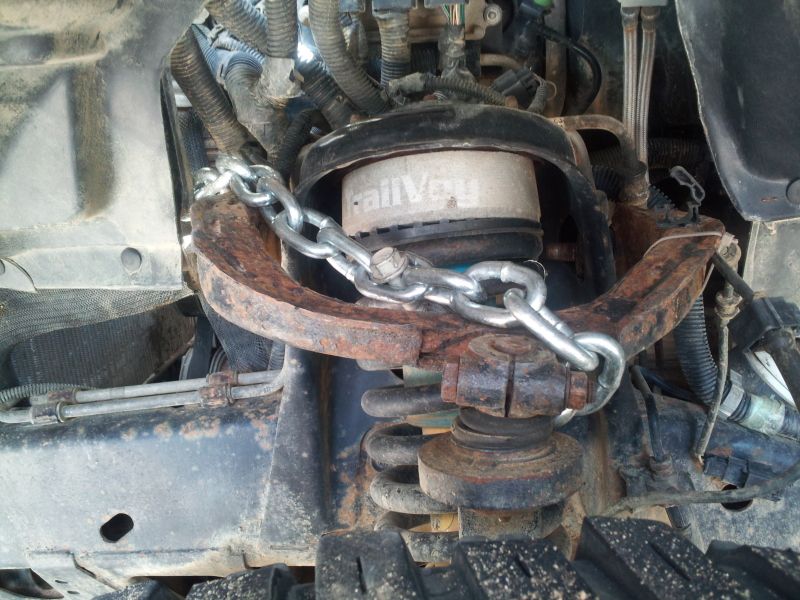
Oh I have the chain, I tied it to the lower frame, I just can't get the nut to budge.
GT5/G80, 265/70-16, PCMforLess + personal tuning, quad headlights
Self-made steel front bumper / pushbar / skid / CAI / lightbar
Self-made steel front bumper / pushbar / skid / CAI / lightbar
- Shdwdrgn
- Contributing Author
- Posts: 436
- Joined: Wed Dec 07, 2011 4:04 pm
- Location: CO, Longmont
- Name: Jeff Taylor
- Vehicle Year: 2004
- Vehicle: Chevrolet TrailBlazer
- DriveTrain: 4WD w/ G80
Can you put a pipe on the end of your wrench? OR my other advice would be BIGGER HAMMER!
IME, that nut will usually break free with a good smack. But if a good smack doesn't do it, try a big pipe on your wrench.
IME, that nut will usually break free with a good smack. But if a good smack doesn't do it, try a big pipe on your wrench.
Chevy Power!
Long live the Republic
"Violence is not always evil. The judicious use of violence and those willing to use it without hesitation is often all that stands between wolves and sheep."
Build Thread
Long live the Republic
"Violence is not always evil. The judicious use of violence and those willing to use it without hesitation is often all that stands between wolves and sheep."
Build Thread
-
dvanbramer88 - Lifer
- Posts: 2283
- Joined: Tue Jul 05, 2011 3:12 pm
- Location: PA, Bristol
- Name: Dave
- Vehicle Year: 2002
- Vehicle: Chevrolet TrailBlazer
- DriveTrain: 4WD
- Rank: Trail Ready
That's my problem, I don't have a crescent wrench big enough to get on it. The only thing I have that fits is some slip-joint pliers.
GT5/G80, 265/70-16, PCMforLess + personal tuning, quad headlights
Self-made steel front bumper / pushbar / skid / CAI / lightbar
Self-made steel front bumper / pushbar / skid / CAI / lightbar
- Shdwdrgn
- Contributing Author
- Posts: 436
- Joined: Wed Dec 07, 2011 4:04 pm
- Location: CO, Longmont
- Name: Jeff Taylor
- Vehicle Year: 2004
- Vehicle: Chevrolet TrailBlazer
- DriveTrain: 4WD w/ G80
Shdwdrgn wrote:When you say UNscrew, you mean the regular way, right? Its not a left-hand thread?
Of course my crescent wrench only opens up to about 33mm... just shy of this stupid thing.
You got grinder? Take off some steel, now you got tool for the next time.
2008 TB Radflo coil overs, Z71 rear springs, 2" spacer, skyjacker N8030 shocks, LT285/75R16E Goodyear MTR
My Build ----- MY Youtube Channel
My Build ----- MY Youtube Channel
-

TBYODA - Moderator
- Posts: 1762
- Joined: Mon Apr 01, 2013 9:07 pm
- Location: NY, Rochester
- Name: Robert Sengillo
- Vehicle Year: 2008
- Vehicle: Chevrolet TrailBlazer
- DriveTrain: 4WD w/ Limited Slip
- Rank: Offroad Rated
Shdwdrgn wrote:That's my problem, I don't have a crescent wrench big enough to get on it. The only thing I have that fits is some slip-joint pliers.
What about a pipe wrench? If you can figure out the size you might be able to rent the socket from Autozone.
And don't you dare grind either the tool or the bolt. haha
It's not how fast you go. It's how quick you get there. Lifted TBSS Build
-
ErikSS - Lifer
- Posts: 2044
- Joined: Fri Apr 26, 2013 5:23 pm
- Location: IL, Flossmoor
- Name: Erik
- Vehicle Year: 2008
- Vehicle: Chevrolet TrailBlazer
- DriveTrain: 4WD w/ Limited Slip
- Rank: Offroad Rated
Shdwdrgn wrote:That's my problem, I don't have a crescent wrench big enough to get on it. The only thing I have that fits is some slip-joint pliers.
I see. This is definatly one of those situations where there is a right tool for the job.
ErikSS wrote:
What about a pipe wrench?
That should work.
ErikSS wrote:
If you can figure out the size you might be able to rent the socket from Autozone.
Good luck trying to put a socket on that nut... This is an open wrench only situation.
Chevy Power!
Long live the Republic
"Violence is not always evil. The judicious use of violence and those willing to use it without hesitation is often all that stands between wolves and sheep."
Build Thread
Long live the Republic
"Violence is not always evil. The judicious use of violence and those willing to use it without hesitation is often all that stands between wolves and sheep."
Build Thread
-
dvanbramer88 - Lifer
- Posts: 2283
- Joined: Tue Jul 05, 2011 3:12 pm
- Location: PA, Bristol
- Name: Dave
- Vehicle Year: 2002
- Vehicle: Chevrolet TrailBlazer
- DriveTrain: 4WD
- Rank: Trail Ready
Yes, it is certainly a right tool for the job kind of thing. 1 1/2" box wrench and a 10 lb sledge.

Twenty years from now you will be more disappointed by the things that you didn’t do than by the ones you did do.
So throw off the bowlines. Sail away from the safe harbor. Catch the trade winds in your sails. Explore. Dream. Discover.
- Mark Twain
--Build--
So throw off the bowlines. Sail away from the safe harbor. Catch the trade winds in your sails. Explore. Dream. Discover.
- Mark Twain
--Build--
-
Regulator1175 - Veteran
- Posts: 1048
- Joined: Wed Mar 17, 2010 3:48 pm
- Location: IN, Warsaw
- Name: Matthew McClelland
- Vehicle Year: 2002
- Vehicle: GMC Envoy
- DriveTrain: 4WD w/ G80
- Rank: Extreme Offroader
10 POUND??? Eesh it better not take THAT much force. Problem is, everyone is closed by now. I already bought an 18MM socket and a 35MM axle socket today. Stupid metric. Guess I'm done for tonight, and no way to get to work tomorrow.
Even removing the fan, alternator, and AC, I'm still not seeing how you had enough room to fish the diff up through there. Must have been a tight squeeze! And you say you can do this whole job in 3 hours now? I've put in almost 10 hours today, and still can't get the old diff out of the vehicle.
Even removing the fan, alternator, and AC, I'm still not seeing how you had enough room to fish the diff up through there. Must have been a tight squeeze! And you say you can do this whole job in 3 hours now? I've put in almost 10 hours today, and still can't get the old diff out of the vehicle.
GT5/G80, 265/70-16, PCMforLess + personal tuning, quad headlights
Self-made steel front bumper / pushbar / skid / CAI / lightbar
Self-made steel front bumper / pushbar / skid / CAI / lightbar
- Shdwdrgn
- Contributing Author
- Posts: 436
- Joined: Wed Dec 07, 2011 4:04 pm
- Location: CO, Longmont
- Name: Jeff Taylor
- Vehicle Year: 2004
- Vehicle: Chevrolet TrailBlazer
- DriveTrain: 4WD w/ G80
You'll probably be alright with a 2 or 3 pound hammer. I've been able to accomplish most jobs with the 2lb hammer i keep in my tool bag.
And in all fairness, Jeff, you definatly get bonus points for simply attempting this. A big percentage of people out there don't wrench on their own vehicles, let alone attempt and axle swap and a diff swap as part of a re-gear. The first time for someone doing a new job can be slow. But once you have more experience with your vehicle things will always go faster in the future. Little things like remembering what size bolts are and what socket/extension combination works best for a particular bolt shaves time off the job. On repeat attempts you'll spend less time trying/guessing and more time turning the wrenches.
So for all your work and progress today
Chevy Power!
Long live the Republic
"Violence is not always evil. The judicious use of violence and those willing to use it without hesitation is often all that stands between wolves and sheep."
Build Thread
Long live the Republic
"Violence is not always evil. The judicious use of violence and those willing to use it without hesitation is often all that stands between wolves and sheep."
Build Thread
-
dvanbramer88 - Lifer
- Posts: 2283
- Joined: Tue Jul 05, 2011 3:12 pm
- Location: PA, Bristol
- Name: Dave
- Vehicle Year: 2002
- Vehicle: Chevrolet TrailBlazer
- DriveTrain: 4WD
- Rank: Trail Ready
I have done it a couple times, so there isn't that much of a learning curve for me. Plus having had everything off, then putting the bolts back in with anti seize helps in tearing it down in the future. Good luck, sorry to hear you are having so many struggles.
Twenty years from now you will be more disappointed by the things that you didn’t do than by the ones you did do.
So throw off the bowlines. Sail away from the safe harbor. Catch the trade winds in your sails. Explore. Dream. Discover.
- Mark Twain
--Build--
So throw off the bowlines. Sail away from the safe harbor. Catch the trade winds in your sails. Explore. Dream. Discover.
- Mark Twain
--Build--
-
Regulator1175 - Veteran
- Posts: 1048
- Joined: Wed Mar 17, 2010 3:48 pm
- Location: IN, Warsaw
- Name: Matthew McClelland
- Vehicle Year: 2002
- Vehicle: GMC Envoy
- DriveTrain: 4WD w/ G80
- Rank: Extreme Offroader
Today I really miss my old '74 Pontiac. Everything was easier to get to, and I didn't need any special tools for anything. Then again, it also wasn't 4WD.
I'm not having much problem guessing bolt sizes. The biggest issue is there's a lot of really large bolt heads in sizes I don't have. If I decide to go the alternate route and pull out the steering, I need to get at least a 21mm socket to be able to pull off that bracket that runs across the frame underneath the steering. I have no idea what else will be required beyond that, but I'm starting to think that route might be easier that trying to get all this crap off the side of the engine.
Oh, by the way... when I go to put the axles back together, what do you do to get those C-clips to snap back in again? I noticed there seems to be some sort of slider inside the CV boots... do you just use that with the weight of the axle as a ram to snap it back in place?
GT5/G80, 265/70-16, PCMforLess + personal tuning, quad headlights
Self-made steel front bumper / pushbar / skid / CAI / lightbar
Self-made steel front bumper / pushbar / skid / CAI / lightbar
- Shdwdrgn
- Contributing Author
- Posts: 436
- Joined: Wed Dec 07, 2011 4:04 pm
- Location: CO, Longmont
- Name: Jeff Taylor
- Vehicle Year: 2004
- Vehicle: Chevrolet TrailBlazer
- DriveTrain: 4WD w/ G80
You can try and align the CV as straight as possible and hit the hub end with a hammer. I found it difficult to get that to work.
I have been successful with putting a large flat blade screw driver in this groove, and hitting the screw driver with a hammer.
Another tip would be to use a little grease on the c-clip to help it stay centered on the shaft.
I have been successful with putting a large flat blade screw driver in this groove, and hitting the screw driver with a hammer.
- 601345-01.jpg (19.16 KiB) Viewed 11144 times
Another tip would be to use a little grease on the c-clip to help it stay centered on the shaft.
Chevy Power!
Long live the Republic
"Violence is not always evil. The judicious use of violence and those willing to use it without hesitation is often all that stands between wolves and sheep."
Build Thread
Long live the Republic
"Violence is not always evil. The judicious use of violence and those willing to use it without hesitation is often all that stands between wolves and sheep."
Build Thread
-
dvanbramer88 - Lifer
- Posts: 2283
- Joined: Tue Jul 05, 2011 3:12 pm
- Location: PA, Bristol
- Name: Dave
- Vehicle Year: 2002
- Vehicle: Chevrolet TrailBlazer
- DriveTrain: 4WD
- Rank: Trail Ready
All right, back to the grind... I think I'm going to abandon the engine route and try to get in through the steering rack today. Anything I should know about removing any of those frame brackets or the steering rack? Anything I need to do to keep the steering in alignment when I pull it apart, or will everything stay self-contained?
GT5/G80, 265/70-16, PCMforLess + personal tuning, quad headlights
Self-made steel front bumper / pushbar / skid / CAI / lightbar
Self-made steel front bumper / pushbar / skid / CAI / lightbar
- Shdwdrgn
- Contributing Author
- Posts: 436
- Joined: Wed Dec 07, 2011 4:04 pm
- Location: CO, Longmont
- Name: Jeff Taylor
- Vehicle Year: 2004
- Vehicle: Chevrolet TrailBlazer
- DriveTrain: 4WD w/ G80