I have a odd feeling that there isn't much broken in mine when I pull it apart.
Sent from my LG-P925 using Tapatalk
Broke Splined Disconnect Housing
52 posts
• Page 3 of 3 • 1, 2, 3
- Nakashige
- Vendor
- Posts: 832
- Joined: Sat May 21, 2011 12:00 pm
- Location: MA, Worcester
- Name: Ben Caesar
- Vehicle Year: 2003
- Vehicle: Chevrolet TrailBlazer
- DriveTrain: 4WD
This happened to me tonight, I don't think my prybar has landed yet. I thought it was bad when one of the actuator bolts broke....My handgun money is going to a new disconnect assy.


- nickgutnick
- Newbie
- Posts: 3
- Joined: Fri Dec 04, 2009 11:35 pm
- Name: Nick
- Vehicle Year: 2002
- Vehicle: Chevrolet TrailBlazer
- DriveTrain: 4WD
Sorry to hear man, best of luck if you haven't gotten the rest out yet.
build thread
All things in moderation, including moderation.
Some people never go crazy... what truly horrible lives they must lead
All things in moderation, including moderation.
Some people never go crazy... what truly horrible lives they must lead
-

v7guy - Moderator
- Posts: 3712
- Joined: Wed Mar 09, 2011 10:17 pm
- Location: NY, long island
- Name: Jason
- Vehicle Year: 2004
- Vehicle: Chevrolet TrailBlazer
- DriveTrain: 4WD
- Rank: Offroad Rated
I'm just going to throw this out there so people stop breaking $500 housings. To rebuild the splined disconnector with the least amount of risk, Leave the inner housing on the truck. You won't be able to replace the inner most bearing or inner oil seal, but that should be fine in most situations. WE just rebuilt Josh's disco with the help of MDB. Remove the module. Remove all the bolts from the housing and separate the halves. Leaving the inner housing on the truck and removing the CV and Outer housing as a whole. Put the outer housing in a bench vise by the stronger "bell shaped" section and use a large drift pin to remove the CV. Replace the outer and middle bearings and the outer oil seal. Re-grease like JD's thread shows and put the outer housing back on the truck. Re-install CV. Use a pry bar or large screw driver to put pressure on the inner most tri-pot of the CV, Strike with large hammer and the clip will pop in surprisingly easy.
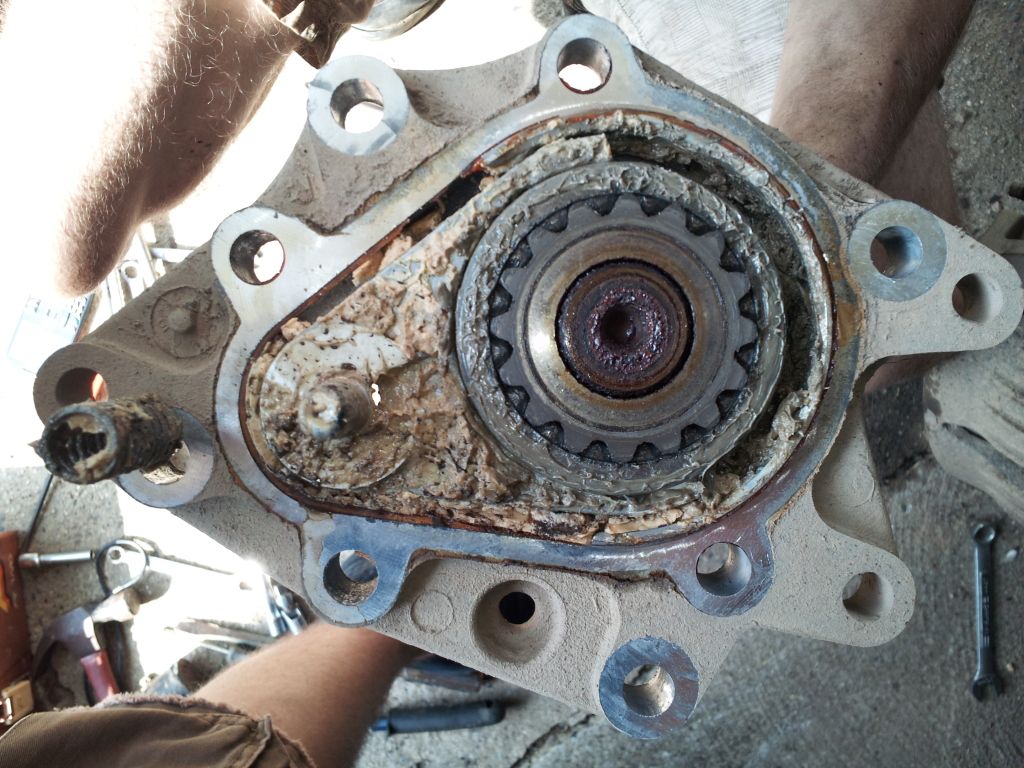
fresh off the truck. The condition of the grease and the rust on the end of the CV indicates water got into the housing.
Notice inner housing on the truck. I just pulled the gear and washer off, degreased, re-greased inner housing and gear/washer and put them back.
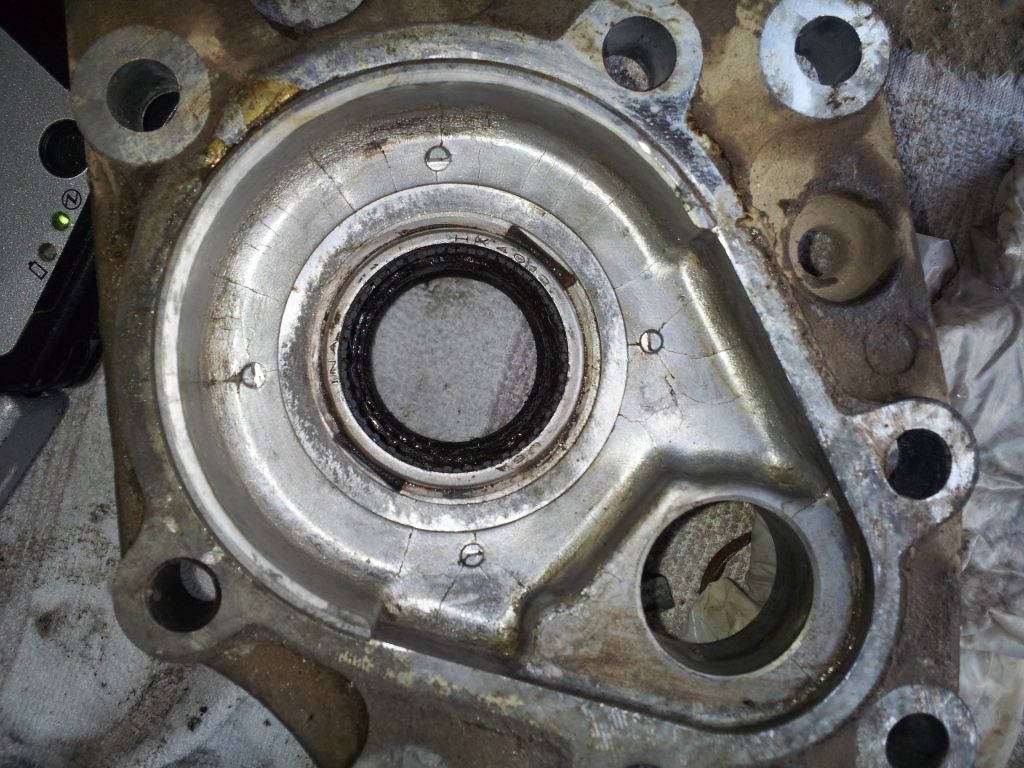
cleaned up outer housing.
If anyone wants more details, just ask
fresh off the truck. The condition of the grease and the rust on the end of the CV indicates water got into the housing.
Notice inner housing on the truck. I just pulled the gear and washer off, degreased, re-greased inner housing and gear/washer and put them back.
cleaned up outer housing.
If anyone wants more details, just ask
Chevy Power!
Long live the Republic
"Violence is not always evil. The judicious use of violence and those willing to use it without hesitation is often all that stands between wolves and sheep."
Build Thread
Long live the Republic
"Violence is not always evil. The judicious use of violence and those willing to use it without hesitation is often all that stands between wolves and sheep."
Build Thread
-

dvanbramer88 - Lifer
- Posts: 2283
- Joined: Tue Jul 05, 2011 3:12 pm
- Location: PA, Bristol
- Name: Dave
- Vehicle Year: 2002
- Vehicle: Chevrolet TrailBlazer
- DriveTrain: 4WD
- Rank: Trail Ready
Three things.
Your grease looks pretty good. What was the reason for your rebuild? Normally extreme wear ends up turning the grease totally black.
You suggest using a screw driver to pop the tripod housing back into the assembly. Where do you put your screwdriver head? I don't recall any location on the tripod housing that would allow this.
On your last image, the 4 nubs in the aluminum housing are ground down. That might pose a problem for the assembly in the future. One potential fix is to drill a blind hole, run a screw into the hole, and grind off the head in order to simulate a new nub. Grinding might be difficult though, without a dremmel.
-

Trail X - Founder
- Posts: 9935
- Joined: Mon Sep 07, 2009 10:22 pm
- Location: VA, Roanoke
- Name: James Downing
- Vehicle Year: 2005
- Vehicle: Chevrolet TrailBlazer
- DriveTrain: 4WD w/ Aftermarket Locker
- Rank: Expedition Guide
JamesDowning wrote:Three things.
Your grease looks pretty good. What was the reason for your rebuild? Normally extreme wear ends up turning the grease totally black.
You suggest using a screw driver to pop the tripod housing back into the assembly. Where do you put your screwdriver head? I don't recall any location on the tripod housing that would allow this.
On your last image, the 4 nubs in the aluminum housing are ground down. That might pose a problem for the assembly in the future. One potential fix is to drill a blind hole, run a screw into the hole, and grind off the head in order to simulate a new nub. Grinding might be difficult though, without a dremmel.
The four wheel drive stopped working. The diagnoses flow chart pointed to disconector. We rebuilt it half to fix it and half maintenance. The outer bearing was dust and the middle was pretty bad and rusted too. It needed to be done. Also, the grease was hard and chunky.
The large aluminum "drum" piece that goes against the disconector on the CV. There are those small ridges on the 3 "sides" of it. You can get a flat blade to catch the ridge and tap with a hammer. I spent an hour beating the end of the CV and nothing was working. My neighbor suggested using a screw driver against that ridge and it popped right in second hit.
http://www.cardone.com/Imagesftp/60/601345-01.jpg
The middle image of the CV, see the ridges on the aluminum piece?
The 4 nubs are ground down. They still caught the thrust washer a little bit. We confirmed the four wheel drive to be functioning properly and to be reliable since then. I'll worry about it when it needs to be worried about. In the mean time, I'm keeping my eyes peeled for a TB in the junk yard and hoping to score a good housing/fork/gears for spares.
Chevy Power!
Long live the Republic
"Violence is not always evil. The judicious use of violence and those willing to use it without hesitation is often all that stands between wolves and sheep."
Build Thread
Long live the Republic
"Violence is not always evil. The judicious use of violence and those willing to use it without hesitation is often all that stands between wolves and sheep."
Build Thread
-
dvanbramer88 - Lifer
- Posts: 2283
- Joined: Tue Jul 05, 2011 3:12 pm
- Location: PA, Bristol
- Name: Dave
- Vehicle Year: 2002
- Vehicle: Chevrolet TrailBlazer
- DriveTrain: 4WD
- Rank: Trail Ready
dvanbramer88 wrote:The large aluminum "drum" piece that goes against the disconector on the CV. There are those small ridges on the 3 "sides" of it. You can get a flat blade to catch the ridge and tap with a hammer. I spent an hour beating the end of the CV and nothing was working. My neighbor suggested using a screw driver against that ridge and it popped right in second hit.
http://www.cardone.com/Imagesftp/60/601345-01.jpg
The middle image of the CV, see the ridges on the aluminum piece?
Thanks, that looks like good advice. I had not tried that method, and it sounds much better mechanically than hammering through the CV joint.
-
Trail X - Founder
- Posts: 9935
- Joined: Mon Sep 07, 2009 10:22 pm
- Location: VA, Roanoke
- Name: James Downing
- Vehicle Year: 2005
- Vehicle: Chevrolet TrailBlazer
- DriveTrain: 4WD w/ Aftermarket Locker
- Rank: Expedition Guide
No problem. I went to my neighbor's shop to borrow a BFH because mine wasn't doing it. He grabbed a CV out of his trash pile and showed me where to hit it instead. My biggest problem was that if the CV isn't perfectly in line, when you hit it, the joint takes up most, if not all of the hit. Using this method, the position of the CV doesn't matter, and a lot less force is required.
Chevy Power!
Long live the Republic
"Violence is not always evil. The judicious use of violence and those willing to use it without hesitation is often all that stands between wolves and sheep."
Build Thread
Long live the Republic
"Violence is not always evil. The judicious use of violence and those willing to use it without hesitation is often all that stands between wolves and sheep."
Build Thread
-
dvanbramer88 - Lifer
- Posts: 2283
- Joined: Tue Jul 05, 2011 3:12 pm
- Location: PA, Bristol
- Name: Dave
- Vehicle Year: 2002
- Vehicle: Chevrolet TrailBlazer
- DriveTrain: 4WD
- Rank: Trail Ready
dvanbramer88 wrote:No problem. I went to my neighbor's shop to borrow a BFH because mine wasn't doing it. He grabbed a CV out of his trash pile and showed me where to hit it instead. My biggest problem was that if the CV isn't perfectly in line, when you hit it, the joint takes up most, if not all of the hit. Using this method, the position of the CV doesn't matter, and a lot less force is required.
I can see how it would make things easier. Because I don't like the idea of hammering through the CV, I've always used the tripod joint as a make-shift slide hammer. It takes a lot of effort though.
-
Trail X - Founder
- Posts: 9935
- Joined: Mon Sep 07, 2009 10:22 pm
- Location: VA, Roanoke
- Name: James Downing
- Vehicle Year: 2005
- Vehicle: Chevrolet TrailBlazer
- DriveTrain: 4WD w/ Aftermarket Locker
- Rank: Expedition Guide
I was hesitant to really lay into the end of the CV as well. I don't like the idea of what i could be forcing where. You could also be displacing grease and stuff too by putting forces through the shaft like that.
Chevy Power!
Long live the Republic
"Violence is not always evil. The judicious use of violence and those willing to use it without hesitation is often all that stands between wolves and sheep."
Build Thread
Long live the Republic
"Violence is not always evil. The judicious use of violence and those willing to use it without hesitation is often all that stands between wolves and sheep."
Build Thread
-
dvanbramer88 - Lifer
- Posts: 2283
- Joined: Tue Jul 05, 2011 3:12 pm
- Location: PA, Bristol
- Name: Dave
- Vehicle Year: 2002
- Vehicle: Chevrolet TrailBlazer
- DriveTrain: 4WD
- Rank: Trail Ready
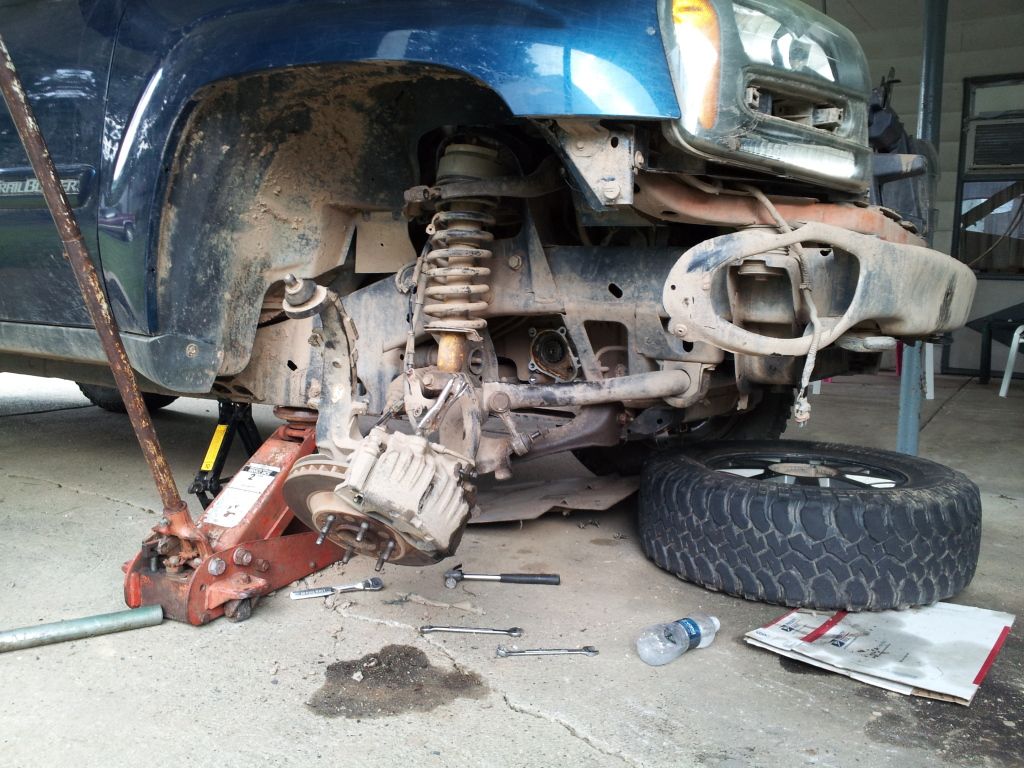
Found another CV removal tip. I figure I'd post it here. In the process of pulling Josh's passenger side CV tonight, I figured out, if you put a medium length, pry bar style flat blade screw driver through the oval hole in the frame directly under the CV, you can use the frame as a fulcrum and not really put much pressure on the Disconnect housing. The CV popped out with surprisingly little force, A couple good hits with a pretty small hammer got it out. Granted, the new bearings and the fact that the CV was removed about a month ago probably helped a lot too.
Chevy Power!
Long live the Republic
"Violence is not always evil. The judicious use of violence and those willing to use it without hesitation is often all that stands between wolves and sheep."
Build Thread
Long live the Republic
"Violence is not always evil. The judicious use of violence and those willing to use it without hesitation is often all that stands between wolves and sheep."
Build Thread
-
dvanbramer88 - Lifer
- Posts: 2283
- Joined: Tue Jul 05, 2011 3:12 pm
- Location: PA, Bristol
- Name: Dave
- Vehicle Year: 2002
- Vehicle: Chevrolet TrailBlazer
- DriveTrain: 4WD
- Rank: Trail Ready
So what methods have you guys used to get this housing that breaks off out?
 Viewed 12096 times")
 Viewed 12096 times")
Moog 14 springs with Bilstien 5125 shocks sitting on BFG KO2's
2003 GMC Envoy XL SLT 4x4
2003 GMC Envoy XL SLT 4x4
-

bljis123 - Off-Roader
- Posts: 111
- Joined: Mon Oct 17, 2016 10:55 am
- Location: Jacksonville, FL
- Name: Brett
- Vehicle Year: 2003
- Vehicle: GMC Envoy XL
- DriveTrain: 4WD
52 posts
• Page 3 of 3 • 1, 2, 3