Offroad Trailblazers and Envoys

4Crawlin Build Thread

G80, GU6, GT4, GT5, WTF? This section is for gearing and driveline stuff.

by Trail X » Wed Apr 06, 2011 11:37 am

chevycrew wrote:That pesky oil pan....

Looks like there is going to be some custom work on that big thing. About the only way to clear it, is run about 14" of suspension lift. Thats just too tall.

At least with the axle Im running, the diff itself will be offset enough to the drivers side to clear. Now I just have the issue of axle tube to drain plug. (Im pushing the axle forward 4-6")


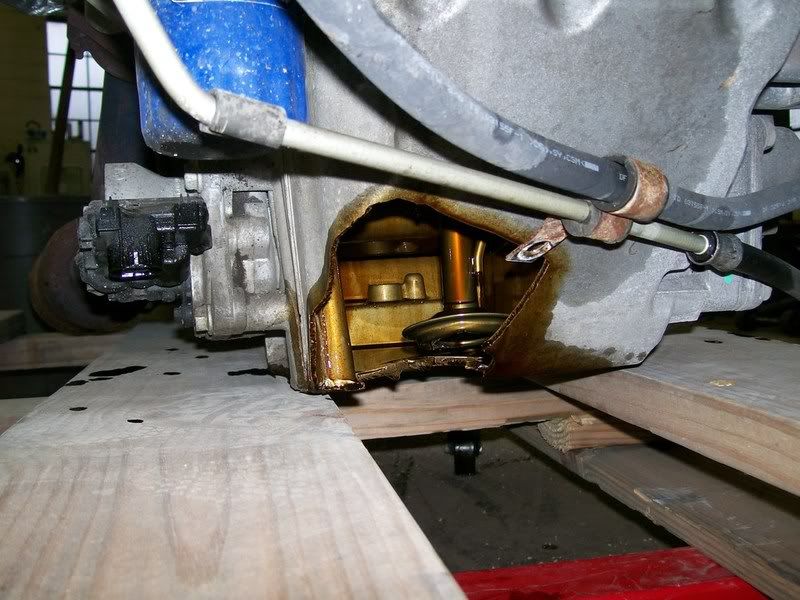
I assume you'll cut it up and TIG some aluminum plate together. The biggest issue being that the oil pickup is in the front of the sump:


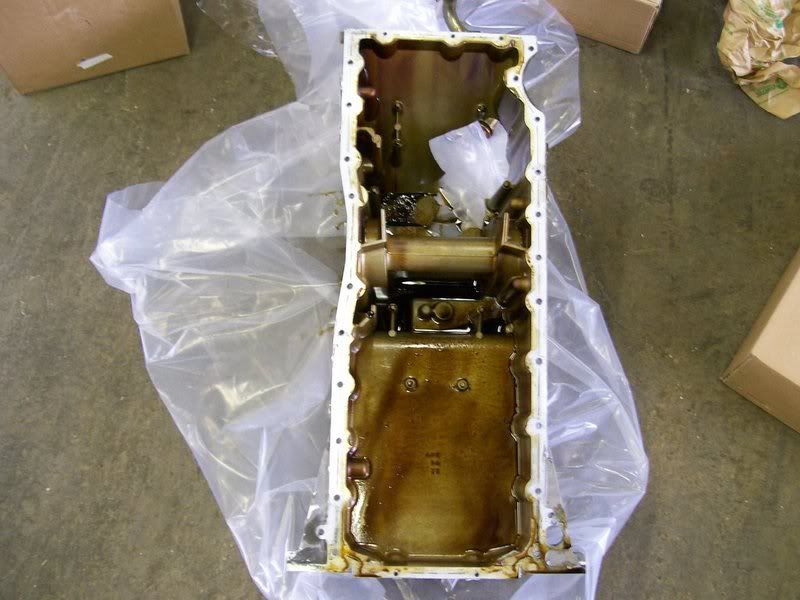
This gives you an idea of what you're going to be working with on the inside of the pan:


You can probably raise the area a good 5" or so, but you'll have to have an external sump or something to keep the capacity at 7 quarts.

I'd also consider adding internal baffles to keep the oil wherever your oil pickup is. Currently it's at the deepest part of the pan and doesn't seem to starve the engine of oil very often (a couple people have reported low oil pressure when going up steel banks though). But you seem pretty smart, so I probably didn't need to state the obvious.

Just some food for thought.
8-) Build Thread | ExPo Build | YouTube Videos
Not all who wander are lost. -Tolkien
User avatar
Trail X
Founder
 
Posts: 9935
Joined: Mon Sep 07, 2009 10:22 pm
Location: VA, Roanoke
Name: James Downing
Vehicle Year: 2005
Vehicle: Chevrolet TrailBlazer
DriveTrain: 4WD w/ Aftermarket Locker
Rank: Expedition Guide

by chevycrew » Wed Apr 06, 2011 12:22 pm

I'm going to try to just trim the front half of the deepest part of the sump, maybe just move the entire sump back 4" or so?
Not sure yet, but those pics are very helpful.
User avatar
chevycrew
Veteran
 
Posts: 1088
Joined: Tue Mar 08, 2011 2:42 pm
Location: UT, Salt Lake City
Name: Steve
Vehicle Year: 2002
Vehicle: Chevrolet TrailBlazer
DriveTrain: 4WD
Rank: Trail Ready

by OregTrailBlazin » Wed Apr 06, 2011 12:48 pm

You build a new pickup tube for the oil pump too, and move the whole sump to the rear. I've seen it done in reverse on a SBC..
Johnny Kurz
General Manager
541-474-2879
Wheeler's Off-Road Inc.
Our Vendor Section
User avatar
OregTrailBlazin
Off-Road Vendor
 
Posts: 610
Joined: Wed Sep 09, 2009 2:34 pm
Location: OR, Grants Pass
Name: Johnathan Kurz
Vehicle Year: 2004
Vehicle: Chevrolet TrailBlazer
DriveTrain: 4WD

by bdp1978 » Wed Apr 06, 2011 1:18 pm

HARDTRAILZ wrote:Fyi..if it helps cost I may be willing to pony up for an oil pan since I will definitely need one someday...soon I hope.


Are you planning to do a SAS or something? :happy whip:


chevycrew- sweet work on making this a reality, this is going to be a great thread to watch.
bdp1978
Trail-Blazer
 
Posts: 253
Joined: Fri Oct 22, 2010 12:32 pm
Location: Rochester Hills, Mi
Name: Brad
Vehicle Year: 2004
Vehicle: Chevrolet TrailBlazer
DriveTrain: 4WD w/ G80

by chevycrew » Wed Apr 06, 2011 3:58 pm

Was there ever a price posted on those oil pans? I don't remember seeing it.
User avatar
chevycrew
Veteran
 
Posts: 1088
Joined: Tue Mar 08, 2011 2:42 pm
Location: UT, Salt Lake City
Name: Steve
Vehicle Year: 2002
Vehicle: Chevrolet TrailBlazer
DriveTrain: 4WD
Rank: Trail Ready

by chevycrew » Wed Apr 06, 2011 4:04 pm

OregTrailBlazin wrote:You build a new pickup tube for the oil pump too, and move the whole sump to the rear. I've seen it done in reverse on a SBC..


I'm looking more along the lines of a center sump, with a long engine its easier to starve the pickup under extreme angles.
User avatar
chevycrew
Veteran
 
Posts: 1088
Joined: Tue Mar 08, 2011 2:42 pm
Location: UT, Salt Lake City
Name: Steve
Vehicle Year: 2002
Vehicle: Chevrolet TrailBlazer
DriveTrain: 4WD
Rank: Trail Ready

by HARDTRAILZ » Wed Apr 06, 2011 4:07 pm

I was quoted 600ish.
I hate to advocate weird chemicals, alcohol, violence or insanity to anyone...but
they've always worked for me.
User avatar
HARDTRAILZ
Moderator
 
Posts: 6342
Joined: Sat Sep 12, 2009 1:49 am
Location: IN, Batesville
Name: Kyle
Vehicle Year: 2006
Vehicle: Chevrolet TrailBlazer
DriveTrain: 4WD w/ Aftermarket Locker
Rank: Extreme Offroader

by chevycrew » Wed Apr 06, 2011 4:41 pm

ouch...


Im hoping I can cut up the pan, cut out some new aluminum, and have it welded up locally for a lot less than that.

I may pay $600 for a street rig oil pan, but not for a offroad rig!
User avatar
chevycrew
Veteran
 
Posts: 1088
Joined: Tue Mar 08, 2011 2:42 pm
Location: UT, Salt Lake City
Name: Steve
Vehicle Year: 2002
Vehicle: Chevrolet TrailBlazer
DriveTrain: 4WD
Rank: Trail Ready

by chevycrew » Thu Apr 07, 2011 7:28 pm

Update: (not much)

Got my doubler stuff mocked up and the t-case is out having the blockoff plate welded up.

Sliders are now ordered and Ill be waiting for them.

Wheels spacers are now in my hands.


Getting closer to go time!

Image
User avatar
chevycrew
Veteran
 
Posts: 1088
Joined: Tue Mar 08, 2011 2:42 pm
Location: UT, Salt Lake City
Name: Steve
Vehicle Year: 2002
Vehicle: Chevrolet TrailBlazer
DriveTrain: 4WD
Rank: Trail Ready

by chevycrew » Fri Apr 08, 2011 10:35 pm

Doubler all assembled and ready to go in.


27 spline 5 bolt 231c, with a 32 spline 6 bolt 241c.

4x4machine Box 4 Rocks doubler, JB Conversions SYE kit.

Image
Last edited by chevycrew on Mon Apr 11, 2011 1:18 am, edited 1 time in total.
User avatar
chevycrew
Veteran
 
Posts: 1088
Joined: Tue Mar 08, 2011 2:42 pm
Location: UT, Salt Lake City
Name: Steve
Vehicle Year: 2002
Vehicle: Chevrolet TrailBlazer
DriveTrain: 4WD
Rank: Trail Ready

by fishsticks » Fri Apr 08, 2011 11:44 pm

Sexy... :thumleft:
11 Silverado LTZ - 6.2L/6l80, 2/3 drop, self tuned
85 Hilux - 3RZ, dual cases, caged, 40s, chromo everything
02 TrailBlazer LTZ - 35s, lockers, balls - Gone but not forgotten - Build
User avatar
fishsticks
Moderator
 
Posts: 4356
Joined: Thu Apr 01, 2010 11:30 pm
Location: WA, Vancouver
Name: Donny
Vehicle Year: Other
Vehicle: Other Vehicle
DriveTrain: 4WD w/ Aftermarket Locker
Rank: Extreme Offroader

by chevycrew » Mon Apr 11, 2011 1:17 am

I managed to sneak some time today.

I had previously removed the bumper/hitch. So, tonight I took the torch too it, and freed the thin wanna-be bumper. Next was drilling some holes. I was able to reuse the factory front bolts, but the 4 rear bolts needed redrilled. Since the hitch was thicker than the frame, I chose to redrill those holes. The factory nuts pound out rather easy, just thread in a bolt and hit with a hammer. Once the hitch was painted, I reinstalled it in the upside down position.

The rear inner fenders were removed for the future removal of the rear lower body corners.


Here are some crappy night pictures:

Image
Image
Image
Image
User avatar
chevycrew
Veteran
 
Posts: 1088
Joined: Tue Mar 08, 2011 2:42 pm
Location: UT, Salt Lake City
Name: Steve
Vehicle Year: 2002
Vehicle: Chevrolet TrailBlazer
DriveTrain: 4WD
Rank: Trail Ready

by bartonmd » Mon Apr 11, 2011 8:21 am

That works out great with the body lift!

Mike
bartonmd
Moderator
 
Posts: 4469
Joined: Wed Sep 09, 2009 9:35 am
Location: IN, Indianapolis
Name: Mike
Vehicle Year: 2007
Vehicle: Chevrolet TrailBlazer
DriveTrain: 4WD w/ G80
Rank: Offroad Rated

by Trail X » Mon Apr 11, 2011 8:44 am

Are you planning to add some plate or tube to the rear bumper?, using the base as a starting point? Cool concept.
8-) Build Thread | ExPo Build | YouTube Videos
Not all who wander are lost. -Tolkien
User avatar
Trail X
Founder
 
Posts: 9935
Joined: Mon Sep 07, 2009 10:22 pm
Location: VA, Roanoke
Name: James Downing
Vehicle Year: 2005
Vehicle: Chevrolet TrailBlazer
DriveTrain: 4WD w/ Aftermarket Locker
Rank: Expedition Guide

by chevycrew » Mon Apr 11, 2011 10:28 am

Yes the hitch is just the base for a new bumper. Im going to be adding a bunch of tube.

For anyone thinking of doing this, a body lift is not required.
User avatar
chevycrew
Veteran
 
Posts: 1088
Joined: Tue Mar 08, 2011 2:42 pm
Location: UT, Salt Lake City
Name: Steve
Vehicle Year: 2002
Vehicle: Chevrolet TrailBlazer
DriveTrain: 4WD
Rank: Trail Ready

by chevycrew » Mon Apr 11, 2011 11:55 am

Little body cutting before I go to work. I still need to clean it up and weld in filler panels.

(Before shots can be seen in earlier pictures)

Image
Image
User avatar
chevycrew
Veteran
 
Posts: 1088
Joined: Tue Mar 08, 2011 2:42 pm
Location: UT, Salt Lake City
Name: Steve
Vehicle Year: 2002
Vehicle: Chevrolet TrailBlazer
DriveTrain: 4WD
Rank: Trail Ready

by MrSmithsTB » Mon Apr 11, 2011 12:40 pm

Temp tag still in the window and you're cutting things off. Love it!
back in the saddle
TB BUILD
User avatar
MrSmithsTB
Veteran
 
Posts: 1756
Joined: Thu Sep 10, 2009 2:28 pm
Location: EHT, NJ
Name: Bob
Vehicle Year: 2006
Vehicle: Other GMT360/370
DriveTrain: AWD w/ G80
Rank: Offroad Rated

by Trail X » Mon Apr 11, 2011 12:58 pm

Are you going to just plate over it, or are you going to add a vent?
8-) Build Thread | ExPo Build | YouTube Videos
Not all who wander are lost. -Tolkien
User avatar
Trail X
Founder
 
Posts: 9935
Joined: Mon Sep 07, 2009 10:22 pm
Location: VA, Roanoke
Name: James Downing
Vehicle Year: 2005
Vehicle: Chevrolet TrailBlazer
DriveTrain: 4WD w/ Aftermarket Locker
Rank: Expedition Guide

by chevycrew » Mon Apr 11, 2011 1:34 pm

I will just plate over it. I'd rather have the negatives of no vent, over having a place for water to enter.

I might trim farther up too, just depends where my tires hit.
User avatar
chevycrew
Veteran
 
Posts: 1088
Joined: Tue Mar 08, 2011 2:42 pm
Location: UT, Salt Lake City
Name: Steve
Vehicle Year: 2002
Vehicle: Chevrolet TrailBlazer
DriveTrain: 4WD
Rank: Trail Ready

by chevycrew » Tue Apr 12, 2011 11:29 pm

Sliders made it!

Thats on the agenda for this weekend, along with some other stuff.
User avatar
chevycrew
Veteran
 
Posts: 1088
Joined: Tue Mar 08, 2011 2:42 pm
Location: UT, Salt Lake City
Name: Steve
Vehicle Year: 2002
Vehicle: Chevrolet TrailBlazer
DriveTrain: 4WD
Rank: Trail Ready

PreviousNext

Return to Differentials / Axles