Offroad Trailblazers and Envoys

Front axle disconnect fix... with a twist.

G80, GU6, GT4, GT5, WTF? This section is for gearing and driveline stuff.

by fishsticks » Fri Aug 20, 2010 2:23 am

Notice to anyone who has arrived here from the link at TrailVoy.com: The article linking here is being displayed by them WITHOUT my consent. They've stolen it. The new (and supported) home of that article is GMTNation.com, where nearly 100% of the enthusiasts responsible for the content on TrailVoy.com have relocated to. I hope to see you there! In the mean time, welcome to OffroadTB.com and enjoy your stay!


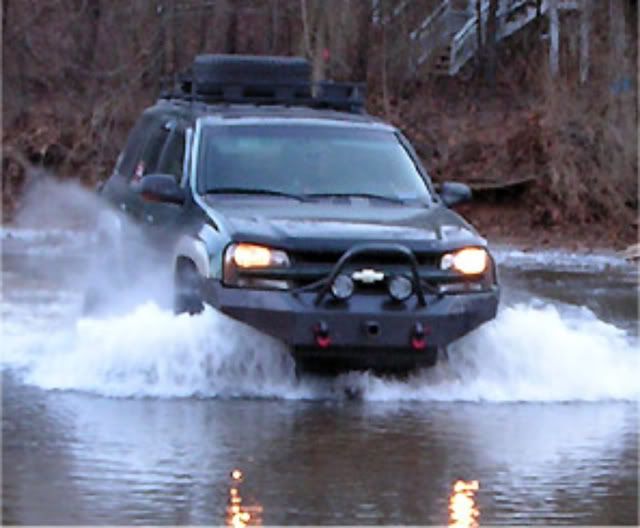
I lost 4WD almost 2 months ago... along with my G80 being out, it's hampered my offroad play considerably.

My parts finally came to rebuild my disconnect, and I decided to try to improve it's future reliability somewhat.

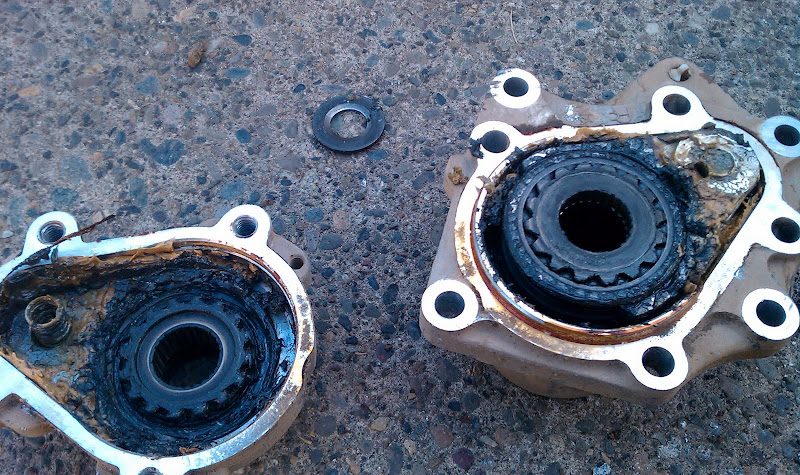
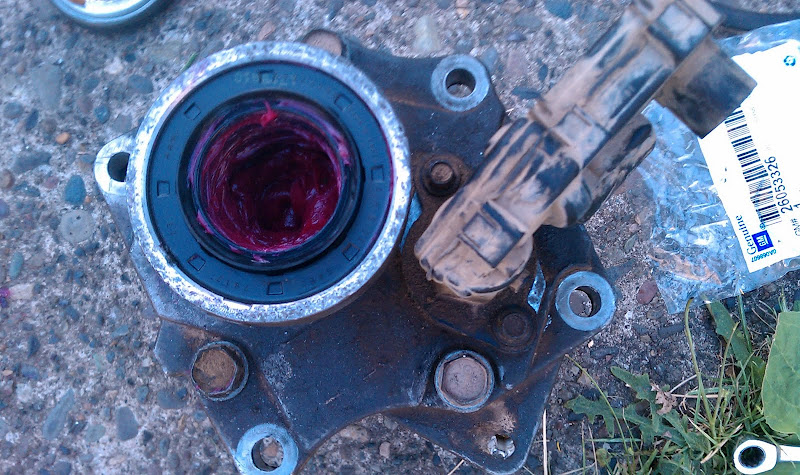
Here's what my disconnect looked like fresh off the truck... not pretty. My outer two bearings are pretty much nonexistent.

Image


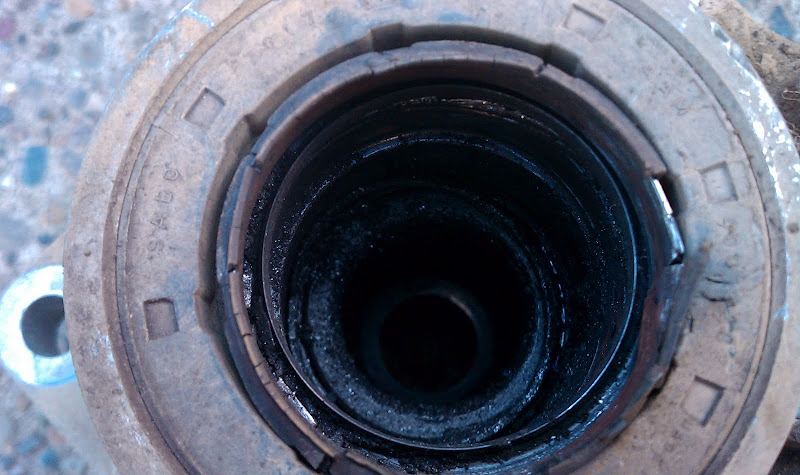
The inside grease is wet, but very black.

Image


My fork is toast. The pin sheared off. I suspected this had happened since one time when engaging 4WD, I heard a loud metallic clank from the front end.

Image


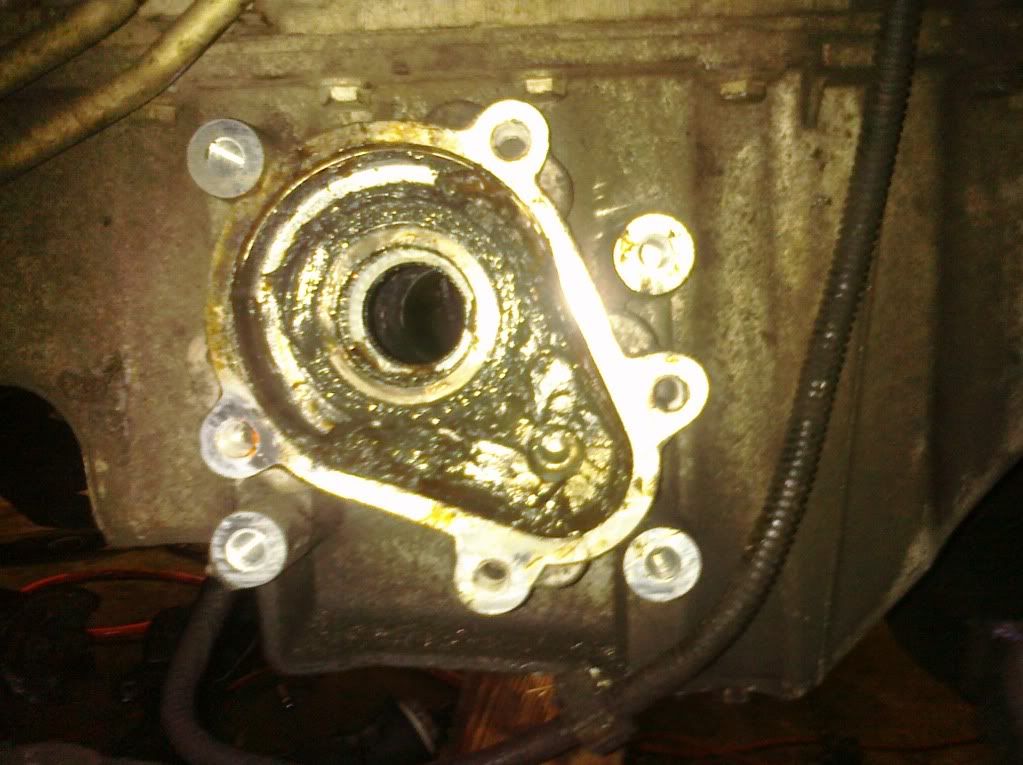
My outer case also showed some signs of wear. Amazingly, the races themselves were in good shape.

Image


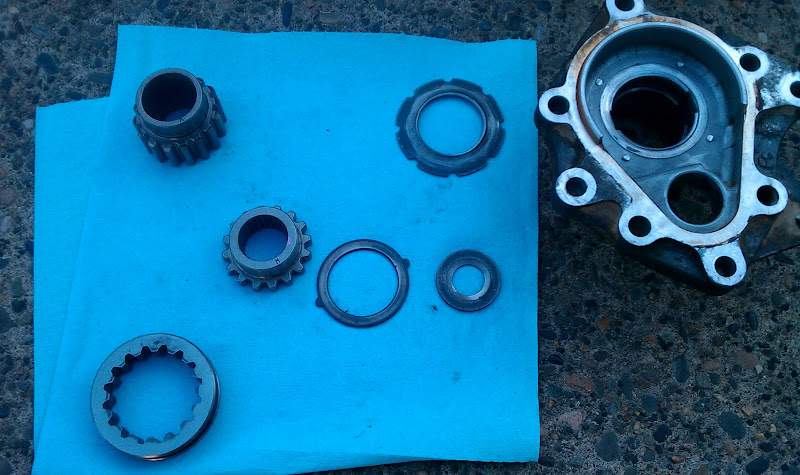
Despite all the carnage, the bearing and teeth on my gears looked good, and nothing else had any physical damage.

Image


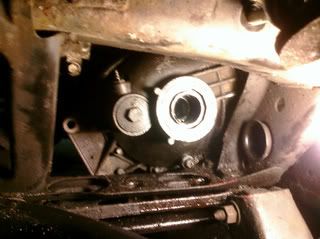
Rather than replace my fork, I opted remove the fork completely. Instead I welded the engagement collar to the outside gear. Here is a picture.

Image


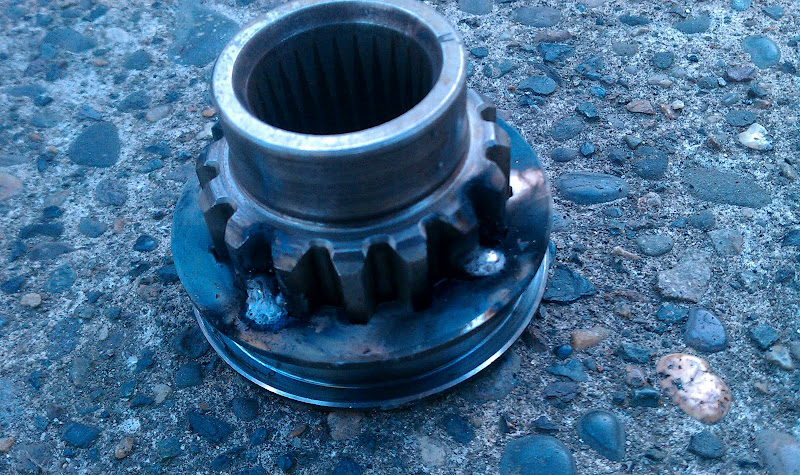
I simply tacked the collar in 4 places to the gear. The welds are simply to hold the collar in place. The collar still bears the torque from the front diff. I did not weld the inner gear. The reason for this is that there is a (very) small amount of play in the whole assembly. If I tacked both gears to the collar and everything was not perfectly aligned it could introduce a vibration into the system which would stress the bearings.

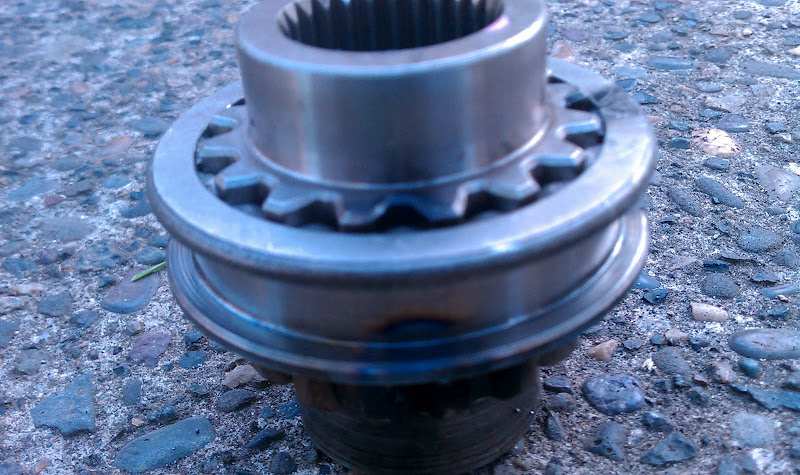
Here's the inner gear sitting in the assembly. The picture exaggerates the amount of the teeth sticking out of the collar. There is only about 1/16th of an inch.

Image


I had a small amount of spatter on one of my welds. I hit the assembly with a wire wheel to remove it. You don't want any spatter falling off later inside the disconnect, or any imperfections on your bearing surfaces.

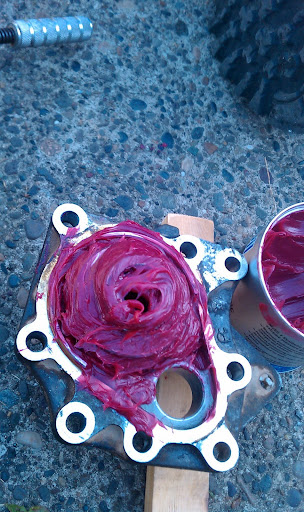
A well greased disconnect ready to go back together.

Image


Ready to install on the truck!

Image


The stepper motor still moves in and out and reports back to the ECM, so no Service 4WD lights. Feels nice to have 4WD back... :excited:
11 Silverado LTZ - 6.2L/6l80, 2/3 drop, self tuned
85 Hilux - 3RZ, dual cases, caged, 40s, chromo everything
02 TrailBlazer LTZ - 35s, lockers, balls - Gone but not forgotten - Build
User avatar
fishsticks
Moderator
 
Posts: 4356
Joined: Thu Apr 01, 2010 11:30 pm
Location: WA, Vancouver
Name: Donny
Vehicle Year: Other
Vehicle: Other Vehicle
DriveTrain: 4WD w/ Aftermarket Locker
Rank: Extreme Offroader

by bartonmd » Fri Aug 20, 2010 7:42 am

Cool, good job!

FWIW, for anybody else going to do this... If you don't have a welder, or only have a MIG, this is the kind of thing that it would be worth the $15 minimum charge to take it to a welding shop and get TIG welded... No spatter, no extra filler... Just melting the 2 parts together...

Mike
bartonmd
Moderator
 
Posts: 4469
Joined: Wed Sep 09, 2009 9:35 am
Location: IN, Indianapolis
Name: Mike
Vehicle Year: 2007
Vehicle: Chevrolet TrailBlazer
DriveTrain: 4WD w/ G80
Rank: Offroad Rated

by glfredrick » Fri Aug 20, 2010 9:02 am

I've not played with my disconnect yet. Once you pull the fork, what makes the disconnect shift without the fork, or are you effectively eliminating the disconnect function with this mod?
http://www.UCORA.org == The United Christian Off-Road Alliance, a family friendly place
2003 Trailblazer = got groceries?
1995 Dodge RAM 2500 w/Cummins = got tow rig?
1986-90 Ford Ranger truggy = got rock?
User avatar
glfredrick
Contributing Author
 
Posts: 130
Joined: Mon Jul 26, 2010 3:28 pm
Location: Eagle, WI
Name: Guy
Vehicle Year: 2003
Vehicle: Chevrolet TrailBlazer
DriveTrain: 4WD

by bartonmd » Fri Aug 20, 2010 9:04 am

glfredrick wrote:I've not played with my disconnect yet. Once you pull the fork, what makes the disconnect shift without the fork, or are you effectively eliminating the disconnect function with this mod?


Yep... Basically spinning the front end all the time, like the AWD models...

You'll probably see a ~1mpg loss from it...

Mike
bartonmd
Moderator
 
Posts: 4469
Joined: Wed Sep 09, 2009 9:35 am
Location: IN, Indianapolis
Name: Mike
Vehicle Year: 2007
Vehicle: Chevrolet TrailBlazer
DriveTrain: 4WD w/ G80
Rank: Offroad Rated

by Trail X » Fri Aug 20, 2010 9:29 am

Lookin good!

I was going to do this same thing, but figured I'd try to fully rebuild it first.

The thing I do like about this, is how you have better support for your outer gear... it helps spread the load to the inner-most bearing.

You will get more gear teeth wear though... so after some time you may get some lash.
8-) Build Thread | ExPo Build | YouTube Videos
Not all who wander are lost. -Tolkien
User avatar
Trail X
Founder
 
Posts: 9935
Joined: Mon Sep 07, 2009 10:22 pm
Location: VA, Roanoke
Name: James Downing
Vehicle Year: 2005
Vehicle: Chevrolet TrailBlazer
DriveTrain: 4WD w/ Aftermarket Locker
Rank: Expedition Guide

by goldberg11219 » Fri Jan 28, 2011 6:53 am

How am I supposed to take out my Front Axle Disconnect? At first I just unscrewed it and pulled it out. Now this part is still inside and won't budge.

Image


Am I supposed to take it out by force?

Sorry for the noob questions, but this is my first 4x4 job in this area.
Last edited by goldberg11219 on Fri Jan 28, 2011 1:05 pm, edited 1 time in total.
goldberg11219
Newbie
 
Posts: 2
Joined: Fri Jan 28, 2011 6:32 am
Name: Goldberg BoroPark
Vehicle Year: 2002
Vehicle: GMC Envoy
DriveTrain: 4WD

by bartonmd » Fri Jan 28, 2011 8:01 am

goldberg11219 wrote:How am I supposed to take out my Front Axle Disconnect? At first I just unscrewed it and pulled it out. Now this part is still inside and won't budge.

Image


Am I supposed to take it out by force?

Sorry for the noob questions, but this is my first 4x4 job in this area.


The disconnect is on the other side of the oil pan. You're looking at the differential...

Mike
bartonmd
Moderator
 
Posts: 4469
Joined: Wed Sep 09, 2009 9:35 am
Location: IN, Indianapolis
Name: Mike
Vehicle Year: 2007
Vehicle: Chevrolet TrailBlazer
DriveTrain: 4WD w/ G80
Rank: Offroad Rated

by Hatchet669 » Fri Jan 28, 2011 9:34 am

goldberg11219 wrote:How am I supposed to take out my Front Axle Disconnect? At first I just unscrewed it and pulled it out. Now this part is still inside and won't budge.

Image


Am I supposed to take it out by force?

Sorry for the noob questions, but this is my first 4x4 job in this area.

put the tools down and step away from the vehicle... :poke:

just kidding, yea ur on the wrong side of the vehicle... so what did you remove that u though was the disconnect?

but its on the passenger side of the oil pan...
User avatar
Hatchet669
Trail-Blazer
 
Posts: 257
Joined: Wed Sep 30, 2009 8:23 pm
Location: IL, Worth
Name: Joe
Vehicle Year: 2003
Vehicle: Chevrolet TrailBlazer
DriveTrain: 4WD
Rank: Trail Ready

by goldberg11219 » Fri Jan 28, 2011 1:17 pm

bartonmd wrote:
goldberg11219 wrote:How am I supposed to take out my Front Axle Disconnect? At first I just unscrewed it and pulled it out. Now this part is still inside and won't budge.

Image


Am I supposed to take it out by force?

Sorry for the noob questions, but this is my first 4x4 job in this area.


The disconnect is on the other side of the oil pan. You're looking at the differential...

Mike


Hatchet669 wrote:put the tools down and step away from the vehicle... :poke:

just kidding, yea ur on the wrong side of the vehicle... so what did you remove that u though was the disconnect?

but its on the passenger side of the oil pan...


My bad. Posted the wrong pic. I meant this one. :Iagree: :oops:

Image

While the photo's already here. The original problem is (I believe) with the differential. (is that what's in the picture?)

I'd like to know how to take that out so I can take it somewhere and know what exactly is wrong with it. (I know what's wrong but since I'm new, I don't know the names and terms. I never went to school. Got training from a guy that's got cancer and is kinda forgetting names at the time. :( ) Or you can just post a link where I can find a post on that. Thanks!!
goldberg11219
Newbie
 
Posts: 2
Joined: Fri Jan 28, 2011 6:32 am
Name: Goldberg BoroPark
Vehicle Year: 2002
Vehicle: GMC Envoy
DriveTrain: 4WD

by bgwolfpack » Fri Jan 28, 2011 1:28 pm

I'm confused but I'll try to help. Is this pic of your truck?
Have you read James write up in Troubleshooting?
If this is your truck then I believe you have the Disconnect off. Otherwise it should come off with some help from tapping with a light hammer and screwdriver as a wedge. It's my understanding they do not come off hard.

The diff is the whole front end unit.
Last edited by bgwolfpack on Fri Jan 28, 2011 1:31 pm, edited 1 time in total.
bgwolfpack
Veteran
 
Posts: 1794
Joined: Fri Sep 18, 2009 7:19 pm
Name: Randy
Vehicle Year: Other
Vehicle: Other Vehicle
DriveTrain: 4WD

by Gordinho80 » Fri Jan 28, 2011 1:30 pm

Sounds and looks like the disconnect may be stuck to the intermediate shaft. Pickle fork wedged between the disconnect and the oil pan, try hammering on the fork to pry it from the oil pan. If it's STUCK STUCK.. then you may need to drop the oil pan and differential. Depending on how bad it is on there, you may need to replace the shaft, pan, and more. I think Brendan (irishboy02) had his disconnect stuck, think it was so bad that he had to replace the oil pan and the intermediate shaft.

Back on topic...

Interesting twist on the disconnect. I'm actually waiting for a spare disconnect to arrive in the mail in the next few days. I'm going to open it up and see what, if anything, needs to be replaced and get it to 100% before I remove my original. Once I've got it ready to go, thats when I'll replace my pass side axle shaft. I'll put the ready to go disconnect in and then rebuild the original. If anyone needs one in the next few weeks, even if just parts... let me know... :)
Mario - Build Thread
User avatar
Gordinho80
Lifer
 
Posts: 2787
Joined: Tue Sep 08, 2009 9:27 am
Location: NJ, Jackson
Name: Mario Almeida
Vehicle Year: Other
Vehicle: Other Vehicle
DriveTrain: 4WD

by dirty anton » Fri Jan 28, 2011 1:44 pm

be careful when you try to get that piece off!(rear disconnect housing) dont just pry on one side, try to evenly pry it off little by little. mine was already cracked and the inner sleeve was left in the oil pan. you can see it in my build thred. when you put it back grease the outside sleeve that goes back into the oil pan,it will make it alot easier to take off later. that rear disc housing is expensive new. if it breaks try to find one at a junk yard or you will pay over 300 bucks for a brand new one from a dealer! but check online (gm parts for less) for a cheaper solution. and yea deff check out the rebuild thred, very informative.
User avatar
dirty anton
Trail-Blazer
 
Posts: 426
Joined: Thu Aug 19, 2010 12:21 am
Location: upper marlboro md
Name: mike
Vehicle Year: 2002
Vehicle: Chevrolet TrailBlazer
DriveTrain: 4WD w/ Aftermarket Locker
Rank: Extreme Offroader

by Hatchet669 » Fri Jan 28, 2011 2:49 pm

Gordinho80 wrote:Interesting twist on the disconnect. I'm actually waiting for a spare disconnect to arrive in the mail in the next few days. I'm going to open it up and see what, if anything, needs to be replaced and get it to 100% before I remove my original. Once I've got it ready to go, thats when I'll replace my pass side axle shaft. I'll put the ready to go disconnect in and then rebuild the original. If anyone needs one in the next few weeks, even if just parts... let me know... :)

i was actually just thinking that... buy new, switch out, rebuild old, sell to next person in line...
User avatar
Hatchet669
Trail-Blazer
 
Posts: 257
Joined: Wed Sep 30, 2009 8:23 pm
Location: IL, Worth
Name: Joe
Vehicle Year: 2003
Vehicle: Chevrolet TrailBlazer
DriveTrain: 4WD
Rank: Trail Ready

by Mooseknuckle » Sat Jan 29, 2011 11:42 am

Gordinho80 wrote:Sounds and looks like the disconnect may be stuck to the intermediate shaft. Pickle fork wedged between the disconnect and the oil pan, try hammering on the fork to pry it from the oil pan. If it's STUCK STUCK.. then you may need to drop the oil pan and differential. Depending on how bad it is on there, you may need to replace the shaft, pan, and more. I think Brendan (irishboy02) had his disconnect stuck, think it was so bad that he had to replace the oil pan and the intermediate shaft.

Back on topic...

Interesting twist on the disconnect. I'm actually waiting for a spare disconnect to arrive in the mail in the next few days. I'm going to open it up and see what, if anything, needs to be replaced and get it to 100% before I remove my original. Once I've got it ready to go, thats when I'll replace my pass side axle shaft. I'll put the ready to go disconnect in and then rebuild the original. If anyone needs one in the next few weeks, even if just parts... let me know... :)

I will take it only question is is it the same fit our vehicles are two years apart?
I don't dial 911
Mooseknuckle
Addict
 
Posts: 708
Joined: Sun Feb 21, 2010 9:31 am
Location: NJ,Brick
Name: Jeff
Vehicle Year: 2006
Vehicle: Chevrolet TrailBlazer
DriveTrain: 4WD
Rank: Offroad Rated

by The Roadie » Sat Jan 29, 2011 1:20 pm

All the years are the same. We could be the Brotherhood of the Traveling Splined Disconnect. :friday:
User avatar
The Roadie
Founder
 
Posts: 5011
Joined: Mon Sep 07, 2009 11:29 pm
Location: CA, Vista, San Diego County
Name: Bill Carton
Vehicle Year: 2004
Vehicle: GMC Envoy
DriveTrain: 4WD w/ G80
Rank: Expedition Guide

by Trail X » Mon Jan 31, 2011 1:33 pm

goldberg11219, were you able to remove this part? Honestly, it should be removed as an assembly. You took out 4 too many bolts.

The disconnect is basically a tapered press fit into the oil pan, so it will take a lot of force to remove it. You will have to rock it back and forth with a pry bar.

This is the article everyone has been referring to: http://www.offroadtb.com/articles/tech- ... disconnect

Good luck.
8-) Build Thread | ExPo Build | YouTube Videos
Not all who wander are lost. -Tolkien
User avatar
Trail X
Founder
 
Posts: 9935
Joined: Mon Sep 07, 2009 10:22 pm
Location: VA, Roanoke
Name: James Downing
Vehicle Year: 2005
Vehicle: Chevrolet TrailBlazer
DriveTrain: 4WD w/ Aftermarket Locker
Rank: Expedition Guide

by Gordinho80 » Thu Feb 03, 2011 6:46 pm

Fish, how's the fix holding up? Notice any significant drop in mileage? Any other issues that may have come about?

I'm deciding on whether or not I will be welding mine as my spare disconnect has a broken fork, but everything looks to be fine.
Mario - Build Thread
User avatar
Gordinho80
Lifer
 
Posts: 2787
Joined: Tue Sep 08, 2009 9:27 am
Location: NJ, Jackson
Name: Mario Almeida
Vehicle Year: Other
Vehicle: Other Vehicle
DriveTrain: 4WD

by Zero » Thu Feb 03, 2011 7:18 pm

why would he have a drop in millage after fixing his dosconnect?
Zero
Veteran
 
Posts: 1048
Joined: Thu Sep 10, 2009 5:07 pm
Location: Los Angeles, CA / Toronto, ON
Name: Brendan
Vehicle Year: 2005
Vehicle: Chevrolet Trailblazer EXT
DriveTrain: 4WD w/ G80
Rank: Offroad Rated

by The Roadie » Thu Feb 03, 2011 7:43 pm

It never disengages in 2HI mode, so more parts are spinning inside the diff than just the spider gears. Presumably that gives you lower mileage or more wear.

Otherwise, GM (or New Process Gear, who actually designed the disconnect) were even more insane than I previously thought. The whole cost/benefit analysis for the splined disconnect was blown by the designers. Idiots. And no zerk fitting. Goofballs.

They should have given us disconnectable hubs if they weren't trying to do something so fancy as this splined crap-ola.
User avatar
The Roadie
Founder
 
Posts: 5011
Joined: Mon Sep 07, 2009 11:29 pm
Location: CA, Vista, San Diego County
Name: Bill Carton
Vehicle Year: 2004
Vehicle: GMC Envoy
DriveTrain: 4WD w/ G80
Rank: Expedition Guide

by dirty anton » Thu Feb 03, 2011 11:37 pm

:Iagree: but then the mom's would have to get out in the snow and slush and
engage these so they can put the truck in what they call all wheel drive! :hissyfit:
User avatar
dirty anton
Trail-Blazer
 
Posts: 426
Joined: Thu Aug 19, 2010 12:21 am
Location: upper marlboro md
Name: mike
Vehicle Year: 2002
Vehicle: Chevrolet TrailBlazer
DriveTrain: 4WD w/ Aftermarket Locker
Rank: Extreme Offroader

Next

Return to Differentials / Axles