Difference between Standard and Heavy Duty....
39 posts
• Page 2 of 2 • 1, 2
Speaker wire is fine for auto (low voltage) use. Not for 115 Volt AC. The benefit of speaker wire over home wiring you find on reels at Home Depot is it's usually made with more flexibility. You can manufacture 12 gauge wire in many ways - one solid conductor (home house wiring), a low number of thinner strands inside the insulation (like appliance wiring), or many, many strands of tinier wire inside the insulation. Flexible wire like speaker wire and voltmeter test leads are usually made with the last method. Smaller interior wires can be bent more times before they break - solid conductors not so much.
-

The Roadie - Founder
- Posts: 5011
- Joined: Mon Sep 07, 2009 11:29 pm
- Location: CA, Vista, San Diego County
- Name: Bill Carton
- Vehicle Year: 2004
- Vehicle: GMC Envoy
- DriveTrain: 4WD w/ G80
- Rank: Expedition Guide
So I'd be better off not to get speaker wire. That's what I wanted to know.
This would work right?
This would work right?
The FIRST Solid Axle Swapped Trailblazer in Presque Isle County MI
My Build
My Build
The Roadie wrote:Research, plan your mods, fund the plan, then GO DO THEM. THEN WHEEL IT.
-

Cable810 - Veteran
- Posts: 1989
- Joined: Thu Feb 09, 2012 6:43 pm
- Location: MI, Rogers City
- Name: Caleb
- Vehicle Year: 2002
- Vehicle: Chevrolet TrailBlazer
- DriveTrain: 4WD w/ Aftermarket Locker
- Rank: Offroad Rated
I said speaker wire would be fine, as long as you get the right gauge. Not sure what you're reading into what I said?
Don't think there's any reason get this mail order. Any local parts store or even Home Depot should have speaker wire in 12 gauge.
Don't think there's any reason get this mail order. Any local parts store or even Home Depot should have speaker wire in 12 gauge.
-
The Roadie - Founder
- Posts: 5011
- Joined: Mon Sep 07, 2009 11:29 pm
- Location: CA, Vista, San Diego County
- Name: Bill Carton
- Vehicle Year: 2004
- Vehicle: GMC Envoy
- DriveTrain: 4WD w/ G80
- Rank: Expedition Guide
Agreed. Go local. We usually find a good deal at a local Ace Hardware over Depot.
As told by the other half: Build Thread
-

JorDaneeKey - Addict
- Posts: 829
- Joined: Thu Jul 19, 2012 7:52 am
- Location: Fl, Clearwater
- Name: JorDanee
- Vehicle Year: 2003
- Vehicle: Chevrolet TrailBlazer
- DriveTrain: 4WD w/ G80
- Rank: Expedition Rated
I read your post wrong sorry. I checked RadioShack this morning they had 12guage for $11. I'll check other places around town too.
The FIRST Solid Axle Swapped Trailblazer in Presque Isle County MI
My Build
My Build
The Roadie wrote:Research, plan your mods, fund the plan, then GO DO THEM. THEN WHEEL IT.
-
Cable810 - Veteran
- Posts: 1989
- Joined: Thu Feb 09, 2012 6:43 pm
- Location: MI, Rogers City
- Name: Caleb
- Vehicle Year: 2002
- Vehicle: Chevrolet TrailBlazer
- DriveTrain: 4WD w/ Aftermarket Locker
- Rank: Offroad Rated
I got mine from RadioShack. You can get your relays and fuses etc all in the same place. I doubt you save a lot of $$$ anywhere else.
"Please consider a search before posting. Folks on this site PIONEERED functional offroad use of these trucks."
The answer to many common lift questions can be found here
My Build Thread
The answer to many common lift questions can be found here
My Build Thread
-

navigator - Moderator
- Posts: 4651
- Joined: Wed Mar 09, 2011 10:16 am
- Location: NC, Winnabow
- Name: Chris
- Vehicle Year: 2006
- Vehicle: Chevrolet TrailBlazer
- DriveTrain: 4WD
- Rank: Trail Ready
All right, here is what I'm going to get.
2 Wire splices
1 relay
fuse
12g wire
Switch
2 Wire splices
1 relay
fuse
12g wire
Switch
The FIRST Solid Axle Swapped Trailblazer in Presque Isle County MI
My Build
My Build
The Roadie wrote:Research, plan your mods, fund the plan, then GO DO THEM. THEN WHEEL IT.
-
Cable810 - Veteran
- Posts: 1989
- Joined: Thu Feb 09, 2012 6:43 pm
- Location: MI, Rogers City
- Name: Caleb
- Vehicle Year: 2002
- Vehicle: Chevrolet TrailBlazer
- DriveTrain: 4WD w/ Aftermarket Locker
- Rank: Offroad Rated
looks like a good list
I got all my parts at AutoZone, cause I was already there. They have spools of wire, fuse holders with pigtails, relays, switches etc. If you're going to drill through the roof like I did make sure you have plenty of silicone to seal it up.
Also a trailer plug, or a weatherpak connector might be a good idea
build thread
All things in moderation, including moderation.
Some people never go crazy... what truly horrible lives they must lead
All things in moderation, including moderation.
Some people never go crazy... what truly horrible lives they must lead
-

v7guy - Moderator
- Posts: 3712
- Joined: Wed Mar 09, 2011 10:17 pm
- Location: NY, long island
- Name: Jason
- Vehicle Year: 2004
- Vehicle: Chevrolet TrailBlazer
- DriveTrain: 4WD
- Rank: Offroad Rated
Not putting them on the roof just to the bumper. Spent 30 and some change for all the things on that list including 3 fuses. Actually got 4 wire splices instead of two seeing that I've got to splice in the fuse holder. SO hopefully I'm set now got to wait for the lights....
The FIRST Solid Axle Swapped Trailblazer in Presque Isle County MI
My Build
My Build
The Roadie wrote:Research, plan your mods, fund the plan, then GO DO THEM. THEN WHEEL IT.
-
Cable810 - Veteran
- Posts: 1989
- Joined: Thu Feb 09, 2012 6:43 pm
- Location: MI, Rogers City
- Name: Caleb
- Vehicle Year: 2002
- Vehicle: Chevrolet TrailBlazer
- DriveTrain: 4WD w/ Aftermarket Locker
- Rank: Offroad Rated
Looks like you have a pretty good list of parts there, but I do have a question for you. What kind of wire splices did you get?
The preferred way to wire up the lights would be to solder/heat shrink it.
The next best way is to go with waterproof butt connectors. These are sometimes called heat shrink butt connectors.
The weatherpack connector that Jason mentioned is an excellent option as well.
The reason I mention it because the standard butt connectors that Home Depot and Radio Shack sell are not waterproof. Most of the auxiliary lights that I have seen have a pretty short (usually ~6 inches) wire lead on the back of them. Since you are mounting your lights on your bumper, this means that your splice will be very near your bumper. Things like standard driving in the rain or driving through a puddle/stream on the trail will send a lot of water to the area of your splice. So you really want a good waterproof connection on those splices.
Just food for thought...
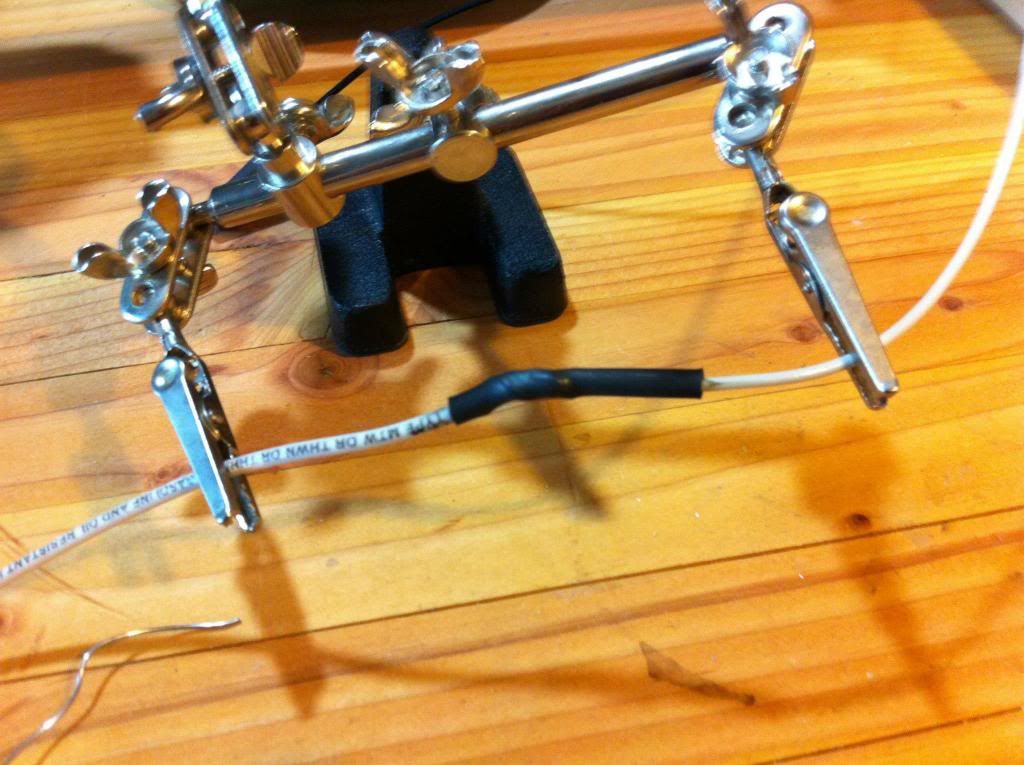
In case you are curious, this is how I did my splices for the lights on my bumper and roof. (sorry for the crappy cell phone pics...)
Solder it (make sure the heat shrink is on the wire before you solder)
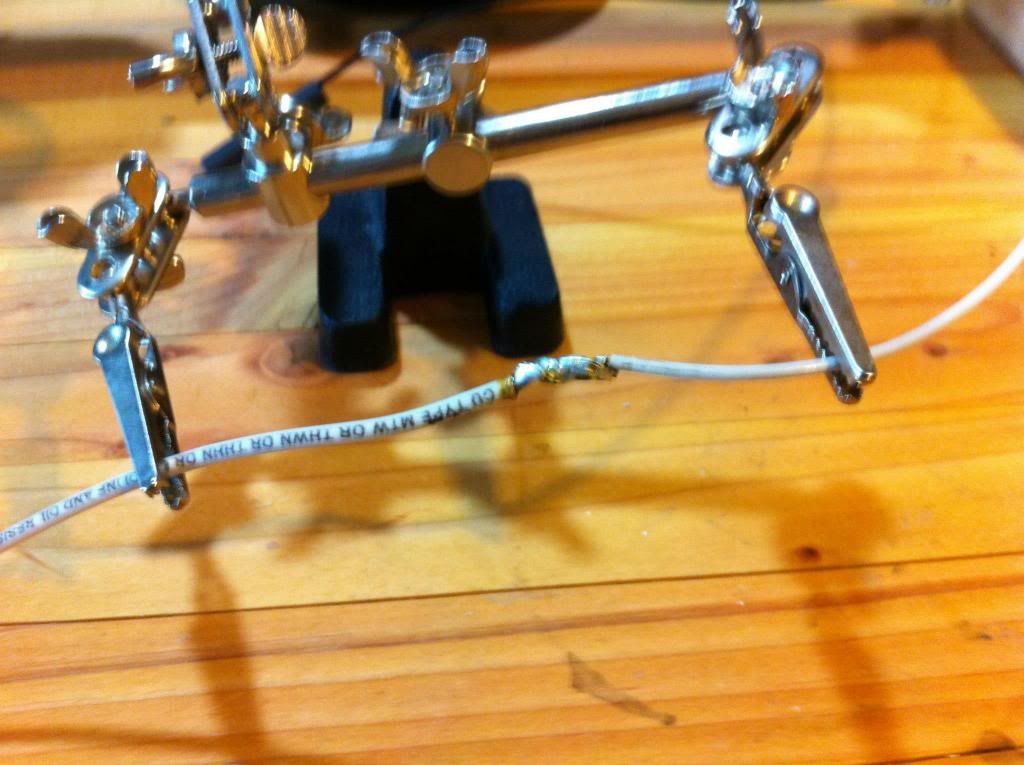
Then slide the heat shrink over the solder and heat it
The preferred way to wire up the lights would be to solder/heat shrink it.
The next best way is to go with waterproof butt connectors. These are sometimes called heat shrink butt connectors.
The weatherpack connector that Jason mentioned is an excellent option as well.
The reason I mention it because the standard butt connectors that Home Depot and Radio Shack sell are not waterproof. Most of the auxiliary lights that I have seen have a pretty short (usually ~6 inches) wire lead on the back of them. Since you are mounting your lights on your bumper, this means that your splice will be very near your bumper. Things like standard driving in the rain or driving through a puddle/stream on the trail will send a lot of water to the area of your splice. So you really want a good waterproof connection on those splices.
Just food for thought...
In case you are curious, this is how I did my splices for the lights on my bumper and roof. (sorry for the crappy cell phone pics...)
Solder it (make sure the heat shrink is on the wire before you solder)
Then slide the heat shrink over the solder and heat it
-

firefox2501 - Off-Roader
- Posts: 208
- Joined: Sat Mar 09, 2013 7:49 pm
- Location: VA, Chantilly
- Name: Mike
- Vehicle Year: 2006
- Vehicle: Chevrolet TrailBlazer
- DriveTrain: 4WD
- Rank: Offroad Rated
I prefer soldering the connection too, but I've also had good luck with butt connectors and liquid electric tape. It seems to seal the joint up nice. Works well when I'm feeling lazy.
build thread
All things in moderation, including moderation.
Some people never go crazy... what truly horrible lives they must lead
All things in moderation, including moderation.
Some people never go crazy... what truly horrible lives they must lead
-
v7guy - Moderator
- Posts: 3712
- Joined: Wed Mar 09, 2011 10:17 pm
- Location: NY, long island
- Name: Jason
- Vehicle Year: 2004
- Vehicle: Chevrolet TrailBlazer
- DriveTrain: 4WD
- Rank: Offroad Rated
Got my lights today 
I've got a question. I mocked them up where I wanted them to be and the back of the light is touching the grill, with the lights being where I want them, would I run the risk of melting that section of the plastic grill? The lights are way bigger than what I thought they would be.

I've got a question. I mocked them up where I wanted them to be and the back of the light is touching the grill, with the lights being where I want them, would I run the risk of melting that section of the plastic grill? The lights are way bigger than what I thought they would be.

The FIRST Solid Axle Swapped Trailblazer in Presque Isle County MI
My Build
My Build
The Roadie wrote:Research, plan your mods, fund the plan, then GO DO THEM. THEN WHEEL IT.
-
Cable810 - Veteran
- Posts: 1989
- Joined: Thu Feb 09, 2012 6:43 pm
- Location: MI, Rogers City
- Name: Caleb
- Vehicle Year: 2002
- Vehicle: Chevrolet TrailBlazer
- DriveTrain: 4WD w/ Aftermarket Locker
- Rank: Offroad Rated
I really really doubt it'll melt it, what will happen is that vibration will cause it to wear a hole in either the light housing or the grill (like my winch cables did on my grill), depends on which material is the harder of the two. Eventually it will "self clearance".
Maybe a piece of rubber between the two will largely avoid the issue.
We want better pics by the way
Maybe a piece of rubber between the two will largely avoid the issue.
We want better pics by the way
build thread
All things in moderation, including moderation.
Some people never go crazy... what truly horrible lives they must lead
All things in moderation, including moderation.
Some people never go crazy... what truly horrible lives they must lead
-
v7guy - Moderator
- Posts: 3712
- Joined: Wed Mar 09, 2011 10:17 pm
- Location: NY, long island
- Name: Jason
- Vehicle Year: 2004
- Vehicle: Chevrolet TrailBlazer
- DriveTrain: 4WD
- Rank: Offroad Rated
Dang - Jason beat me to it!
Second the rubber padding.
You may also be able to put at shim under the lamp mounts to tilt it slightly away from the grill. A better pic of the mounting bracket would help to see if that is possible...
Second the rubber padding.
You may also be able to put at shim under the lamp mounts to tilt it slightly away from the grill. A better pic of the mounting bracket would help to see if that is possible...
-
firefox2501 - Off-Roader
- Posts: 208
- Joined: Sat Mar 09, 2013 7:49 pm
- Location: VA, Chantilly
- Name: Mike
- Vehicle Year: 2006
- Vehicle: Chevrolet TrailBlazer
- DriveTrain: 4WD
- Rank: Offroad Rated
I agree.. you can get small 5/16 rubber tube and snake the wire in that and electrical tape it at the ends where it goes near the grill..
-

Moots1288 - Veteran
- Posts: 1964
- Joined: Fri Feb 24, 2012 8:42 pm
- Location: Long island
- Name: Moots
- Vehicle Year: 2006
- Vehicle: GMC Envoy
- DriveTrain: 4WD
- Rank: Offroad Rated
If I tilt the lights a smidge forward they will clear the grill by 1"


The FIRST Solid Axle Swapped Trailblazer in Presque Isle County MI
My Build
My Build
The Roadie wrote:Research, plan your mods, fund the plan, then GO DO THEM. THEN WHEEL IT.
-
Cable810 - Veteran
- Posts: 1989
- Joined: Thu Feb 09, 2012 6:43 pm
- Location: MI, Rogers City
- Name: Caleb
- Vehicle Year: 2002
- Vehicle: Chevrolet TrailBlazer
- DriveTrain: 4WD w/ Aftermarket Locker
- Rank: Offroad Rated
Another question. There are 2 wires coming out of the light(Obviously) one is white and the other is Black. I'm assuming that the white is power and the black is ground. When Installing the lights I would want to Ground the black wire if its ground?
I can't find anything on the internet in regards to the lights.
This diagram is kind of giving me an idea on what to do
http://support.kchilites.com/index.php? ... tach_id=21
I can't find anything on the internet in regards to the lights.
This diagram is kind of giving me an idea on what to do
http://support.kchilites.com/index.php? ... tach_id=21
The FIRST Solid Axle Swapped Trailblazer in Presque Isle County MI
My Build
My Build
The Roadie wrote:Research, plan your mods, fund the plan, then GO DO THEM. THEN WHEEL IT.
-
Cable810 - Veteran
- Posts: 1989
- Joined: Thu Feb 09, 2012 6:43 pm
- Location: MI, Rogers City
- Name: Caleb
- Vehicle Year: 2002
- Vehicle: Chevrolet TrailBlazer
- DriveTrain: 4WD w/ Aftermarket Locker
- Rank: Offroad Rated
Does not matter for a incandescent lamp but if are using black for ground the follow that and hook red up to the white wire.
2008 TB Radflo coil overs, Z71 rear springs, 2" spacer, skyjacker N8030 shocks, LT285/75R16E Goodyear MTR
My Build ----- MY Youtube Channel
My Build ----- MY Youtube Channel
-

TBYODA - Moderator
- Posts: 1762
- Joined: Mon Apr 01, 2013 9:07 pm
- Location: NY, Rochester
- Name: Robert Sengillo
- Vehicle Year: 2008
- Vehicle: Chevrolet TrailBlazer
- DriveTrain: 4WD w/ Limited Slip
- Rank: Offroad Rated
Robert is steering you right Caleb. You'll be good to go.
build thread
All things in moderation, including moderation.
Some people never go crazy... what truly horrible lives they must lead
All things in moderation, including moderation.
Some people never go crazy... what truly horrible lives they must lead
-
v7guy - Moderator
- Posts: 3712
- Joined: Wed Mar 09, 2011 10:17 pm
- Location: NY, long island
- Name: Jason
- Vehicle Year: 2004
- Vehicle: Chevrolet TrailBlazer
- DriveTrain: 4WD
- Rank: Offroad Rated
39 posts
• Page 2 of 2 • 1, 2