Offroad Trailblazers and Envoys

CB Rear Mount Plate Flex/Bounce

Breaker 1-9, anybody got a copy? Any discussion or mods relating to electrons and wires go here.

by mikekey » Tue Jun 26, 2012 8:20 am

Sorry my thread title isn't more descriptive. And I wasn't 100% sure where to stick this. But I know a few of you used the Jeep Wrangler Hood Mount with the firestik over the rear tail light, and I know someone else just made their own bracket.

I'm curious about what kind of screws or bolts/how many you used to secure the bracket to the sheet metal.

Image

The problem I'm having right now is after a couple of days the bracket itself starts wobbling, and I'm afraid this will lead to stripping out the holes.

Suggestions appreciated.
Once lifted 03 Trailblazer on 35's, gave it up to travel the USA with my family.
User avatar
mikekey
Lifer
 
Posts: 2585
Joined: Sat Jan 15, 2011 4:08 am
Location: North America
Name: Mike
Vehicle Year: 2003
Vehicle: Chevrolet TrailBlazer
DriveTrain: 4WD w/ G80
Rank: Expedition Rated

by bartonmd » Tue Jun 26, 2012 8:32 am

From my build thread: viewtopic.php?f=25&t=1477

- Cobra C75-WXST CB Radio, and associated antenna (seen below).

I made a bracket out of 12ga 304 stainless steel, and cut it to fit. I drilled (2) 1/4" holes in it, then transferred them to the body, as shown. There is no good way to get nuts on the inside of that spot, so I removed the tail light and drilled a 7/8" hole in the bottom sheet metal. I slathered everything in between the mount and body with silicone, then put the 1/4-20 bolts through the holes and put the Nylock nuts on the inside, through the 7/8" hole. I then put some silicone on a 7/8" Heyco plug, and snapped it in the hole. I ran the antenna wire in with the tail light wiring, and used a round file to file off a little bit of the top of the tail light, so the cable could pass through.

Image
Image
Image
Image


ETA: Also, an antenna spring helps take some of the vibration and impulse loads off of the mount/body.

Mike
bartonmd
Moderator
 
Posts: 4469
Joined: Wed Sep 09, 2009 9:35 am
Location: IN, Indianapolis
Name: Mike
Vehicle Year: 2007
Vehicle: Chevrolet TrailBlazer
DriveTrain: 4WD w/ G80
Rank: Offroad Rated

by mikekey » Tue Jun 26, 2012 9:07 am

Ok, interesting. This gives me some ideas. I'll pick up the spring too! Thanks.
Once lifted 03 Trailblazer on 35's, gave it up to travel the USA with my family.
User avatar
mikekey
Lifer
 
Posts: 2585
Joined: Sat Jan 15, 2011 4:08 am
Location: North America
Name: Mike
Vehicle Year: 2003
Vehicle: Chevrolet TrailBlazer
DriveTrain: 4WD w/ G80
Rank: Expedition Rated

by dvanbramer88 » Tue Jun 26, 2012 9:21 am

Like MDB did and Josh did, You definatly want to have nuts and lock washers on the back. I used stainless machine screws. On the passenger side you can reach through with a socket and hold the nut while another tightens the screw. On the driver side, see MDB's thread.
Chevy Power!
Long live the Republic
"Violence is not always evil. The judicious use of violence and those willing to use it without hesitation is often all that stands between wolves and sheep."

Build Thread
User avatar
dvanbramer88
Lifer
 
Posts: 2283
Joined: Tue Jul 05, 2011 3:12 pm
Location: PA, Bristol
Name: Dave
Vehicle Year: 2002
Vehicle: Chevrolet TrailBlazer
DriveTrain: 4WD
Rank: Trail Ready

by Trail X » Tue Jun 26, 2012 1:16 pm

I used rivet nuts after my sheet metal screws basically stripped out entirely.
8-) Build Thread | ExPo Build | YouTube Videos
Not all who wander are lost. -Tolkien
User avatar
Trail X
Founder
 
Posts: 9935
Joined: Mon Sep 07, 2009 10:22 pm
Location: VA, Roanoke
Name: James Downing
Vehicle Year: 2005
Vehicle: Chevrolet TrailBlazer
DriveTrain: 4WD w/ Aftermarket Locker
Rank: Expedition Guide

by mikekey » Wed Jun 27, 2012 9:36 am

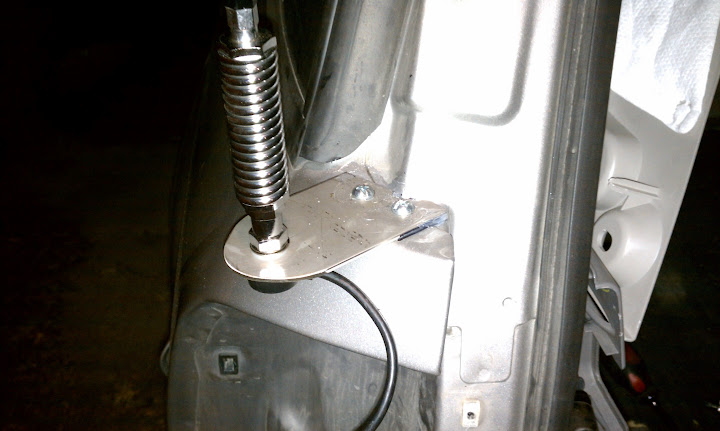
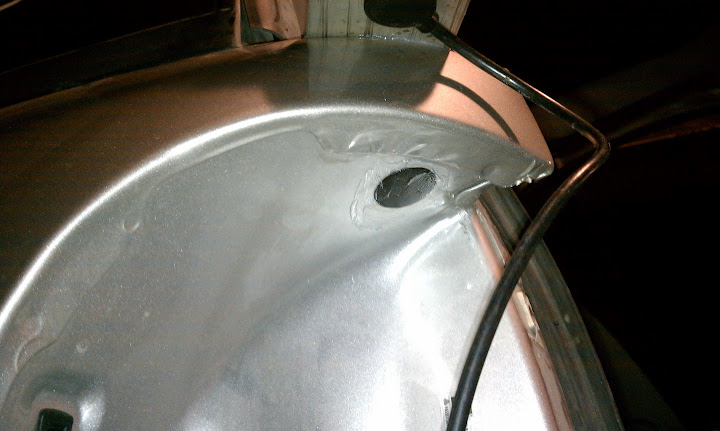
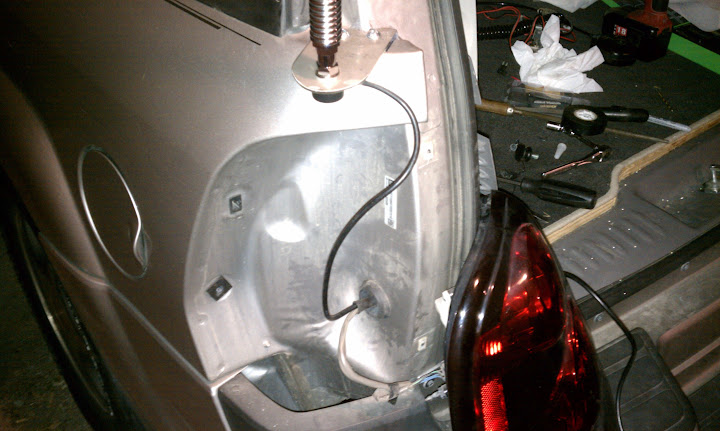
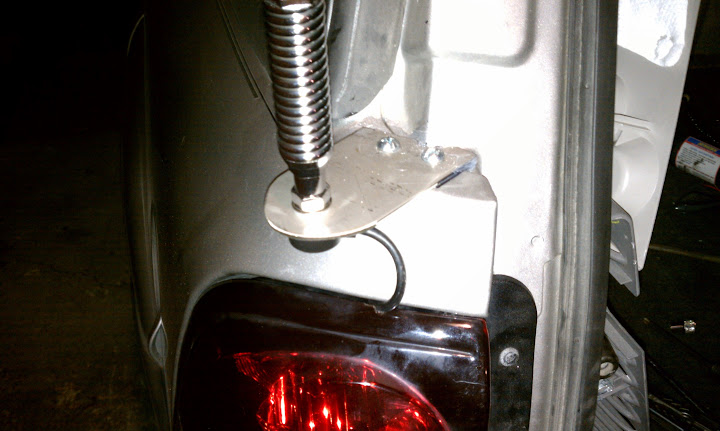
bartonmd wrote:I made a bracket out of 12ga 304 stainless steel, and cut it to fit. I drilled (2) 1/4" holes in it, then transferred them to the body, as shown. There is no good way to get nuts on the inside of that spot, so I removed the tail light and drilled a 7/8" hole in the bottom sheet metal. I slathered everything in between the mount and body with silicone, then put the 1/4-20 bolts through the holes and put the Nylock nuts on the inside, through the 7/8" hole. I then put some silicone on a 7/8" Heyco plug, and snapped it in the hole. I ran the antenna wire in with the tail light wiring, and used a round file to file off a little bit of the top of the tail light, so the cable could pass through.


I originally ran my wire the same way. I removed the bracket last night, and kind of annoyed at how quickly rust formed on the sheetmetal. It's only been on for about a week.

My idea here is to move it a few inches further back, I'm going to have to cut a hole like you did. and I might enlarge the holes on the plate to use a larger bolt with lock nut. I also have a few strips of rubber from another project, so I think I'm going to cut a gasket to go under it before tightening it to the body. This might also eliminate some vibration.

I have contemplated just welding the sucker on there.
Once lifted 03 Trailblazer on 35's, gave it up to travel the USA with my family.
User avatar
mikekey
Lifer
 
Posts: 2585
Joined: Sat Jan 15, 2011 4:08 am
Location: North America
Name: Mike
Vehicle Year: 2003
Vehicle: Chevrolet TrailBlazer
DriveTrain: 4WD w/ G80
Rank: Expedition Rated


Return to Electrical / Radios