Offroad Trailblazers and Envoys

Ceiling Mount CB, Spectra Mount, and Rear Mount Antenna

Breaker 1-9, anybody got a copy? Any discussion or mods relating to electrons and wires go here.

by SaltWaterDrinker » Thu Feb 23, 2012 9:39 pm

Today Dave and I decided to get the Comm gear in the Trailblazer - I was missing it...haha. From the experience I had in my previous Trailblazer, having the CB mounted on the glovebox made it too far away to operate safely and way too hard to hear. I also learned that having the massive Laird Whip antenna mounted on the lip of my hood was a bit much, especially when running into low hanging tree branches with it during trail runs - it hurt when it whipped in my window! :?

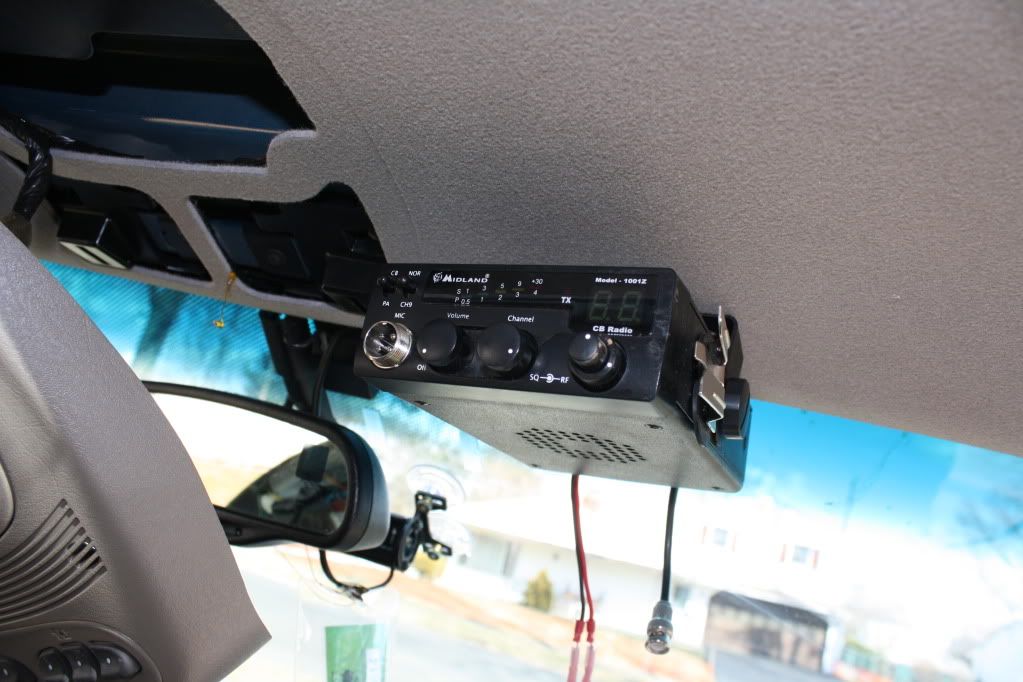
I figured one night that all "business" comes from above...so I wanted to somehow mount my CB to the ceiling. The original plan was to mount it in/on the voice recorder and garage opener...but it was too honky and blocked the rear view mirror. Then, over the phone, it evolved into getting a small piece of metal and fixing it to one of the screws that hold the voice recorder/garage opener thing to the ceiling, allowing it to rotate so both driver and passenger could view the radio. However, that would require us to punch through the ceiling and...well, that was just a horrid idea. Then Dave figured we could remove the sun visor and mount it with the existing hardware somehow.

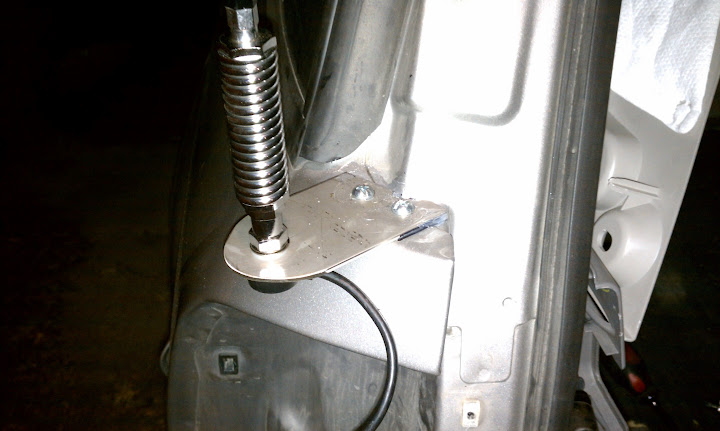
I wanted to use my existing Laird Whip, but mount it in the back of the TrailBlazer - kind of like what most of you guys have...just not punching through the side of the truck or using the "contact method." So, we figured we would mount it to the tail light or metal are above the tail light. It would keep it "lower" yet high enough so I could still get out to talk to my locals.

Somehow...my Midland 1000Z Blew up. When we hooked it up to test it, all you heard was a loud whining on the other end...no TX audio at all. So, since I had no other options, I put my 19DX in there which is over modulated since I broke the modulation adjuster on the board :facepalm: ; that's why you see two different radios down there:

Well, here are the photos - Captions are below the photos:

Image
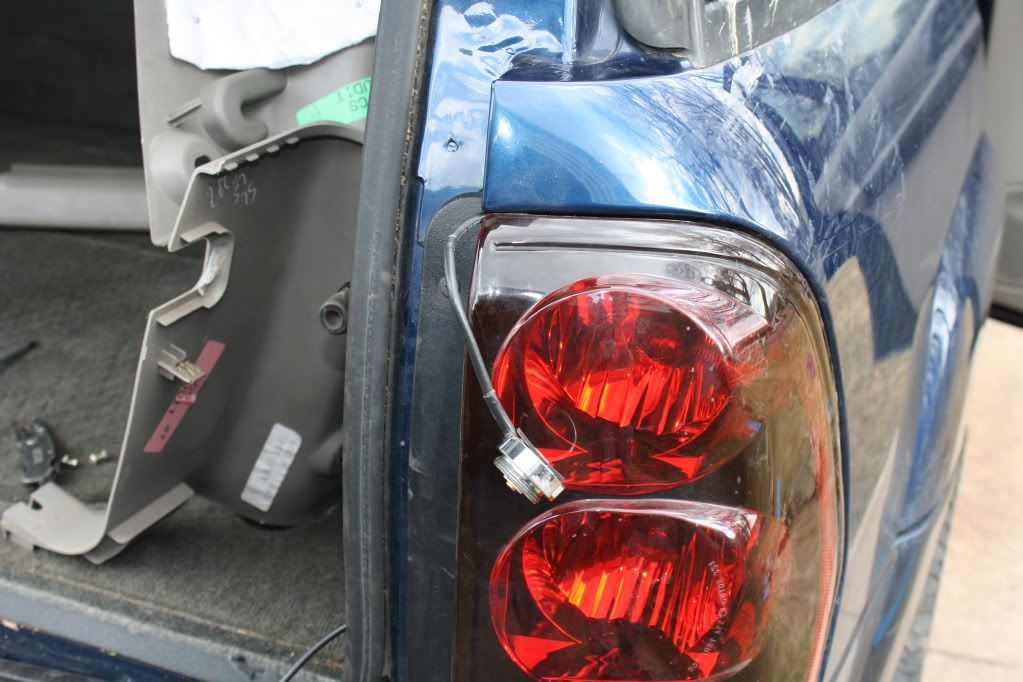
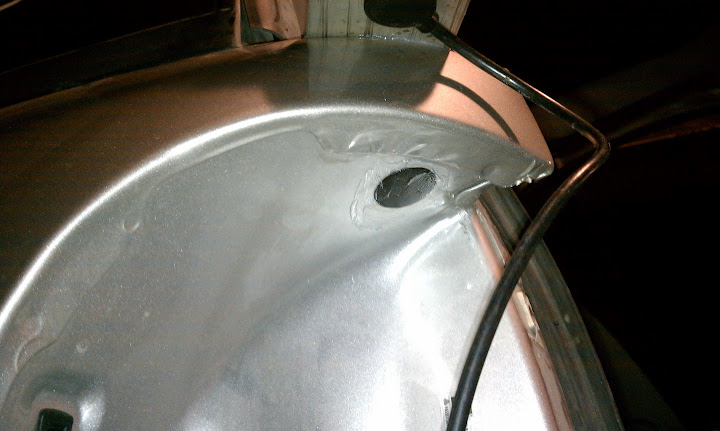
You can see here that we fed the Coax through rear of the tail light...

Image
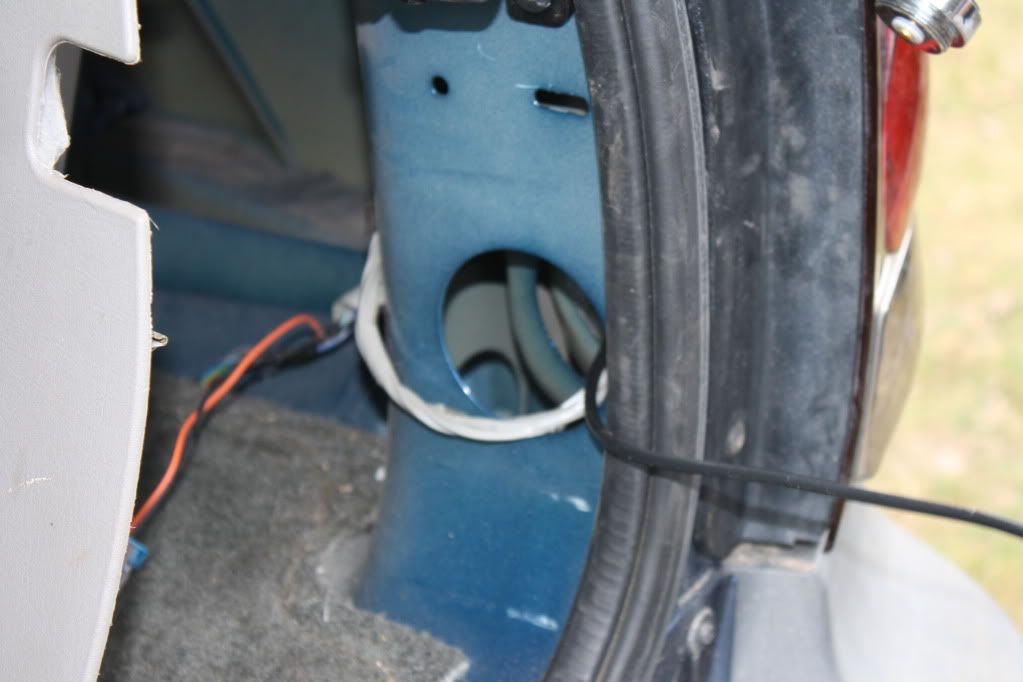
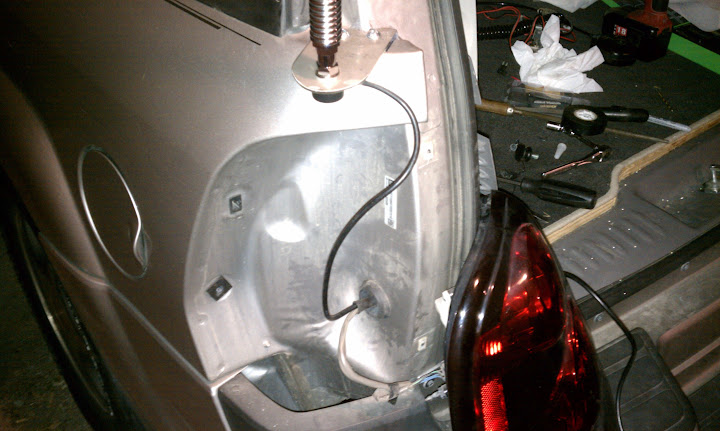
How the coax entered the interior...we fed it along the side.

Image
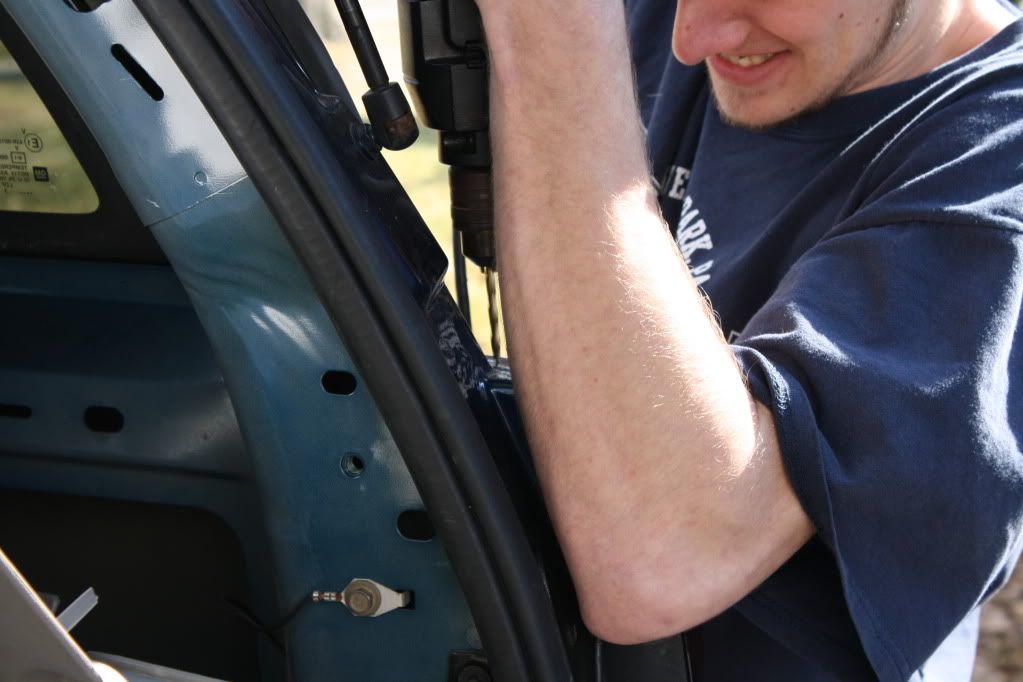
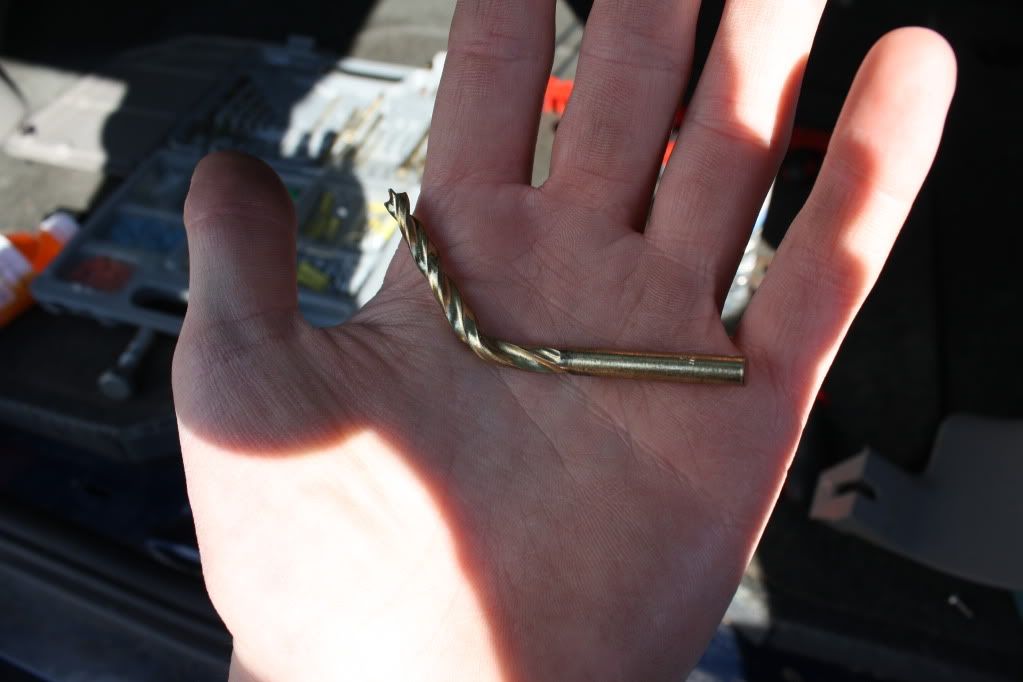
Dave attempting to drill into the mounting area...with a wood bit...my fault; whoops. Bent bit below:
Image

Image
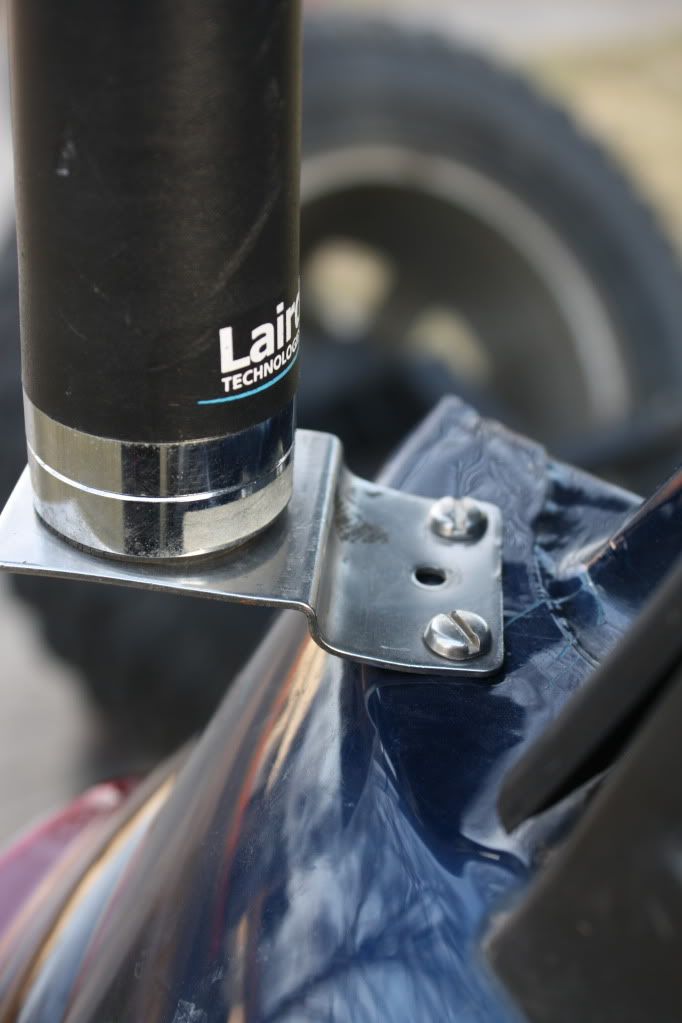
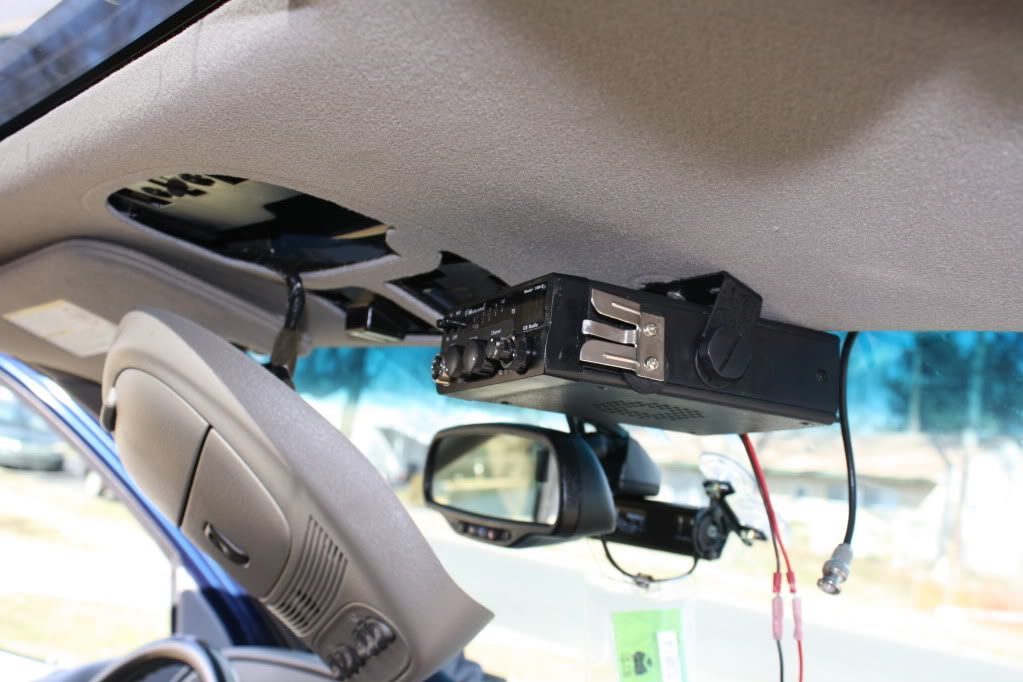
Close up of the Finished mount
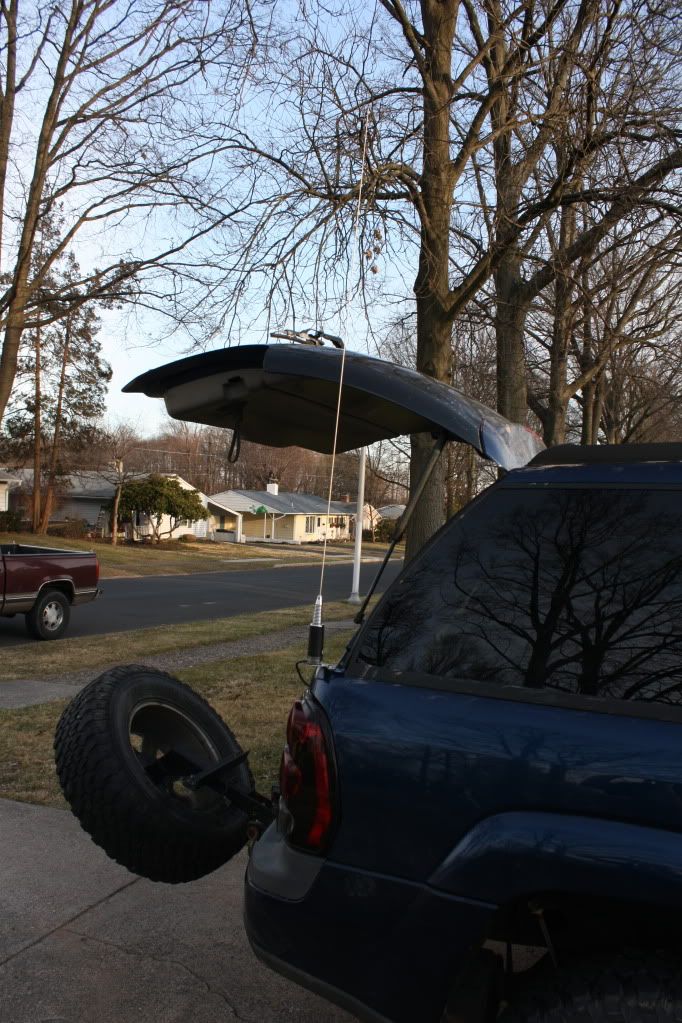
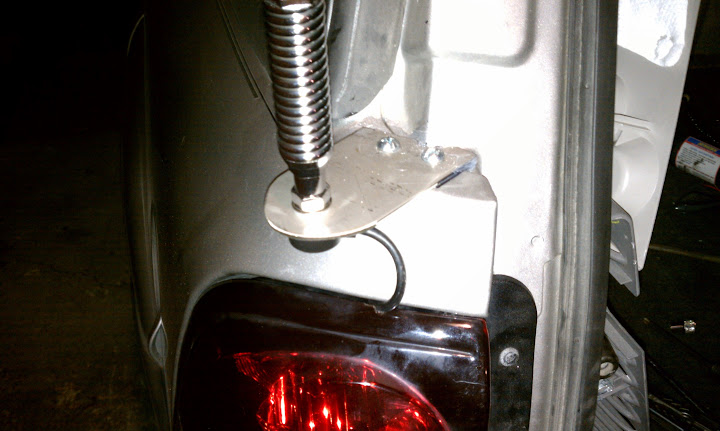
Image
Far off shot

INTERIOR

Image
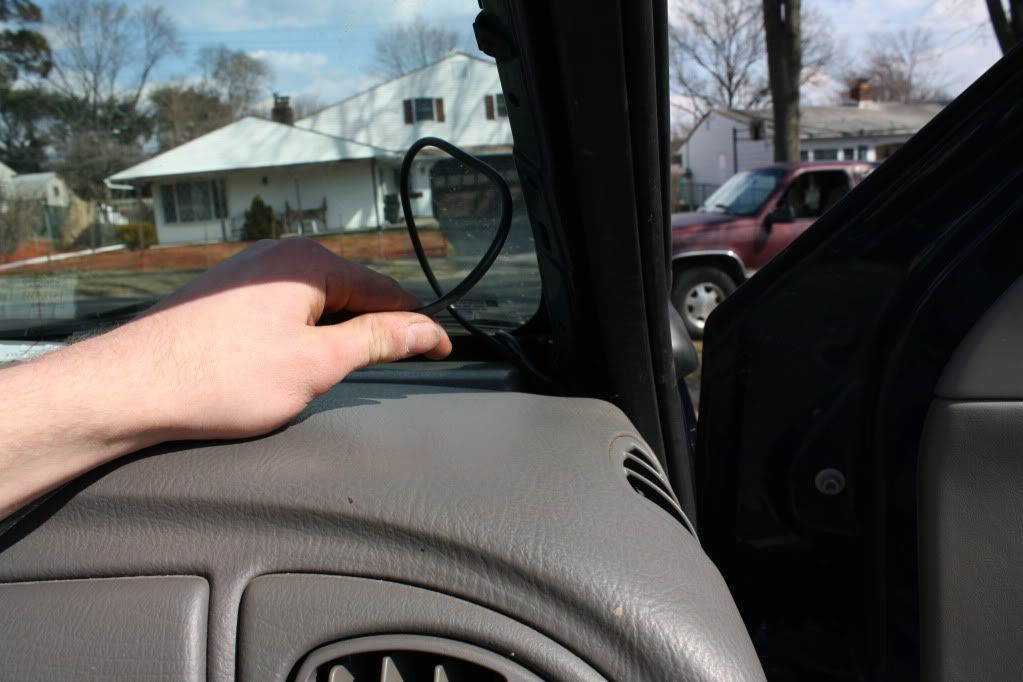
Where we brought the coax through

Image
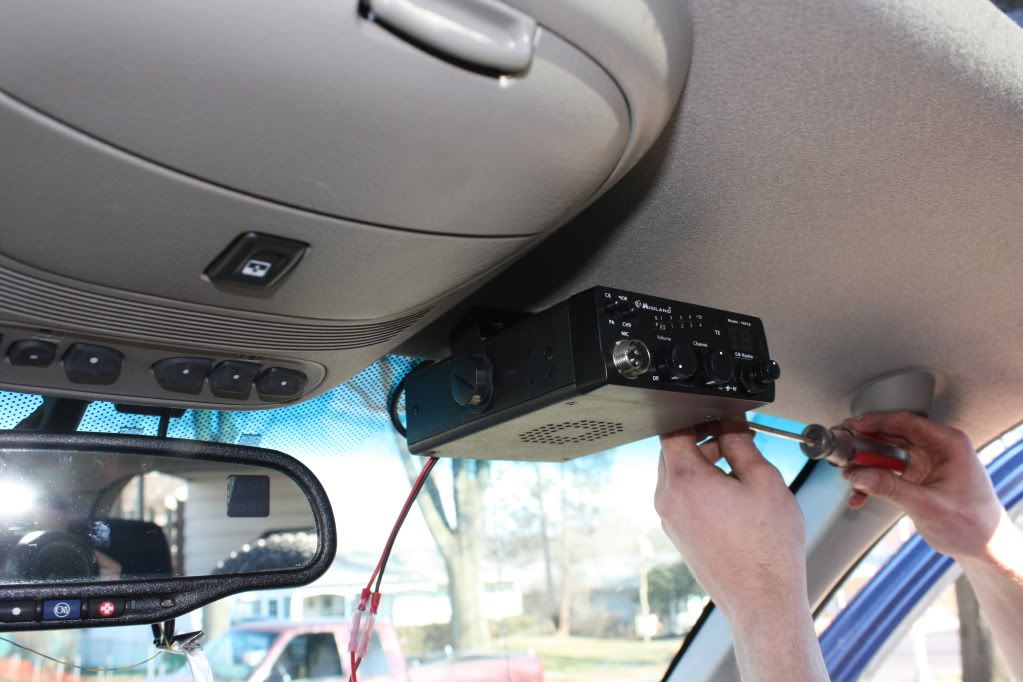
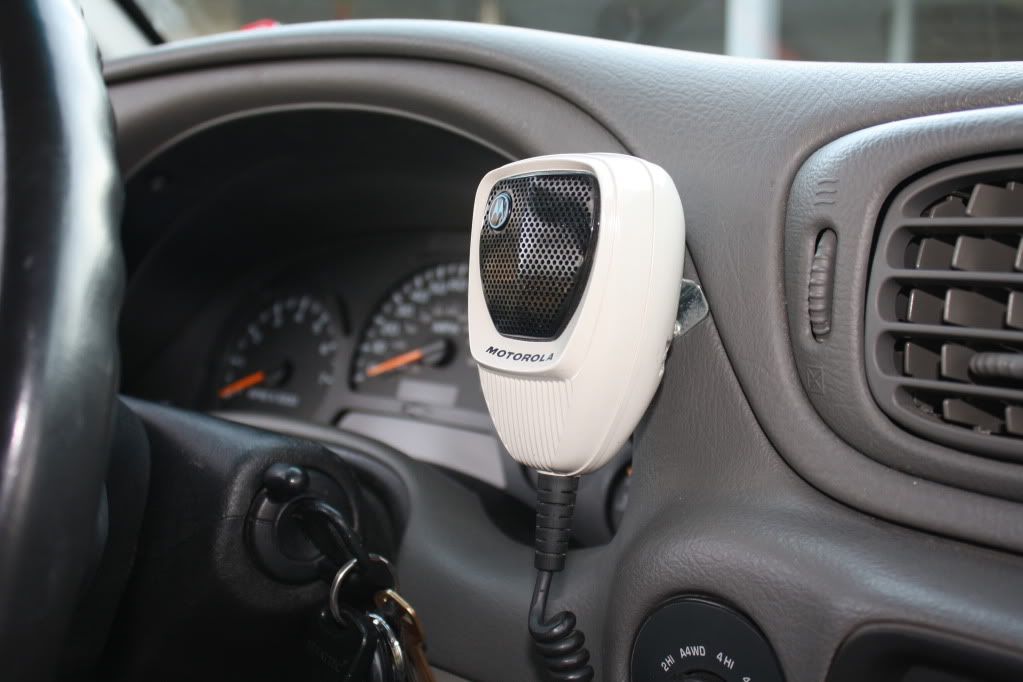
The CB - mounted where the visor used to clip into place
Image
Image

Image
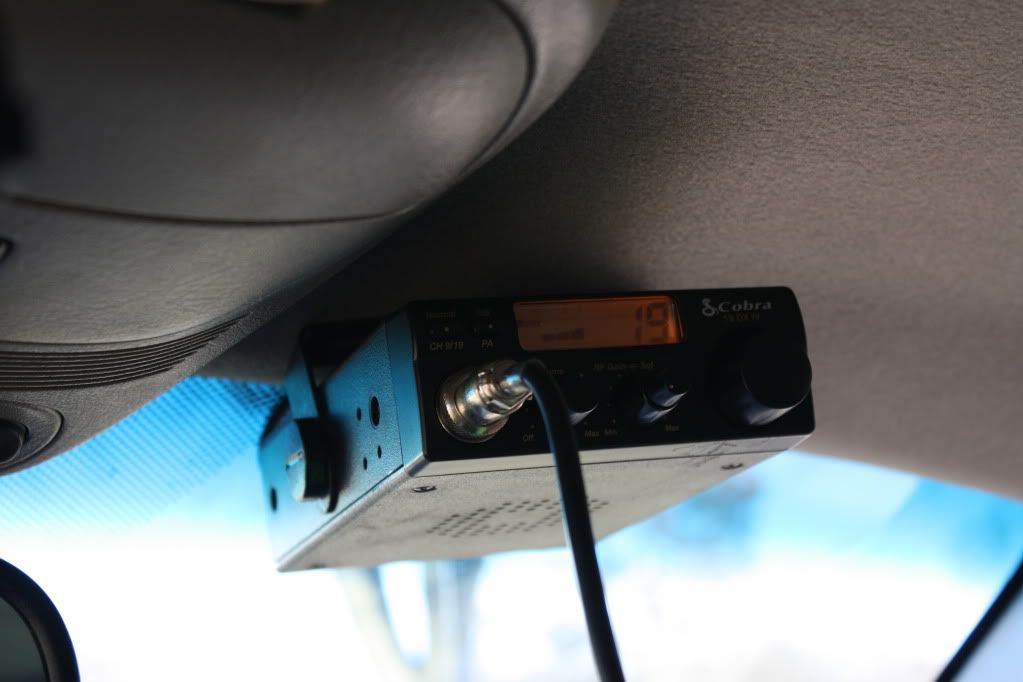
The really crappy sounding 19DX...

We fed the electrical across the top of the headliner, and down the driver side door area. We then fed it through the internal fuse box. I have a nasty alternator noise...I guess the 19DX isn't set to filter that out...or we did something wrong.

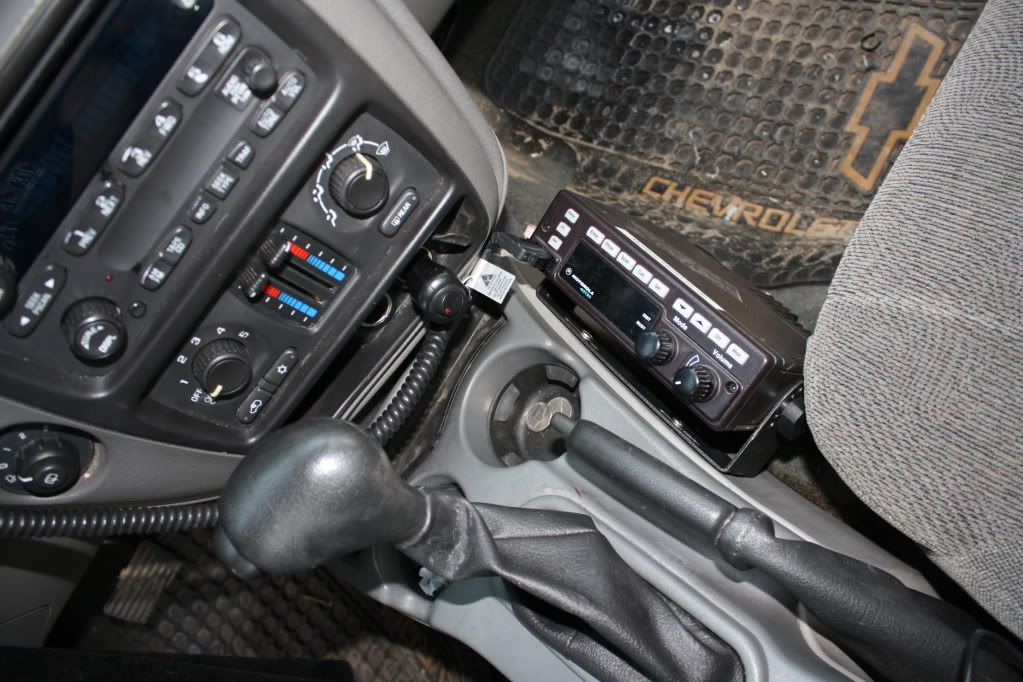
Finally...my not so complete VHF:
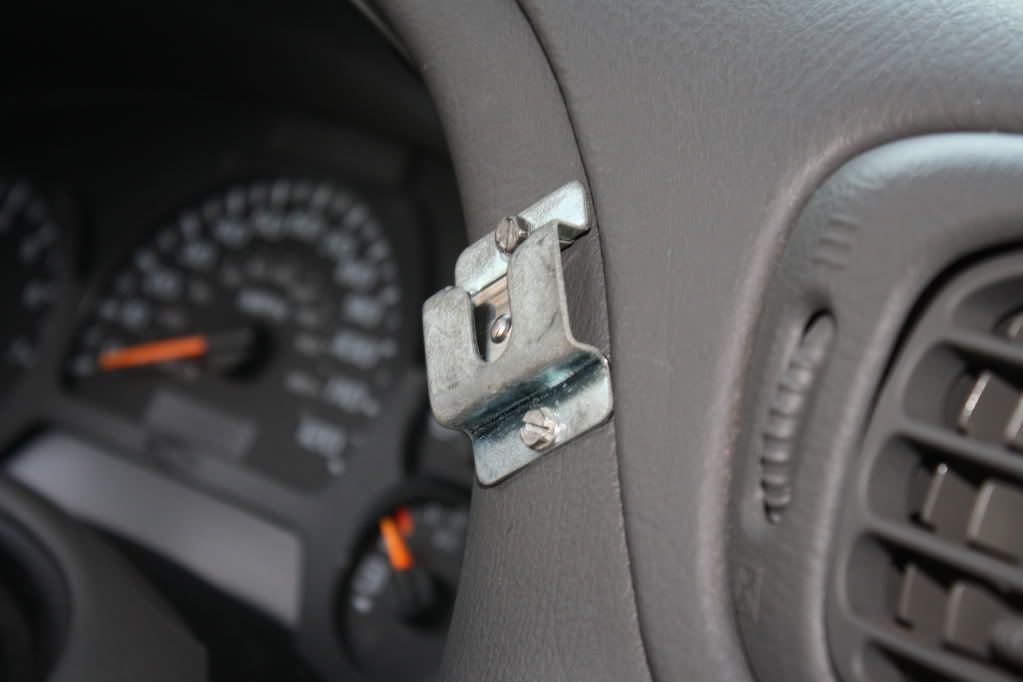
I got sick of the Johnson; the speaker was blown and it's receiver was dirt. So, I threw my trusty Spectra in there. We had to break the area in which we mounted it, but Dave put a screw into place to hold it - pretty clever. The only reason it is not complete is because I don't know how to wire it to the ignition - I'll make a Troubleshooting post on it soon. I plan to mount the VHF antenna to the opposite area above the tail light - It just seems more practical and allows me to pull this under the carport.

Image
Image
Image

As time progressed...the camera became less and less of a priority and our patience began to become tested. Happy this is squared away now. I can't wait for the ribbing I'll get tomorrow when I jump in with the locals on 19.

:excited: :safari:
User avatar
SaltWaterDrinker
Trail-Blazer
 
Posts: 465
Joined: Wed Jul 06, 2011 9:07 pm
Location: PA, Philadelphia
Name: Josh
Vehicle Year: 2003
Vehicle: Chevrolet TrailBlazer
DriveTrain: 4WD
Rank: Trail Ready

by Bigbadbowtie088 » Thu Feb 23, 2012 10:26 pm

Very nice! I was fine tuning my CB today. Used my scanner to pick up the cb channel, was coming in nice and clear. I've got the cobra like you have pictured above. I think I finally got it squared away. I still need to install a new AUX cord to my PA speaker
User avatar
Bigbadbowtie088
RIP
 
Posts: 30
Joined: Fri Apr 30, 2010 11:46 pm
Location: GA, Alpharetta
Name: Brandon Walker
Vehicle Year: 2005
Vehicle: Chevrolet TrailBlazer
DriveTrain: 2WD

by Mooseknuckle » Fri Feb 24, 2012 6:18 am

Looks nice. Good job. I need to do something right now I have a magnet mount
I don't dial 911
Mooseknuckle
Addict
 
Posts: 708
Joined: Sun Feb 21, 2010 9:31 am
Location: NJ,Brick
Name: Jeff
Vehicle Year: 2006
Vehicle: Chevrolet TrailBlazer
DriveTrain: 4WD
Rank: Offroad Rated

by SaltWaterDrinker » Fri Feb 24, 2012 6:59 am

Mooseknuckle wrote:Looks nice. Good job. I need to do something right now I have a magnet mount


Mount that bad boy to your rear end! Depending on what the base looks like, you could get a steel plate and drill into the base, mounting it to the steel plate...and then do what I did. Or, just get a whole new antenna. I know with an antenna your size that perma-mounting it requires you to drill an obnoxious sized hole in the side of your truck...or you could downgrade it altogether. I just don't know if you use it off the trails - the 959 is one heck of a radio. :D

How do you like it, anyway?
User avatar
SaltWaterDrinker
Trail-Blazer
 
Posts: 465
Joined: Wed Jul 06, 2011 9:07 pm
Location: PA, Philadelphia
Name: Josh
Vehicle Year: 2003
Vehicle: Chevrolet TrailBlazer
DriveTrain: 4WD
Rank: Trail Ready

by bartonmd » Fri Feb 24, 2012 8:58 am

FWIW, James did a mount like that, and the screws kept coming loose, to the point that he just put nutserts and machine screws in it, instead. I straight up bolted mine together.

From my build thread:

I made a bracket out of 12ga 304 stainless steel, and cut it to fit. I drilled (2) 1/4" holes in it, then transferred them to the body, as shown. There is no good way to get nuts on the inside of that spot, so I removed the tail light and drilled a 7/8" hole in the bottom sheet metal. I slathered everything in between the mount and body with silicone, then put the 1/4-20 bolts through the holes and put the Nylock nuts on the inside, through the 7/8" hole. I then put some silicone on a 7/8" Heyco plug, and snapped it in the hole. I ran the antenna wire in with the tail light wiring, and used a round file to file off a little bit of the top of the tail light, so the cable could pass through.

Image
Image
Image
Image
bartonmd
Moderator
 
Posts: 4469
Joined: Wed Sep 09, 2009 9:35 am
Location: IN, Indianapolis
Name: Mike
Vehicle Year: 2007
Vehicle: Chevrolet TrailBlazer
DriveTrain: 4WD w/ G80
Rank: Offroad Rated

by dvanbramer88 » Fri Feb 24, 2012 9:02 am

bartonmd wrote:FWIW, James did a mount like that, and the screws kept coming loose, to the point that he just put nutserts and machine screws in it, instead. I straight up bolted mine together.

From my build thread:

I made a bracket out of 12ga 304 stainless steel, and cut it to fit. I drilled (2) 1/4" holes in it, then transferred them to the body, as shown. There is no good way to get nuts on the inside of that spot, so I removed the tail light and drilled a 7/8" hole in the bottom sheet metal. I slathered everything in between the mount and body with silicone, then put the 1/4-20 bolts through the holes and put the Nylock nuts on the inside, through the 7/8" hole. I then put some silicone on a 7/8" Heyco plug, and snapped it in the hole. I ran the antenna wire in with the tail light wiring, and used a round file to file off a little bit of the top of the tail light, so the cable could pass through.

Image
Image
Image
Image


Don't worry, There is lock washers and nuts on the back side of those stainless screws. And I don't know why you had trouble with nuts. I just reached back there and put the nut on and held to with a socket while Josh turned the screw.
Last edited by dvanbramer88 on Fri Feb 24, 2012 9:06 am, edited 1 time in total.
Chevy Power!
Long live the Republic
"Violence is not always evil. The judicious use of violence and those willing to use it without hesitation is often all that stands between wolves and sheep."

Build Thread
User avatar
dvanbramer88
Lifer
 
Posts: 2283
Joined: Tue Jul 05, 2011 3:12 pm
Location: PA, Bristol
Name: Dave
Vehicle Year: 2002
Vehicle: Chevrolet TrailBlazer
DriveTrain: 4WD
Rank: Trail Ready

by bartonmd » Fri Feb 24, 2012 9:04 am

dvanbramer88 wrote:
Don't worry, There is lock washers and nuts on the back side of those stainless screws.


OK, good... They looked like self-tapping sheetmetal screws!

What did you do to get the nuts on them?

Mike
bartonmd
Moderator
 
Posts: 4469
Joined: Wed Sep 09, 2009 9:35 am
Location: IN, Indianapolis
Name: Mike
Vehicle Year: 2007
Vehicle: Chevrolet TrailBlazer
DriveTrain: 4WD w/ G80
Rank: Offroad Rated

by dvanbramer88 » Fri Feb 24, 2012 9:07 am

I just reached back there and put them on. It wasn't too hard. I held them with a socket while josh turned the screws.
Chevy Power!
Long live the Republic
"Violence is not always evil. The judicious use of violence and those willing to use it without hesitation is often all that stands between wolves and sheep."

Build Thread
User avatar
dvanbramer88
Lifer
 
Posts: 2283
Joined: Tue Jul 05, 2011 3:12 pm
Location: PA, Bristol
Name: Dave
Vehicle Year: 2002
Vehicle: Chevrolet TrailBlazer
DriveTrain: 4WD
Rank: Trail Ready

by dvanbramer88 » Fri Feb 24, 2012 9:08 am

If you look in the very first picture, almost off frame to the left, next to the craftsman razor, those two screws/nuts are what we used.
Chevy Power!
Long live the Republic
"Violence is not always evil. The judicious use of violence and those willing to use it without hesitation is often all that stands between wolves and sheep."

Build Thread
User avatar
dvanbramer88
Lifer
 
Posts: 2283
Joined: Tue Jul 05, 2011 3:12 pm
Location: PA, Bristol
Name: Dave
Vehicle Year: 2002
Vehicle: Chevrolet TrailBlazer
DriveTrain: 4WD
Rank: Trail Ready

by bartonmd » Fri Feb 24, 2012 9:22 am

Oh, I get it! You did it on the passenger side, and reached through the "storage comparment" hole, right? I did it on the driver's side, and there is no storage compartment hole, so there was nothing to reach through... I looked for like 1/2 hour for something to reach through, before I drilled that 7/8" hole...

Mike
bartonmd
Moderator
 
Posts: 4469
Joined: Wed Sep 09, 2009 9:35 am
Location: IN, Indianapolis
Name: Mike
Vehicle Year: 2007
Vehicle: Chevrolet TrailBlazer
DriveTrain: 4WD w/ G80
Rank: Offroad Rated

by dvanbramer88 » Fri Feb 24, 2012 10:57 am

bartonmd wrote:Oh, I get it! You did it on the passenger side, and reached through the "storage comparment" hole, right? I did it on the driver's side, and there is no storage compartment hole, so there was nothing to reach through... I looked for like 1/2 hour for something to reach through, before I drilled that 7/8" hole...

Mike


Yep, haha. And FWIW, we ran the coax inside the rear quarter panel, down through the door sills, up through the A pillar and into the head liner. Ran the power supply on the driverside down the A pillar through the door sills and into the fuse center under the rear seat. It was quick and easy. Hardest part was getting the passenger side sun visor off of it's swivel mount.
Chevy Power!
Long live the Republic
"Violence is not always evil. The judicious use of violence and those willing to use it without hesitation is often all that stands between wolves and sheep."

Build Thread
User avatar
dvanbramer88
Lifer
 
Posts: 2283
Joined: Tue Jul 05, 2011 3:12 pm
Location: PA, Bristol
Name: Dave
Vehicle Year: 2002
Vehicle: Chevrolet TrailBlazer
DriveTrain: 4WD
Rank: Trail Ready

by SaltWaterDrinker » Fri Feb 24, 2012 2:02 pm

You ain't kidding, that was the worst part of it all. I was pleasantly surprised at how easy all of the panels came off...especially in the back cargo area. I envisioned having a repeat quality(poor) of what a professional radio shop did on my previous trailblazer...thankfully, this was not the case.
User avatar
SaltWaterDrinker
Trail-Blazer
 
Posts: 465
Joined: Wed Jul 06, 2011 9:07 pm
Location: PA, Philadelphia
Name: Josh
Vehicle Year: 2003
Vehicle: Chevrolet TrailBlazer
DriveTrain: 4WD
Rank: Trail Ready

by KE7WOX » Sun Feb 26, 2012 2:33 am

Nice install, a few questions.

- Did you put the mount on the bracket after running the coax? I have yet to see an NMO that can be mounted that way, all the ones I have seen you start by running the coax through the hole and then tighten it.

I am definitely thinking about getting one of those but with a whip that will do 27-30 so I can swap the CB for a 10m radio, given that I have no use for the CB except when traveling and maybe the PA speaker if I do go with one.

-What is the Spectra for? is it for VHF Ham?
This is an aggressive post. You probably won’t like it. It is quite doubtful that you have the taste or sophistication to be able to appreciate a post of this quality and depth.

Build Thread
User avatar
KE7WOX
Veteran
 
Posts: 1226
Joined: Tue Sep 29, 2009 2:10 pm
Location: OH, Dublin (Columbus)
Name: Felipe G
Vehicle Year: 2004
Vehicle: Chevrolet TrailBlazer
DriveTrain: 4WD

by djthumper » Sun Feb 26, 2012 2:46 am

I have seen some that are generally used for a trunk lip mount but I have sen a few others.

He is using the spectra for MURS, though that is a bit overkill of a radio service limited to 2 watts. Which would mean the radio is either modded to go down to 2W or he is running it out side of the limits of the service.
User avatar
djthumper
Moderator
 
Posts: 2702
Joined: Wed Mar 24, 2010 6:04 pm
Location: NV, Las Vegas
Name: Larry
Vehicle Year: 2006
Vehicle: Chevrolet TrailBlazer
DriveTrain: 4WD
Rank: Offroad Rated

by SaltWaterDrinker » Sun Feb 26, 2012 9:08 am

KE7WOX wrote:Nice install, a few questions.

- Did you put the mount on the bracket after running the coax? I have yet to see an NMO that can be mounted that way, all the ones I have seen you start by running the coax through the hole and then tighten it.

I am definitely thinking about getting one of those but with a whip that will do 27-30 so I can swap the CB for a 10m radio, given that I have no use for the CB except when traveling and maybe the PA speaker if I do go with one.

-What is the Spectra for? is it for VHF Ham?


We ran it before mounting it; I cut the end off and then we ran it thru with a wire snake.

The Spectra is for CAP, Ham, and local public safety primarily - doing MURS is the tip of the iceberg and is rarely used at this point.

djthumper wrote:I have seen some that are generally used for a trunk lip mount but I have sen a few others.

He is using the spectra for MURS, though that is a bit overkill of a radio service limited to 2 watts. Which would mean the radio is either modded to go down to 2W or he is running it out side of the limits of the service.


The mount was originally a lip mount - if you look in my old build thread, you can see it on the front of the vehicle. We bent this into shape to function as it does today.

I originally caught onto this trend when I heard a group of aspiring communicators waiting to take their ham test; they were out of Cherry Hill...and further South. One guy was running 110 watts out of a trunk mount spectra, the others were on iComs or something with amps and directional antennas. "Free VHF," they said - "Modified CB Radio...without the idiots." They had their own PL tones and everything...it was really intricate.
Mind you, this was back when I had my EFJ-5300 in service; I've never heard or communicated with someone so far away before on simplex.

Since then, they stopped - moved on to bigger and brighter things. I talk to them on the BEARS network every now and then.
User avatar
SaltWaterDrinker
Trail-Blazer
 
Posts: 465
Joined: Wed Jul 06, 2011 9:07 pm
Location: PA, Philadelphia
Name: Josh
Vehicle Year: 2003
Vehicle: Chevrolet TrailBlazer
DriveTrain: 4WD
Rank: Trail Ready

by dvanbramer88 » Sun Feb 26, 2012 11:05 am

SaltWaterDrinker wrote:
doing MURS is the tip of the iceberg and is rarely used at this point.


That's because I'm literally the only person he talks to on MURS and he hasn't had a radio in his truck since the wreck last year....
Chevy Power!
Long live the Republic
"Violence is not always evil. The judicious use of violence and those willing to use it without hesitation is often all that stands between wolves and sheep."

Build Thread
User avatar
dvanbramer88
Lifer
 
Posts: 2283
Joined: Tue Jul 05, 2011 3:12 pm
Location: PA, Bristol
Name: Dave
Vehicle Year: 2002
Vehicle: Chevrolet TrailBlazer
DriveTrain: 4WD
Rank: Trail Ready

by SaltWaterDrinker » Sun Feb 26, 2012 11:11 am

dvanbramer88 wrote:
That's because I'm literally the only person he talks to on MURS and he hasn't had a radio in his truck since the wreck last year....


I talk to myself... :safe:
User avatar
SaltWaterDrinker
Trail-Blazer
 
Posts: 465
Joined: Wed Jul 06, 2011 9:07 pm
Location: PA, Philadelphia
Name: Josh
Vehicle Year: 2003
Vehicle: Chevrolet TrailBlazer
DriveTrain: 4WD
Rank: Trail Ready

by KE7WOX » Sun Feb 26, 2012 12:46 pm

Yeah, my Icom puts out 65W I think. Almost nothing compared to the 110W Spectras. Was it too difficult to get it down from 146 to 144?
This is an aggressive post. You probably won’t like it. It is quite doubtful that you have the taste or sophistication to be able to appreciate a post of this quality and depth.

Build Thread
User avatar
KE7WOX
Veteran
 
Posts: 1226
Joined: Tue Sep 29, 2009 2:10 pm
Location: OH, Dublin (Columbus)
Name: Felipe G
Vehicle Year: 2004
Vehicle: Chevrolet TrailBlazer
DriveTrain: 4WD

by SaltWaterDrinker » Sun Feb 26, 2012 12:49 pm

KE7WOX wrote:Yeah, my Icom puts out 65W I think. Almost nothing compared to the 110W Spectras. Was it too difficult to get it down from 146 to 144?


Not at all - its the 136-162 version.

Before the heads leaked acid all over the board of my 146-174 non-astro spectra, I just had to use the lab software and bring it down to where I wanted it. I'm not too sure how to do it with the CPS non-DOS Software; maybe HEX edits or something.
User avatar
SaltWaterDrinker
Trail-Blazer
 
Posts: 465
Joined: Wed Jul 06, 2011 9:07 pm
Location: PA, Philadelphia
Name: Josh
Vehicle Year: 2003
Vehicle: Chevrolet TrailBlazer
DriveTrain: 4WD
Rank: Trail Ready

by KE7WOX » Sun Feb 26, 2012 2:08 pm

Yeah, I believe the way to do it is to perform a HEX edit to certain values, then that switches everything, so if you put in a frequency that is within the range of the radio but shifted up from the real (eg. 152 on the software is 144 on the radio, 154 is 146 or something like that).

I have thought about picking up a couple of cheap Spectras to play with, as they're readily available in remote mount version, which is good with the TB, as it has like zero space to mount anything more than 1 radio within reach of the driver.
This is an aggressive post. You probably won’t like it. It is quite doubtful that you have the taste or sophistication to be able to appreciate a post of this quality and depth.

Build Thread
User avatar
KE7WOX
Veteran
 
Posts: 1226
Joined: Tue Sep 29, 2009 2:10 pm
Location: OH, Dublin (Columbus)
Name: Felipe G
Vehicle Year: 2004
Vehicle: Chevrolet TrailBlazer
DriveTrain: 4WD

Next

Return to Electrical / Radios