There have been quite a few threads over the years on the subject on various boards, many of them filled with wild performance claims along with disagreements, misunderstandings and just plain misinformation on how the cooling system actually works and how an electric fan may or may not perform on a TB/Envoy. Hopefully this will give people a better understanding of how things work and lay out a clear path to actually improving the cooling system for those who would like to do so.
I’ve been wanting to upgrade the cooling system on this thing for a long time as I feel the stock system is just not adequate. It has always bothered me knowing it’ll warm up if just pushed a little too hard—that doesn’t leave much margin for really extreme conditions. Having to watch the temp gauge when screaming up long mountain passes at 80 MPH in hot weather--even when not towing anything--is not satisfactory. Having to watch the temp gauge and allowing it to dictate my speed while towing something bothers me even if it’s something I don’t do everyday—when I do do it, I want things to work.
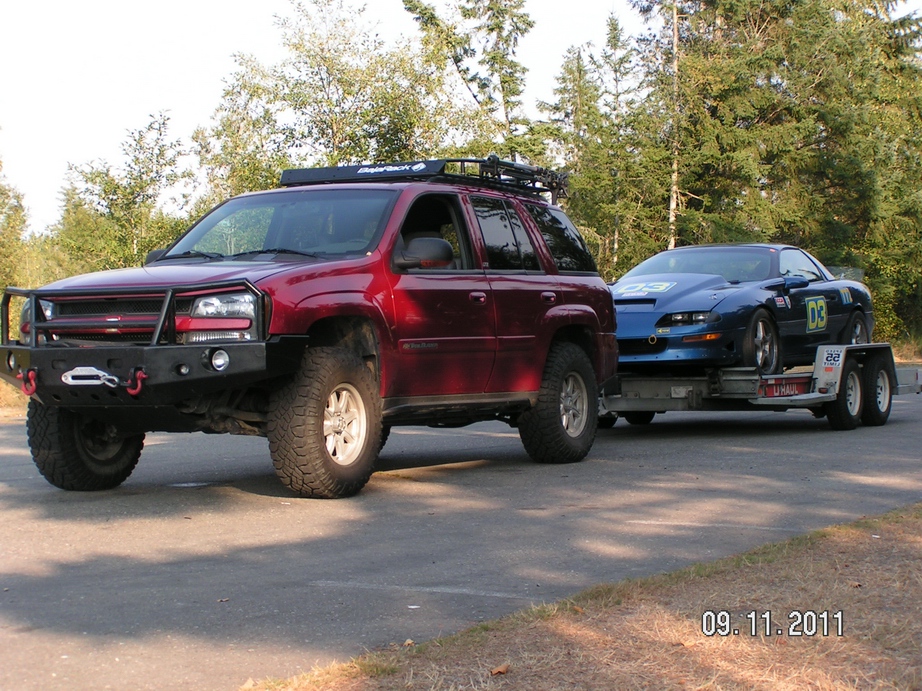
The planned upgrades are new fans, radiator, external tranny cooler and airflow improvements.
From the factory we have a fan sized for a 1-ton Duramax and a radiator sized for a 4-banger econobox. It’s very unbalanced. While there were some very good reasons GM did it this way (cheaper and much more efficient for 99% of the people 90% of the time) this naturally leaves much to be desired from a performance standpoint in many situations. The “problem” is the undersized radiator. While everything works together as a system, the radiator is really the heart, or foundation, of it. If it’s too small and it’s the weak link—the biggest and most important link is the weakest. You can band-aid over it with other parts of the system (such as an oversized fan that can move insane amounts of air) but they’re still just band-aids which come with their own tradeoffs.
I’d much rather have a well balanced system that works better and more efficiently in all conditions. Since most of my problems are at higher speeds the stock fan isn’t as good a band-aid as it is at lower speeds--trying to fix an 80 MPH problem with a fan is just silly. The correct way to address that problem is to increase natural ram airflow and/or radiator size. I’ll do both—which requires ditching the stock fan.
I did this project in stages over the course of more than a year, with much testing along the way. This allowed me to identify exactly what sort of difference each change made in a way that would have been impossible had I “re-Engineered” the whole thing at once. Though I may think I’m a pretty smart cookie, there were some surprises along the way. Hopefully this experience will allow others to make smart choices the first time and know they’re going to work.
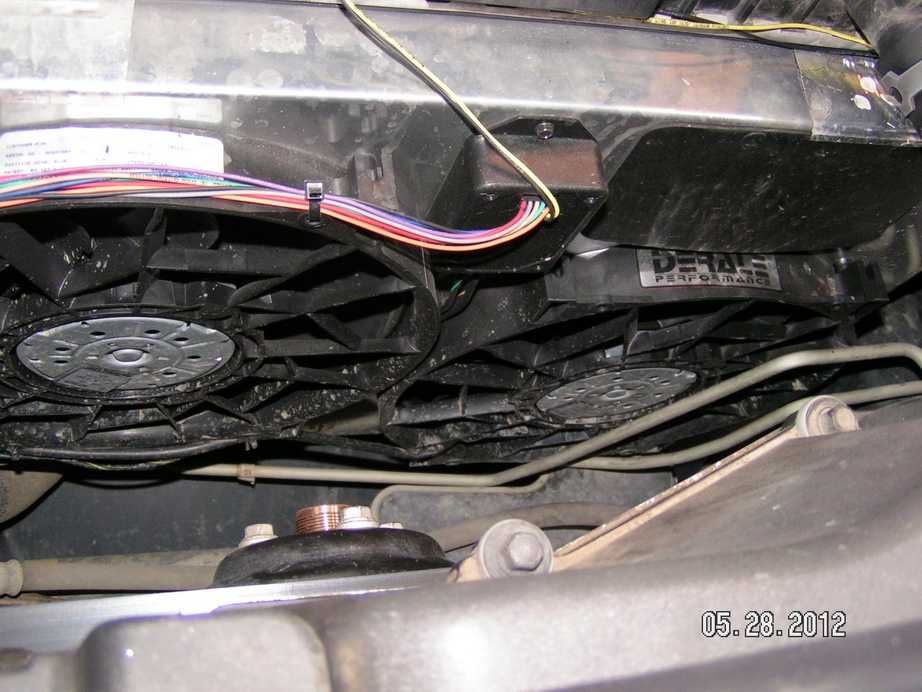
The first thing I did was the new fans, stay tuned for the radiator and other improvements. The reasons for switching to electric fans were many. First, I’ve just always liked electric fans—they’re on when you need them, not when you don’t, they do a really good job when sized correctly (though many people get that part wrong), in many ways they do a better job in typical day to day use, they don’t put wear and tear on your waterpump, and yes, they don’t consume nearly as much power to run full blast (especially compared with our monster fan). Some of the most miserable aspects about really hot weather in the summer is idling around at low speeds, getting stuck in traffic, etc; the A/C doesn’t work very well and many have issues running hot. This is where electric fans really shine. They’re simply much, much more effective than the mechanical fan in such conditions.
If you ever have to do any work on or near the front of your engine, it’s dramatically easier with the stock fan out of the way. This alone may make the swap worthwhile to some as the stock fan is such a PITA do deal with.
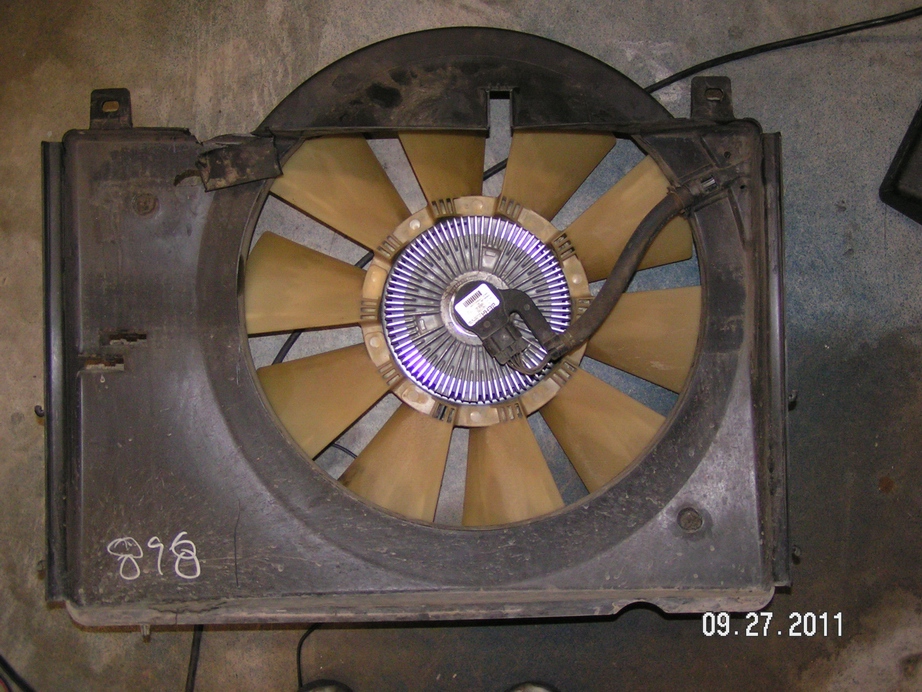
I’ve never really liked the stock fan clutch on these as it has always given me the impression of a great idea on paper that left a lot to be desired in execution, not to mention they have a reputation for failing. Though other than the jet engine sound at startup that had annoyed me years back until dealer replacement and reprogramming, mine seemed to be working correctly—for the moment, as a 2002 it was probably only a matter of time before it failed. It was going to need replacement sooner or later, so instead of spending more money and effort on something I don’t like, I took it as an opportunity for a change.
But the biggest reason for the electric fans, goes back to fixing the “problem” in the system—the radiator. We can’t make it much taller or wider, so for increased size that leaves us with thickness. I don’t see how we can easily fit a thicker radiator with the stock fan in the way. The stock shroud isn’t something you could easily trim very much and still retain its function. It looked like moving that shroud even a little bit would be problematic.
Fitting a thicker radiator is dramatically easier with electric fans. I don’t think I’m the only one to figure this out—nearly every radiator Ron Davis sells is a 2” thick core just by default. But the one he makes as a drop-in for the TB SS is only 1.5” thick. The guys that did all the measuring figured out there was just no room to fit a thicker core and retain the stock fan. I doubt I could do any better. I’m sure it’s a very nice radiator and probably more than sufficient for most uses, but if I’m going to spend $700 on a radiator (actually to have it custom adapted with the exit on the right side, etc, it would be even more for us) it’s sure as hell going to be thicker than 1.5”. The 2” thick one he makes comes with electric fans as a package deal but is very expensive.
So, I also saw switching to electric fans as one of the things that would pave the way for a larger radiator. After getting that stock thing out of the way, installing a larger radiator should be dramatically easier.
While a larger radiator means one should no longer need the crutch of the stock fan’s potential airflow at 100%, fans are still important. The design of the TB’s is rather poor from an airflow standpoint (and can be made even worse by the addition of the steel front bumper, skidplate between the radiator and the frame, winch, lights in front of the grill, etc) so the fans can contribute to cooling up to speeds much higher than people might think. Testing of the fans I installed showed they were still having a dramatic effect on cooling at 70 MPH and still significant at 80 MPH before the other airflow improvements. Yes, 80, not the 30-40 MPH one might correctly assume for other vehicles. While that makes obvious I had some airflow issues that had to be addressed, I’ll bet a lot of people’s rigs here are in a similar boat with all the crap we like to hang on the fronts of these things.
I recommend for everybody (if improved cooling is what you’re after), but even more emphatically if there’s any chance the rig will do any towing--you don’t want to skimp on the fans. Don’t make the mistake of thinking they’re only needed while idling at stoplights. With properly designed cooling systems in some vehicles this is true—but the TB is not one of them. It may become “more nearly” that way with a thicker radiator and improved airflow but I wouldn’t count on that too much, and with the stock radiator, forgetaboutit. Little, cheap fans simply won’t get the job done. Using a better radiator and improving airflow won’t completely change the fact that these vehicles need lots of airflow from the fan.
The fans I considered most strongly were the Flex-a-lite 295, Spal 30102130 and the Derale 16927 as they should all be a pretty good fit for the radiator and they all move a lot of air. Of those, the Flexalite is advertised as moving the most air—but at zero pressure, which is largely meaningless. While I can’t say for 100% certain without testing, given the thin, straight blades and fan motors less powerful than others I think it’s very likely it won’t keep up once some serious resistance is place in front of it. Spal provides actual data for theirs ( http://www.spalusa.com/pdf/30102130_SPEC.PDF#view=FitH ) which is really nice. I almost wanted to buy theirs just to thank them for providing such good data as it really helps people make informed decisions. This would definitely be my second choice.
Looking at the Spal data for all their different fans is quite interesting, one can learn a lot. Two fans the same size may move the same amount of air at zero pressure, but after some resistance is added one fan might move 10 times as much air as the other. There’s even a pressure at which a fan will “stall” and flow zero, yes, zero CFM. While looking at a picture and specs is no exact science, the general trend is with added resistance fans with thinner, fewer blades and smaller motors fall off in performance much more quickly which should be no surprise. When looking at Spal’s data you can see the old rule of thumb of 10 amps per 1000 cfm has a pretty strong basis in reality when you consider how the fan will perform in real life. Moving a lot of air through a resistance is a lot of work and it takes energy, there’s just no way around it. Any fan claiming a bunch more than the above is likely to disappoint if actually measured with a radiator placed in front of it—and if they’re claiming to do it with fewer amps the BS Flag should really fly. I’ve seen some numbers thrown around for various electric fans in prior threads that are pure fantasy. If you think you’re going to get some $50 fans off ebay that will do an adequate job, put that thought out of your head right now. If you think you can get any electric fans that can match the stock fan at full speed—no matter how much money you spend—forget about it, they don’t exist.
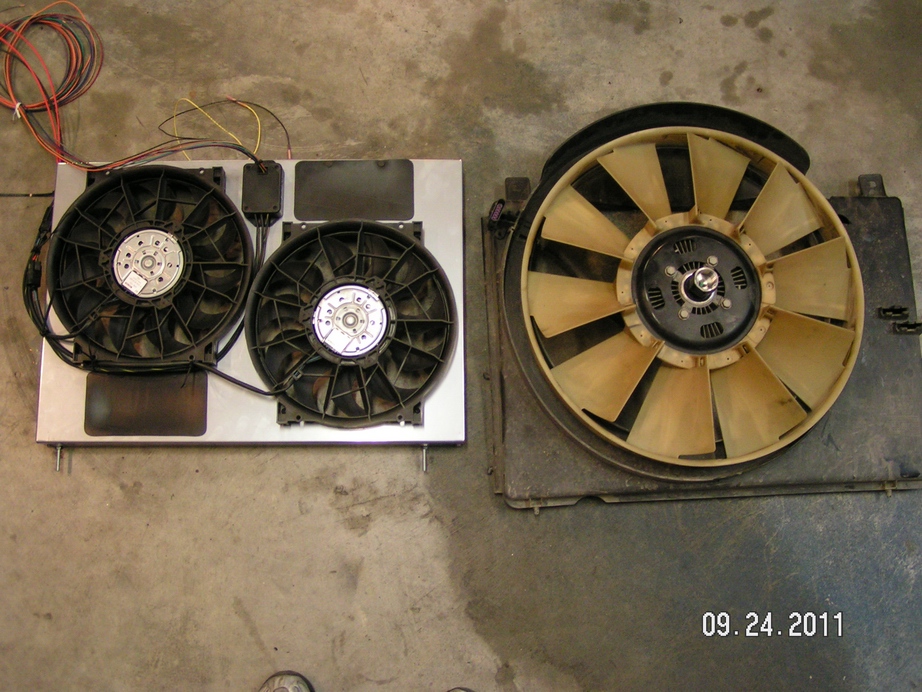
In the end I went with the Derale 16927 as I’m guessing with its slightly bigger blades and bigger motors it should do better than the Spal and I really think it’ll do a lot better than the Flexalite through a thick radiator.
http://www.summitracing.com/parts/der-16927
Of course I didn’t buy the others just to test them so don’t quote me on that. What I can say is the testing I did on the Derale shows it doesn’t disappoint—it may even be a bit under-rated—flowing close to its full 4000 cfm even when pulling air through the stock radiator and condenser. Each fan uses a Bosch motor rated at 265 Watts. Of course the stock radiator isn’t very thick so all those amps will be put to even better use with a thicker radiator. (Later testing showed only about 1 MPH decrease in airspeed with a thicker radiator.) If using a weaker fan, there’s not only a point of diminishing returns but one of “more harm than good” where making a radiator thicker actually reduces the airflow so much you get less total cooling. That’s not going to happen with these fans. Since we can’t make the radiator significantly taller or wider, only thicker, we don’t have the luxury of skimping on the fans. I suppose this would be a good place to add the obligatory “fan sucking video:” (Spoiler alert, the video shows some of my airflow upgrades.)
http://youtu.be/_A8Tx1UuM0A
Those bars on the grill guard and the vent in the lower bumper are a full 12” in front of the condenser. And in that video it’s sucking through a 2” thick aftermarket radiator instead of the stock thin one.
If one of your goals is reduction of noise, these fans are not your choice—you can hear these suckers (no pun intended). In the end I think noise, much like amps, is the price you pay for moving a lot of air.
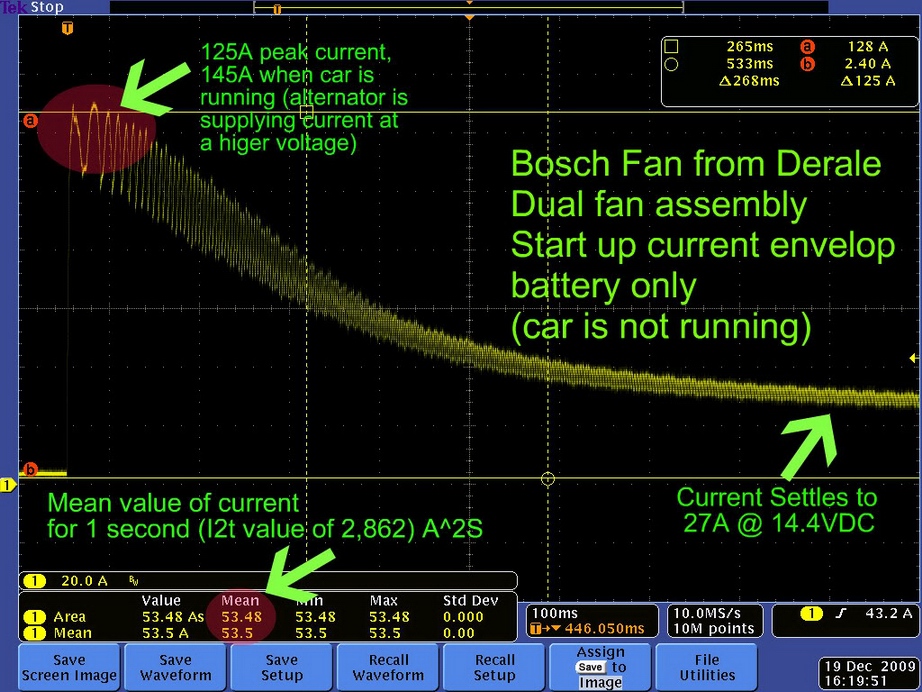
Speaking of amps, these fans use a lot of them. They pull more than a constant 50 when on high speed. This narrows your choices of controllers somewhat as many good ones (such as the Flexalite used on the fan above) aren’t rated for such a large amount of current. For a mission critical item such as your fans, you don’t want to cut corners and end up melting wires or popping relays/fuses which is naturally most likely to happen on the hottest day of the year when you’re nowhere near civilization.
Here’s a current graph of the spike a guy on the Chevelle forum made using only one Derale fan:
The fans come with relays and wiring so if you’re on a tight budget you can wire them up to a simple temp switch of some sort to get them running on the cheap. It’s a shame there’s not an easy way to get the PCM to control them as that would simplify things greatly.
Derale, of course, makes a nice quality dual fan controller that can handle the fans. Unfortunately, like many, for low speed it switches on one fan, for high speed it switches on the other. I much prefer to have both fans running at reduced speed for the low speed setting instead of one running at high speed because it’s a much better way to do it and I’m picky that way. With only one fan on full speed, you literally suck a large amount of air backward through the other fan instead of through the radiator which is a big waste of amps and needlessly makes a bunch of noise—in addition to not cooling very much.
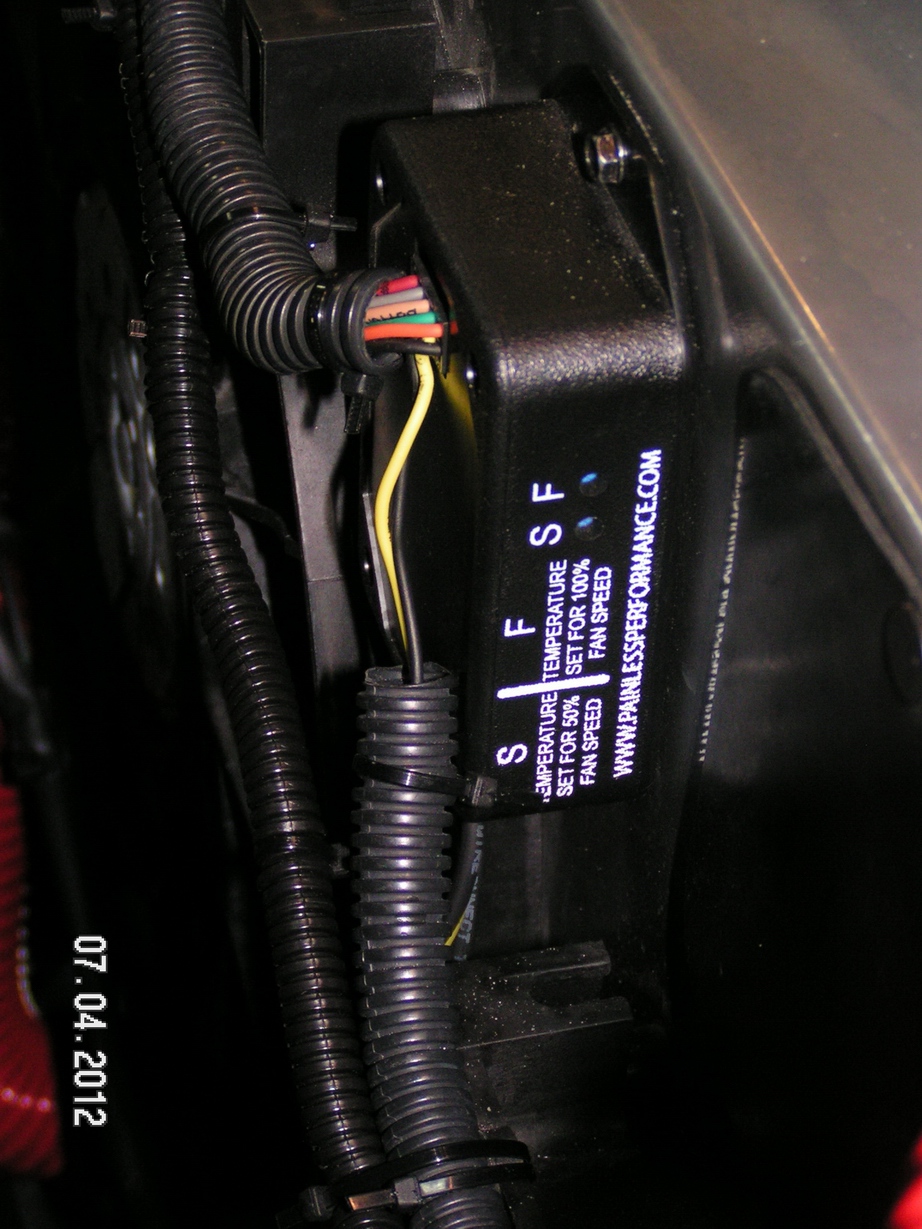
I ended up getting the Painless Wiring 30140 F5 Dual Fan Controller. It’s not cheap, but sometimes piece of mind is worth it. It uses an OEM-quality water temp sensor which gives it very good accuracy and likely less chance of failure than a temp probe that sticks in the fins of the radiator. It has two temp settings which are both adjustable—the first one turns on both fans at 50%, the second one is for 100% operation. It gradually ramps up the speed of both fans from 50% to 100% between the two temperatures as the temp increases, much like the Flexalite and a few other controllers. It’s rated to handle 70 amps total continuous with a startup spike of 70 amps per channel so there’s no worry about these fans being too much for it.
It comes with a manual override three position switch that will kill the fans (great for testing, water crossing, etc), crank them on 100% any time you feel like it or when left in the middle lets the fans do their thing automatically. It also has an A/C input which will crank them on 100% whenever your compressor kicks on which makes for very cold A/C. Finally it has a speed cutoff which you set with a button so you don’t have to run the fans all day when you’re cruising across country at 80 MPH just because the AC has kicked on. *See notes at bottom for further experience with these features.
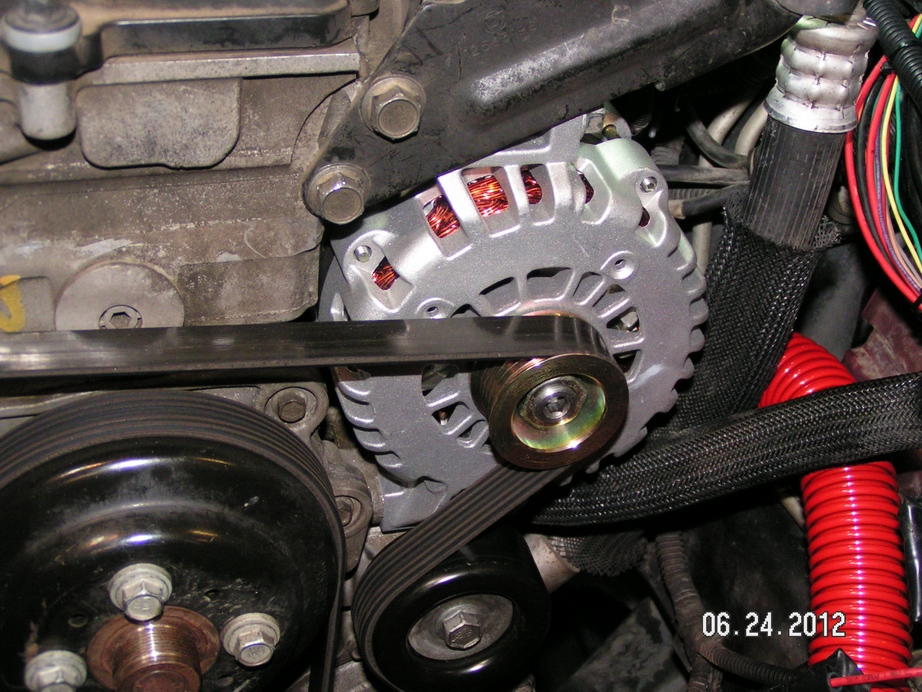
Another nice thing it does is kick the fans on one at a time, staggered by a couple seconds even when the manual or A/C override kicks in. This cuts the potential big amperage spike you’d have if they both kicked on the same time in half. With these big fans you will still notice the lights dim a bit as they kick on (moreso when they kick on 100% due to the A/C or override than at low speed from temp alone) and can see the voltmeter in the cluster drop. I do feel it’s a good idea to upgrade the alternator with these fans—especially if you’re in a climate where it stays “hot” at night (and thus run the A/C and fans and all of your lights at the same time a lot). Here’s the one I got:
http://www.dbelectrical.com/p-9753-alte ... envoy.aspx
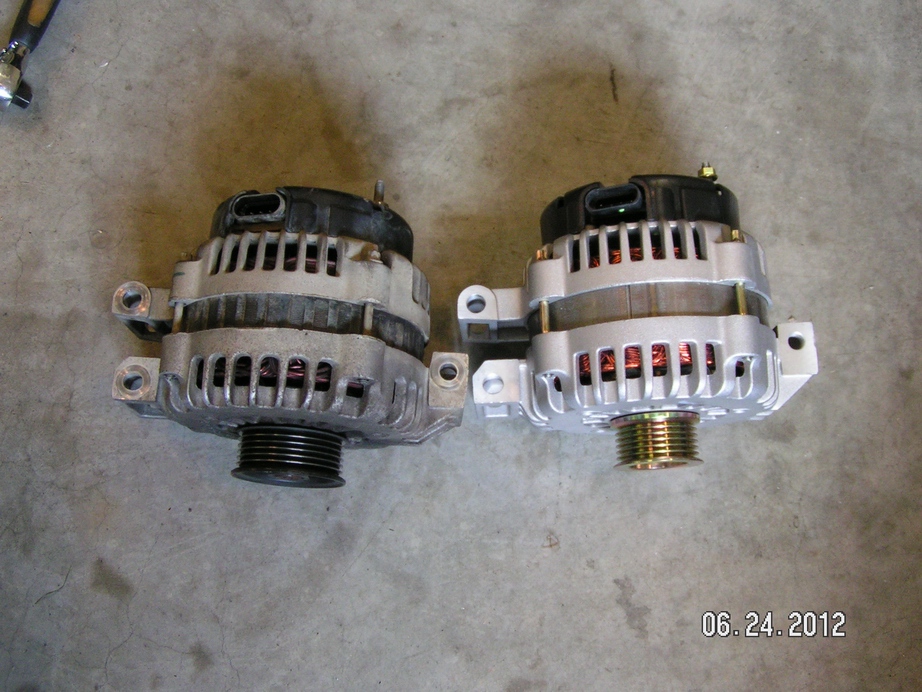
With all the lights, winches, etc, we like to run a higher output alternator is something that should be on most peoples’ list anyway. With the stock alternator, with all the lights on and the fans on high, the lights were dimmed slightly at idle (not just due to the startup spike of the fans but they stayed dimmer than normal). With the aftermarket alternator there’s no dimming other than the startup spikes.
Which brings me to the data. While no electric fan you can fit in this engine bay can match the potential max flow of the stock fan, some actual data to compare performance is good to have. My intention was not to do lab-quality absolute flow measurements, but simply relative measurements to get an idea how they compare with one another, putting some actual numbers to it so I know where I stand with the new fan. I also wanted to do it in a simple, repeatable way which others could replicate to test their setups. I tested the stock fan by forcing it on to a specific percentage via the PCM, raising the RPM to the desired point and holding it there for some time so the fan could “spool up.”
The measurements were taken with a Kestral wind meter at (or close to) the center of the radiator (technically on the condenser) with the grill off and the hood up. The meter hung flat to the condenser with a bent paperclip. It doesn’t get much more simple than that. Technically the center is a bit below bumper level where the bumper itself could interfere, and the grill support is in the way a bit, but I found even the stock fan had a pretty large “sweet spot” so the speeds didn’t change much as long as the meter was somewhat close to the center of the radiator.
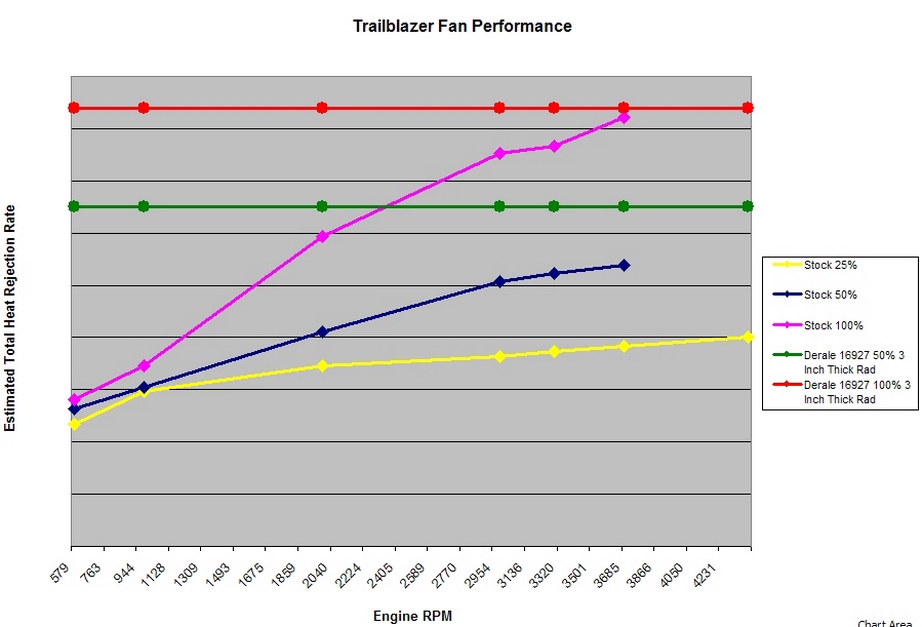
Here’s a chart of the max speeds; with this anybody should be able to make a direct relative comparison of their setup to those speeds in the center.
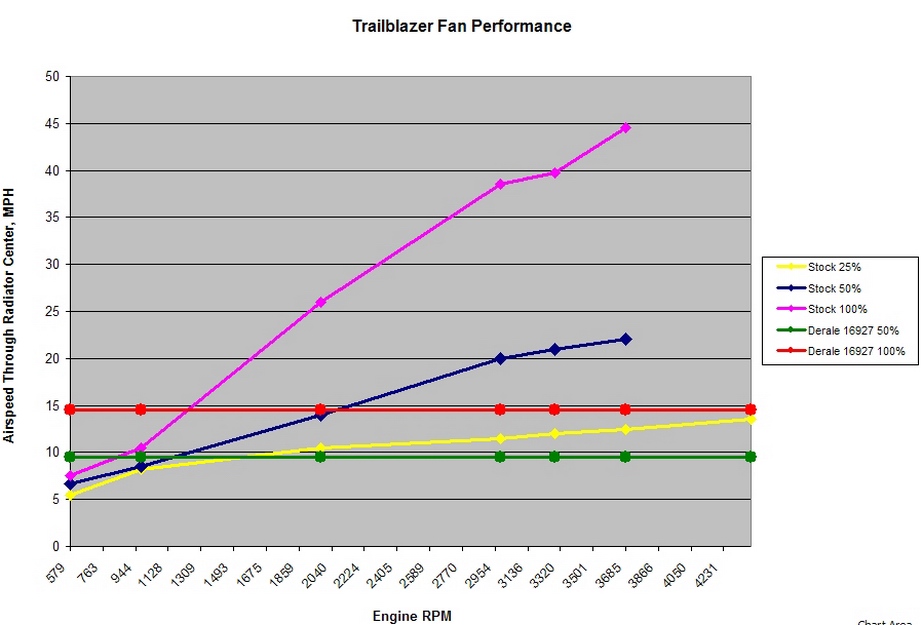
The readings didn’t change much until I actually got out of the shadow of the stock fan—mostly to the passenger’s side. Out toward those edges and the upper and lower corners the speed would start to drop significantly. The stock shroud is pretty decent for a factory setup, but it’s much too shallow and off-centered to be ideal. I didn’t attempt to measure every single spot on the radiator and mathematically come up with the exact total airflow as that would have taken months. But measuring many spots I came up with a guesstimate that the average speed would be around 75% of the max speed in the center. That may not be exact to the last few percentage points but I think it’s a decent ballpark number.
The Derales do a much better job of having a large “sweet spot” as it’s basically the entire radiator. They do an amazing job of pulling air through the whole thing evenly. Even at the very corner farthest from either fan, the air is only moving a couple MPH slower than at the center. I estimated its average as about 90% of max speed in the center at least. Beware of aftermarket electric fans with a shroud that lacks depth. An inch or two of depth at least is needed so they pull air through the entire radiator. Shrouds that resemble a flat plate will effectively block off a large portion of the radiator. This can be demonstrated simply by hanging the wind meter in the corner of the radiator.
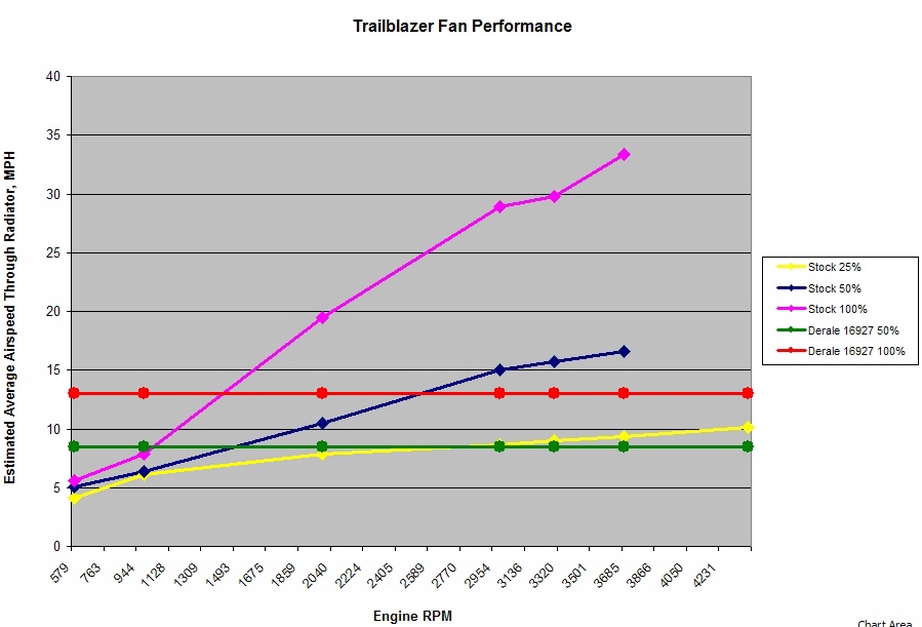
Here’s the chart with the estimated averages taken into account to give a more realistic picture of total airflow through the radiator. Keep in mind though, if the total airflow is the same but one setup pulls the air through the radiator more evenly, it will cool better and this is not taken into account on that chart.
Also note if one has electric fans with a shroud that doesn’t cover the entire radiator, that should be taken into account on this chart—estimate the average speed in the area of the shroud like I did above and then multiply that by the percentage of the radiator covered to find a rough equivalent cooling number.
For example if an electric fan setup gave the same speeds as the Derales above on high speed (13 avg) but the shroud only covered 60% of the radiator, you’d see 7.8 MPH average equivalent in the chart above—basically providing less cooling potential as the Derales provide on low speed. Technically it would be even less effective than that, but that gives a ballpark figure.
From this chart one can get a pretty good idea of the comparative performance of the fans in various conditions. The first thing that jumps out is just how powerful the stock fan is and how much air it can move when fully engaged. Of course the stock programming doesn’t turn it on to 100% until 246 degrees which is about a half step from complete meltdown—I don’t think I’ve ever let mine get that hot (except in testing).
That may lead one to say if the stock fan is never commanded to run at 100% over the entire life of the vehicle, how much air it can move at that setting is moot. From a practical standpoint one could certainly make that case, of course knowing you have the capability in reserve if you really need it is worth something. But that’s not something you want to rely upon at on a daily basis. At 100%, the fan is a struggle to turn—the engine lugs noticeably, the belt starts squealing, it puts a large load on your water pump bearings, it takes forever for the fan to get up to full speed, and it consumes about 14 HP which doesn’t exactly help the engine pull the vehicle up the hill. It’s not something you want to experience on a daily basis. It’s just too much for this little engine. If you have 450 HP you may not notice it much, but we don’t.
At the higher settings the stock fan is not “rigidly set.” Meaning when triggered to a higher setting at high RPM it takes a long time to “spool up.” So if you “hit passing gear” for several seconds, don’t think you’re getting the cooling benefit of the fan turning at that high RPM when at a high setting—you’re not. You’ll be back at lower RPM after the shift long before the fan catches up. It’s only really when running at high RPM for an extended period—up a really long grade where you let the engine scream for a minute or so—that you’ll get all the airflow the stock fan can provide. And in that situation, it does kick ass.
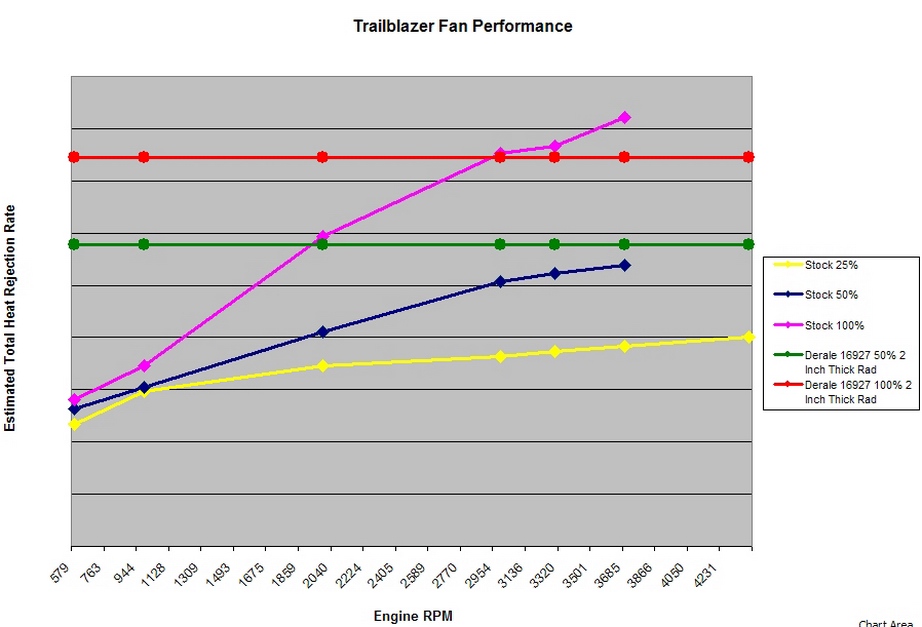
It is important to note that the heat removed by the radiator is not directly proportional to the airflow rate. If you double the speed of the air, you will not double the cooling. The exact amount of course depends upon radiator design, coolant temp, coolant flow rate, etc, so the exact curve for a particular application must be found via testing. A “general rule of thumb guesstimate” for a typical radiator application in normal conditions is around a 50% increase in cooling for a doubled airflow rate. Taking this into account, we can make a chart with a more realistic visual scale of the actual cooling capacity of each setup:

As expected from a powerful set of electric fans, they can move a bunch more air than stock at low RPM. For city-type stop and go or most offroad driving in extreme heat they’re much better than stock. Moving nearly 3 times as much air at idle makes for the absolute best A/C performance. Even cruising down the highway they are a large improvement over stock at typical cruise RPMs with the engine temp under control. As long as the temp stays at or below 235 (where the stock fan turns on beyond 50%) the Derale’s are significantly better across the board in all conditions. The stock fan can outperform them, but only at high RPM when your engine is already on its way to overheating (with stock programming).
235 (scanner temp) is where things start to look scary to me on the stock temp gauge (at least the one on my rig which is quite accurate beyond 210), with the needle passing the big mark 3/4 of the way to the red so that’s usually about when I back off the throttle. I think I may have let it exceed that about twice in the 10 years I’ve owned it. So for the most part my stock fan never ran more than 25% meaning even with the stock radiator there is no downgrade in performance in any condition with these fans but actually an increase in performance in most conditions. Yes, I am saying that with stock programming, these fans will outperform the stock fan in all conditions even with the stock radiator—until such time as your engine is so hot you’d normally back off anyway—at least I would. If you actually run the thing and keep your foot to the floor with the gauge right up to the red constantly, then you will be using some of the potential of the stock fan in an area where it will outdo these electrics. Of course in the case of an actual “overheat” situation, the stock fan does provide a safety net the electrics do not. That could be a big deal in the right situation.
But obviously being “better than stock” is a pretty low bar and not the goal. Coupling the electric fans with a better radiator (which again, is difficult to do with the stock fan) is when you’ll really have something. That’s the goal of this effort.
Now let’s alter the chart for a thicker radiator to go with the Derales. Much like airspeed, making the radiator twice as thick doesn’t make it twice as effective—one reason OEM’s always try and use as thin a radiator as they can get away with. Make the radiator twice as wide or tall and it cools twice as much, make it twice as thick and it doesn’t. A similar “rule of thumb guesstimate” puts making the radiator twice as thick increasing cooling in the 50-60% range. Make it 3 times as thick and you’re certainly getting into the ballpark of doubling the cooling rate (or even beyond) but it depends upon many variables, a 70-80% increase is a pretty conservative estimate. See what this does on the chart below to the total cooling rate of the system. Again, these are only estimated ballpark figures, but I feel the guesses are “educated enough” to give a pretty realistic reflection of real world performance one can expect with these fans in front of a thick, efficient radiator at very low vehicle speed.
2” effective thickness radiator:
3” effective thickness radiator:
While even on those charts, the stock fan/radiator shows potential beat the 2” radiator with the Derales under some conditions and to nearly match the cooling of the 3” radiator when cranked on 100% at higher RPM the reality is the fan simply isn’t going to be turning that fast very much of the time with the vehicle near zero velocity. It’s just physically difficult to make that happen as the fan will slow down every time you let up on the gas even a little and take a long time to spool back up. In other words, it’s physically difficult to keep the stock fan operating in that range with a decent duty cycle at low vehicle speeds—at higher speeds such as when headed up a mountain pass on the freeway it is easier. The electric fans can run at 100% duty cycle all day long so they don’t miss a single second when they’re needed. In short, the stock setup isn’t going to perform quite as well in the real world as one may expect looking at the charts. And that’s only for when the vehicle is stopped or barely moving.
As soon as the vehicle starts moving, the Derale/thick radiator lines move up the chart further as the theoretical maximum airflow of the stock fan begins to have less meaning—while testing has shown the fans are still “helping” at 80 MPH, they are no longer responsible for all of the airflow, only a portion of it. This means at higher speeds the electric fan setup will be closer to the stock fan setup in total airflow than when the vehicle is not moving. The more you improve the natural airflow of the vehicle, the lower the speeds will be at which this occurs.
When you take into account the fact that the larger radiator dramatically increases the coolant capacity of the entire system, it’s no contest. Such a combo will outdo the stock setup in any real-life condition with the 3” radiator, and most for the 2” radiator, though it’s possible to conceive of a scenario the stock setup would still be better than a 2” with these fans.
As mentioned at the beginning, stock performance is not adequate for many conditions. There are many conditions under which the temp will go right past 230 and keep going if you keep your foot to the floor. For somebody who wants to stick with the stock radiator for some reason and does a lot of low speed towing up hills, etc, the stock fan can do a better job if reprogrammed to come on sooner. Once the stock fan is running at 50% and over 3K RPM, it starts to pull away from the Derales (or any electric fans I can think of) and can move a ton more air above that. If you program that to happen at lower temps so you don’t need to heat it up to 235 degrees to make it happen (when the stock programming turns the fan to 50%) it will easily cool better for long high RPM pulls up hills at slow speed (provided you stay at that RPM for a long time). Be prepared for squealing belts and a lugging engine though.
The point is if you really need the stock fan running between 50% and 100% to keep this little engine cool, you’d really be much better off with a larger radiator. You’re bandaiding the problem. This tiny little engine should never need that much fan with a decent radiator. As a point of reference, the GM trucks that use electric fans and are rated to tow a whole bunch more than the TB’s have a radiator that’s about 30% wider (roughly same height and thickness) and that’s all it takes. A radiator twice as thick has that covered assuming all else is equal, a radiator three times as thick easily does.
If your temp problems aren’t occurring at high RPM/high speed/heavy towing situations, but at lower speed, idling around, stuck in traffic in extremely hot weather, etc, then these electric fans will be an improvement even with the stock radiator.
The airflow design on these vehicles (especially early TB’s, later year TB LT’s, SS’s and Envoys seem to have better inlets) for highway speeds is rather poor, with the vast majority of high speed air that comes through the grill going through only a small portion of the radiator. In tests with the stock radiator, even at 70 MPH if the ambient temp was over 80 degrees, my TB would heat up with no fan. That’s on flat ground, unloaded, not towing anything, with the A/C off and with no tranny cooler. Just gently cruising in 80 degree temps is enough to send the temp gauge toward the red. That’s sad. That’s pathetic. Switching on the fans brings the temp back down quickly. That not only highlights how poor the airflow management of this vehicle is (which will be addressed later) but highlights just how impressive the Derale fans are. Even at 70 MPH they dramatically increase the total amount of air being pulled through the radiator. Even at 80 MPH, switching the fans on and off still makes a noticeable difference.
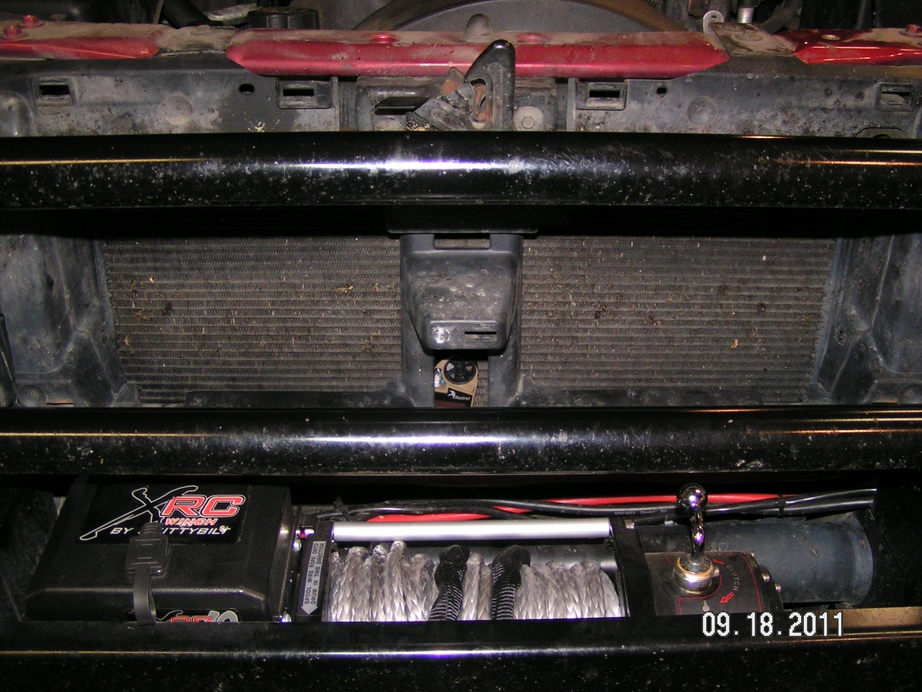
There’s not too much we can do to improve natural airflow at speed without dramatically altering the vehicle’s appearance or function. Some changes people may find OK, others they may not. Keep in mind winches, lights, and other things one might put in front of the grill opening will hurt airflow. Removing the skidplate of course would help, but that’s needed for other reasons. Louvers in the hood would help by providing an exit path for the air. A different grill can help as can cutting holes in the steel bumper to allow more airflow through it. So there are some things that can be done, but many have downsides many would find unacceptable.
I did notice my issues got noticeably worse with the addition of the steel bumper and winch. The stock setup does allow some air in from the bottom, but this setup effectively blocks off the lower ½ of the radiator. That puts a tall burden on the radiator and fans. I’ll address improvements to that in a different thread.
What will help regardless of how much we can improve airflow is put the air that does come through to better use. You do this by making the portion of the radiator it does go through much thicker. That may or may not be enough, depending upon an individual’s needs. (Later testing with thicker radiator showed it would easily stay cool in the exact same test above with the fans turned off even before any airflow improvements were accomplished.)
The Installation:
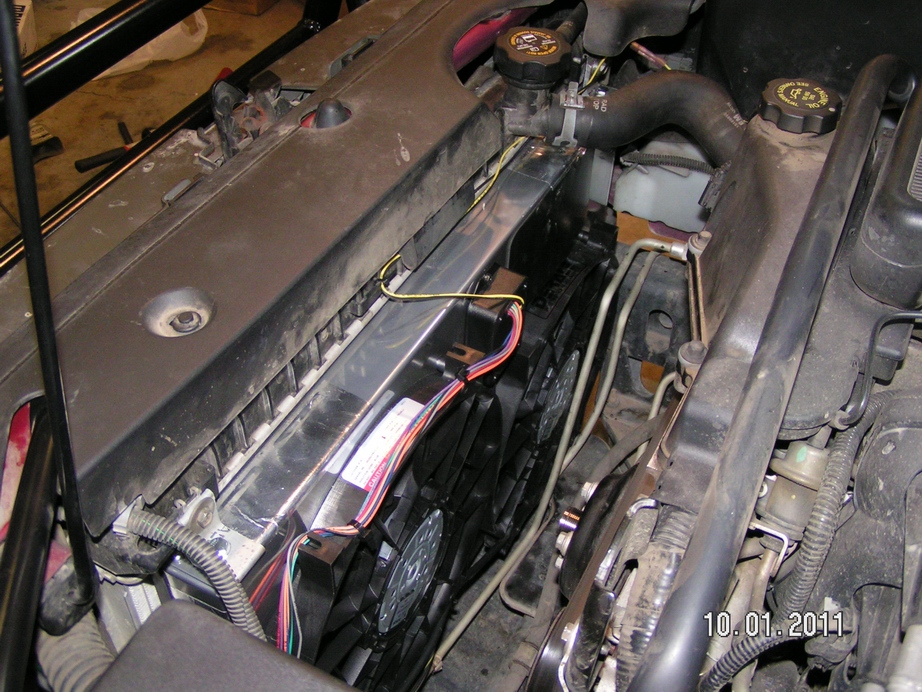
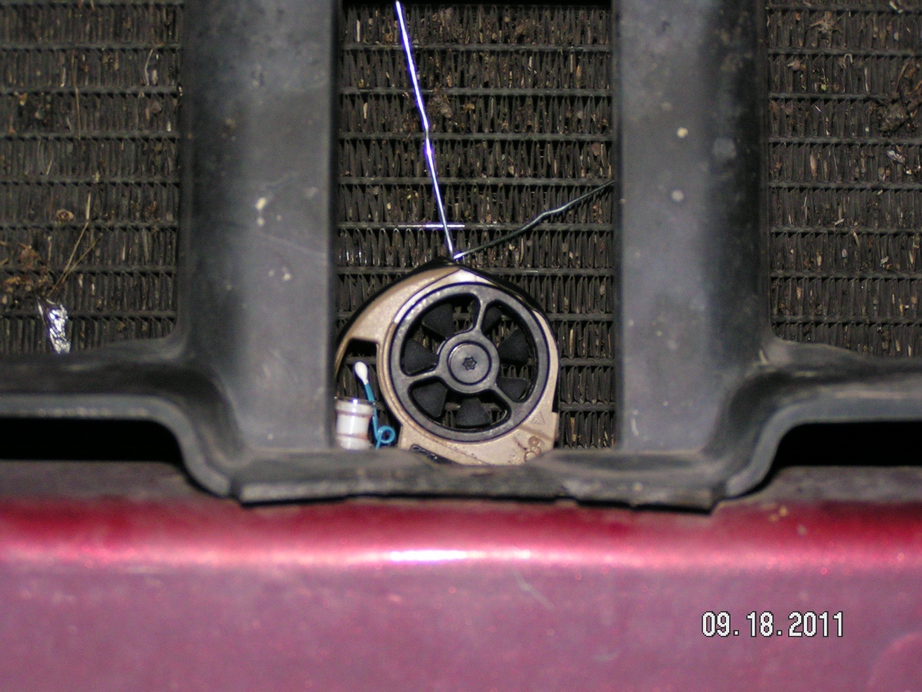
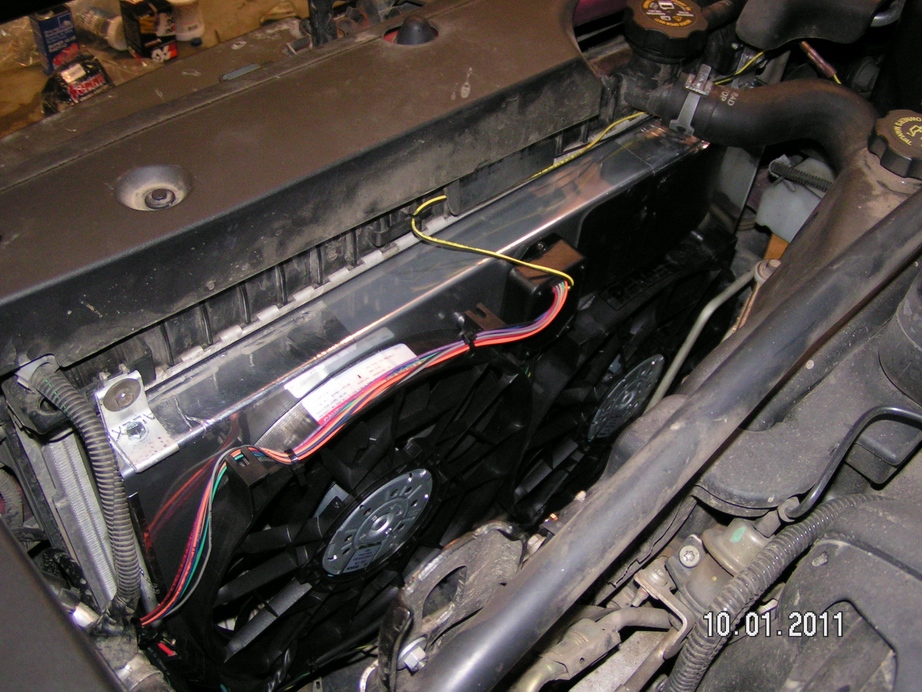
This setup fits the stock radiator very well making things easy. The steel shroud also makes it easy to bolt or even weld on brackets or whatever you may need to use when mounting it on a custom setup. With the stock radiator, I re-used the stock fan mounting points. Bolts at the bottom go into the mounting holes, the weight supported by the lower tank:
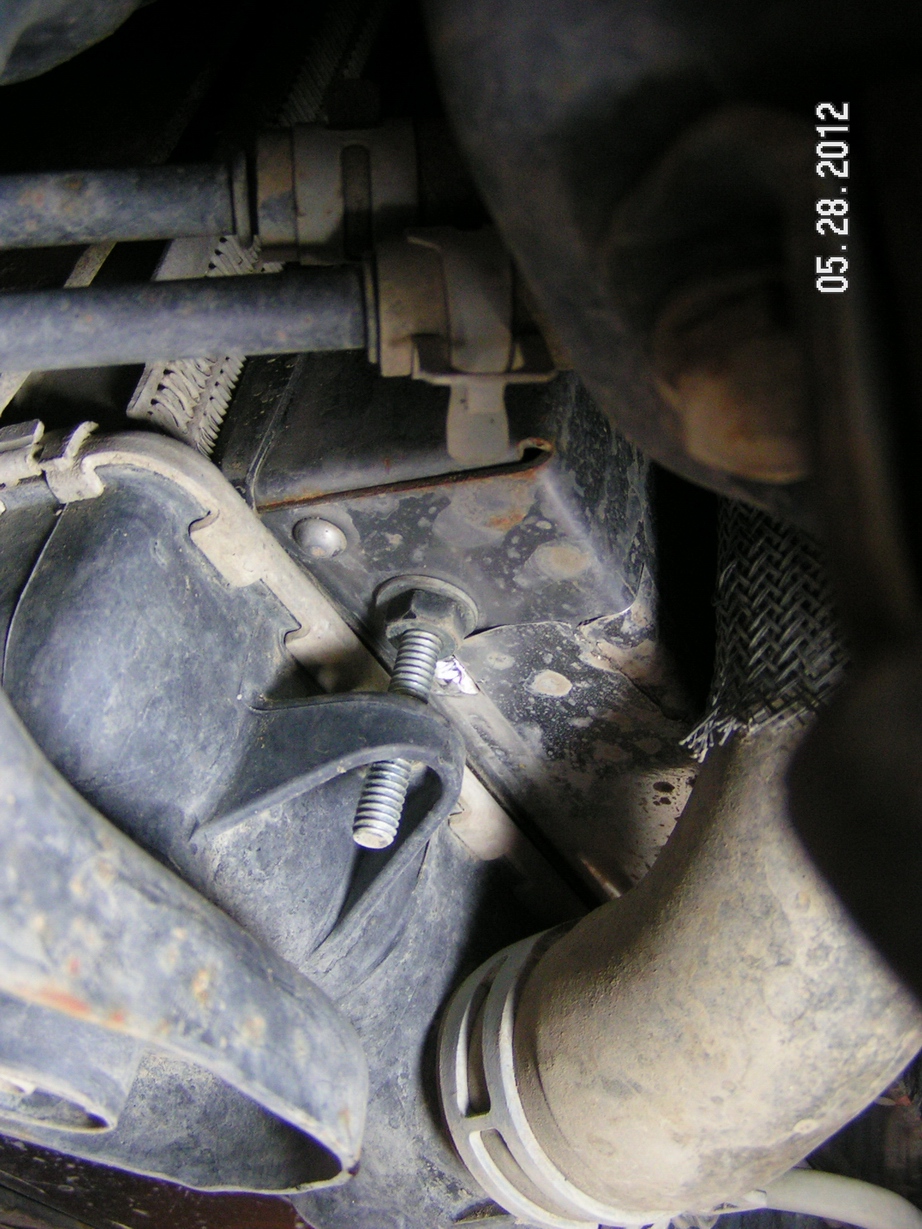
Brackets at the top to re-use the stock mounting bolts:
You have to pay attention to the spacing of both these brackets and the bottom mounting bolts so the fan is pressed against the radiator core when everything is tightened up. It takes a little time and patience but it’s not too difficult. Removing the stock fan and shroud is tougher than putting this one on. The wiring takes a while though.
The stock tranny cooler lines must be bent out of the way. This can be done carefully without making any kinks and having no adverse affects but they do make for a PITA while trying to mount the thing. If you’re going to do an aftermarket tranny cooler and re-do the lines anyway, this is a good time to do it. Replacing the last couple feet of these steel lines with rubber makes life so much easier.
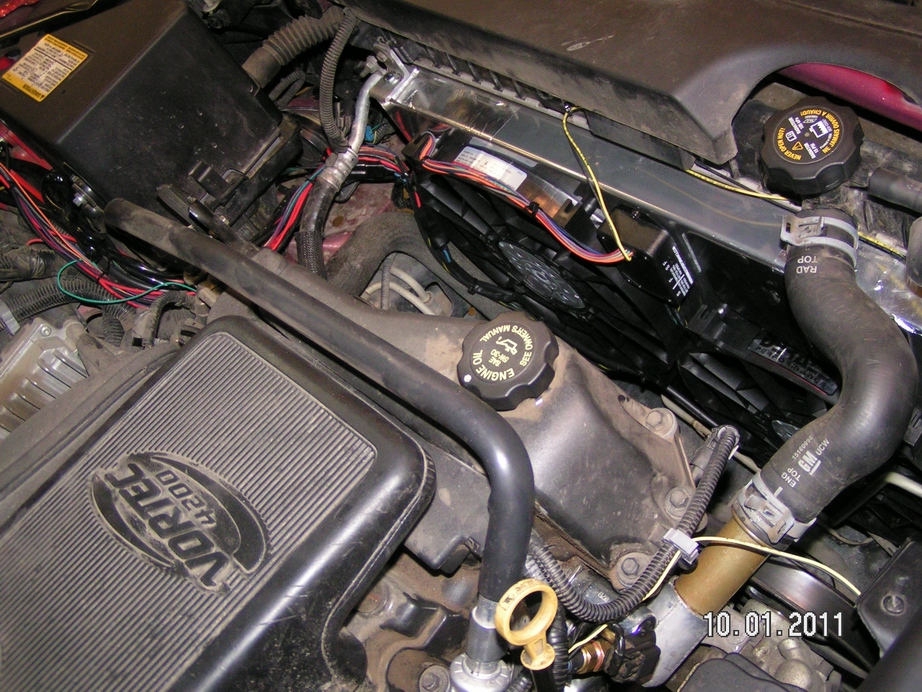
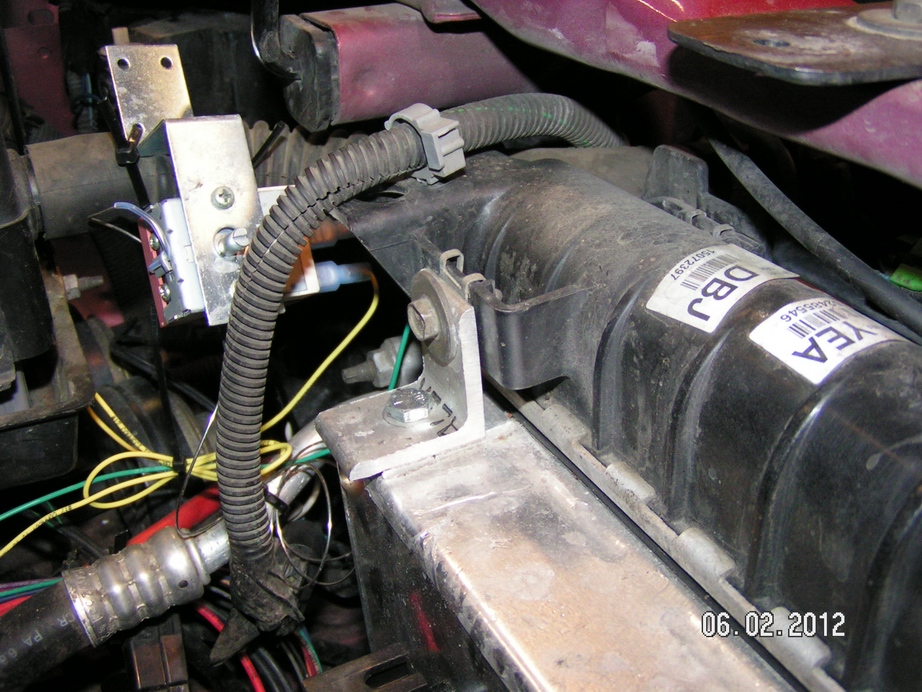
I mounted the controller on the shroud itself. One needs to take care not to block the “flaps” on the shroud with any wires. Keep it high enough you won’t submerse it when crossing water. (Pay no attention to the wires being uncovered as this was a semi-temporary setup that would be re-done when the new radiator goes in.)
I mounted the temp sensor in the engine’s water outlet as I thought it was probably the easiest place to do it and it was temporary at that point. I would not recommend doing this for several reasons. First, it’s a PITA. For some reason it’s really hard to get at one of the bolts on that thing so it takes about 10 times longer than you thought it would.
But most importantly, it’s a poor choice of location from an operational standpoint (when your concern is for cooling capability while keeping a relatively high temp thermostat, not emissions or mileage). I had it this way for quite a while and really didn’t like it. The fans can only directly control the temperature of the water leaving the radiator. Here you’re monitoring the temp of the water entering the radiator which often has very little to do with what the fans are doing. It’ll work, but it’s far from ideal IMHO.
It results in the fans running many times when they’re not needed. In cool weather especially, the radiator can be ice cold but the thermostat will keep the water exiting the engine hot—very close to the fan’s turn on point. If you stop and let the engine heat soak a bit, or put your foot into the throttle going up a hill, the fans will come on even if the water in the radiator is ice cold--which is pointless.
It also forces you to set the turn-on point of the fans to a pretty high temperature (especially with the stock thermostat). A little too low and you’ll trigger an “infinite loop” where the fans come on and never shut off. The thermostat will keep the water temp exiting the engine too high to shut the fans off, even if the water in the radiator is ice cold. So you can’t set the fans to keep the water in the radiator cool at all times—they have to be set above the thermostat temp by a ways.
This puts the fans at a disadvantage because in some conditions, when they finally come on all the water in the radiator can be quite hot already. They have some “catching up” to do. The cooling system is “preloaded” with a large amount of heat. You can’t have the fans come on earlier so they have a “head start” and the engine has some pre-cooled water for when it needs it.
This prevents you from having a nice gradual ramp from “low” to “high” setting of the fans because your “low” setting starts out high enough the “high” setting has to come quickly or the engine can get quite hot.
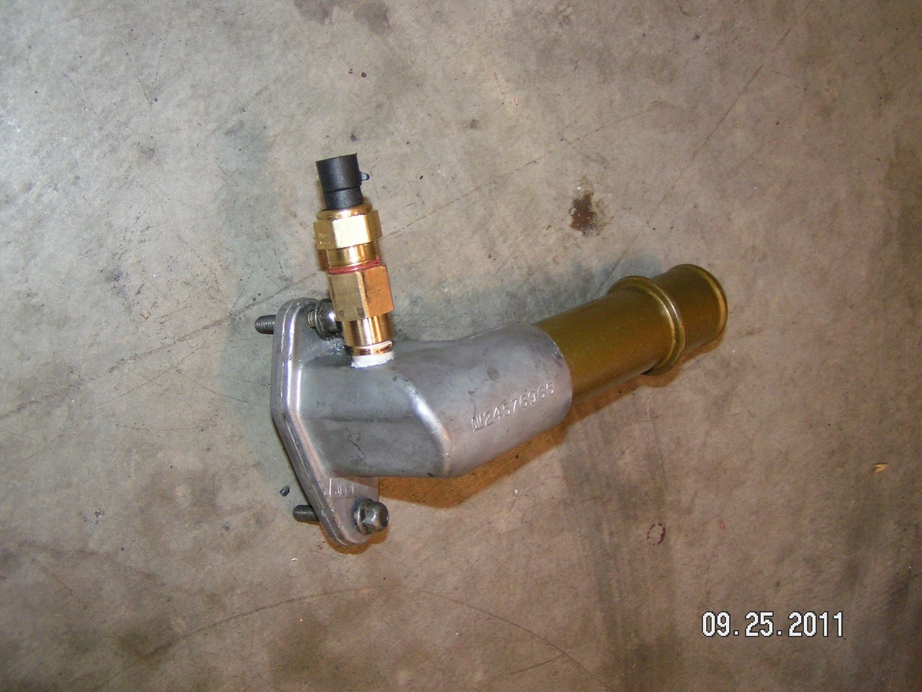
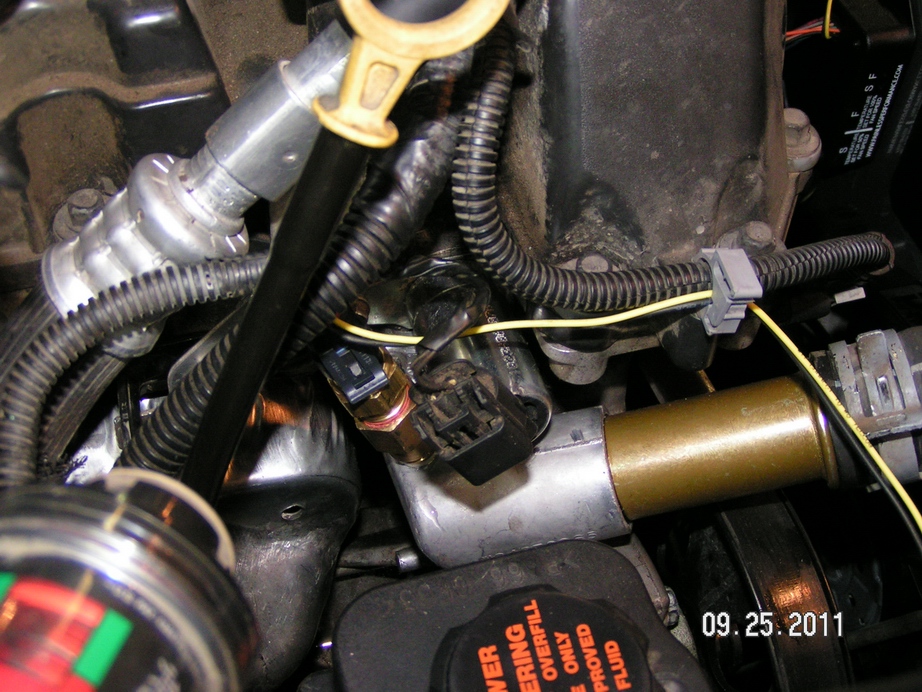
So it will work, but it’s not ideal which leads to some side effects you might find annoying. It’s much better to monitor the temp exiting the radiator to control the fans—because that’s what the fans can control. If I had to do it over again with the stock radiator, I’d put the sensor in the lower radiator hose with an adapter like this:
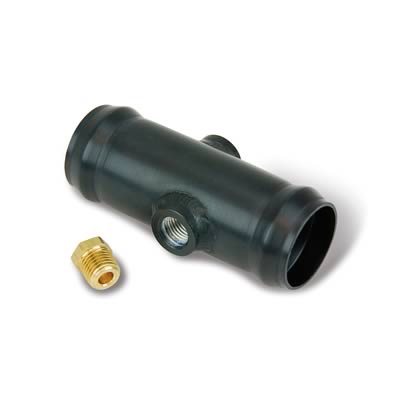
Not only would that be much easier to install it’ll do a much better job. The new radiator has a spot for a drain which can be utilized even more easily (the drain on the bottom of a downflow radiator pretty much represents exit temp).

The drain on the stock radiator is an O-ring affair which would be difficult to adapt. By monitoring the water temps exiting the radiator, the fans will only turn on when they’re actually needed—to cool the water in the radiator. Regardless of how hot the water is coming out of the engine, if the water in the radiator is cold turning on the fans isn’t going to help so they’ll stay off. Very simple, much like a typical “old style” fan clutch—it turns on when the air hitting it gets hot as that means the water in the radiator is hot.
You can also set the fans to come on at a much lower temperature—lower than the thermostat temp—without having an “infinite loop.” In most weather the fans should be able to cool the radiator down to a “cool” temp below the thermostat temp at which point they’ll shut off. The thermostat can keep the engine exit temp nice and toasty without keeping the fans on.
This allows you to have a radiator full of cool water so the engine keeps running right at the temp regulated by the thermostat—just like it does all winter long--instead of heating up and cooling down as the fans cycle on and off with a wide open thermostat. It also allows you to have less total heat in the cooling system so when heat production of the engine spikes for whatever reason, the cooling system has a “head start” and can absorb a large heat dump without the engine temp increasing so much. Combine that with a radiator that holds a lot more water and you have a cooling system that can take a really dramatic shock load of heat without the engine temp going up noticeably at all. We often focus a bit too much on Q in vs. Q out in school, as very few real-world automotive applications which involve WOT are remotely “steady state.”
Of course that’s assuming you have enough cooling power in the radiator/fan combo to do that in a given set of conditions. Even with a decent radiator and fan in really hot weather and heavy use the temp will stabilize somewhere above the thermostat “target temp” at times, depending upon what you’re doing and there’s nothing you can do about it. The cooling system can’t cool to its maximum capability until the thermostat is wide open so the temp needs to rise a bit for that to happen. At least when set up this way you know you’re using 100% of what the cooling system can give you when that finally does happen, utilizing the fans as much as possible anytime they can actually be of help. That’s an area where a cooler thermostat can be beneficial if you want it to stabilize at a lower temp for a given use by being open wider, and thus increasing the capability of the cooling system at a given temperature.
Monitoring radiator exit temps also allows you to have a larger spread between “low” and “high” settings of the fan since you can set them to come on “low” much earlier than the other way and not ramp up to high speed until engine temps are actually increasing to well above the thermo setting. This means the fans spend less time running at full speed, making all that noise and draining all those amps. You can even set the high setting fairly high—220 or even more and with a large radiator you may find the high speed is really never needed which will make things easier on your alternator (though I’d suggest working your way up to that slowly with much testing).
So as you can see, there are a ton of advantages of having the controller monitor the radiator exit temp to control the fans—especially with the stock thermostat. That’s my philosophy for this application (a “truck” that will be used in sub-zero temps and thus the stock thermostat (or one only moderately lower in temp) is desirable, but a cooling system that aggressively keeps the engine cool as possible in hot weather is desired as well). It might be different than many aftermarket systems recommend (often based around “hotrods” running really cool 160 degree thermostats where the fan trying to keep the coolant colder than that doesn’t work well) and OEMs (who like the engine running nice and toasty for idle emissions reasons so they don’t turn on the electric fans until high temperatures). In both of those cases, the engine temp in hot weather is not regulated by the thermostat as it is mostly wide open, but by the fan turning on and off. In those cases, exit temp of the engine is a natural place to want to monitor that. I want to keep this engine at the thermostat regulated temp in hot and cold weather.
To set the low speed setting with the sensor in the engine outlet, manually run the fans full blast for a minute or so, then shut them off and let it idle. In normal temps the engine should hold steady a bit over 200 while it’s being supplied with cool water from the radiator. Once that temp starts to climb move the switch to auto. Starting from all the way clockwise, slowly turn the screw CCW until the fans kick on low speed at the temp you want (207 or so is where I found it worked best as viewed on a scanner). That should be fairly close. If you notice it falls into an “infinite loop” in some situations, turn it slightly to the right. If it comes on too slowly in some conditions, turn it to the left. Unfortunately with this setup there is a fine line between the two.
Setting the high speed is done much the same. With the fans manually shut off, watch the temp. When it hits the temp you want the fans on full speed, turn the fans back to the auto setting which will kick them on “low.” Starting with the high speed screw all the way CW, gradually turn it CCW. You’ll hear the pitch of the fans gradually increase. At some point the pitch will stop increasing—that’s the spot they’re set to max speed. A good way to verify this setting is to manually shut the fans off until the desired temp is reached, turn them to auto and then after a couple seconds turn them to manually full on. If they speed up when you turn them to manual on, the high speed setting is at a higher temp than you thought.
I found with the Painless controller, both adjustment screws were very accurate and calibrated together well. So another way to set the “high speed setting” is to turn both all the way to the right and when you reach the desired temp slowly turn the low speed screw to until the fans turn on to more accurately find that point. Then you can turn the high speed screw the exact same amount and put the low speed screw back to where you want it.
With the sensor in the radiator outlet, setting the max temp is the same except you can set it a fair amount lower if you like (if setting it higher than the thermostat regulated temp). The thermostat will be wide open so your engine temp is directly related to radiator outlet temp. If you want to set it lower than that, set it like the low speed below.
Setting the low speed turn-on point is more guesswork when the sensor is in the radiator outlet. The sensor is measuring what is coming out of the radiator but the temp gauge (or scanner) is measuring water after the thermostat, which is mostly closed giving an artificially high temp when the water in the radiator is cold. Setting based on this reading is impossible. You could use an IR gun on the radiator outlet hose if you want to be anal, but the truth is this setting isn’t very critical (if setting below the thermostat temp, if setting above thermostat temp do it the same as above). Just pick a setting. All the way CCW is 160 with this controller. Each 90 degrees you turn it alters the setting 25 degrees. So, one 90 degree turn puts you at 185. Anywhere in that range should keep most people happy. If you find the fan is running a lot and being annoying in weather cool enough you don’t think it’s justified, turn it up a bit. If the engine heats up a bit over the standard 210 without the fans coming on quickly enough or continues to warm until the fans are at max speed when it shouldn’t, turn it down. It’s a personal preference call.
The low setting I used with the sensor in the bottom tank (of an aftermarket radiator) with the stock thermostat was 1/6th turn from the bottom, or 177 degrees. I found that keeps the radiator a good 15 degrees or so cooler than the point at which the engine begins to warm over the regular 201-208 thermostat regulated temp at idle. This gives it a nice “head start” so quickly changing conditions don’t cause the temp to spike, but keeps the fans off most of the time on the highway in “easy conditions” up to 75 degrees or so.
The high setting I ran in normal conditions was ¼ turn + 1/12th turn (or 2.5 1/6th turns) down from the top, or around 202 degrees. When the radiator temp reaches 202 it’s warm enough to begin allowing the engine temp to start creeping above the normal 201-208. This setting gives a decent 25 degree temp spread between low and high so the fans have plenty of time to get the job done on lower speeds before they ramp all the way up and ensures that any time the engine temp begins to rise above “normal,” the fans are cranked on 100%. It’s a fairly aggressive setting for those looking for maximum cooling; one could back it off quite a bit to keep the fans running more slowly if you aren’t the type to panic if the temp gauge rises a bit from time to time.
These settings (along with the A/C mod mentioned below) pretty much mean the fans never turn on in the winter time. You have to be idling around for quite a while before they kick on in really cold weather which is kind of nice.
* Other notes about this controller: I was unable to make the speed cutoff function work, but I quit trying before exhausting all possibilities. If I remember correctly, I intercepted the VSS from the tranny going to the PCM and it just didn’t work. At a later date I installed a Dakota Digital Controller to correct the speedo and intercepted the signal as it goes into the cluster. This Controller has multiple outputs and one of those may have worked but I had quit trying at that point. I now feel silly for spending as much time on it as I did.
To make a long story short, don’t bother with this function for these vehicles. My more recent testing (mentioned above) showing the fans are not only still useful, but needed at speeds up to 80 MPH in hot weather means this function is not useful for these vehicles (with typical offroad mods). The idea behind it is that at some vehicle speed, the fans become useless—turning them on does not increase airflow through the radiator over what’s happening via the natural ram air flow. A vehicle with better natural airflow through the radiator and smaller fans may have this occur at a mere 40 MPH or so. In that case, by all means, shut off the fans above that speed as they are only wasting energy, using up their life and amps from your alternator.
But for the TB (at least ones with crap on the front like mine), that speed is probably closer to 90 MPH. So there’s no point in a speed cutoff. At “normal highway speeds” the fans still increase airflow through the radiator so they had better be able to come on when needed. And in hot weather, especially if you’re towing something, they will be needed! Modifications to increase airflow can certainly lower that number significantly, but I’d be really wary of assuming the fans aren’t needed for “highway speeds” regardless of airflow mods without much testing to prove it. And with the A/C mod below this becomes a moot issue anyway.
Without that function, the A/C will turn on the fans at high speeds, even in cool weather which is annoying (but this is typical with all controllers that have a simple A/C compressor switch). Keeping the condenser cool does not take much airflow. Having the fans turn on and stay on with the compressor is quite wasteful. I solved this problem with this:
http://www.nostalgicairparts.com/air-co ... ns-374.php
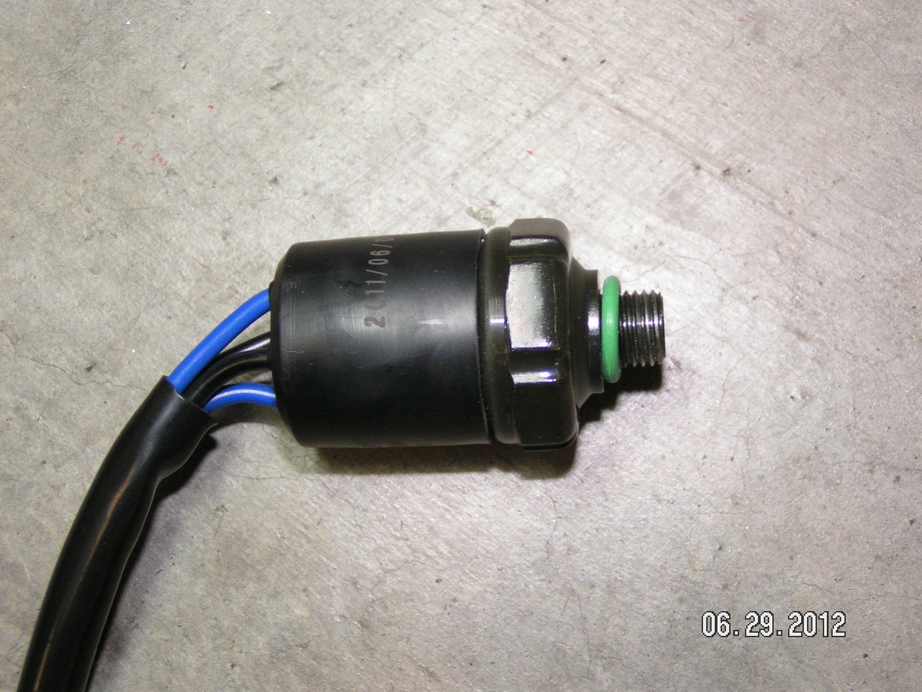
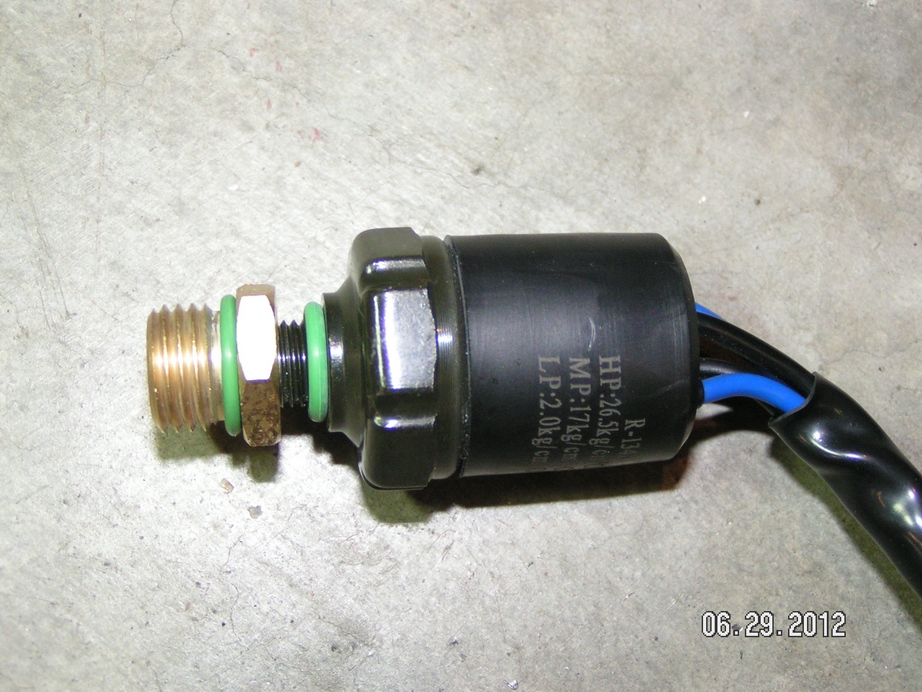
It’s a Trinary Switch. It performs three functions, two of which replace the Binary Safety Switch in most systems. Our system doesn’t appear to have one (I believe it’s a sensor on the compressor, not a switch, which reports to some control module which controls the system in lieu of a binary safety switch), so you can ignore those two functions (just tape up and don’t use those wires for anything). What makes the trinary different is the third function—the electric fan switch. It’s specifically designed to turn on and off the electric fans when needed by the A/C system.
Without airflow across the condenser, the high side pressure of the system is pretty much directly related to the temp of the condenser. If the pressure is low, the condenser is cool and is in no need of more airflow. If it’s high, the condenser is hot and needs air. This switch turns on the fans at 227 psi which represents the condenser surface temp reaching roughly 150 degrees—time to turn on the fan. It shuts the fans back off at 185 psi and keeps them off as long as the condenser stays cool.
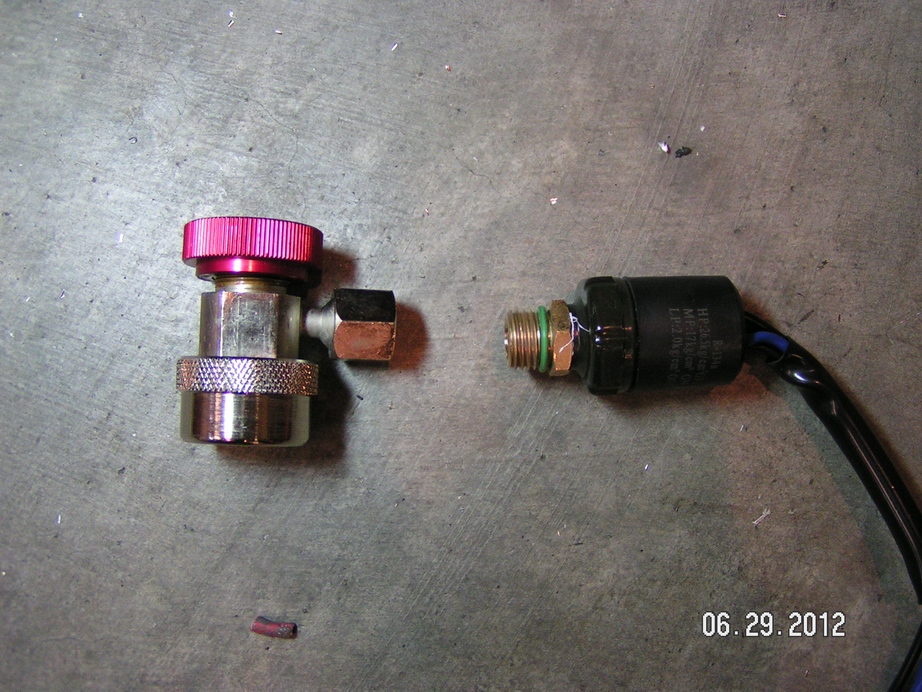
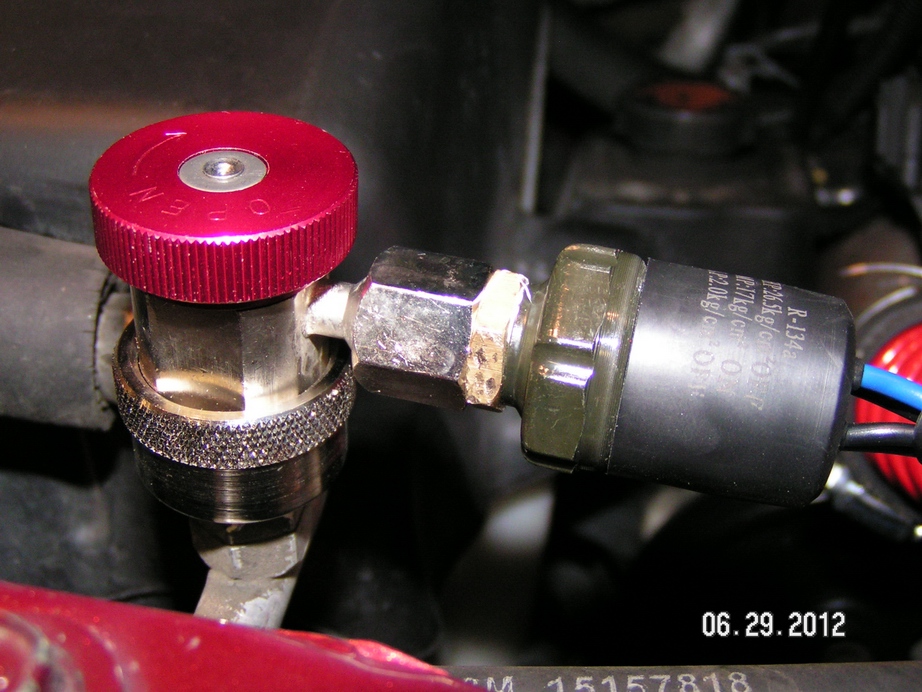
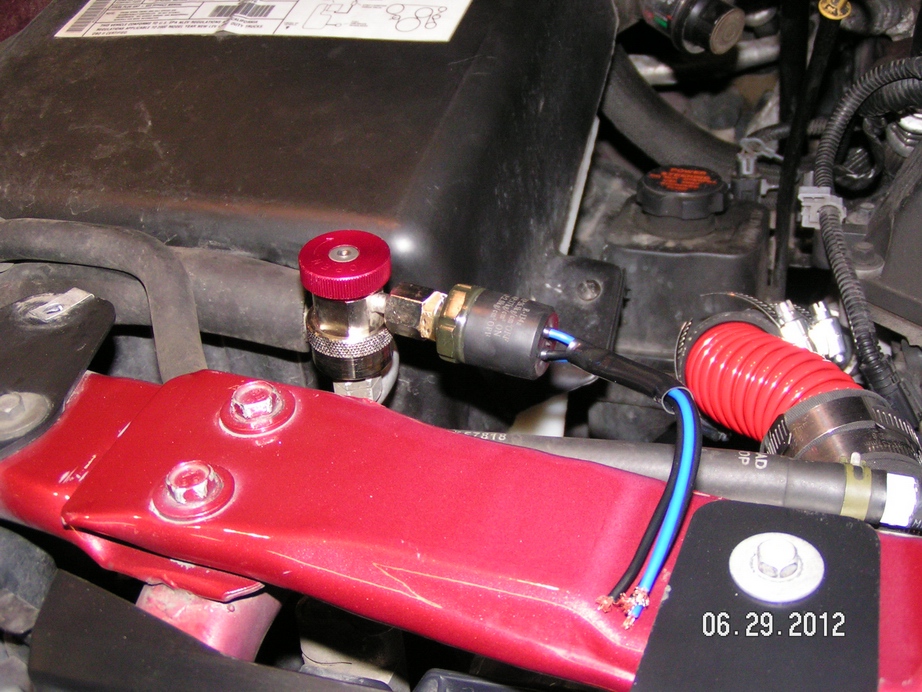
While we don’t have a binary switch to replace, I found a way to attach the switch to the high side service port. I got one of these:
http://cgi.ebay.com/ws/eBayISAPI.dll?Vi ... OU:US:1123
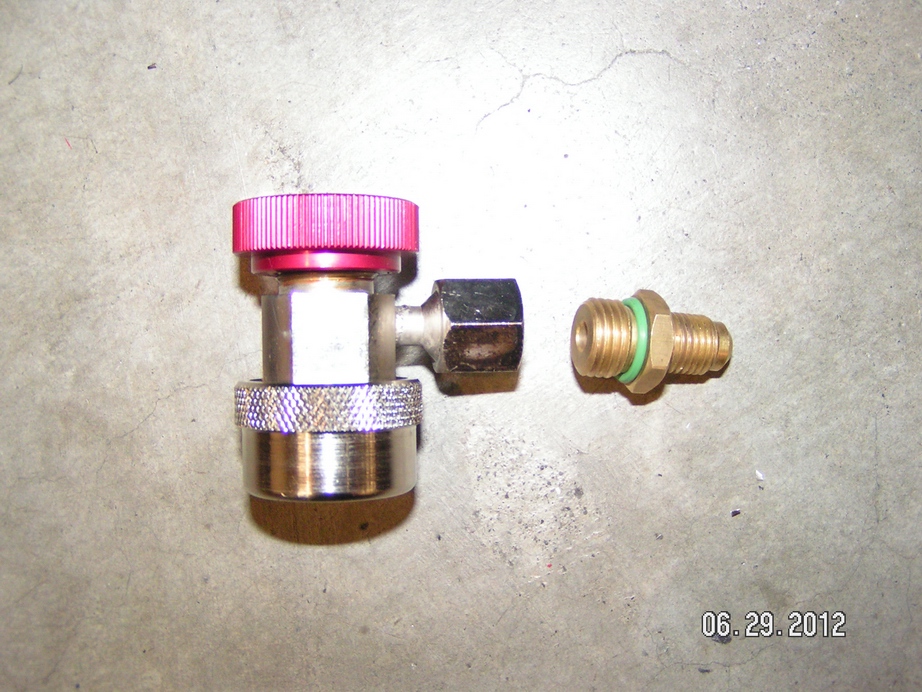
I’m sure there exists somewhere out there an adapter combination that will work but I got tired of looking as it seems every adapter fitting made for A/C systems is made for swapping R-12 stuff for R-134a stuff. So I simply chopped the end of that adapter I didn’t need off and drilled and tapped it 3/8” fine to match the trinary switch. This seals up with this particular switch very well.
I used Teflon tape and removed the O-ring where the sensor screws into the adapter on the 3/8” threads:
Simply run 12V to one blue wire and the other blue wire to the fan controller’s A/C override wire (instead of attaching that to the compressor positive lead).
With the fans triggered directly from the compressor I found the frequency with which the compressor turns on and off in cool weather was driving me crazy. It may not have been so bad with smaller fans or if the controller only turned them on low speed, but these big fans kicking on full speed for 5 seconds, off again, on again, etc when the condenser is nice and cold is obnoxious (and yes, I have replaced the low pressure cycling switch and checked the system pressure). And as mentioned above, running the fans on high when you’re driving down the freeway in cool weather is a waste. Especially at nighttime when your lights are on and you need those amps. I think the A/C override defaulting to full speed with this controller is probably a good idea with smaller fans but a bit of overkill with these big fans (though in really hot weather I don’t mind so much).
At idle/low speeds in cool weather this basically puts a buffer on the fan operation. The compressor kicking on for 5 seconds doesn’t actually warm the condenser that much or build much pressure. After it has done it a few times, the condenser is now warm enough it could use some fan. They only click on and off as needed. Much nicer.
Once the vehicle is moving, even just city-driving speeds, the condenser stays cool and the fans aren’t needed. Like I said, it does not take much air to keep it cool. So as mentioned above, this is a way to keep the fans from running when you’re cruising down the freeway and they aren’t needed but the climate control clicks on and off your A/C all the time.
When idling around in really hot weather the compressor and the fans are pretty much on full time so it doesn’t make much of a difference. When the compressor kicks on, the condenser heats up pretty quickly so there isn’t much of a delay. And in hot weather the compressor usually stays on longer so the frequent on/off isn’t as much of an issue.
In some “room temperature” conditions it may actually seem the fans are clicking on and off more than if they were directly wired to the compressor. If you want them to stop cycling at idle in moderate weather, you can always hit the override switch to force them on. I don’t mind using the switch that way but I do mind using it the other way (shutting them off when you don’t think they’re needed because sooner or later you’ll forget you did that and it will bite you).
You may find they cycle a bit less at times with a lower low water temp setting on the controller. If you set that to a low temp, the fans will be on low speed a lot more of the time. This will keep the fans from kicking on high due to the A/C override when they’re already running at low speed due to the radiator temp. The condenser gets really hot really fast but doesn’t contain all that much heat (if that makes any sense,
That should about cover it. More than you ever wanted to know about the cooling system and electric fans. Hopefully the few who actually read the whole thing know a heck of a lot more now than when they started. While the above isn’t the only way to do electric fans, I can say if you at least follow the more important points in principal you’re headed in the right direction and should have good results vs some of the other fan setups you may see elsewhere. Stay tuned for part II, the new radiator installation.


 Viewed 39487 times")

