Offroad Trailblazers and Envoys

MOD: Baja Rack - Roof Rack

If its been completed, and doesn't fit into another category, stick it here.
Forum rules
Threads must fully document the modification with pictures and verbiage in the first post.
Threads that do not meet this criteria may be moved or deleted.

by Trail X » Tue Sep 08, 2009 1:22 am

Well I took the plunge and decided to get a roof rack. I thought especially with TECORE coming up, I could use some extra storage. I also wanted to be able to transport some fuel... since I couldn't add that on my tire carrier, I decided a roof rack would be the best bet.

So I took a look at all the options available. I wanted something that wouldn't affect gas mileage too much, wasn't too heavy, yet was strong enough to handle a big load.

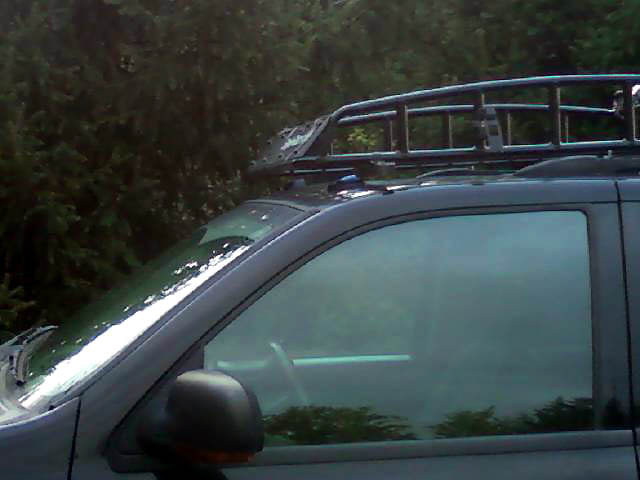
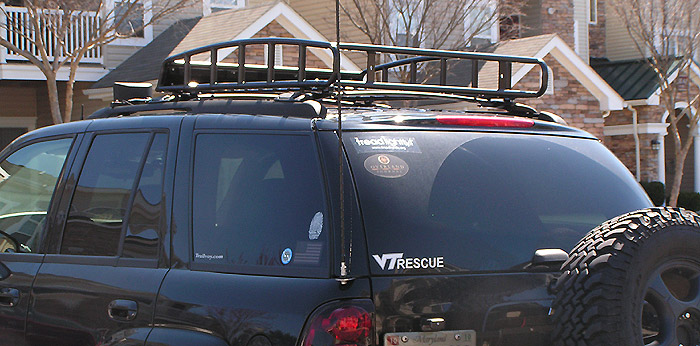
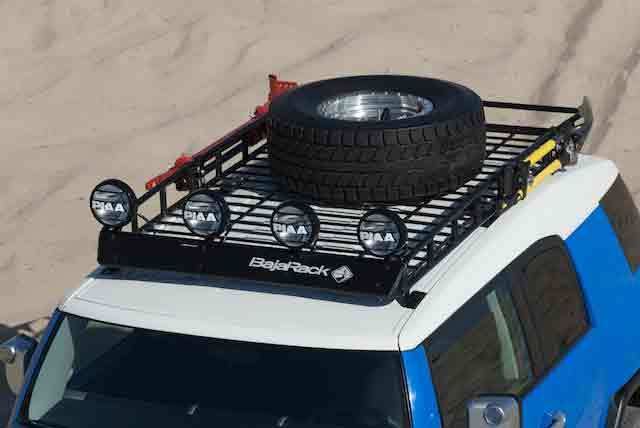
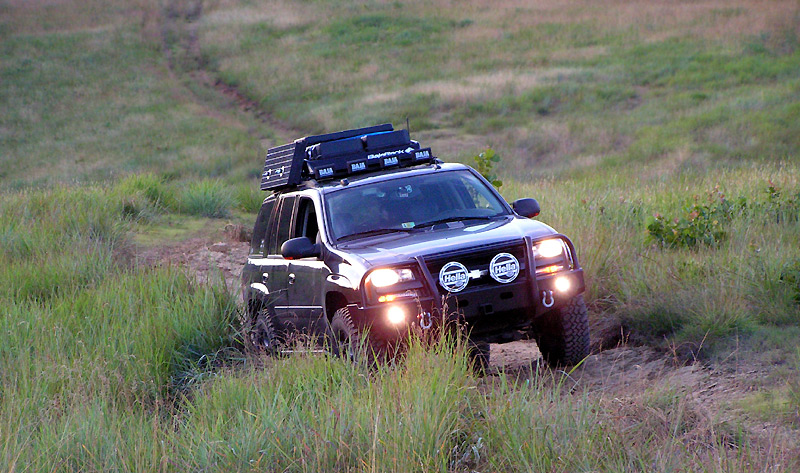
What I found was the Baja Rack.

Image

I believe I have the first on a TB. So I figured I'd write up a short review.

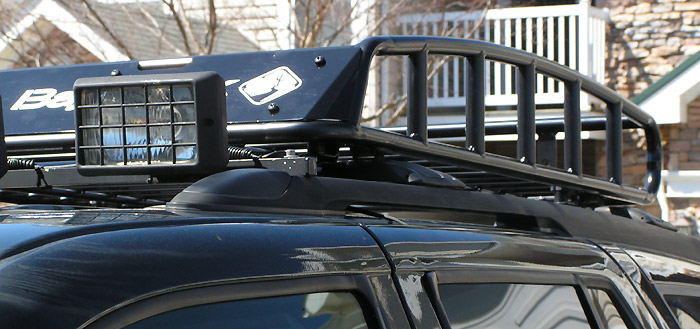
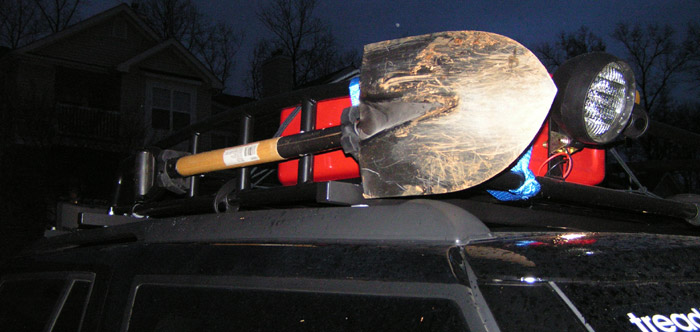
It's a fully welded hollow carbon-steel tube construction. So it's light and will not rattle. Plus, the rack is powdercoated, and not painted, which should give it some added durability. I picked mine up from Sierra Expeditions (http://www.sierraexpeditions.com/).

Image

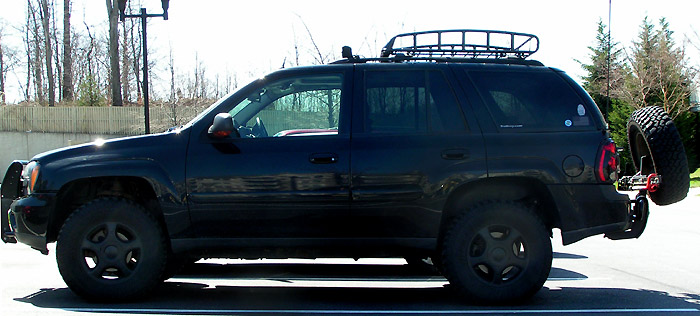
Baja Rack offers two sizes (http://www.bajarack.com/products.html). The Mule, which I got, and the MegaMule, which I felt was just a bit too big for the TB.

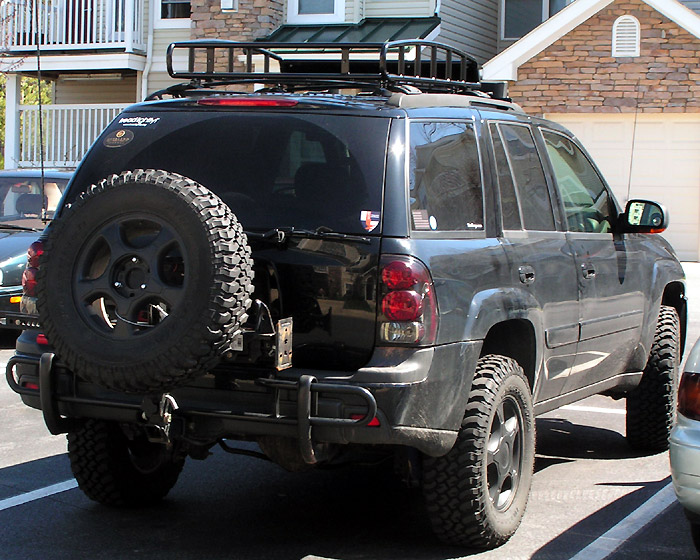
The rear has two tabs for rear facing lights. I'll stick some lights in there eventually. I'm still looking for some small wide angle flood lights... any suggestions?

Image

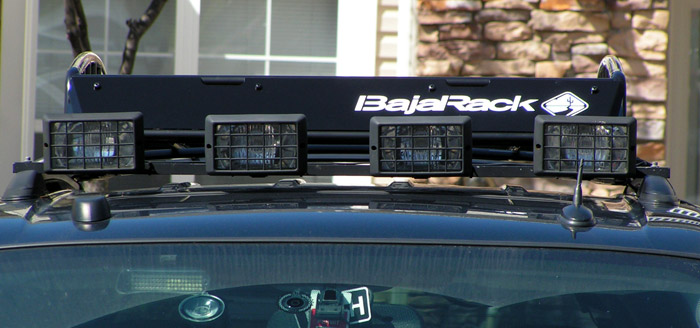
The front faring is also aluminum, and not a plastic sheet.

Image

Image

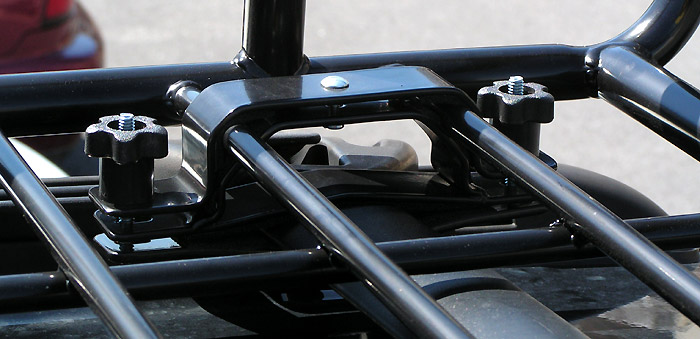
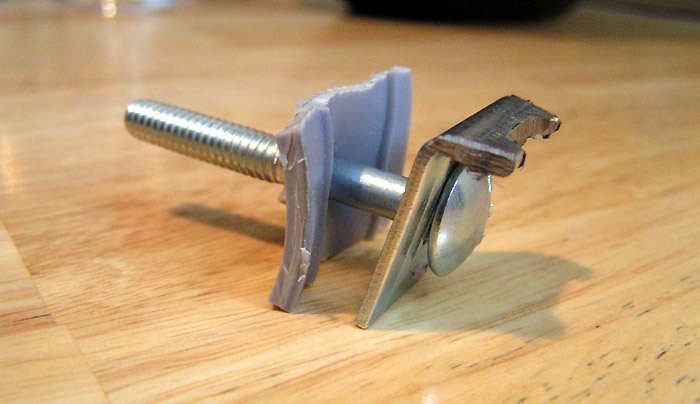
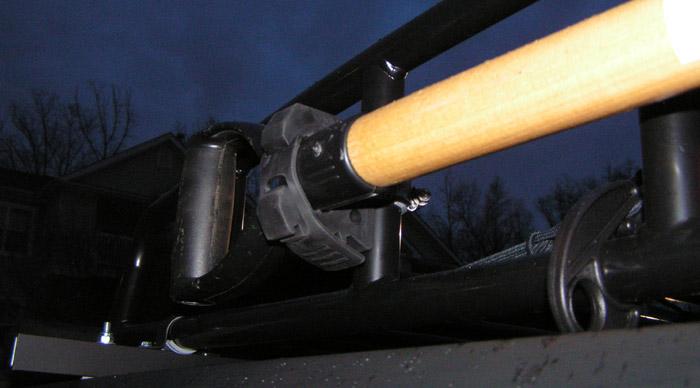
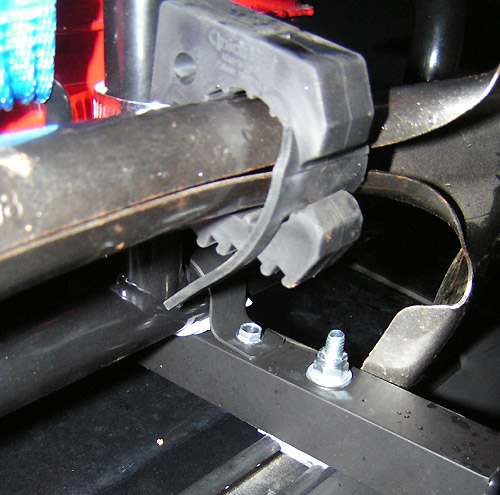
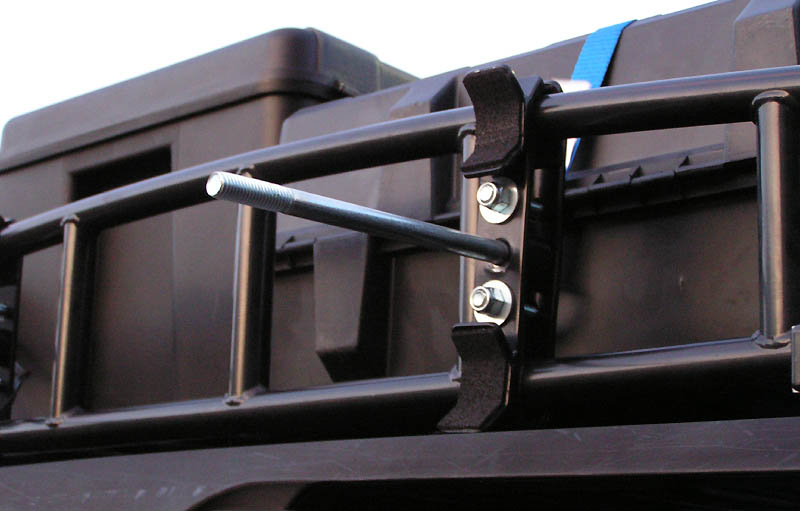
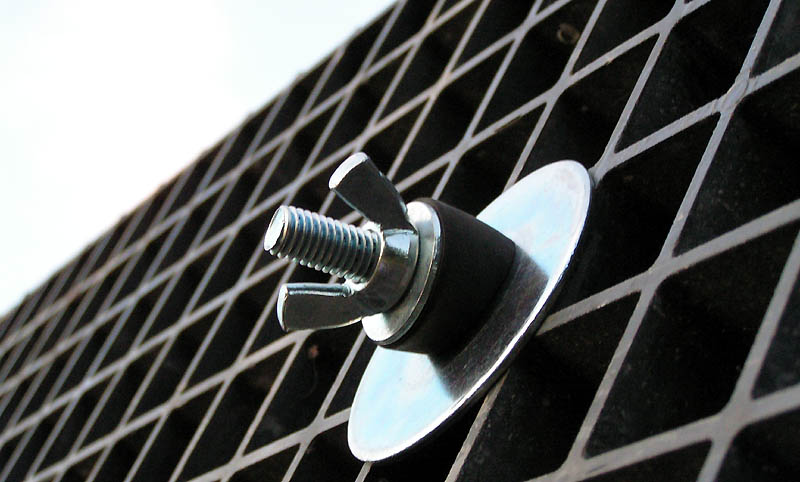
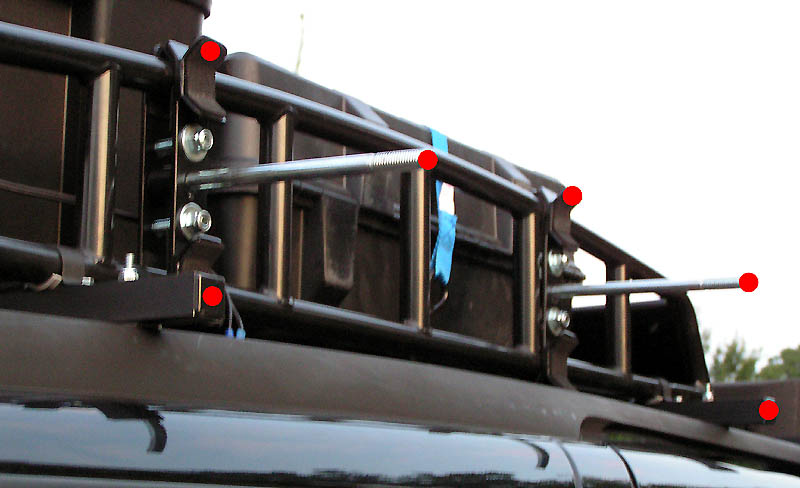
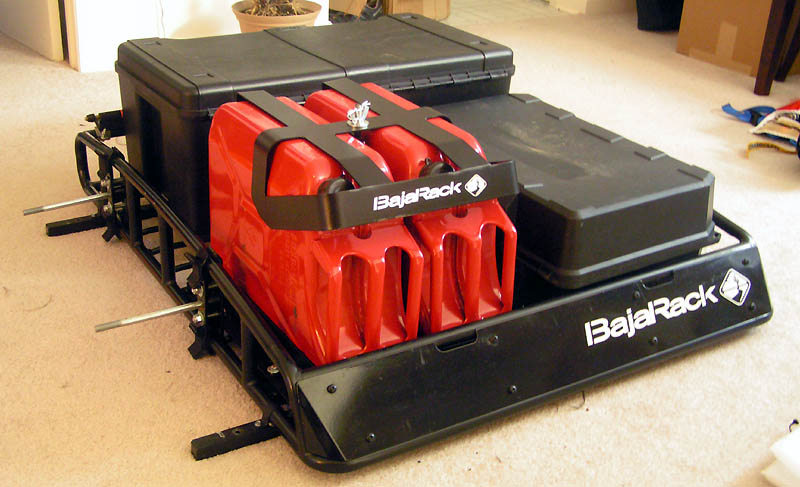
I used the stock crossbars for the rack, which actually worked very well with the Baja Rack mounting system.

Image

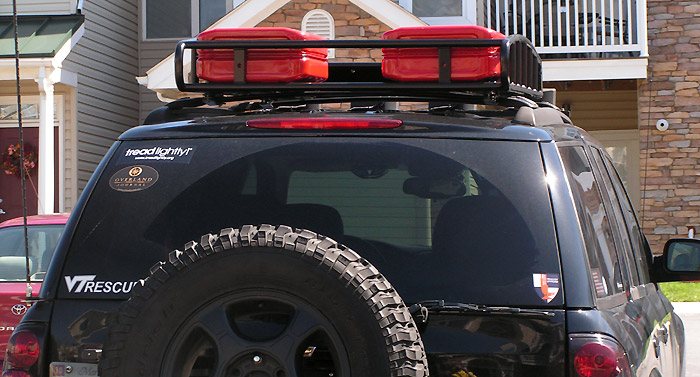
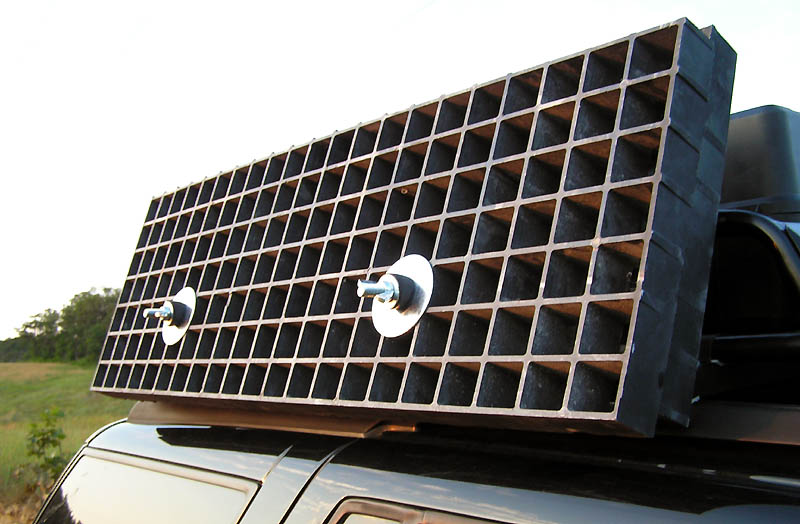
Here are my Wedco gas cans in place, just so you get an idea. If any of you are wanting gas cans, the Wedco supply is running out... pick up some of the last ones at https://www.expeditionexchange.com/wedco/.

Image

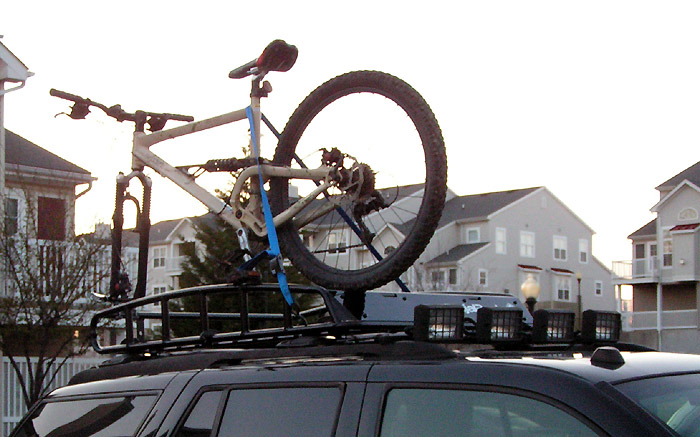
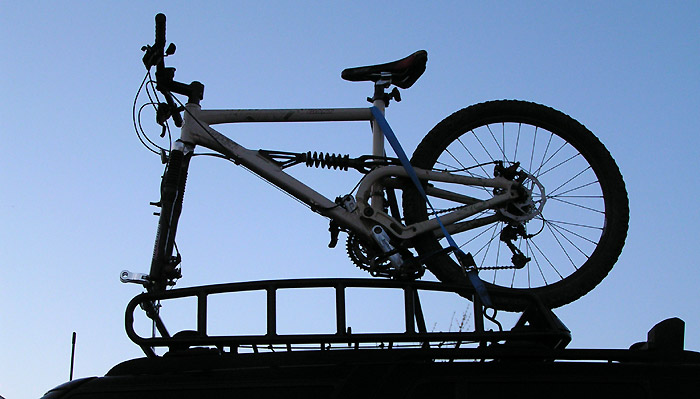
I'm also hoping to get a bike rack mounted up there. Although, I'm still unsure how that will all work out.

As always, I appreciate the feedback! :D
8-) Build Thread | ExPo Build | YouTube Videos
Not all who wander are lost. -Tolkien
User avatar
Trail X
Founder
 
Posts: 9935
Joined: Mon Sep 07, 2009 10:22 pm
Location: VA, Roanoke
Name: James Downing
Vehicle Year: 2005
Vehicle: Chevrolet TrailBlazer
DriveTrain: 4WD w/ Aftermarket Locker
Rank: Expedition Guide

by Trail X » Tue Sep 08, 2009 1:23 am

They sell a spare tire accessory, awning brackets (not pictured below), hi-lift holder, light tabs, and shovel/ax holders.

Image

However... one accessory that they don't sell is a bike rack... (how did you like that segue, eh?)

So, I fashioned one up for about $35 using a DeltaCycle Bike Hitch (below), some U bolts, and some rubber strips. Very simple.
Image

The result:
Image

Image

Image

I'll probably play around with it's location a bit, but once I'm happy with a location, I may end up bolting it through the crossbar. I guess I'll see how this holds up for now. :D
8-) Build Thread | ExPo Build | YouTube Videos
Not all who wander are lost. -Tolkien
User avatar
Trail X
Founder
 
Posts: 9935
Joined: Mon Sep 07, 2009 10:22 pm
Location: VA, Roanoke
Name: James Downing
Vehicle Year: 2005
Vehicle: Chevrolet TrailBlazer
DriveTrain: 4WD w/ Aftermarket Locker
Rank: Expedition Guide

by Trail X » Tue Sep 08, 2009 1:24 am

I reversed my prior approach taken with the lightbar with the rack mounts. Instead of a nut attached to the plate, I used a carrier bolt in a modified square washer with a square hole. This prevents the carrier bolt from spinning when tightening, and is much stronger than gluing on a nut (referencing my lightbar design).

The rubber material is a high grade plumbing rubber. When clamped, the rubber compound sees an extreme normal force acting on it. Because of the rubber's qualities, it provides maximum friction between the rack load bar and the truck's rack.

Image

The load bars are 1"x1" aluminum extrusions. The rack is held by a 1" pipe clamp. Again, you can see the rubber compound is used between the rack and the load bar. This will prevent any movement between the rack and the load bar due to the large normal force caused by the pipe clamp.

Image

By the time I installed it on the truck, I was working by streetlamp light. So no pictures. Very little visual difference though (the rack may be 3/4" lower), but the rigidity of the rack has improved 10-fold. No relative movement exists between the rack and the truck when I shake the rack as hard as I can. With the stock load bars, there was a lot of movement.

So, I'm pleased with this mod of my mod... :cool:
8-) Build Thread | ExPo Build | YouTube Videos
Not all who wander are lost. -Tolkien
User avatar
Trail X
Founder
 
Posts: 9935
Joined: Mon Sep 07, 2009 10:22 pm
Location: VA, Roanoke
Name: James Downing
Vehicle Year: 2005
Vehicle: Chevrolet TrailBlazer
DriveTrain: 4WD w/ Aftermarket Locker
Rank: Expedition Guide

by Trail X » Tue Sep 08, 2009 1:24 am

I considered purchasing the Bajarack shovel and ax mount:

Image

However, after chatting with Ho at Expedition Exchange, he convinced me that the system was way too complex. Upon closer inspection, I realized just how right he was. There are little washers, little wingnuts, and even mini retaining clips... all just waiting to be lost on the trail.

Ho steered me towards the quickfist:

Image

No extra hardware needed. Just tighten the rubber strap onto itself, and presto! Mounting the fists themselves was simple too. All I used was a pipe clamp and some small rubber pieces as backers.

Image

This last photo also shows a closeup of the rack as installed on the rails.

Image
8-) Build Thread | ExPo Build | YouTube Videos
Not all who wander are lost. -Tolkien
User avatar
Trail X
Founder
 
Posts: 9935
Joined: Mon Sep 07, 2009 10:22 pm
Location: VA, Roanoke
Name: James Downing
Vehicle Year: 2005
Vehicle: Chevrolet TrailBlazer
DriveTrain: 4WD w/ Aftermarket Locker
Rank: Expedition Guide

by Trail X » Tue Sep 08, 2009 1:25 am

Well, lets add this to the list of rack modifications. Bridging ladders:
Image

I used some hardware originally meant to mount a shovel and axe. Since I used the quick fists for the shovel, I no longer had a real use for the brackets. Luckily by changing the main bolt to a longer bolt, I was able to adapt them to hold my bridging ladders.
Image

I used a combination of two washers (one big, one small), a rubber stopper (with a hole drilled in it), and a wing nut:

Image

The bridges mount in 6 points. It mounts on the two bolts, the two load bars for the rack, and the top of the brackets (points labeled red):

Image

Of course, you've got to test it out. Lots of popping and snapping sounds, as Roadie said in the prior thread (http://forums.trailvoy.com/showthread.php?t=44314), but they seemed to pop back fine!

Image

On a trail:

Image
8-) Build Thread | ExPo Build | YouTube Videos
Not all who wander are lost. -Tolkien
User avatar
Trail X
Founder
 
Posts: 9935
Joined: Mon Sep 07, 2009 10:22 pm
Location: VA, Roanoke
Name: James Downing
Vehicle Year: 2005
Vehicle: Chevrolet TrailBlazer
DriveTrain: 4WD w/ Aftermarket Locker
Rank: Expedition Guide

by Trail X » Wed Sep 09, 2009 6:50 pm

I just got confirmation that Sergio over at BajaRack is going to send me one of these to evaluate (and show off) during TECORE:

Image

Image

Woohoo!

The biggest question is... will it require any modification to fit my Wedco cans? The cans pictured above are Blitz cans.

This product should also work for any other rack that has slats... not sure if there are any limitations.

The big benefit of these holders is that when the upper bracket is removed, all that remains is a low profile baseplate:

Image
8-) Build Thread | ExPo Build | YouTube Videos
Not all who wander are lost. -Tolkien
User avatar
Trail X
Founder
 
Posts: 9935
Joined: Mon Sep 07, 2009 10:22 pm
Location: VA, Roanoke
Name: James Downing
Vehicle Year: 2005
Vehicle: Chevrolet TrailBlazer
DriveTrain: 4WD w/ Aftermarket Locker
Rank: Expedition Guide

by Trail X » Tue Sep 15, 2009 9:30 pm

It came in today! Just in time for TECORE. I'll be evaluating the holder during the event and providing product input back to BajaRack.

So guys at TECORE... take a look when you're out there.

For anyone with a rack with rod-slats, it should fit. I'll report back with my findings after the weekend. :camping: :friday:

Image
8-) Build Thread | ExPo Build | YouTube Videos
Not all who wander are lost. -Tolkien
User avatar
Trail X
Founder
 
Posts: 9935
Joined: Mon Sep 07, 2009 10:22 pm
Location: VA, Roanoke
Name: James Downing
Vehicle Year: 2005
Vehicle: Chevrolet TrailBlazer
DriveTrain: 4WD w/ Aftermarket Locker
Rank: Expedition Guide

by The Roadie » Tue Sep 15, 2009 11:24 pm

The footlocker in the back looks familiar. :lol:
User avatar
The Roadie
Founder
 
Posts: 5011
Joined: Mon Sep 07, 2009 11:29 pm
Location: CA, Vista, San Diego County
Name: Bill Carton
Vehicle Year: 2004
Vehicle: GMC Envoy
DriveTrain: 4WD w/ G80
Rank: Expedition Guide

by teebes » Tue Sep 15, 2009 11:33 pm

Is that a wingnut on the top holder? Is there a locking mechanism by any chance?

Careful of the scoundrels out there.
:finger: thieves :finger:
User avatar
teebes
Founder
 
Posts: 1052
Joined: Thu Sep 03, 2009 1:05 am
Location: CA, San Diego
Name: Teebes
Vehicle Year: 2002
Vehicle: Chevrolet TrailBlazer
DriveTrain: 4WD w/ Aftermarket Locker
Rank: Expedition Rated

by Trail X » Wed Sep 16, 2009 12:40 am

The Roadie wrote:The footlocker in the back looks familiar. :lol:


Cheap ol' walmart crap... but it's held up fine so far. No point paying for a pelican case yet. Although, not ruling it out down the road... :drool3:

teebes wrote:Is that a wingnut on the top holder? Is there a locking mechanism by any chance?

Careful of the scoundrels out there.
:finger: thieves :finger:


Yeah, its a single wingnut holding the top on. There is a hole in the stud that you can insert a retaining clip in. As an alternative, you can put in a small lock. Although, I only carry these around on long trips. So I'm not too worried as of now.
8-) Build Thread | ExPo Build | YouTube Videos
Not all who wander are lost. -Tolkien
User avatar
Trail X
Founder
 
Posts: 9935
Joined: Mon Sep 07, 2009 10:22 pm
Location: VA, Roanoke
Name: James Downing
Vehicle Year: 2005
Vehicle: Chevrolet TrailBlazer
DriveTrain: 4WD w/ Aftermarket Locker
Rank: Expedition Guide

by Philberto » Wed Sep 16, 2009 1:56 pm

That jerry can holder looks nice! I think Expedition Exchange is out of the 5gal wedcos though, so I'm stuck with those crappy CARB ones, unless I drive to Arizona and pick some up :coffee: Still waiting on somebody to get a RTT and mount it on their roof so I can see how I'll do it myself, and unfortunately BajaRack's EXP rack is just too expensive for me to use that. Anything similar out there?
My Build Thread | 2006 Trailblazer LS Desert Camping Edition **SOLD**
2013 Nissan Xterra S "ReXterra"
User avatar
Philberto
Lifer
 
Posts: 2046
Joined: Fri Sep 11, 2009 5:30 pm
Location: CA, Oxnard
Name: Philip Cruz
Vehicle Year: Other
Vehicle: Other Vehicle
DriveTrain: 4WD
Rank: Offroad Rated

by bgwolfpack » Tue Nov 03, 2009 2:03 pm

What do you carry in the tote boxes? How much weight? (I've parsed this question in other threads and never gotten anyone to bite.) 'The manual says no loading of the luggage carrier beyond 220 lbs.' Is that the limit to stay under? My plans will be to use a Mega Mule, so I need help in determining if this idea is over kill or not, depending on the weight. Any insight?
bgwolfpack
Veteran
 
Posts: 1794
Joined: Fri Sep 18, 2009 7:19 pm
Name: Randy
Vehicle Year: Other
Vehicle: Other Vehicle
DriveTrain: 4WD

by Trail X » Tue Nov 03, 2009 3:17 pm

JamesDowning wrote:Image

The smaller, front case is my field kitchen case. It houses the grill, coleman propane tanks, regulator, small pots, & stove utensils. This case smells like a grill... so I prefer to keep it on the roof, as oppose to inside. (although, I put it inside the vehicle at night... which is debatable weather it's a good or bad idea...)

The larger case in the rear houses "camp" supplies. Its got stuff like my reciprocating saw, lantern, bugspray, emergency cold weather gear, flashlights, tent ceiling fan, tarps, paper towels, TP, etc etc... When I set up camp, I generally set this beside my tent.

No way you'd want more than 200 lbs up there while on a trail. The rocking of the vehicle is greatly exacerbated by the lever arm of this weight to the roll center of the vehicle. Things tend to loosen a bit over time... However, if you had a roof top tent up there that was under 200 lbs, and only were in it when the vehicle wasn't rocking, you'd probably be ok.
8-) Build Thread | ExPo Build | YouTube Videos
Not all who wander are lost. -Tolkien
User avatar
Trail X
Founder
 
Posts: 9935
Joined: Mon Sep 07, 2009 10:22 pm
Location: VA, Roanoke
Name: James Downing
Vehicle Year: 2005
Vehicle: Chevrolet TrailBlazer
DriveTrain: 4WD w/ Aftermarket Locker
Rank: Expedition Guide

by Trail X » Fri Apr 09, 2010 3:51 pm

Kinda cool, my truck made it to the BajaRack website:

http://www.bajarack.com/the-mule/
8-) Build Thread | ExPo Build | YouTube Videos
Not all who wander are lost. -Tolkien
User avatar
Trail X
Founder
 
Posts: 9935
Joined: Mon Sep 07, 2009 10:22 pm
Location: VA, Roanoke
Name: James Downing
Vehicle Year: 2005
Vehicle: Chevrolet TrailBlazer
DriveTrain: 4WD w/ Aftermarket Locker
Rank: Expedition Guide

by OregTrailBlazin » Tue Apr 13, 2010 2:25 pm

JamesDowning wrote:Kinda cool, my truck made it to the BajaRack website:

http://www.bajarack.com/the-mule/


That's funny.. Just last week my co-worker came to me talking about this bitch'n trailblazer on the BajaRack sight. And how I just had to see it.. hehehe... I was able to show him a bunch more of your photo's..

:thumleft: :cheers: Congrats!! Now send some pics in to readers ride!.. I bet one of the mag's would do a write up on the TB/EV since it hasn't been covered much yet!
Johnny Kurz
General Manager
541-474-2879
Wheeler's Off-Road Inc.
Our Vendor Section
User avatar
OregTrailBlazin
Off-Road Vendor
 
Posts: 610
Joined: Wed Sep 09, 2009 2:34 pm
Location: OR, Grants Pass
Name: Johnathan Kurz
Vehicle Year: 2004
Vehicle: Chevrolet TrailBlazer
DriveTrain: 4WD

by Trail X » Fri Aug 05, 2011 1:05 pm

The baja rack is entering a previously unanticipated phase 2...

I'm working on a plan to mount the front half of the baja rack to the front of the cab. This should help shoot the wind over top of the roof tent, plus add a little space for carrying things like firewood. The challenge being that the roof rack rails do not stretch that far forward.

I just threw it into place to get an idea of what I was working with. It looks like I will be cutting it right behind the 3rd vertical support bars:

Image

I'm considering using the front-most stock roof rack mounting bolts to mount the rear of the baja. For the front, I think I may need to be a bit more creative. I've got two ideas floating around in my head and both require drilling into the roof.

The first idea is a blind rivet nut.

The second idea is a short bolt sticking out from inside, and a coupling nut tightened down on top of that.

(Of course, both ideas require smothering the hole with RTV.)

Any input from anyone? For some reason the non-serviceability of the rivet nuts worries me.
8-) Build Thread | ExPo Build | YouTube Videos
Not all who wander are lost. -Tolkien
User avatar
Trail X
Founder
 
Posts: 9935
Joined: Mon Sep 07, 2009 10:22 pm
Location: VA, Roanoke
Name: James Downing
Vehicle Year: 2005
Vehicle: Chevrolet TrailBlazer
DriveTrain: 4WD w/ Aftermarket Locker
Rank: Expedition Guide

by bartonmd » Fri Aug 05, 2011 1:26 pm

We use the blind rivet-nuts on stuff at work all the time... They are good to go...

Mike
bartonmd
Moderator
 
Posts: 4469
Joined: Wed Sep 09, 2009 9:35 am
Location: IN, Indianapolis
Name: Mike
Vehicle Year: 2007
Vehicle: Chevrolet TrailBlazer
DriveTrain: 4WD w/ G80
Rank: Offroad Rated

by The Roadie » Fri Aug 05, 2011 1:31 pm

A couple of my OEM rivnuts started spinning when I removed the rails for the 4th time, so I sort of dimpled them into not spinning when I put on my industrial channel material. I never want to take that stuff off now. You might consider a couple short lengths of unistrut.
User avatar
The Roadie
Founder
 
Posts: 5011
Joined: Mon Sep 07, 2009 11:29 pm
Location: CA, Vista, San Diego County
Name: Bill Carton
Vehicle Year: 2004
Vehicle: GMC Envoy
DriveTrain: 4WD w/ G80
Rank: Expedition Guide

by Trail X » Fri Aug 05, 2011 1:53 pm

bartonmd wrote:We use the blind rivet-nuts on stuff at work all the time... They are good to go...

Mike

My only worry is getting them tight enough. I won't be using a rivet nut tool, just a jerry-rigged nut and bolt system. I've used that before on a broken-side rivet nut, but I worry about being able to generate enough force on the unbroken/sealed side rivnuts.

The Roadie wrote:A couple of my OEM rivnuts started spinning when I removed the rails for the 4th time, so I sort of dimpled them into not spinning when I put on my industrial channel material. I never want to take that stuff off now. You might consider a couple short lengths of unistrut.


That was one of my worries about using rivet nuts. The ones I was looking at are slightly splined to supposedly prevent spin. Unistrut might work, but I'm not convinced I need the mounting flexibiltiy it would offer. Plus, the roof is pretty curved on the front... not sure if it would contour properly...?
8-) Build Thread | ExPo Build | YouTube Videos
Not all who wander are lost. -Tolkien
User avatar
Trail X
Founder
 
Posts: 9935
Joined: Mon Sep 07, 2009 10:22 pm
Location: VA, Roanoke
Name: James Downing
Vehicle Year: 2005
Vehicle: Chevrolet TrailBlazer
DriveTrain: 4WD w/ Aftermarket Locker
Rank: Expedition Guide

by MrSmithsTB » Fri Aug 05, 2011 2:45 pm

If you were to use the shallow(7/8") strut, you could get it to curve to the roofline. It's still stout, far more than our stock channels, but gives just enough flexibility. I was going to suggest this, but Bill beat me to it. It would also keep everything closer to the roof itself, help aid in wind deflection.
back in the saddle
TB BUILD
User avatar
MrSmithsTB
Veteran
 
Posts: 1756
Joined: Thu Sep 10, 2009 2:28 pm
Location: EHT, NJ
Name: Bob
Vehicle Year: 2006
Vehicle: Other GMT360/370
DriveTrain: AWD w/ G80
Rank: Offroad Rated

Next

Return to Completed Modifications