Greetings, all.
I'm currently looking at having a CBI off-road rear tire carrier built for my 06 LS, after having done some research and deciding that this is the best option for me to carry a full-sized spare with my current set up. The only issue is that CBI requires some fairly precise measurements regarding the rear hitch/bumper spacing to properly construct the carrier. Being that I am currently deployed to Afghanistan, and subsequently thousands of miles from my TB in storage, this just isn't feasible. Is there anyone with the same/similar truck that can take some quick measurements for me so I can pass them along with my order to CBI Off Road? Below are the measurements required:
-Distance from the front face of your receiver hitch, back to the center of the pin hole?
-Distance from the top of your receiver to the top of your bumper?
-Does the back face of your receiver sit flush with the back face of the rear bumper or is it recessed or stick out beyond that face? What is the measurement of the difference?
http://www.cbioffroadfab.com/store/prod ... ucts_id=93
For reference, I have the stock rear bumper and hitch component set up and am not running a body lift. I realize this is an odd request, but any help is appreciated.
Thanks - Josh
New Member Seeking Assistance with Rear Tire Carrier
12 posts
• Page 1 of 1
- jhberria
- Cruiser
- Posts: 23
- Joined: Tue Aug 20, 2013 12:13 pm
- Location: NY, Evans Mills/Fort Drum
- Name: Josh
- Vehicle Year: 2006
- Vehicle: Chevrolet TrailBlazer
- DriveTrain: 4WD
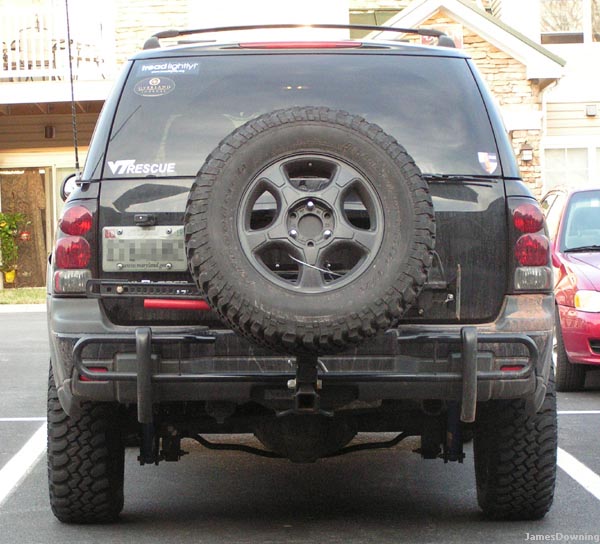
I just walked out to my truck, fully intending to come back in with the measurements you need... completely forgetting that I have a custom rear bumper. Doh.
Not sure if this will help you at all, but the measurements I initially sent CBI are included in the picture below. (I had a rear brush guard at the time that I wanted to make sure didn't interfere with the tire carrier.)
Not sure if this will help you at all, but the measurements I initially sent CBI are included in the picture below. (I had a rear brush guard at the time that I wanted to make sure didn't interfere with the tire carrier.)
- Attachments
-
 Viewed 11260 times")
-

Trail X - Founder
- Posts: 9935
- Joined: Mon Sep 07, 2009 10:22 pm
- Location: VA, Roanoke
- Name: James Downing
- Vehicle Year: 2005
- Vehicle: Chevrolet TrailBlazer
- DriveTrain: 4WD w/ Aftermarket Locker
- Rank: Expedition Guide
That may prove to be incredibly helpful, James. I appreciate it. I'll probably take those measurements and adjust to compensate for my lack of a rear brush guard.
- jhberria
- Cruiser
- Posts: 23
- Joined: Tue Aug 20, 2013 12:13 pm
- Location: NY, Evans Mills/Fort Drum
- Name: Josh
- Vehicle Year: 2006
- Vehicle: Chevrolet TrailBlazer
- DriveTrain: 4WD
I guesss I'm the cheapo that just bought the universal one from CBI. They didn't need any measurments from me... Hmmmmmmm
Current Count of Transmission Rebuilds: 5.5
***The more you know, the less you need.***
USMC '07-'12
Dirty Bacon's Build
-

DirtyBacon04 - Moderator
- Posts: 3046
- Joined: Fri Aug 05, 2011 4:59 am
- Location: FL, Central
- Name: Michael
- Vehicle Year: 2004
- Vehicle: Chevrolet TrailBlazer
- DriveTrain: 4WD w/ Aftermarket Locker
- Rank: Expedition Rated
Hah well the only issue with the standard model is that it doesn't really offer an alternative for license plate mounting, so I feel like something would have to by hastily rigged. How did the standard model fit your TB? Also, where did you mount your license plate afterwards?
Also, if anyone is still willing to take the required measurements, it would be greatly appreciated.
Also, if anyone is still willing to take the required measurements, it would be greatly appreciated.
- jhberria
- Cruiser
- Posts: 23
- Joined: Tue Aug 20, 2013 12:13 pm
- Location: NY, Evans Mills/Fort Drum
- Name: Josh
- Vehicle Year: 2006
- Vehicle: Chevrolet TrailBlazer
- DriveTrain: 4WD
Standard model fits fine. 3 different holes in the hitch so you choose how far out it sits. I bought a trailer tag holder/light and mounted it on the bottom left of my bumper. Theres a pic in my build thread (link in signature)
Current Count of Transmission Rebuilds: 5.5
***The more you know, the less you need.***
USMC '07-'12
Dirty Bacon's Build
-
DirtyBacon04 - Moderator
- Posts: 3046
- Joined: Fri Aug 05, 2011 4:59 am
- Location: FL, Central
- Name: Michael
- Vehicle Year: 2004
- Vehicle: Chevrolet TrailBlazer
- DriveTrain: 4WD w/ Aftermarket Locker
- Rank: Expedition Rated
Interesting. I'm now thinking that the standard may be a better option, as I don't have to worry about jacking up the measurements while out here (not to mention it's significantly cheaper, hah). Unfortunately, I can't view any of the pictures in your build thread because the guv-mint' run internet here in Afghanistan has fairly limited bandwidth, producing a series of red Xs.
- jhberria
- Cruiser
- Posts: 23
- Joined: Tue Aug 20, 2013 12:13 pm
- Location: NY, Evans Mills/Fort Drum
- Name: Josh
- Vehicle Year: 2006
- Vehicle: Chevrolet TrailBlazer
- DriveTrain: 4WD
Josh, many of us have also mounted the license plate off to the side of it's stock position by using a homemade metal bracket.
Have you seen this thread?
viewtopic.php?f=9&t=14
Have you seen this thread?
viewtopic.php?f=9&t=14
-
Trail X - Founder
- Posts: 9935
- Joined: Mon Sep 07, 2009 10:22 pm
- Location: VA, Roanoke
- Name: James Downing
- Vehicle Year: 2005
- Vehicle: Chevrolet TrailBlazer
- DriveTrain: 4WD w/ Aftermarket Locker
- Rank: Expedition Guide
If you really want to save time wiring up the above solution...

http://www.ebay.com/itm/HARNESS-194-282 ... 0860181200
Cut off the socket on this harness and wire the new light to this, plug it into one of the orignal license plate light sockets... BAM!
Just get the 2 pieces of aluminum bar and 2 rubber stoppers to prevent rattle and scratching from Lowes or HomeDepot.
Mario - Build Thread
-

Gordinho80 - Lifer
- Posts: 2787
- Joined: Tue Sep 08, 2009 9:27 am
- Location: NJ, Jackson
- Name: Mario Almeida
- Vehicle Year: Other
- Vehicle: Other Vehicle
- DriveTrain: 4WD
I have mine mounted with a plastic trailer bracket bolted in under edge of window. I like it far better than when I had the bracket. I am not sure I ever took a pic of the mount, but you can see where it sits


they've always worked for me.
-

HARDTRAILZ - Moderator
- Posts: 6342
- Joined: Sat Sep 12, 2009 1:49 am
- Location: IN, Batesville
- Name: Kyle
- Vehicle Year: 2006
- Vehicle: Chevrolet TrailBlazer
- DriveTrain: 4WD w/ Aftermarket Locker
- Rank: Extreme Offroader
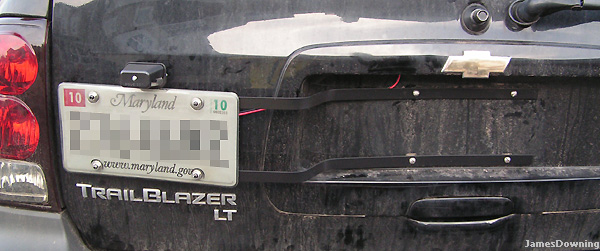
Here's everything I sent to them off my sales receipt....
PREMIUM Fold down tire carrier: Includes hi-lift jack mount, license plate mount w/ light, and pass through receiver hitch. Shipping and Handling
1) My vehicle is a 2006 Chevrolet Trailblazer LS 4x4.
2) Measurement from front face of the receiver to center of the pin hole is : 2 1/2"
3) My rear bumper has a step built into it directly above the receiver. The measurement from the top of the receiver to the top step in the bumper is : 1 1/2"
4) I'm not really sure what you are asking for on this, or I'm just confused. My hitch is factory built into the steel support brackets of the rear bumper by GM and tucks up behind the bumper.
Other measurements are as follow to maybe help with #4..
The receiver is straight through design until you reach the factory spare tire ( will no longer be here after this is made) and its 7" deep from the face of the receiver till it hits the tire.
The face of the receiver sticks out 1/2" beyond the bumper.
I've also attached a couple pictures so you can see the hitch. I am running a 265/70r17 tire and 6x5.5 bolt pattern wheel ( full size Chevy truck rim).
The bottom edge of my window is 26- 3/4" from the top of the step built into my bumper to the lower portion of my lift gate glass.
The other measurement, the handle of the window glass sticks out further than the glass itself and reaches the even point of the bumper before the glass does.
When the window is closed the outer most part of the handle is 5-1/8" to the even point of the bumper. The lower edge of the glass is taken at same point for the above measurement is 6-1/4" to the even point of the bumper.
The bottom edge center of the handle is 27-3/4"to the top of the step built into my bumper.
When the window is open the handle becomes even with the bumper at 35" from the top of the step built into my bumper.
The handle sticks out 1-1/4" from the face of the glass and the bottom of the handle is 5/8" from the bottom edge of the glass.
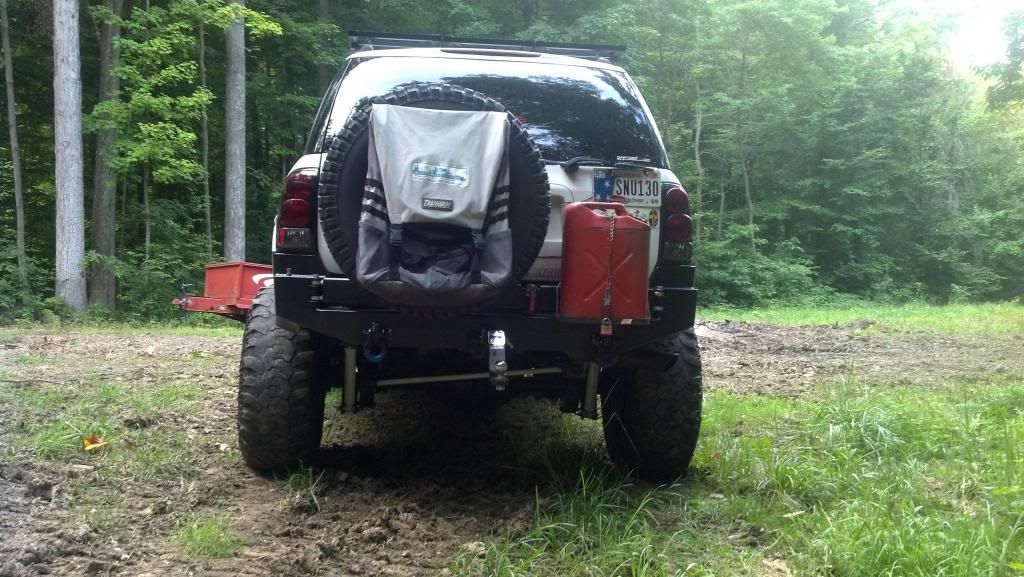
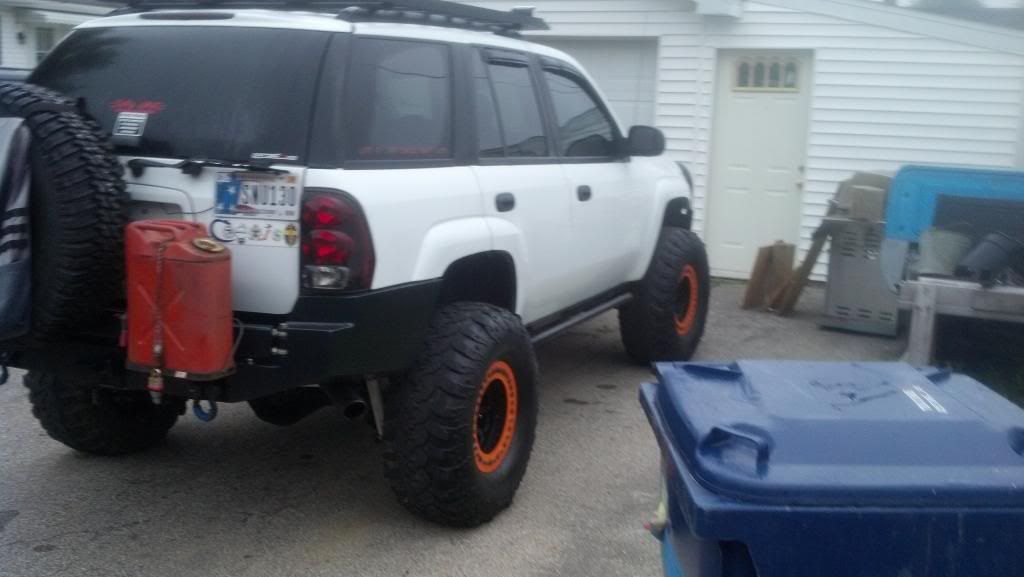
The license plate can be made like in my build, comes right through the center of the tire. In my pictures, the mount isn't fully seated. I bought a light off eBay and an 8' coiled 7 way to flat 4 and wired just the aux light off that. Snakes up the back of the mount.
PREMIUM Fold down tire carrier: Includes hi-lift jack mount, license plate mount w/ light, and pass through receiver hitch. Shipping and Handling
1) My vehicle is a 2006 Chevrolet Trailblazer LS 4x4.
2) Measurement from front face of the receiver to center of the pin hole is : 2 1/2"
3) My rear bumper has a step built into it directly above the receiver. The measurement from the top of the receiver to the top step in the bumper is : 1 1/2"
4) I'm not really sure what you are asking for on this, or I'm just confused. My hitch is factory built into the steel support brackets of the rear bumper by GM and tucks up behind the bumper.
Other measurements are as follow to maybe help with #4..
The receiver is straight through design until you reach the factory spare tire ( will no longer be here after this is made) and its 7" deep from the face of the receiver till it hits the tire.
The face of the receiver sticks out 1/2" beyond the bumper.
I've also attached a couple pictures so you can see the hitch. I am running a 265/70r17 tire and 6x5.5 bolt pattern wheel ( full size Chevy truck rim).
The bottom edge of my window is 26- 3/4" from the top of the step built into my bumper to the lower portion of my lift gate glass.
The other measurement, the handle of the window glass sticks out further than the glass itself and reaches the even point of the bumper before the glass does.
When the window is closed the outer most part of the handle is 5-1/8" to the even point of the bumper. The lower edge of the glass is taken at same point for the above measurement is 6-1/4" to the even point of the bumper.
The bottom edge center of the handle is 27-3/4"to the top of the step built into my bumper.
When the window is open the handle becomes even with the bumper at 35" from the top of the step built into my bumper.
The handle sticks out 1-1/4" from the face of the glass and the bottom of the handle is 5/8" from the bottom edge of the glass.
The license plate can be made like in my build, comes right through the center of the tire. In my pictures, the mount isn't fully seated. I bought a light off eBay and an 8' coiled 7 way to flat 4 and wired just the aux light off that. Snakes up the back of the mount.
-

Opeth - Addict
- Posts: 846
- Joined: Tue Oct 05, 2010 4:46 pm
- Location: NY, Solvay
- Name: Cody
- Vehicle Year: 2006
- Vehicle: Chevrolet TrailBlazer
- DriveTrain: 4WD
- Rank: Trail Ready
Thanks, Opeth (Cody). I ended up using your measurements, considering we have the same trim and year. Placed the order today, so it should be ready by the time I get home from my government sponsored vacation.
Now it's time to start thinking about future mods, and collating my progress into one of those build threads all of you guys feature in your signatures (you know, to fit in with the cool kids).
Now it's time to start thinking about future mods, and collating my progress into one of those build threads all of you guys feature in your signatures (you know, to fit in with the cool kids).
- jhberria
- Cruiser
- Posts: 23
- Joined: Tue Aug 20, 2013 12:13 pm
- Location: NY, Evans Mills/Fort Drum
- Name: Josh
- Vehicle Year: 2006
- Vehicle: Chevrolet TrailBlazer
- DriveTrain: 4WD
12 posts
• Page 1 of 1